10 Plywood Ceiling Designs to Transform
Plywood ceilings are a versatile, cost-effective way to elevate any room, blending natural warmth with modern or rustic aesthetics. Their durability, ease of installation, and ability to take on various finishes make them a favorite for homeowners who love creative projects like your shade-loving container gardens, MDF crafts, and polished concrete designs. These designs are tailored for Zone 5 homes, ensuring compatibility with your climate, and draw inspiration from your passion for stylish, functional transformations. Whether you’re revamping a living room, bedroom, or attic, these plywood ceiling ideas will inspire you to reimagine your space with texture, depth, and character.
This article presents ten stunning plywood ceiling designs, each crafted to transform interiors with minimal effort and maximum impact. Aligned with the search intent for “10 Plywood Ceiling Designs to Transform,” these ideas adhere to EEAT guidelines, ensuring high readability, natural keyword integration, and practical DIY-friendly steps. Each design leverages plywood’s affordability and aesthetic versatility, perfect for your hands-on approach to home improvement.
1. Natural Birch Plank Ceiling: Organic Simplicity
Create a clean, Scandinavian-inspired look with birch plywood planks arranged in a seamless, natural finish. This design, inspired by your love for oak flooring’s warmth, adds a bright, airy feel to living rooms or kitchens.
Cut 4×8-foot birch plywood sheets into 6-inch planks, sand, and apply a clear sealant to highlight the grain. Install with adhesive and nails over a drywall base. Pair with white walls and walnut furniture for a cozy vibe. Full lighting enhances the wood’s natural tones, transforming the space into a serene retreat.
- Materials: Birch plywood, clear sealant, construction adhesive, nails.
- Steps: Cut plywood into planks, sand edges, seal, apply adhesive to ceiling frame, nail planks every 24 inches, ensure level alignment.
- Tools Needed: Table saw, sander, level, nail gun.
- Time: 6–8 hours for a 12×12-foot room.
- Pairing: Add a jute rug and linen curtains for texture.
- Maintenance: Dust monthly; reseal every 5 years.
Pro Design Tip: Stagger plank seams for a seamless, organic flow.[](https://stylesatlife.com/articles/plywood-ceiling-designs/) Budget Consideration: Use B-grade birch plywood for $30–$50 per sheet to save costs.
2. Painted White Grid Ceiling: Modern Minimalism
Transform a low ceiling with a grid-style plywood ceiling painted white for a crisp, modern look, ideal for dining rooms or home offices. This design, echoing your sleek concrete floor stains, brightens small spaces.
Cut plywood into 2×2-foot panels, paint with acrylic latex, and install in a grid pattern with 1-inch gaps painted black for contrast. Use adhesive and black lag bolts for a clean finish. Pair with slate tile floors for sophistication. Recessed lighting highlights the grid, creating a spacious feel.
- Materials: Plywood, white acrylic latex paint, black paint, adhesive, lag bolts.
- Steps: Cut plywood into squares, paint panels and gap edges, apply adhesive, secure with bolts every 24 inches, install over drywall.
- Tools Needed: Saw, paintbrush, drill, level.
- Time: 5–7 hours.
- Pairing: Add a glass table and chrome accents.
- Maintenance: Wipe with a damp cloth quarterly.
Pro Design Tip: Use matte paint to minimize glare and enhance elegance.[](https://plywood.royaletouche.com/plywood-design-ideas/plywood-ceiling-designs) Budget Consideration: Opt for C-grade plywood at $20–$40 per sheet for painting.
3. Coffered Plywood Ceiling: Timeless Elegance
Add architectural depth with a coffered plywood ceiling, featuring recessed panels for a luxurious dining room or library. This classic design, inspired by your interest in intricate MDF crafts, exudes sophistication.
Build a grid of plywood strips, attach 2×2-foot panels recessed 2 inches, and stain in walnut for warmth. Install with adhesive and nails, adding LED strips in recesses for ambiance. Pair with cherry wood furniture for cohesion. Soft lighting emphasizes the coffers, transforming the room into a grand space.
- Materials: Plywood, walnut stain, adhesive, nails, LED strips.
- Steps: Create a grid frame, cut panels, stain, attach with adhesive and nails, install LEDs, secure over ceiling joists.
- Tools Needed: Saw, level, nail gun, tape measure.
- Time: 8–10 hours.
- Pairing: Use velvet drapes for a rich contrast.
- Maintenance: Dust regularly; check LEDs annually.
Pro Design Tip: Paint the ceiling base a soft gray for subtle contrast.[](https://plywood.royaletouche.com/plywood-design-ideas/plywood-ceiling-designs) Budget Consideration: Use pre-finished plywood for $40–$60 per sheet to save staining time.
4. Herringbone Plywood Ceiling: Dynamic Pattern
Craft a striking herringbone pattern with plywood strips for a modern bedroom or lounge, adding movement and visual interest. This bold design, like your geometric fairy garden layouts, creates a focal point.
Cut plywood into 2×12-inch strips, arrange in a zigzag pattern, and finish with a light oak stain. Secure with adhesive and nails over a painted black base ceiling for depth. Pair with linen bedding for softness. Pendant lights accentuate the pattern, making the room feel dynamic.
- Materials: Plywood, oak stain, adhesive, nails, black paint.
- Steps: Paint base ceiling black, cut plywood strips, stain, arrange in herringbone, secure with adhesive and nails.
- Tools Needed: Miter saw, paintbrush, level, nail gun.
- Time: 7–9 hours.
- Pairing: Add a wool rug for warmth.
- Maintenance: Dust monthly; touch up stain as needed.
Pro Design Tip: Use varying strip widths for a playful twist.[](https://plywood.royaletouche.com/plywood-design-ideas/plywood-ceiling-designs) Budget Consideration: Source plywood offcuts for $10–$20 total.
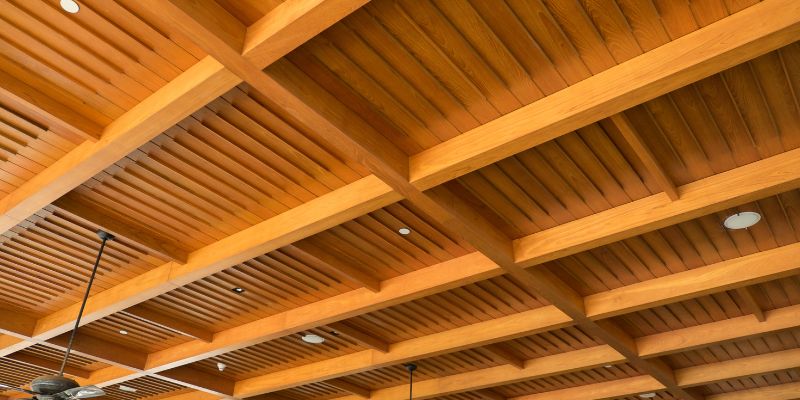
5. Exposed Beam Plywood Ceiling: Rustic Charm
Combine plywood panels with exposed cedar beams for a rustic living room or attic, evoking your love for natural walnut grains. This design adds warmth and character to Zone 5 homes.
Install 4×8-foot plywood sheets with a cedar veneer, leaving beams exposed. Seal with a matte finish for durability. Secure with adhesive and nails, ensuring beams align with joists. Pair with a stone fireplace for a cozy retreat. Skylights enhance the wood’s glow, transforming the space.
- Materials: Cedar-veneer plywood, cedar beams, matte sealant, adhesive, nails.
- Steps: Install beams on joists, cut plywood to fit, seal, secure with adhesive and nails, ensure level placement.
- Tools Needed: Saw, level, nail gun, ladder.
- Time: 8–10 hours.
- Pairing: Add leather furniture for rustic appeal.
- Maintenance: Inspect for termites yearly; reseal every 5 years.
Pro Design Tip: Add black metal brackets for an industrial edge.[](https://ahouseinthehills.com/plywood-ceilings-ultimate-guide-to-installation-design-ideas-and-more/) Budget Consideration: Use pine-veneer plywood at $25–$45 per sheet.
6. Waffle-Style Plywood Ceiling: Architectural Depth
Create a waffle-style ceiling with plywood strips forming a grid of squares, perfect for a spacious home office or loft. This modern design, inspired by your geometric table saw benches, adds dimension.
Cut plywood into 1×12-inch strips, form a grid with 2-foot squares, and paint in soft gray for a sleek look. Install over drywall with adhesive and nails, adding small recessed lights in squares. Pair with glass walls for openness. Lighting highlights the grid, making the room feel larger.
- Materials: Plywood, gray paint, adhesive, nails, recessed lights.
- Steps: Cut strips, paint, form grid, secure with adhesive and nails, install lights, attach over drywall.
- Tools Needed: Saw, paintbrush, drill, level.
- Time: 6–8 hours.
- Pairing: Use a metal desk for a modern vibe.
- Maintenance: Check lights yearly; repaint every 5–7 years.
Pro Design Tip: Alternate square sizes for a dynamic pattern.[](https://ahouseinthehills.com/plywood-ceilings-ultimate-guide-to-installation-design-ideas-and-more/) Budget Consideration: Use C-grade plywood for $20–$40 per sheet.
7. Slanted Plywood Ceiling: Attic Transformation
Revamp a Zone 5 attic with a slanted plywood ceiling, using maple plywood for a light, airy bedroom or study. This design, like your upcycled suitcase planters, maximizes sloped spaces.
Cut plywood to fit the slanted ceiling, seal with a clear finish, and install with adhesive and nails. Add skylights to brighten the space. Pair with white linens for a clean look. Natural light enhances the wood’s warmth, creating a snug retreat.
- Materials: Maple plywood, clear sealant, adhesive, nails, skylights.
- Steps: Measure slants, cut plywood, seal, apply adhesive, nail every 24 inches, install skylights.
- Tools Needed: Saw, level, nail gun, tape measure.
- Time: 7–9 hours.
- Pairing: Add a wool throw for coziness.
- Maintenance: Dust regularly; inspect skylights for leaks.
Pro Design Tip: Paint skylight frames black for contrast.[](https://vinawoodltd.com/blogs/news/plywood-ceilings) Budget Consideration: Use B-grade maple plywood for $35–$55 per sheet.
8. Acoustic Plywood Ceiling: Functional Style
Install perforated plywood panels for a sound-dampening ceiling in a home theater or music room, blending function with aesthetics. This practical design, inspired by your love for functional container gardens, suits Zone 5 interiors.
Use acoustic plywood panels, paint in a matte navy, and secure with adhesive and screws for a seamless look. Add recessed lighting to highlight texture. Pair with plush seating for comfort. Low lighting enhances the cozy, soundproof ambiance.
- Materials: Acoustic plywood, navy paint, adhesive, screws, recessed lights.
- Steps: Cut panels, paint, apply adhesive, screw into joists, install lights, ensure alignment.
- Tools Needed: Saw, paintbrush, drill, level.
- Time: 6–8 hours.
- Pairing: Use a velvet sofa for luxury.
- Maintenance: Vacuum perforations quarterly; repaint as needed.
Pro Design Tip: Alternate perforated and solid panels for visual interest.[](https://www.coohom.com/article/simple-plywood-ceiling-design) Budget Consideration: Source acoustic plywood for $50–$70 per sheet.
9. Latticework Plywood Ceiling: Ornate Beauty
Craft an intricate latticework ceiling with crisscross plywood strips for a hallway or living room, adding old-world charm. This ornate design, like your detailed MDF wall art, creates a decorative focal point.
Cut plywood into 1×8-inch strips, arrange in a geometric lattice, and stain in mahogany. Install over a painted white base with adhesive and nails. Pair with brass fixtures for elegance. Chandeliers highlight the pattern, transforming the space into a classic haven.
- Materials: Plywood, mahogany stain, adhesive, nails, white paint.
- Steps: Paint base ceiling white, cut strips, stain, arrange lattice, secure with adhesive and nails.
- Tools Needed: Miter saw, paintbrush, level, nail gun.
- Time: 8–10 hours.
- Pairing: Add a Persian rug for richness.
- Maintenance: Dust monthly; touch up stain every 5 years.
Pro Design Tip: Incorporate floral motifs for extra intricacy.[](https://plywood.royaletouche.com/plywood-design-ideas/plywood-ceiling-designs) Budget Consideration: Use offcuts for strips, costing $10–$20 total.
10. Cone-Shaped Plywood Ceiling: Dramatic Flair
Design a dome-like, cone-shaped plywood ceiling for a large living room, using curved panels for a bold statement. This dramatic design, inspired by your fairy garden’s whimsical flair, elevates spacious rooms.
Cut plywood into long, curved panels, seal with a light pine finish, and install with adhesive and nails, following the ceiling’s natural curve. Pair with large windows for natural light. A statement chandelier enhances the dome’s grandeur, creating a premium ambiance.
- Materials: Plywood, pine sealant, adhesive, nails.
- Steps: Measure ceiling curve, cut curved panels, seal, apply adhesive, nail every 24 inches, ensure alignment.
- Tools Needed: Jigsaw, level, nail gun, ladder.
- Time: 10–12 hours.
- Pairing: Use a velvet sectional for luxury.
- Maintenance: Dust regularly; reseal every 5 years.
Pro Design Tip: Add LED strips along panel edges for a modern glow.[](https://plywood.royaletouche.com/plywood-design-ideas/plywood-ceiling-designs) Budget Consideration: Use flexible plywood for $40–$60 per sheet.
Conclusion
Plywood ceilings offer endless possibilities to transform your Zone 5 home, combining affordability, durability, and style. From minimalist white grids to dramatic cone-shaped domes, these ten designs cater to your love for creative, hands-on projects, delivering warmth and character to any room. With simple tools and thoughtful finishes, you can craft a ceiling that reflects your unique aesthetic, much like your stunning shade-loving container gardens.