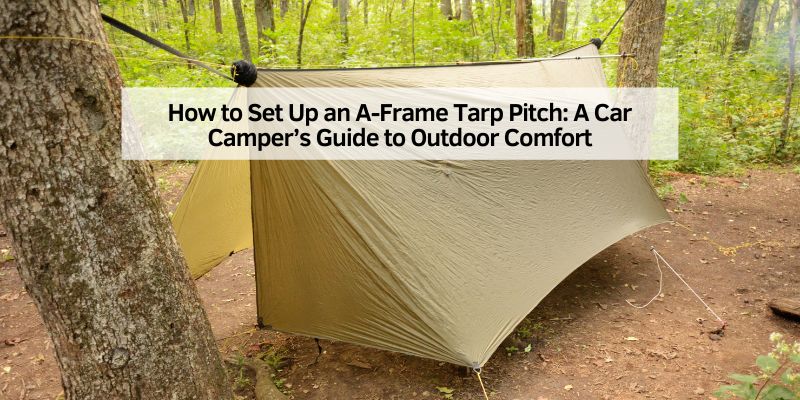
How to Set Up an A-Frame Tarp Pitch: A Car Camper’s Guide to Outdoor Comfort
Hey there, friend! Picture us parked at a campsite, my trusty pickup loaded with gear, and you point to my tarp setup and ask, “How do you make that A-frame tarp pitch?” I love that question! As a car enthusiast who’s spent countless weekends camping, tailgating, or just chilling outdoors, I’ve pitched A-frame tarps for shade, rain cover, and even a cozy hangout spot. It’s a simple, versatile setup that’s perfect for car campers, RV travelers, or anyone who loves their vehicle as much as the open road.
I’ve tinkered with tarps on rainy nights, sunny tailgates, and windy desert trips, learning what works through trial and error. Let’s imagine we’re setting one up together, swapping stories as we go. I’ll walk you through every step of creating an A-frame tarp pitch, with tips for car camping, RV sites, or even your backyard. Grab a cold drink, and let’s get that tarp up!
Why an A-Frame Tarp Pitch Is Perfect for Car Campers
An A-frame tarp pitch is like the Swiss Army knife of outdoor shelters. I first tried it years ago when a sudden storm hit during a camping trip. It’s quick to set up, keeps you dry, and provides shade or wind protection. For car campers, it’s a game-changer. You can park your vehicle nearby, use it as an anchor, or even extend the tarp over your tailgate for a covered cooking area.
I’ve used A-frames at car shows, tailgates, and RV parks, and they always draw compliments. They’re lightweight, pack small in your trunk, and don’t need a ton of gear. Plus, they’re budget-friendly compared to fancy awnings. Whether you’re shielding your gear from rain or creating a chill spot to watch the sunset, an A-frame tarp pitch makes your outdoor time more comfortable, like adding a sunroof to your camping experience.
What Makes the A-Frame Tarp Pitch Special
The A-frame tarp pitch gets its name from its shape, like the letter “A.” You drape a tarp over a ridgeline—usually a rope or poles—and stake the sides to the ground, creating a slanted roof. I love how it sheds rain and wind better than flat tarps. The steep sides let water run off, and the open ends keep air flowing, so it’s not stuffy.
I’ve set up A-frames in forests, deserts, and beach campsites. It’s versatile for different weather and spaces. You can make it high for shade or low for storm protection. For car campers, it’s ideal because you can use your vehicle, trees, or even spare car parts as anchors. It’s like customizing your car’s suspension—you tweak it to fit your needs.
Gear You’ll Need for an A-Frame Tarp Pitch
Setting up an A-frame doesn’t take much. I keep my gear in a duffel bag in my truck. Here’s what I use:
| Item | Purpose | Where to Find It |
|---|---|---|
| Tarp (8×10 or 10×10 ft) | From the shelter | Camping stores, online |
| Paracord or guyline (50 ft) | Creates ra line and secures the tarp | Hardware stores, camping stores |
| Tent stakes (6-8) | Anchors the tarp to the ground | Camping stores, hardware stores |
| Trekking poles (2) | Supports ridgeline (optional) | Outdoor stores, online |
| Mallet or hammer | Drives stakes into the ground | Hardware stores, home |
| Carabiners (4-6) | Quick attachment for cords | Camping stores, online |
| Ground cloth (optional) | Protects the gear under a tarp | Camping stores, online |
| Bungee cords (optional) | Adds flexibility in windy conditions | Auto stores, hardware stores |
A square or rectangular tarp works best. I use a 10×10 silnylon tarp because it’s lightweight and waterproof. If you’re new, a cheap poly tarp from a hardware store is fine to start. Keep extra cord and stakes in your car—you never know when a gust will pull one loose.
Step 1: Choose the Perfect Spot
Picking the right spot is like finding the best parking space at a car show. I look for flat ground with no rocks or roots. If I’m car camping, I park my truck nearby to use as an anchor or to extend the tarp over the tailgate. I check for two anchor points, like trees or poles, about 12-15 feet apart for a 10×10 tarp.
I avoid low spots where water pools—learned that after waking up in a puddle once! I also face the tarp’s open ends away from the wind, using my truck as a windbreak if needed. For RV camping, I set up near the RV’s awning for extra coverage. Check overhead for dead branches, like checking your car for loose parts before a road trip. A clear spot makes setup easy and safe.
Step 2: Set Up the Ridgeline
The ridgeline is the backbone of your A-frame, like the frame of your car. I start by tying a length of paracord between two anchor points. If I’m using trees, I wrap the cord around each trunk at about chest height and tie it with a bowline knot. I keep it tight but not stretched like a guitar string.
If trees aren’t available, I use trekking poles. I stake one pole into the ground, attach the cord to its tip, and run it to the second pole, staking that one too. For car campers, I sometimes tie one end to my truck’s roof rack or hitch. I once used a spare tire as a pole base in the desert—worked like a charm! The ridgeline should be high enough to sit under, about 4-5 feet off the ground.
Step 3: Drape and Secure the Tarp
Now, let’s get that tarp up. I drape it evenly over the ridgeline so both sides hang down equally, like balancing a car on a lift. I use carabiners to clip the tarp’s center tie-outs to the ridgeline, or I tie small loops of cord with prusik knots to slide it into place. This keeps the tarp from slipping, even in the wind.
I pull the tarp taut along the ridgeline, making sure it’s centered. If it’s sagging, I adjust the ridgeline’s tension or move the tarp. For car camping, I sometimes clip one edge to my truck’s tailgate for a sloped setup. This step feels like aligning your car’s wheels—get it right, and everything runs smoothly.
Step 4: Stake Out the Corners
Time to anchor the tarp. I grab four stakes and head to the tarp’s corners. I pull each corner tight and stake it to the ground at a 45-degree angle, using a mallet to drive the stakes in. I make sure the tarp is taut, like a drum skin, but not so tight it tears. Silnylon tarps stretch a bit, so I check them after an hour.
If the ground is hard, I use rocks or my truck’s weight to hold cords. I once tied cords to my wheel rims when camping on rocky ground. For extra stability, I add stakes to the side tie-outs. This step is like tightening lug nuts—you want it secure but not overdone.
Step 5: Adjust for Weather Conditions
Weather can change fast, like a sudden traffic jam. I tweak my A-frame based on conditions. For rain, I lower the ridgeline to about 3 feet and angle the sides steeply so water runs off. I dig small trenches around the stakes to divert water, like clearing debris from your car’s drains.
In windy conditions, I add extra guylines to the side tie-outs and stake them firmly. I face the open ends away from the wind, using my vehicle as a shield. For shade on hot days, I raise the ridgeline higher and lift one side off the ground for airflow, like opening your car’s windows. Testing the setup by tugging the tarp ensures it’s ready, like revving your engine before a drive.
Step 6: Add Comfort Features
An A-frame can be more than a shelter—it’s your outdoor living room. I lay a ground cloth under the tarp to keep gear dry, like carpeting your garage. I set up camp chairs or a cooler under it for a hangout spot. At tailgates, I string LED lights along the ridgeline for vibe, powered by my truck’s battery.
I sometimes hang a bug net if mosquitoes are bad, tucking it under the tarp’s edges. For cooking, I set up a portable stove on a flat spot under the tarp, keeping it away from the fabric. These touches make the A-frame feel like home, like adding custom rims to your ride.
Maintenance Tips for Your Tarp Setup
To keep your tarp in top shape, I follow these habits:
- Clean it regularly: I shake off dirt and wipe the tarp with a damp cloth after use.
- Dry before storing: I air-dry the tarp to prevent mold, like drying your car after a wash.
- Check cords and stakes: I inspect for frayed cords or bent stakes, replacing them as needed.
- Store properly: I fold the tarp loosely and keep it in a dry bag in my truck.
- Repair tears: I patch small holes with tarp repair tape, like fixing a car’s upholstery.
These steps keep my tarp ready for action, like keeping your car’s oil changed.
Why Car Campers Love the A-Frame Tarp Pitch
The A-frame tarp pitch is a car camper’s best friend. It’s quick to set up, leaving more time for fishing, grilling, or admiring your vehicle. It’s versatile, working over your tailgate, beside your RV, or in a field. I’ve used it to cover my truck bed during rain or shade my buddies at a car meet.
It’s also budget-friendly, costing less than a fancy tent. The lightweight gear fits easily in your trunk, leaving room for coolers and chairs. Plus, it’s a skill that impresses friends, like knowing how to jump-start a car. Whether you’re a weekend warrior or a full-time RVer, an A-frame tarp pitch adds comfort to your adventures.
Common Mistakes to Avoid
I’ve goofed up plenty, so let me save you some hassle. Don’t pitch on uneven ground—water will pool, and you’ll slide around. I did this once and woke up in a muddy mess. Also, don’t skimp on stakes; cheap ones bend in hard ground. I lost a stake in a storm and had to tie the tarp to my bumper.
Avoid loose ridgelines—they make the tarp sag like a flat tire. Don’t set up under dead trees; falling branches are no joke. I narrowly missed a branch once. And don’t forget to practice at home—fumbling in the rain isn’t fun. These mistakes are like skipping a car wash—they’re avoidable with care.
When to Use Other Tarp Pitches
The A-frame is awesome, but sometimes I switch it up. In heavy storms, I use a half-pyramid pitch, staking one side to the ground for better wind protection. For quick shade, a lean-to pitch works, using one pole or my truck’s roof. If I’m hammock camping, a diamond pitch covers my hammock nicely.
Each pitch has its place, like choosing the right gear for a road trip. I stick with the A-frame 90% of the time because it’s simple and reliable, but knowing other pitches gives you options, like having all-wheel drive for tough roads.
My Personal Tarp Pitch Story
Let me tell you about my first A-frame pitch. I was camping with friends, and a storm rolled in fast. My tent was leaking, so I grabbed a tarp from my truck and some rope. I tied it between two trees, staked it down, and created a dry spot for us to cook and chill. It wasn’t perfect—sagged a bit—but it saved the trip.
Since then, I’ve pitched A-frames everywhere, from beach camps to mountain sites. Each time, I get faster and tweak it better. It’s like learning to parallel park—practice makes it second nature. Now, my A-frame is the star of every camping trip, like my truck’s custom paint job.
Why It’s Worth Learning
Setting up an A-frame tarp pitch is so rewarding. It’s quick, cheap, and makes your car camping trips better. I love the freedom of creating my shelter, whether it’s for a tailgate party or a week-long RV adventure. It’s a skill you can use anywhere, from your backyard to a remote campsite.
The pride of a taut, weather-proof A-frame is like polishing your car to a shine. It’s practical, fun, and impresses everyone around the campfire. Plus, it saves you from spending hundreds on fancy gear. For car enthusiasts, it’s the perfect mix of DIY and outdoor living.
Conclusion
An A-frame tarp pitch is a must-have skill for any car camper. I’ve shared my step-by-step guide—from picking a spot to staking it tight—because I know how awesome it feels to master this setup. It’s like we’ve been at the campsite together, rigging up a shelter that’s ready for rain, sun, or wind. Whether you’re tailgating, RV camping, or just hanging out, an A-frame tarp pitch makes your outdoor time epic. So grab a tarp, practice in your driveway, and hit the road. Here’s to dry gear, shady spots, and killer camping adventures!
FAQs
What size tarp is best for an A-frame pitch?
An 8×10 or 10×10 foot tarp works great for most car campers. I use a 10×10 for extra coverage.
Can I set up an A-frame without trees?
Yes, use trekking poles or your vehicle as anchors. I’ve tied one end to my truck’s roof rack.
How do I keep my tarp from sagging?
Tighten the ridgeline and stake corners taut. I recheck the tension after an hour, especially with silnylon.
Is an A-frame tarp pitch good for storms?
Yes, lower the ridgeline and add extra guylines for wind. I’ve stayed dry in heavy rain with a low pitch.
Do I need trekking poles for an A-frame?
Not always. Trees, your car, or even sticks can work. I use poles when trees aren’t around.
How long does it take to set up an A-frame tarp?
About 10-15 minutes once you’ve practiced. My first try took 30, but now I’m quick!