Best Grit Sandpaper for Wood Floors
Choosing the right sandpaper for your wood floors before applying polyurethane can feel tricky, especially if you’re new to refinishing. Many people wonder about the exact grit numbers and what they mean for the final look and feel of their floors. Don’t worry, it’s simpler than it sounds!
We’ll walk you through finding the Best Grit Sandpaper for Wood Floors Before Polyurethane, step by step, so your project turns out great. Get ready to make your wood floors shine like new!
Choosing the Best Grit Sandpaper for Wood Floors Before Polyurethane
Selecting the proper sandpaper grit is a vital step in refinishing wood floors before applying polyurethane. The correct grit ensures a smooth, even surface that will accept the finish evenly, preventing blotchiness and ensuring durability. Using sandpaper that is too coarse can leave deep scratches that are hard to remove, while sandpaper that is too fine won’t adequately prepare the surface for the polyurethane, leading to a less than ideal finish.
This section will explore the general principles of grit selection and how to approach it for your specific flooring project.
Understanding Sandpaper Grit
Sandpaper grit refers to the number of abrasive particles per square inch on the sandpaper. A lower grit number means fewer, larger particles, which are coarser and remove material more quickly. A higher grit number means more, smaller particles, which are finer and produce a smoother finish.
For wood floor refinishing, you’ll typically use a progression of grits. You start with a coarser grit to remove old finish and imperfections, then move to progressively finer grits to smooth the wood surface. Each grit level smooths out the scratches left by the previous, coarser grit.
It’s important to remember that the goal isn’t just to make the floor look smooth. The sanding process creates a “tooth” on the wood surface. This tiny roughness allows the polyurethane to adhere properly.
Without this, the finish might peel or chip later.
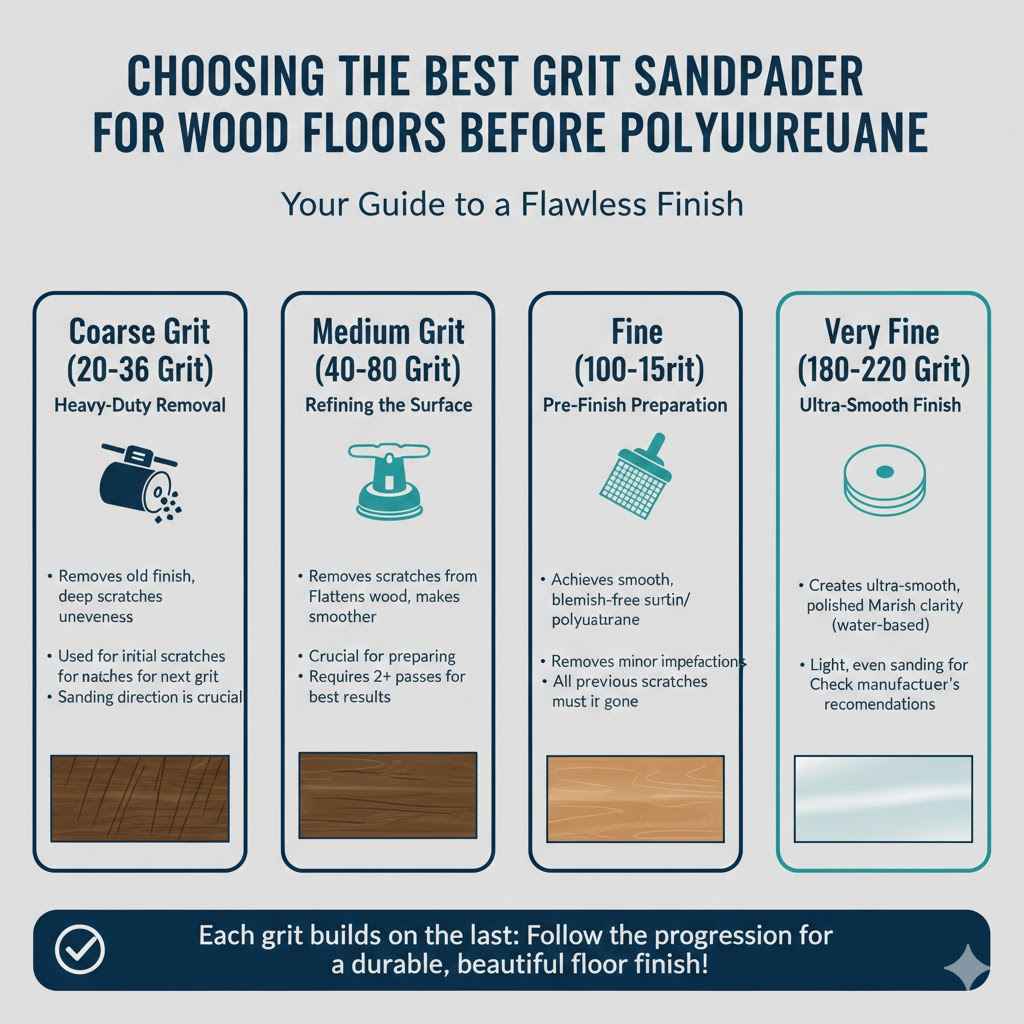
Coarse Grit (20-36 Grit)
This is your heavy-duty grit. It’s used for the initial sanding of wood floors, especially when you need to remove old, stubborn finishes, deep scratches, or unevenness. Think of it as the ‘rough start’ to get the biggest problems out of the way.
Using too fine a grit initially will clog your sandpaper quickly and won’t be effective. It’s designed for aggressive material removal.
- Purpose: Removing old paint, varnish, deeply ingrained dirt, or significant surface damage. It’s also used to level out boards that might be slightly warped or uneven.
- Application: Typically used with a drum sander or a powerful orbital floor sander for the first pass. It’s aggressive and can create dust, so proper ventilation and dust collection are crucial. This grit level is not for fine finishing; it’s for the heavy lifting.
- Considerations: Because it’s so coarse, it can leave visible scratches if not followed up with finer grits. It’s essential to sand in a consistent direction, usually with the grain of the wood, to minimize visible scratch patterns. Over-sanding with this grit can damage the wood itself.
Medium Grit (40-80 Grit)
Once the bulk of the old finish is gone, you move to medium grits. These grits refine the surface, removing the deeper scratches left by the coarse grits. They continue to smooth the wood but in a less aggressive way.
This is where you start making the floor feel smoother underfoot and look more uniform.
- Purpose: To remove the scratches left by coarse grits and to further flatten the wood surface. This stage is crucial for preparing for finer sanding stages.
- Application: Often used with an orbital sander or belt sander. Each pass should aim to remove the scratches from the previous, coarser grit. You’ll usually make at least two passes with medium grits, moving to a finer medium grit for the second pass.
- Considerations: The transition from coarse to medium grit is important. If you skip grits, you’ll struggle to remove the deeper scratches. For example, if you used 24 grit, your next step should be around 40 grit, not 80 grit.
This ensures efficient scratch removal without excessive sanding time.
Fine Grit (100-150 Grit)
These are the grits that truly prepare the floor for finishing. Fine grits create a very smooth surface, ensuring that the polyurethane will go on evenly and look its best. They remove any minor imperfections and the last traces of sanding marks from the medium grits.
This is the stage where the floor starts to look ready for its protective coat.
- Purpose: To achieve a smooth, blemish-free surface that is ready for stain (if used) or polyurethane. These grits prepare the wood’s “pores” to accept the finish.
- Application: Typically done with an orbital sander or a buffer with screens. Many DIY refinishers find orbital sanders easier to control than drum sanders. The sanding pattern should be consistent, and the goal is to achieve a uniform smoothness across the entire floor.
- Considerations: It’s vital to make sure all scratches from the previous grits are completely removed. If you can still see scratch marks, they will likely show through the polyurethane finish. A common mistake is to jump to a very fine grit too early.
Each grit level needs adequate time to do its job.
Very Fine Grit (180-220 Grit)
For most standard polyurethane finishes, 120-150 grit is sufficient. However, for some water-based polyurethanes or if you desire an exceptionally smooth feel, you might go up to 180 or even 220 grit. This is considered the final sanding stage before applying the finish.
It’s about perfecting the surface, ensuring it’s as smooth as possible.
- Purpose: To create an ultra-smooth surface that maximizes the clarity and smoothness of the final polyurethane coat. This is the peak of surface preparation.
- Application: Usually done with an orbital sander or a buffer with a fine-grit sanding screen. The sanding action should be light and even. This step is about polishing the wood surface rather than aggressive removal of material.
Some professionals might even use a polishing pad after this stage.
- Considerations: Using grits much higher than 220 can sometimes make it harder for oil-based polyurethanes to adhere properly, though this is less of an issue with modern water-based finishes. Always check the polyurethane manufacturer’s recommendations. Over-sanding with very fine grits can burnish the wood, making it too smooth for good adhesion.
Selecting the Best Grit Sandpaper for Wood Floors Before Polyurethane Based on Floor Type
The type of wood and its condition play a significant role in determining the sandpaper grits you should use. Different wood species have varying hardness, and the existing condition of your floor will dictate how aggressive your initial sanding needs to be. Understanding these factors will help you choose the right sandpaper sequence for a flawless finish.
Hardwood Species Considerations
Harder woods like oak or maple require more effort to sand than softer woods like pine. For harder woods, you might need to start with a slightly coarser grit or make more passes with each grit level to effectively abrade the surface. Softer woods can be sanded more quickly, but you must be careful not to over-sand, which can create divots or unevenness.
For example, oak is a very common and durable wood that sands well. You can typically follow a standard grit progression for oak. Pine, being softer, can dent and gouge more easily.
With pine, you might avoid the absolute coarsest grits unless there’s significant damage, and you’d be extra careful with pressure.
Brazilian cherry or other exotics can be very dense and may even contain silica, which can dull sandpaper faster. For these, you might need more aggressive grits or a higher quality sandpaper. Always test on an inconspicuous area if you’re unsure.
Condition of the Existing Floor
A floor with deep scratches, gouges, or a thick layer of old, peeling finish will require a more aggressive starting grit. If your floor is in relatively good shape with only minor scuffs and fading, you can start with a finer grit. The key is to match your starting grit to the extent of the damage.
If your floor has deep scratches, you might start with 20 or 24 grit. If it’s just faded, perhaps 60 grit is enough to start. It’s always better to start slightly coarser than needed and move up, rather than starting too fine and finding you can’t remove the imperfections.
Here’s a general guideline:
- Heavily damaged floors (deep scratches, old finishes): Start with 20-36 grit.
- Moderately worn floors (minor scratches, some finish wear): Start with 40-60 grit.
- Lightly worn floors (fading, light scuffs, good original finish): Start with 60-80 grit.
DIY vs. Professional Equipment
The type of sander you use also influences grit selection. Professional drum sanders are very powerful and aggressive. If you rent one, you’ll likely need to start with coarser grits and be very careful.
Orbital sanders are less aggressive, making them more forgiving for DIYers. With an orbital sander, you might start with a slightly finer grit than you would with a drum sander.
When using a rented drum sander, it’s common to start with 24 or 36 grit, then move to 60 grit, then 100 grit. If you use an orbital sander, you might start with 50 or 60 grit, then move to 80 or 100 grit, and finish with 120 or 150 grit. The goal is always to achieve the same final smoothness regardless of the machine.
For a common DIY scenario with an orbital sander on oak floors in moderate condition, a good sequence might be:
- Start with 60 grit to remove the old finish and general wear.
- Move to 100 grit to smooth out scratches from the 60 grit.
- Finish with 150 grit to get the surface ready for polyurethane.
The Best Grit Sandpaper for Wood Floors Before Polyurethane A Step-by-Step Guide
Following a clear, progressive sanding plan is essential for achieving a professional-looking finish. Skipping steps or using the wrong grit progression can lead to visible scratches and an uneven final product. This guide outlines a reliable method for sanding your wood floors to prepare them for polyurethane, ensuring a smooth and durable result.
Step 1 Initial Coarse Sanding
Begin with the coarsest grit necessary to remove the old finish and any significant imperfections. For most floors, this means starting with 20, 24, or 36 grit sandpaper, especially if using a drum sander. If using an orbital sander and the floor is in decent shape, you might start with 50 or 60 grit.
Ensure the sander is set up correctly and that you move it at a consistent speed, usually following the direction of the wood grain. Overlapping your passes slightly helps to avoid missed spots and creates a more uniform surface. The goal here is aggressive material removal, so don’t be afraid to take your time and be thorough.
After completing the first pass, thoroughly clean the floor to remove all dust. Inspect the floor closely for any deep scratches that were missed or created. If you see any significant issues, you might need to make another pass with the same grit or a slightly finer one.
Sanding Machine Types and Grit Selection Examples:
| Sander Type | Starting Grit (Typical) | Intermediate Grit(s) | Final Grit (Before Poly) |
|---|---|---|---|
| Drum Sander | 24 or 36 | 60 | 100 or 120 |
| Orbital Sander | 50 or 60 | 80 or 100 | 120 or 150 |
| Rotary Buffer (with screens) | 80 | 100 or 120 | 150 or 180 |
Step 2 Medium Grit Sanding
After the initial coarse sanding, switch to a medium grit sandpaper, typically 50 or 60 grit if you started with 20-36, or 80 grit if you started with 50-60. This step is crucial for removing the scratches left by the coarser grit. You want to create a smoother surface than you had after the first pass.
Again, move the sander at a steady pace, ensuring even coverage. It’s important that this pass completely obliterates the scratch pattern from the previous grit. If you can still see lines from the coarser grit, you haven’t sanded enough with the current grit, or you need to go back to a slightly coarser grit to remove them properly.
After this sanding stage, vacuum and tack cloth the floor meticulously to remove all dust. A clean surface is essential for the next sanding stage and for the final finish. Inspect the floor again.
The surface should feel noticeably smoother.
Step 3 Fine Grit Sanding
Now, transition to a fine grit sandpaper. This is typically 100 or 120 grit if you used a drum sander, or 120 or 150 grit if you used an orbital sander. This stage refines the surface even further, removing any remaining minor imperfections and preparing the wood for the polyurethane.
The scratches from the medium grit should be completely gone.
For this stage, it’s often beneficial to sand in a pattern that slightly differs from the previous pass. For instance, if you sanded north-south previously, you might sand east-west now. This can help to eliminate any faint directional scratches.
However, for most home DIYers, sticking to a consistent direction is usually best if you’re not experienced.
Clean the floor thoroughly again. The wood surface should now feel smooth to the touch. You might even see a subtle sheen developing on the wood as it gets smoother.
This is a good sign that you’re on the right track.
Step 4 Optional Very Fine Sanding
Depending on the type of polyurethane you are using and the desired finish, you may choose to do a final sanding with a very fine grit, such as 180 or 220 grit. This is particularly common when using water-based polyurethanes or when aiming for a glass-like finish. This step is more about polishing than aggressive sanding.
Use an orbital sander or a buffer with a fine-grit sanding screen. Keep the sander moving at all times to avoid creating burn marks or overly smoothing any single area. The goal is to gently buff the surface to its smoothest possible state, ensuring optimal adhesion and a flawless appearance for the polyurethane.
After this final sanding pass, clean the floor with a vacuum and then a tack cloth. Ensure no dust remains. The floor should feel exceptionally smooth and look clean and bright.
It is now perfectly prepared for your chosen polyurethane finish.
Importance of Dust Control
Dust control is not just about cleanliness; it’s about the quality of your finish. Sanding wood floors produces a fine dust that can settle into the grain of the wood. If this dust isn’t removed, it can discolor the finish or even cause it to adhere poorly.
Always use a vacuum with a good filter, preferably a HEPA filter. After vacuuming, use a tack cloth, which is a sticky cloth designed to pick up fine dust particles. For thorough dust removal, consider using a shop vacuum with a brush attachment for edges and corners, followed by repeated tack cloth wiping until no dust is visible on the cloth.
Many modern floor sanders have integrated dust collection systems that can capture a significant amount of the dust. However, even with these systems, some fine dust will always escape, making thorough post-sanding cleaning essential. Investing in a good dust mask is also a wise precaution for your health.
Troubleshooting Common Sanding Issues Before Polyurethane
Even with the best intentions and careful planning, sanding wood floors can present challenges. Recognizing common problems and knowing how to address them can save you time, effort, and potentially the cost of redoing your work. This section covers some frequent issues and how to resolve them to ensure a smooth path to polyurethane application.
Dealing with Deep Scratches and Gouges
If your floor has deep scratches or gouges that weren’t removed by your initial sanding passes, you have a few options. You might need to go back to a coarser grit than you initially planned. For example, if you’ve reached 100 grit and still see deep scratches, you may need to re-sand with 60 grit in that area.
Another approach is to use a wood filler that matches your wood color. Apply the filler to the scratches and gouges after the main sanding is complete but before the final fine grit pass. Once the filler is dry, you can sand it smooth with the surrounding wood using a fine grit sandpaper.
Ensure the filler is completely flush with the floor surface.
Scenario Example: Deep Gouge on Oak Floor
- Identify the gouge.
- If it’s very deep, consider re-sanding the area with a 50-grit sandpaper to minimize its depth.
- Clean the area thoroughly.
- Apply a high-quality wood filler that matches the oak color.
- Allow the filler to dry completely according to the manufacturer’s instructions.
- Sand the filled area smooth using 150-grit sandpaper, feathering the edges to blend it with the surrounding wood.
- Vacuum and tack cloth the entire floor.
Avoiding Swirling or Circular Marks
Swirling marks, often called “sander chatter” or “haze,” occur when an orbital or rotary sander is not moved in a consistent pattern or is left in one spot for too long. This creates a visual swirl pattern that will be very noticeable under a clear finish.
The primary way to avoid this is by keeping the sander moving at a steady pace. Always sand with the grain of the wood, or in a consistent pattern across the entire floor. If you notice swirling marks, you’ll need to sand them out with a finer grit.
Often, a final pass with a 150 or 180 grit sandpaper, or a buffer with a sanding screen, can remove these marks. Ensure your sandpaper is not worn out, as old sandpaper can contribute to poor sanding results.
Addressing Uneven Sanding or “Hot Spots”
Uneven sanding can happen if the sander is not held flat, if the weight distribution is off, or if you press too hard in certain areas. “Hot spots” are areas that have been sanded more aggressively than others, appearing darker or smoother than the surrounding wood. This can lead to uneven stain absorption or polyurethane application.
To fix uneven sanding, you need to re-sand the affected area. If an area is too smooth, you might need to lightly scuff it up with a fine-grit sandpaper to match the texture of the rest of the floor. If an area is too rough, you’ll need to sand it down until it’s flush with the surrounding surface.
This often requires carefully feathering the edges of the sanded area to blend it seamlessly with the un-sanded or less-sanded parts.
Tip: Before starting on the main floor, practice on a scrap piece of wood or in an inconspicuous area (like inside a closet) to get a feel for the sander’s pressure and movement.
Dealing with Raised Grain
Raised grain can occur when moisture causes wood fibers to swell after sanding. This is more common with certain wood types or in humid environments. It can make the surface feel rough even after fine sanding.
The best way to handle raised grain is to lightly mist the floor with water after your main sanding is done (but before the final fine grit). Let it dry completely, then lightly sand with your finest grit sandpaper (150-220). This process raises and sands away the fibers that would otherwise swell and create roughness later.
For example, after you finish your 120-grit sanding, you might lightly spray the floor with water. Allow it to dry for a few hours or overnight. Then, do a final light sanding with 150 or 220 grit.
This step ensures that any subsequent moisture exposure during the finishing process won’t cause the grain to swell and ruin your smooth surface.
Statistic: According to a survey by the National Wood Flooring Association, approximately 70% of homeowners who refinish their own wood floors report encountering at least one significant sanding challenge, with swirl marks and unevenness being the most common.
Choosing Sandpaper for the Best Grit Sandpaper for Wood Floors Before Polyurethane
The physical quality of the sandpaper itself matters. Not all sandpaper is created equal. The type of abrasive grain, the bonding agent, and the backing material all contribute to how effectively and efficiently the sandpaper performs.
Investing in good quality sandpaper can make a noticeable difference in the ease of sanding and the quality of the final finish.
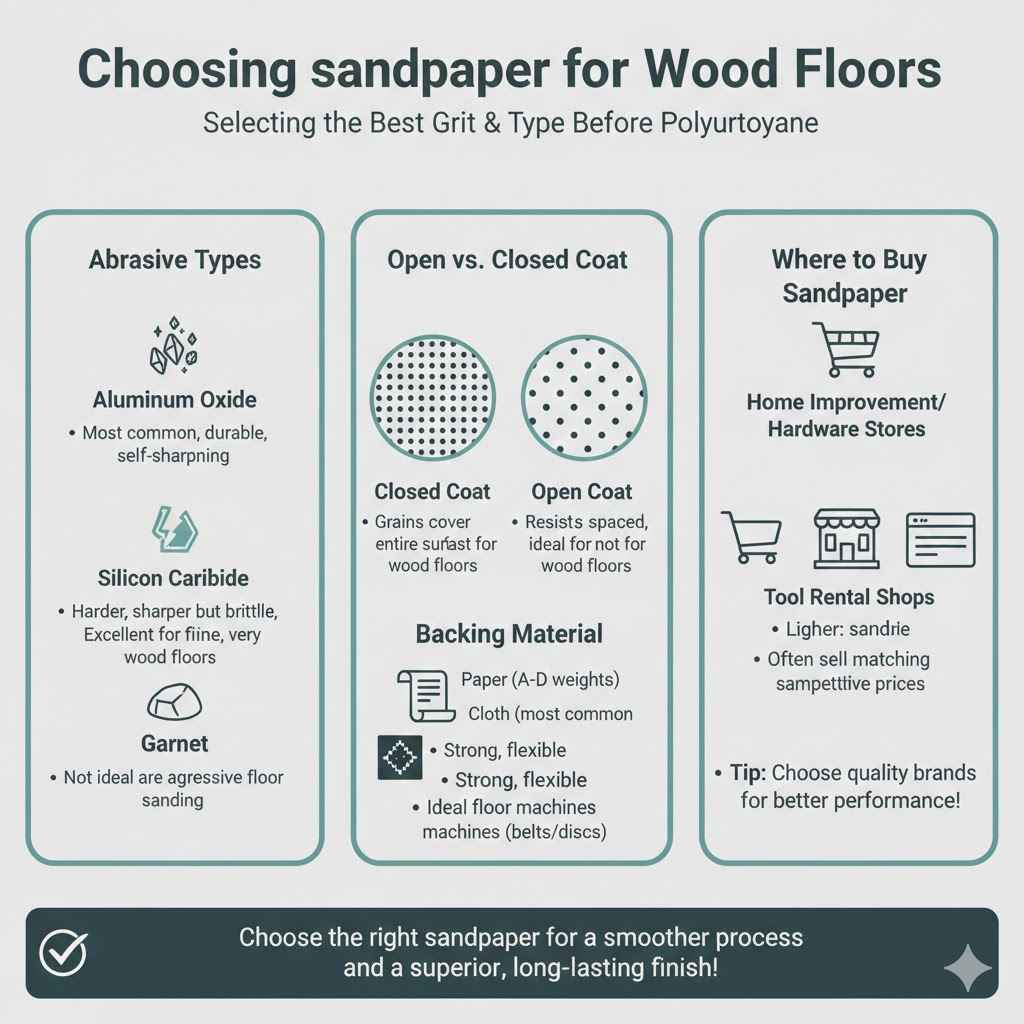
Abrasive Types
There are several types of abrasive grains used in sandpaper. The most common ones for wood flooring include:
-
Aluminum Oxide: This is the most common abrasive grain. It’s durable, self-sharpening, and cost-effective. It works well on wood and is suitable for most sanding tasks, from heavy-duty removal to fine finishing.
It’s a good all-around choice for floor sanding.
- Silicon Carbide: This grain is harder and sharper than aluminum oxide but is more brittle. It’s excellent for cutting through harder materials and for achieving a very smooth finish, often used for wet sanding or on plastics and metals. For wood floors, it’s particularly good for very fine grits.
- Garnet: A natural mineral that is softer than aluminum oxide. Garnet sandpaper cuts more smoothly and breaks down faster, producing a finer finish. It’s often used for final sanding stages on fine woods, but it may wear out too quickly for aggressive floor sanding.
For floor sanding, aluminum oxide is generally the preferred choice due to its durability and versatility. It can handle the demands of sanding large floor areas effectively. Silicon carbide is excellent for the final stages where a super smooth finish is desired.
Open Coat vs. Closed Coat
Sandpaper comes in two main “coats”:
- Closed Coat: In a closed coat sandpaper, the abrasive grains are spread evenly across the entire surface, providing maximum contact. This is good for hard, smooth surfaces where you want maximum abrasion. However, it can clog easily when sanding soft woods or materials that produce a lot of dust.
- Open Coat: In an open coat sandpaper, the abrasive grains are spaced farther apart. This leaves gaps on the surface, allowing dust and debris to pass through, which significantly reduces clogging. Open coat sandpaper is ideal for soft woods, painted surfaces, and any task that generates a lot of dust or debris.
For sanding wood floors, especially with the amount of dust generated, open coat sandpaper is highly recommended. It will last longer and perform better by resisting clogging, which is a major problem when sanding wood.
Backing Material
The backing material of sandpaper provides support for the abrasive grains. Common backing materials include:
- Paper: Comes in different weights (e.g., ‘A’ weight is lighter, ‘C’ or ‘D’ weight is heavier). Heavier paper is more durable and less likely to tear. Paper-backed sandpaper is common for handheld sanding.
- Cloth: Cloth-backed sandpaper is much stronger and more flexible than paper. It’s ideal for demanding tasks and for use on curved surfaces or for floor sanders where durability is key. Floor sanding discs and belts are almost always cloth-backed.
- Fiber: A strong, dense material often used for heavy-duty sanding discs.
For floor sanding machines, especially drum sanders and orbital sanders, you will typically use heavy-duty cloth-backed sandpaper or sanding screens. These are designed to withstand the high pressures and continuous use involved in refinishing floors.
Where to Buy Sandpaper
You can find sandpaper at most home improvement stores, hardware stores, and specialty woodworking stores. For floor sanding, you might need to rent a floor sander from a tool rental shop, and they often sell or rent the corresponding sandpaper or sanding screens.
It’s often worth buying slightly higher quality sandpaper from a reputable brand, especially for the intermediate and fine grits. While it might cost a bit more upfront, it can save you frustration and time by clogging less and providing a more consistent abrasive surface. Online retailers also offer a wide selection, often at competitive prices.
When purchasing, make sure the sandpaper is the correct size and type for your specific sanding machine. For drum sanders, you’ll need belts. For orbital or rotary sanders, you’ll need discs or pads.
For edgers, you’ll need specific edger discs or sandpaper.
Frequently Asked Questions
Question: What is the most important grit for preparing wood floors for polyurethane?
Answer: The most important grits are the ones that prepare the surface for the final finish. Typically, this means the fine grits like 120, 150, or even 180/220. These grits remove the scratches from coarser grits and create a smooth surface that the polyurethane can adhere to evenly.
Question: Should I use the same grit sandpaper for all types of wood floors?
Answer: No. While the progression of grits is similar, the starting grit and the number of passes might change based on the wood’s hardness and the floor’s condition. Harder woods or damaged floors may require coarser starting grits or more sanding overall.
Question: Can I skip a grit level when sanding wood floors?
Answer: It is generally not recommended to skip grit levels. Each grit removes the scratches left by the previous, coarser grit. Skipping a grit means those deeper scratches will remain and will likely be visible through the polyurethane finish.
Question: How do I know when I’m done sanding and ready for polyurethane?
Answer: The floor should feel very smooth to the touch. Visually, there should be no visible scratches or swirl marks. A clean floor, free of dust, that looks uniform in texture and color is ready for the finish.
You can test adhesion by applying a small amount of polyurethane in an inconspicuous area.
Question: How much sandpaper do I need for a room?
Answer: This depends on the size of the room and the condition of the floor. It’s always better to buy a little more than you think you’ll need, especially for the coarser grits. You can estimate based on the square footage and the number of passes you plan to make, but having extra ensures you don’t run out mid-project.
Summary
Choosing the best grit sandpaper for wood floors before polyurethane involves a progressive approach. Start with grits appropriate for removing old finishes and damage, then move through progressively finer grits to smooth the surface. Always clean thoroughly between grits.
Aim for a final grit of 120-150 for most finishes, ensuring a smooth, dust-free surface for a durable, beautiful polyurethane application. Your floors will look amazing!