Best Way To Remove Painted Popcorn Ceiling: Proven Solution
The best way to remove painted popcorn ceiling involves careful scraping after wetting the surface, ensuring proper protection and patience for a smooth, refreshed look. This guide breaks down the process for a confident DIY finish.
Remember those bumpy popcorn ceilings? They were a popular choice once, but many of us are looking for a smoother, more modern finish. If your popcorn ceiling has paint on it, you might be thinking it’s a much harder job to tackle. Well, you’re in luck! Removing painted popcorn ceiling can seem a bit daunting, but with the right approach, it’s totally achievable for any DIYer. This guide will walk you through everything you need to know, making this home update feel less like a chore and more like a rewarding project. Get ready to transform your space, one scrape at a time!
Why Remove Painted Popcorn Ceilings?
Popcorn ceilings, also known as acoustic ceilings, were a big trend from the 1950s through the 1980s. Their primary purpose was to help absorb sound and hide imperfections in the drywall. However, over time, tastes have changed. Modern home design favors smooth, flat ceilings that make rooms feel larger and brighter. Painted popcorn ceilings add an extra layer of complexity because the paint seals the texture, making it more resistant to water, which is typically used to soften it for removal.
Beyond aesthetics, popcorn ceilings can also trap dust and allergens, making them a concern for people with respiratory issues. The presence of lead paint, particularly in homes built before 1978, adds another layer of caution. If you suspect lead paint, it’s crucial to test for it before starting any removal work. You can find lead testing kits at most hardware stores.
The good news is that removing even painted popcorn ceilings is a manageable DIY project. With the right preparation, tools, and a bit of patience, you can achieve a beautifully smooth ceiling and update your home’s look significantly.
Is It Safe to Remove Painted Popcorn Ceilings?
Safety is always the top priority when tackling any home improvement project, and removing popcorn ceilings is no exception. The primary safety concern is the potential presence of asbestos in the popcorn texture itself, especially in homes built before 1977. If your home was built during or before this era, it’s highly recommended to have your ceiling tested for asbestos by a certified professional before you begin any scraping. Disturbing asbestos-containing materials can release harmful fibers into the air, posing serious health risks.
For painted popcorn ceilings, the risk of lead paint is also a consideration for homes built before 1978. Similar to asbestos, lead paint dust can be hazardous if inhaled or ingested. Always test for lead paint before starting. If lead is detected, you’ll need to take extra precautions and follow specific lead abatement procedures, often best handled by professionals.
Even without asbestos or lead, proper personal protective equipment (PPE) is essential. This includes:
- Safety glasses or goggles: To protect your eyes from falling debris and dust.
- Respirator or dust mask (N95 or better): To prevent inhalation of dust and particles.
- Gloves: To protect your hands.
- Old clothing: Wear old clothes that you don’t mind getting dirty, or consider coveralls.
Working from a stable ladder or scaffolding is also crucial. Ensure it’s placed on a level surface and never overreach. If you’re uncomfortable working at heights or dealing with potential hazardous materials, it’s always best to hire a qualified professional.
Tools and Materials You’ll Need
Gathering the right tools and materials before you start will make the entire process much smoother and more efficient. Here’s a comprehensive list to get you prepared:
Essential Tools
- Scrapers: A sturdy putty knife or a wider ceiling scraper with a long handle is ideal. Some professionals prefer a pole scraper for easier reach and better leverage.
- Ladder or Scaffolding: A stable, adjustable ladder or a small scaffolding unit to safely reach the ceiling.
- Spray bottle or garden sprayer: For wetting the ceiling.
- Drop cloths or plastic sheeting: Heavy-duty plastic sheeting is best to cover furniture, floors, and walls.
- Painter’s tape: To secure the plastic sheeting and protect trim.
- Bucket: For water and cleaning.
- Sponge or rags: For cleanup.
- Sanding pole and sandpaper: For smoothing the ceiling after scraping. Start with a medium grit (like 100-120) and finish with a finer grit (like 180-220).
- Utility knife: For cutting plastic sheeting and other minor tasks.
- Vacuum cleaner with a brush attachment: For cleaning up dust.
Materials
- Water: The primary agent for softening the popcorn texture.
- Dish soap (optional): A small amount can help the water penetrate better.
- Drywall joint compound (spackle): For filling any minor gouges or imperfections after scraping.
- Primer: A good quality primer to seal the drywall and prepare it for paint.
- Paint: Your chosen ceiling paint for the final finish.
Safety Gear
- Safety glasses or goggles
- N95 or better respirator mask
- Work gloves
- Coveralls or old clothing
Step-by-Step Guide to Removing Painted Popcorn Ceilings
Removing painted popcorn ceiling is a project that requires patience and thorough preparation. Unlike unpainted popcorn, the paint can make the texture a bit more stubborn. Here’s how to tackle it:
Step 1: Prepare the Room (Crucial!)
This is arguably the most important step. Proper preparation will save you a lot of cleanup time later. The mess from popcorn ceiling removal can be substantial, especially with painted surfaces where water might bead up more.
- Clear the room: Remove all furniture, or at least move it to the center of the room and cover it completely with plastic sheeting or drop cloths.
- Cover the floors: Lay down heavy-duty plastic sheeting or drop cloths across the entire floor. Overlap the edges and tape them securely to prevent dust and moisture from seeping through. Extend the sheeting up the baseboards by a few inches and secure with painter’s tape.
- Protect walls and fixtures: Use painter’s tape and plastic sheeting to cover the top edges of walls, light fixtures, ceiling fans, vents, and any other fixtures you can’t remove. This creates a sealed environment to contain the mess.
Step 2: Test a Small Area
Before you dive in, it’s essential to test how the paint affects the removal process. This also helps you determine the right amount of water to use.
- Choose an inconspicuous spot, like a corner or inside a closet ceiling.
- Lightly spray a small section of the popcorn ceiling with water using your spray bottle or garden sprayer. Wait about 10-15 minutes to see how the water soaks in.
- Gently try to scrape the softened texture. If it comes off easily, you’re on the right track. If it’s still tough, you may need to let the water sit longer or apply a second coat of water. For painted ceilings, you might find that the paint creates a barrier, requiring a bit more moisture or patience. A bit of dish soap mixed into the water can sometimes help break through the paint layer.
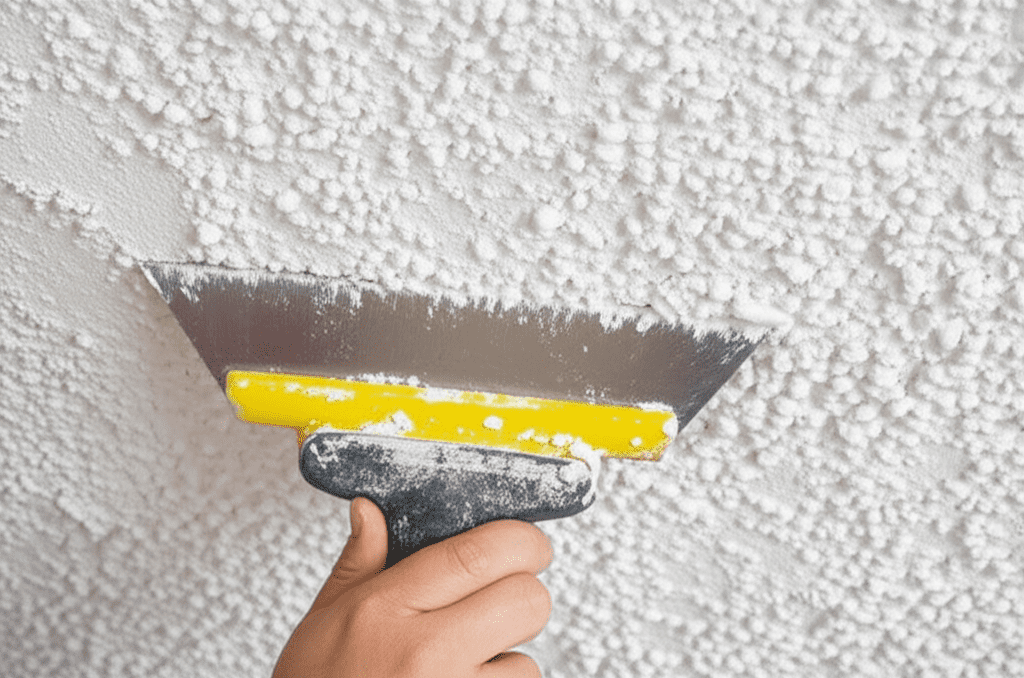
Step 3: Wet and Scrape Section by Section
Now, it’s time to start the removal. Work in small, manageable sections to keep the ceiling material damp and to avoid over-saturating the drywall.
- Spray: Using your garden sprayer, lightly mist a section of the ceiling (about 4-6 square feet). Don’t soak it; you want it damp enough to soften, not so wet that it damages the drywall paper.
- Wait: Let the water penetrate for about 15-20 minutes. For painted popcorn, you might need to let it sit a bit longer or re-mist if the paint is creating a strong barrier.
- Scrape: Using your scraper, hold it at a shallow angle (around 30-45 degrees) to the ceiling. Apply steady pressure and push the scraper forward. The softened popcorn texture should peel away. If it’s sticking, the area may need more water or more time to soak.
- Work methodically: Move across the ceiling in a systematic way, ensuring you overlap your scraped areas slightly to catch any missed spots.
- Clean your scraper: Periodically scrape the popcorn debris from your tool into your bucket.
You might notice that some areas are easier to scrape than others. This is normal, especially with painted ceilings. Be patient and adjust your technique as needed.
Step 4: Manage the Debris
As you scrape, the popcorn texture will fall. It’s important to manage this debris as you go to keep your work area as clean as possible.
- Use your drop cloths: The plastic sheeting on the floor will catch most of the falling material.
- Sweep into piles: Gently push the debris on the plastic into piles using a broom or your scraper.
- Bag it up: Once you have a good amount of debris, carefully gather the plastic sheeting and pour the mess into heavy-duty garbage bags.
- Frequent disposal: For large jobs, it might be helpful to have a designated trash bin outside the work area to dispose of the debris frequently.
Step 5: Address Any Remaining Texture or Damage
Once the bulk of the popcorn texture is removed, you’ll likely see some areas where small bits are still stuck, or where the drywall paper might have been slightly nicked or torn during scraping.
- Touch-up scraping: For stubborn bits, you might need to re-wet a small area and scrape again, perhaps with a sharper or more flexible scraper.
- Fill imperfections: Inspect the ceiling for any minor gouges or divots. Use a putty knife to fill these small imperfections with drywall joint compound (spackle). Apply it smoothly and allow it to dry completely according to the product instructions.
Step 6: Sanding for Smoothness
After the joint compound has dried, the ceiling will need a light sanding to create a smooth, uniform surface ready for priming and painting.
- Set up your pole sander: Attach a sheet of medium-grit sandpaper (100-120 grit) to your pole sander.
- Sand gently: Work in a consistent pattern, applying light pressure. The goal here isn’t to remove material aggressively, but to knock down any rough spots, feather out the filled areas, and create an even surface.
- Switch to fine grit: Once you’ve smoothed out the majority of the imperfections, switch to a fine-grit sandpaper (180-220 grit) for a final smooth finish.
- Clean as you go: Use a damp sponge or cloth to wipe down the ceiling after sanding to remove dust, and then vacuum the entire area thoroughly to catch all fine particles. A shop vacuum with a good filter is excellent for this.
According to the National Institute for Occupational Safety and Health (NIOSH), proper dust control is paramount during any renovation activity to maintain air quality.
Step 7: Prime and Paint
The final steps are priming and painting to give your ceiling a fresh, clean look.
- Prime the ceiling: Apply a coat of high-quality primer. Primer seals the drywall, helps cover any residual stains or imperfections, and provides a uniform surface for your paint. Use a roller for the main areas and a brush for edges and corners. Allow the primer to dry completely as per the manufacturer’s instructions.
- Paint the ceiling: Apply your chosen ceiling paint. You’ll likely need two coats for even coverage. Use a roller with an extension pole for the main areas and a brush for cutting in the edges.
- Allow drying time: Ensure each coat of paint is thoroughly dry before applying the next or before reassembling anything in the room.
Tips for Removing Painted Popcorn vs. Unpainted
While the basic process is similar, there are key differences when tackling painted popcorn ceilings:
Penetration Challenges
- Paint Barrier: The paint acts as a seal, making it harder for water to penetrate and soften the texture. This means you’ll likely need more water, a longer soaking time, or a surfactant (like dish soap) to help the water break through.
- Test, Test, Test: Always test a small area first. You’ll quickly learn how much moisture and soaking time your specific painted ceiling requires.
Scraping Technique
- More Patience: Painted popcorn may require more effort and patience during scraping. Don’t force the scraper, as this can gouge the drywall. Work with steady, firm pressure.
- Blade Angle: Experiment with your scraper’s angle. A slightly shallower angle might help lift the painted texture more effectively without digging into the ceiling.
Potential for Wall Damage
- Increased Risk: Because painted popcorn can be tougher, there’s a slightly higher risk of accidentally scraping or gouging the drywall paper underneath if you’re not careful.
- Thorough Prep: Extra care with your plastic sheeting and wall protection is essential, as you might be dealing with a bit more water and debris.
Long-Term Smoothness
- Sanding is Key: After scraping, the sanding phase becomes even more critical for painted ceilings. Ensure you get a really smooth finish to avoid any hint of the old texture showing through, especially under new paint.
- Quality Primer: A good primer will be your best friend in hiding any minor imperfections left after scraping and ensuring your new paint job looks flawless.
Pros and Cons of Removing Popcorn Ceiling
Deciding whether to remove your popcorn ceiling involves weighing the benefits against the work involved. Here’s a look at the pros and cons:
Pros
- Modern Aesthetic: Creates a sleek, contemporary look that often makes rooms feel more spacious and updated.
- Easier Cleaning: Smooth ceilings are much easier to dust and clean than the textured surfaces of popcorn ceilings.
- Improved Lighting: Smooth ceilings can reflect light better, potentially making a room feel brighter.
- Increased Home Value: A refreshed ceiling can be an attractive feature for potential buyers.
- Healthier Environment: Eliminates potential dust traps and removes concerns about asbestos or lead paint if properly managed.
Cons
- Labor-Intensive: The process, especially for painted ceilings, requires significant time, effort, and patience.
- Messy Project: Despite preparation, it’s an inherently dusty and messy job.
- Potential for Drywall Damage: Incorrect scraping can damage the underlying drywall, requiring repairs.
- Cost of Materials/Tools: While cheaper than hiring professionals, there’s still an investment in tools and supplies.
- Safety Concerns: Potential presence of asbestos or lead paint requires careful testing and handling.
How Long Does It Take?
The time it takes to remove a painted popcorn ceiling can vary significantly based on several factors:
| Factor | Impact on Time |
|---|---|
| Ceiling Size | Larger rooms obviously take longer. A 10×10 room might take a day, while a 20×20 room could take 2-3 days for removal and prep alone. |
| Paint Adhesion | If the paint is very thick or adheres well, it can slow down the softening and scraping process. |
| Skill Level | More experienced DIYers or those familiar with scraping techniques will likely work faster. Beginners should allow extra time. |
| Number of People | Having a helper can significantly speed up the process, especially for prepping, covering, and debris cleanup. |
| Drying Times | Time must be allocated for any joint compound to dry and for paint to cure between coats. |
| Breaks and Pacing | It’s a strenuous job, so regular breaks are important. Rushing can lead to mistakes and damage. |
A general estimate for a standard 10×12 foot room might be 4-8 hours for the scraping and initial cleanup, plus additional time for repairs, sanding, priming, and painting, potentially spreading the project over a weekend or longer.
FAQ About Painted Popcorn Ceiling Removal
Q1: Can I just paint over my popcorn ceiling instead of removing it?
A1: Yes, you can paint over popcorn ceilings, but it’s generally not recommended if it has been painted multiple times or if the texture is very deep. Painting over it can make future removal much harder and can highlight imperfections. However, if done carefully with a good primer and sprayer, it can offer a quick refresh.
Q2: How do I know if my popcorn ceiling contains asbestos?
A2: If your home was built before 1977, there’s a chance the popcorn ceiling contains asbestos. The only way to be sure is to have a sample tested by a qualified laboratory. Many home improvement stores offer testing kits, or you can hire a professional abatement company.
Q3: What’s the best scraper for painted popcorn ceiling?
A3: A wide (6-inch or more) metal putty knife or a dedicated ceiling scraper with a long handle or pole is usually best. For painted ceilings, a flexible but sturdy blade is helpful. Some people prefer a sharp, aggressive blade for tougher jobs, while others opt for a blade with a rounded corner to prevent gouging.
Q4: My ceiling paper tore when I was scraping. What should I do?
A4: Minor tears or gouges in the drywall paper are common. Once the ceiling is dry, you can repair them using drywall joint compound (spackle). Apply a thin layer over the damaged area, feathering it out smoothly to the surrounding surface. Let it dry completely, then sand it smooth. You might need a second thin coat for a perfectly even finish.
Q5: How much water should I use?
A5: Start with a light mist. For painted ceilings, you may need to be more generous, but avoid saturating the drywall to the point where it starts to sag or disintegrate. The goal is to soften the popcorn texture so it scrapes off easily. Let the water soak for 10-20 minutes, testing in a small spot. Re-misting may be necessary.
Q6: Is it worth the effort to remove it myself?
A6: For many homeowners, yes! While it’s a messy and time-consuming project, the cost savings compared to hiring professionals can be significant. If you’re comfortable with DIY tasks and patient, it’s a rewarding way to update your home. If you’re dealing with suspected asbestos or lead paint, or if you’re not comfortable with the mess and effort, hiring a professional is the safer and more efficient option.
Conclusion
Transforming your space by removing a painted popcorn ceiling is a very achievable DIY project. While it requires dedication and meticulous preparation, the result is a smooth, modern ceiling that instantly updates your home. By following these steps, gathering the right tools, and prioritizing safety, you can confidently tackle this task and enjoy a refreshed, more aesthetically pleasing living environment. Remember to work methodically, protect your surroundings, and be patient with the process. The satisfaction of a job well done, and the beautiful, smooth ceiling that awaits, will make all the effort worthwhile!