Can I Grow A Cherry Tree From Store Bought Cherries? Essential
Yes, you absolutely can grow a cherry tree from the pits of store-bought cherries, but it requires patience and several important steps like proper stratification. It is a fun, rewarding project, though success isn’t guaranteed, as the resulting tree may not match the parent fruit.
Have you ever finished a bowl of sweet summer cherries and looked at those little pits, wondering if you could plant them? It is a natural curiosity! Turning a simple fruit pit into a mighty tree feels like magic, but many folks stop because they think it’s too complicated or that the store-bought fruit won’t work. It can be frustrating when you want to grow something beautiful but aren’t sure where to start with seeds that have traveled far.
Good news! Starting from seed is totally possible. I will walk you through every simple step, just like we’re setting up a small woodworking project together, ensuring you know exactly what to do to give your cherry pits the best shot at sprouting. Let’s get those pits ready for their new life!
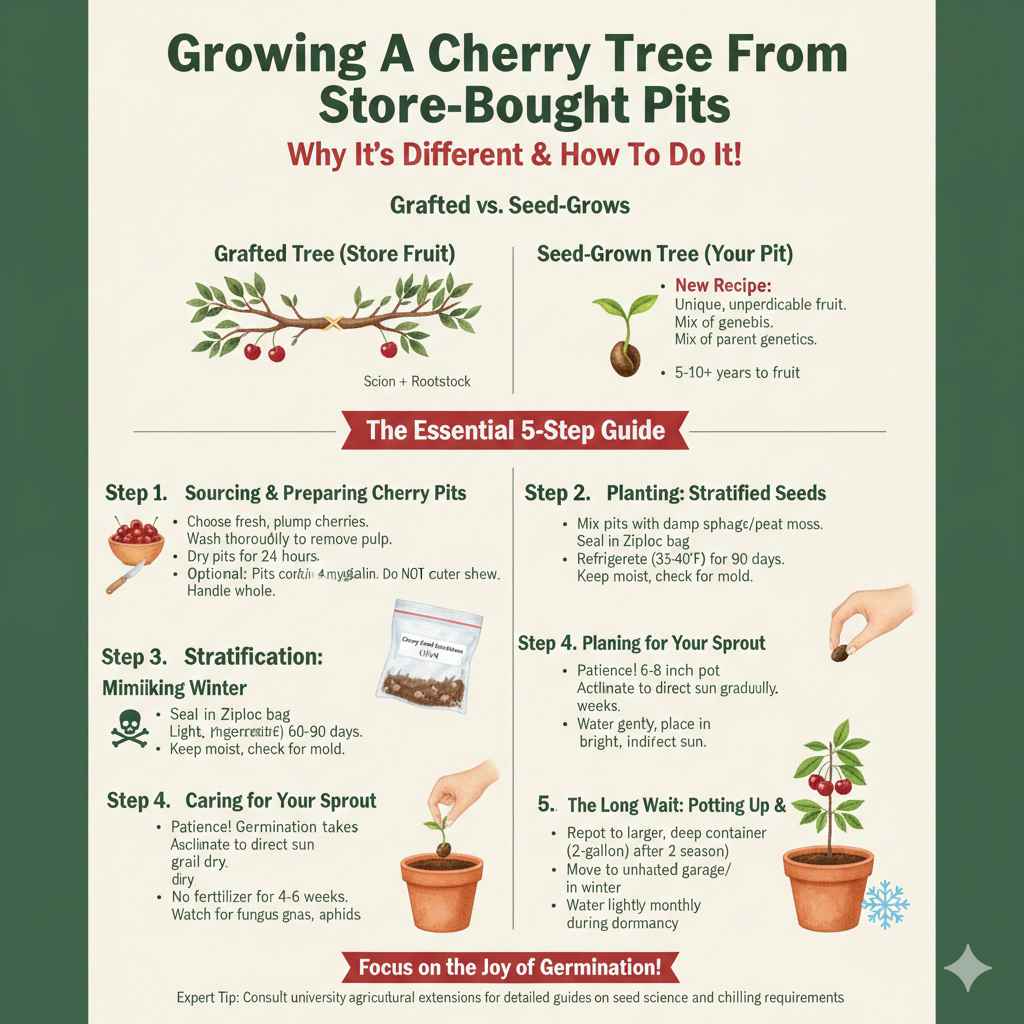
The simple answer is yes, you can grow a cherry tree from the pit (seed) of a store-bought cherry. However, it’s important to know that this method is more about gardening adventure than guaranteed fruit production. Most store-bought cherries come from grafted trees, meaning the fruit variety is cloned. When you grow from seed, you get a brand-new genetic mix, which might result in a tree that takes many years to fruit, or perhaps never produces the same delicious cherries you ate. But for the pure joy of growing a tree from scratch? It’s a fantastic starting point!
Why Growing From Store-Bought Pits Is Different
When you buy a cherry from the grocery store, you are usually getting a fruit that came from a mature, specially selected tree. Commercial growers use a process called grafting. This is where a piece of a known, high-producing tree (the scion) is attached to the root system of another strong tree (the rootstock). This ensures consistent, good quality fruit every time.
When you plant a pit, you are essentially planting the seed, which contains a mix of both “parent” trees’ genetics.
Think of it this way:
- Grafted Tree (Store Fruit): It’s like a known recipe—always the same result.
- Seed-Grown Tree (Your Pit): It’s like baking from scratch with new ingredients—the result will be unique and unpredictable.
Because of this genetic shuffle, the seedling might need 5 to 10 years, or sometimes even longer, before it might produce fruit. For the beginner, focus on the joy of germination first. We are growing a cool plant!
Step 1: Sourcing and Preparing Your Cherry Pits
This first stage is about getting clean, viable seeds ready for planting. We need pits that haven’t been treated to prevent sprouting.
Identifying Good Cherries
For the best results, choose cherries that look fresh and plump, not dried out or shriveled. While the origin might be far away, the important thing is that the pit inside is healthy.
Tools Needed for Preparation:
- Fresh cherries (a handful or more)
- Water (for washing)
- Small knife or nutcracker (optional, for careful extraction)
- Paper towels
Cleaning the Pits
The flesh of the cherry needs to be completely removed. Leftover sugars or pulp can invite mold, which will kill your seed before it even gets a chance to sprout.
- Eat the Cherries (The Fun Part!): Enjoy your fruit, making sure to save every pit.
- Wash Thoroughly: Place the pits in a bowl of water and gently rub them together to remove all the sticky residue. Rinse several times.
- Dry Slightly: Spread the clean pits out on a paper towel to air dry for about 24 hours. They should be dry to the touch, but not cracked.
Shelling the Pit (Optional but Recommended)
The outer shell of the cherry pit is very hard, designed to protect the true seed inside. Sometimes cracking this shell slightly can speed up germination, but you must be extremely careful not to damage the tiny kernel inside.
Safety First: Cherry pits contain a substance called amygdalin, which releases cyanide when crushed or heavily chewed. When handling the pits whole or washing them, this isn’t an issue. If you choose to crack the shell, do so carefully with a nutcracker or by gently tapping with a small hammer, focusing only on the seam of the pit. If you are unsure or uncomfortable, simply skip this step and proceed directly to stratification with the whole pit. Many pits will germinate just fine without cracking.
Step 2: Stratification—Mimicking Winter
Cherry tree seeds need a period of cold, moist conditions to break dormancy. This natural process is called stratification, and it tells the seed that winter has passed and it’s safe to grow. Without this cold period, the seed will just sit there, even if planted in warm soil.
This step is often the biggest hurdle for beginners, but we’ll make it simple.
Cold, Moist Stratification Method
This process mimics the natural cycle of the seed being buried in the cold, damp ground over winter.
Materials for Stratification:
- Clean, viable cherry pits
- Ziploc bag (freezer bag)
- Sphagnum moss or peat moss (clean, slightly damp)
- Spray bottle with water
- Marker for labeling
- Moisten the Medium: Soak your peat moss or moss in water until it is thoroughly damp, like a wrung-out sponge. You should not see standing water in the bag.
- Bag the Pits: Place your cleaned pits into the Ziploc bag along with the damp moss. Mix them gently so the pits are nestled in the moss.
- Label Everything: Use your marker to label the bag with the current date and “Cherry Seed Stratification.” Trust me, after a few months, you won’t remember what’s in which bag!
- Refrigerate: Place the sealed bag in the main compartment of your refrigerator—not the freezer! The temperature should stay consistently between 35°F and 40°F (about 1.7°C to 4.4°C).
- Wait Patiently: Leave them in the fridge for 60 to 90 days. Check them every two weeks. If the moss seems dry, lightly mist it with water. If you see any mold, gently remove the affected pit and mist the remaining moss.
Expert Tip: For a deeper dive into seed science, resources like university agricultural extensions often provide detailed germination guides. For example, information regarding cold requirements for various stone fruits can be found through publications from The National Center for Home Food Preservation, showing how critical chilling hours are for these types of seeds.
Step 3: Planting Your Stratified Seeds
After your 2-to-3-month cold treatment, your seeds should be ready to sprout! You might even see small white root tips emerging from some pits while they are still in the fridge—that’s a great sign!
When to Plant
The best time to plant the seeds is in early spring, right after the danger of hard frost has passed in your area. If you started the stratification process in early winter (say, January), they should be ready to plant around March or April.
Choosing the Right Container and Soil
Since this tree will eventually get very large, we start small but use the right ingredients to promote strong root growth.
Container Choice:
- Use a container that is at least 6 to 8 inches deep. A deeper pot encourages a strong taproot.
- Ensure the pot has excellent drainage holes at the bottom.
Soil Mix: Do not use heavy garden soil! It compacts too easily and can drown the roots. Use a light, well-draining mix.
A good beginner mix is often: 2 parts commercial potting mix, 1 part perlite or coarse sand (to aid drainage).
The Planting Process
This is the exciting part where you move from the kitchen science project to actual gardening.
- Fill the Pot: Fill your chosen container almost to the top with your prepared potting mix.
- Position the Pit: Dig a small hole about 1 to 1.5 inches deep. Place the pit in the hole with the rounded side down (where the root usually emerges) facing downwards, if you can tell which side it is. If not, just place it horizontally.
- Cover Lightly: Gently cover the pit with soil. The rule of thumb is to cover the seed to a depth about twice its size.
- Water Gently: Water the soil thoroughly until you see water running freely out of the drainage holes. This settles the soil around the seed.
- Placement: Place the pot in a location that gets bright, indirect sunlight. A sunny windowsill indoors or a sheltered spot outside, protected from heavy rain, works well initially.
Step 4: Caring for Your Sprouting Cherry Seedling
Patience is key here, just like waiting for the finish on a piece of furniture. Germination can take several weeks, even after stratification.
What to Look For
Once the soil warms up and conditions are right, you should see a tiny sprout emerge. It might look like a small hook pushing through the soil first.
When to Move Outdoors:
- Once the seedling has its first set of true leaves (the second set that appears), it is generally strong enough to handle more direct sun.
- If you started indoors, gradually acclimate it to outdoor conditions over a week by placing it outside for a few hours longer each day (this prevents sunburn).
Watering and Feeding
For a young seedling, consistent moisture is crucial, but soggy soil is deadly.
Watering Rule: Water only when the top inch of soil feels dry to the touch. Never let the pot sit in standing water.
Feeding: Do not fertilize seedlings right away. Wait until the plant is established (about 4 to 6 weeks after sprouting). When you do feed, use a diluted liquid fertilizer specifically formulated for young plants, perhaps at half the strength recommended on the bottle.
Pest Watch
Keep an eye out for common houseplant pests like fungus gnats (tiny black flies around the soil) or aphids. Good air circulation helps prevent most issues. If you see small bugs, a gentle wipe with a cotton swab dipped in soapy water can often handle the problem safely.
Step 5: The Long Wait—Potting Up and Wintering
This is where the dream meets the reality of growing a tree. Your seedling is now a genuine tree, but it needs more room to grow strong roots before you can think about planting it outside permanently.
Repotting (Potting Up)
If your seedling has been thriving for a full growing season and its roots are starting to circle the bottom of its initial pot, it’s time to move it up to a larger container—perhaps a 2-gallon size.
When repotting, handle the roots gently. Cherry trees, like many woody plants, benefit from a deep, strong taproot. Ensure the new pot is deep, not just wide.
Preparing for the First Winter
If you live in an area that experiences hard freezes, your young cherry tree seedling will not survive its first winter outdoors unprotected. It needs the same winter protection that any young landscape tree would require.
Protecting Overwintering Seedlings:
- Move the pot into an unheated garage, shed, or cool basement once the leaves begin to drop naturally in the fall.
- Water lightly only once a month to prevent the roots from drying out completely. The goal is dormancy—cool but not freezing solid.
- Bring it back out when spring signals the end of frost danger.
Transplanting to the Yard: Years Down the Road
A seedling grown from a grocery store pit should ideally spend 2 to 3 years growing in progressively larger containers (or a protected nursery bed) before it is robust enough to face the outdoor world permanently.
When to Plant in the Ground
Wait until the tree is at least 3 years old and has a sturdy trunk (thicker than a pencil). Plant it in early spring or early fall when the weather is mild, giving the roots time to establish before summer heat or winter cold hits.
Site Selection:
- Sunlight: Cherries need full sun—at least 6 to 8 hours of direct sun daily.
- Drainage: This is non-negotiable. Cherries hate “wet feet.” If your soil drains poorly, consider planting on a small mound or berm to improve drainage around the roots.
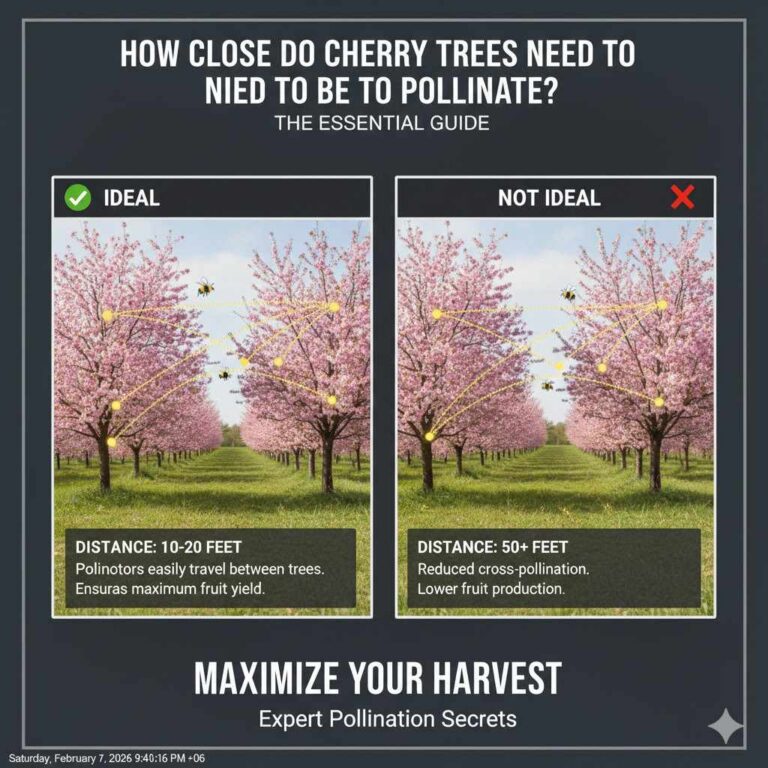
- Spacing: Plant at least 15 to 20 feet away from any structure or other large trees.
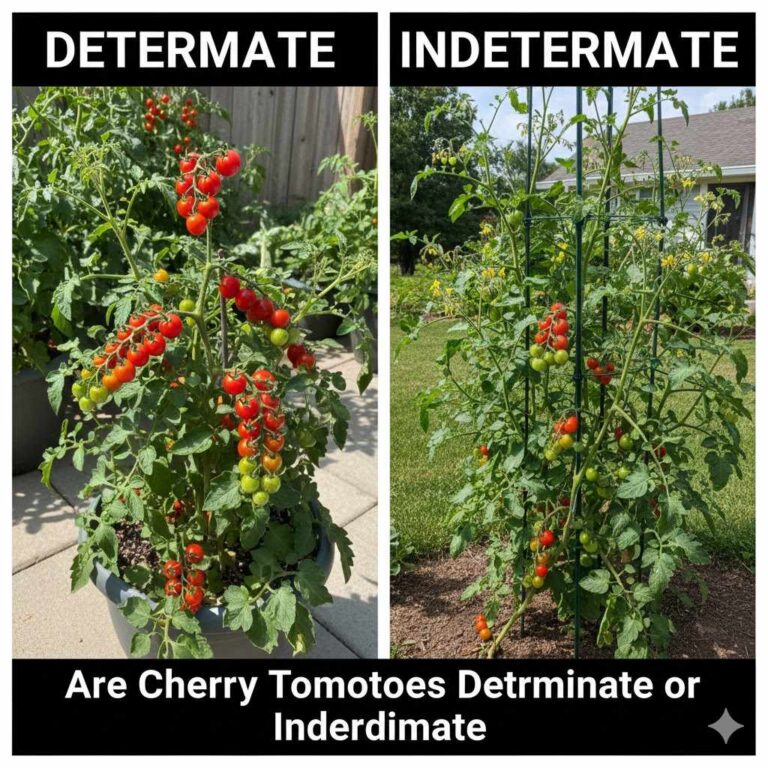
A Note on Pollination
Many sweet cherry varieties require a second, different variety of cherry tree nearby to successfully pollinate and produce fruit. While some sour cherries are self-pollinating, you won’t know which type you have until the tree matures. This is another reason why growing from seed is an exercise in patience and horticultural exploration!
Pros and Cons of Growing Cherry Trees from Store-Bought Pits
As your guide in making things happen at home, I want you to weigh the effort against the potential outcome.
| Pros (The Reward) | Cons (The Reality Check) |
|---|---|
| Extremely low cost (just the price of a bowl of cherries!) | Very long time to fruit (5–10+ years is common). |
| Fantastic learning experience in seed dormancy and germination. | The fruit produced is rarely the same as the parent fruit (genetic lottery). |
| You get a unique, locally adapted hybrid tree variety. | Requires careful, multi-step process including cold stratification. |
| Environmentally friendly way to start a tree. | Seedlings may lack disease resistance compared to nursery stock. |
Troubleshooting Common Seed Starting Issues
If your pits don’t sprout, don’t panic! Gardening involves trial and error. Here are the most common hiccups:
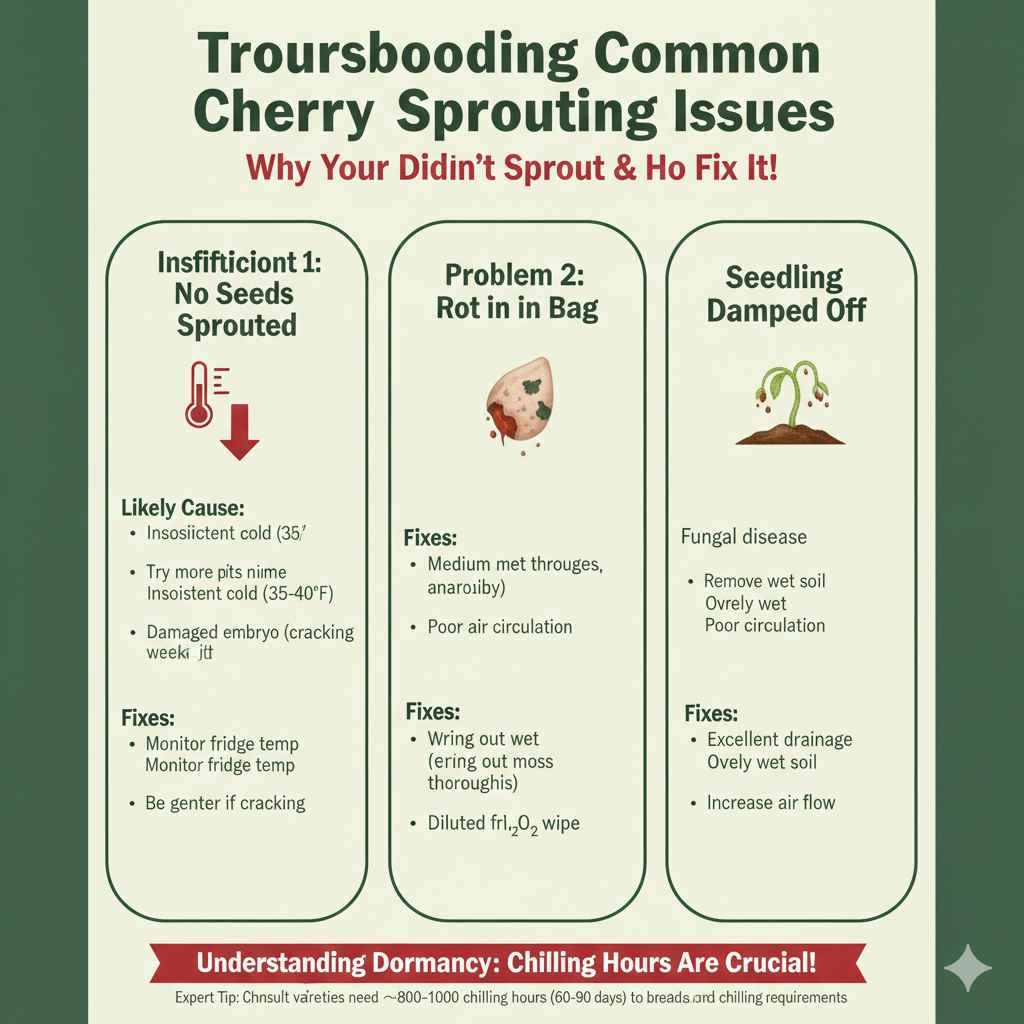
Problem 1: No Seeds Sprouted After Stratification
Likely Cause: Insufficient or inconsistent cold exposure, or the seed was damaged during preparation.
Fix: Try again next season with more pits. Ensure your refrigerator temperature is steady between 35-40°F. If you cracked the shell, you might have damaged the embryo inside—be gentler next time!
Problem 2: Mold or Rot in the Bag
Likely Cause: The moss/peat was too wet, leading to anaerobic conditions.
Fix: Next time, wring out the medium much drier. If mold appears, carefully remove the affected pits, lightly mist the remaining medium, and replace the bag. You can try wiping the moldy pits gently with a cloth dipped in a weak hydrogen peroxide solution (1 part peroxide to 10 parts water).
Problem 3: Seedling Damped Off
“Damping off” is when a healthy-looking seedling suddenly collapses at the soil line and dies. It’s caused by a fungal disease that thrives in overly wet soil.
Fix: Ensure excellent drainage. Do not overwater, especially while the seedling is tiny. Increase air circulation around the soil surface.
Understanding Dormancy Requirements for Stone Fruits
The chilling hour requirement is critical. Different types of cherries (Sweet vs. Tart) have varying needs, but generally, pits need sustained cold exposure. For reference, resources from extension services often categorize these needs. For example, many sweet cherry varieties need around 800 to 1000 chilling hours, which is what our 60-90 day refrigerator stratification aims to achieve.
FAQ: Your Beginner Questions About Cherry Pits
Q1: Do I have to buy organic cherries to grow a tree?
No, you do not need organic cherries. The goal is simply to get a viable pit that wasn’t damaged by being dried out or heat-treated before shipping. Most supermarket cherries work fine.
Q2: How long does it take for a seed-grown cherry tree to bear fruit?
This is the big unknown! Generally, expect anywhere from 5 to 10 years, sometimes longer. It is much slower than buying a small, grafted tree from a nursery, which often fruits in 2 to 4 years.
Q3: Can I skip the refrigeration (stratification) step?
It is highly recommended that you do not skip this step. Cherry seeds require a cold period to break dormancy naturally. If planted directly in the soil without chilling, the seed will likely remain dormant indefinitely or rot.
Q4: What happens if I plant the pits outside directly in the garden in winter?
If you live in a region with reliably cold, moist winters, planting them directly outside (double-bagged and perhaps lightly buried in mulch for extra protection) can work as natural stratification. However, you risk animal predation (squirrels digging them up) or too much moisture fluctuation, which is why the controlled environment of the fridge is safer for beginners.
Q5: Can I use the pits from dried or frozen cherries?
It is best to avoid these. Frozen cherries are often fine if the pits were protected, but dried cherries have usually lost too much moisture to remain viable. The pits need to maintain some internal moisture content to survive the cold period.
Q6: Will my seed-grown tree need another tree for pollination?
It’s highly likely, especially for sweet cherries. Most sweet cherry varieties are not self-fertile and need a genetically different cherry tree nearby blooming at the same time. Sour cherries (like Montmorency) are usually self-fertile, but you won’t know which type you have until the tree matures.
Conclusion: Cultivating Confidence, One Pit at a Time
Starting a cherry tree from a store-bought pit is a wonderful journey into gardening science. It teaches you about dormancy, soil structure, and patience—skills that make you a better DIY gardener and homeowner overall. Remember, success isn’t just about the fruit; it’s about the process. By carefully cleaning, chilling (stratifying), and nurturing your tiny seeds, you are giving them the absolute best foundation.
Even if your tree takes a decade to produce its first bite, you’ve successfully taken something intended for waste and transformed it into a living, growing piece of nature. Keep the soil moist but never soaked, provide bright light, and enjoy watching your little sprout turn into a future landscape feature. You have the know-how now; happy growing!