Can You Stain Red Oak Grey, Black, Or White? Expert Tips Revealed
Yes, you can stain red oak grey, black, or white. Staining red oak in these colors can transform the look of your wood projects.
It’s a popular choice for modern and contemporary styles. Red oak is a versatile wood that takes stain well. Whether you’re aiming for a sleek, modern appearance with grey, a bold and dramatic look with black, or a clean, bright finish with white, staining red oak can meet your needs.
Each color brings a unique charm to the wood, enhancing its natural grain and character. In this blog post, we will explore the steps and tips for achieving these stunning finishes. Let’s dive into the world of staining red oak and see how you can achieve these beautiful colors for your next project.
Staining Red Oak Grey
Staining red oak grey can give your woodwork a modern, sleek look. This trendy color choice can transform any space, giving it a fresh, updated feel. Grey stains highlight the natural grain of red oak, creating a beautiful contrast that is both elegant and contemporary. But achieving the perfect grey stain on red oak requires careful consideration and technique.
Choosing The Right Grey Shade
Choosing the right grey shade is crucial. Different shades can produce varying effects. Light grey stains can brighten a room and make it feel more open. Darker greys can add depth and sophistication. Consider the overall decor and lighting of the space. Test a few shades on scrap pieces of red oak before making a final decision.
Application Techniques
Proper application techniques ensure the best results. Start by sanding the red oak to a smooth finish. Use a fine-grit sandpaper for the best surface. Apply a wood conditioner to the oak. This helps the stain absorb evenly. Apply the grey stain using a clean cloth or brush. Work in small sections to avoid streaks. Wipe off excess stain to achieve the desired color. Allow the stain to dry completely before applying a protective finish. This will help maintain the beautiful grey color and protect the wood.
Credit: www.thehandymansdaughter.com
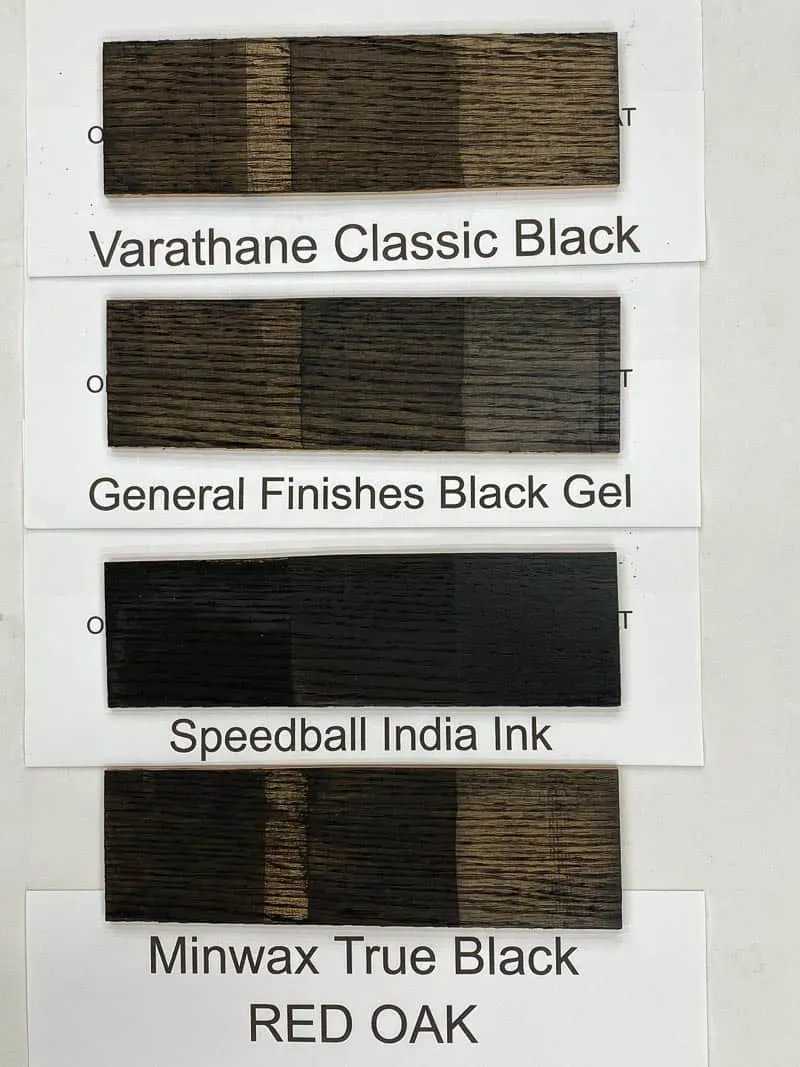
Staining Red Oak Black
Staining red oak black can give your furniture a sleek, modern look. This deep, rich color adds sophistication to any room. The process may seem daunting, but with the right steps, you can achieve a beautiful finish.
Selecting The Best Black Stain
Choosing the right stain is crucial for achieving the desired look. Several black stains are available on the market. Popular options include oil-based and water-based stains. Oil-based stains penetrate deeply and provide a long-lasting finish. They also enhance the grain of the wood. Water-based stains are easier to clean and have less odor. They dry quickly and are more environmentally friendly.
Test the stain on a small, hidden area first. This helps ensure you like the color and finish. It also allows you to see how the stain interacts with the wood.
Achieving A Uniform Finish
A uniform finish is key to a professional look. Start by sanding the wood thoroughly. Use fine-grit sandpaper for a smooth surface. This helps the stain absorb evenly.
Apply a wood conditioner before staining. This step is important for red oak, which can absorb stain unevenly. The conditioner helps the wood take the stain more evenly.
When applying the stain, use a clean brush or cloth. Work in the direction of the grain. Apply a thin, even coat. Let it sit for a few minutes, then wipe off the excess. Allow the first coat to dry completely before applying additional coats. Multiple thin coats provide a richer color and a more even finish.
Finally, seal the wood with a clear topcoat. This protects the stain and adds shine. Options include polyurethane or lacquer. Choose based on your desired level of gloss and durability.
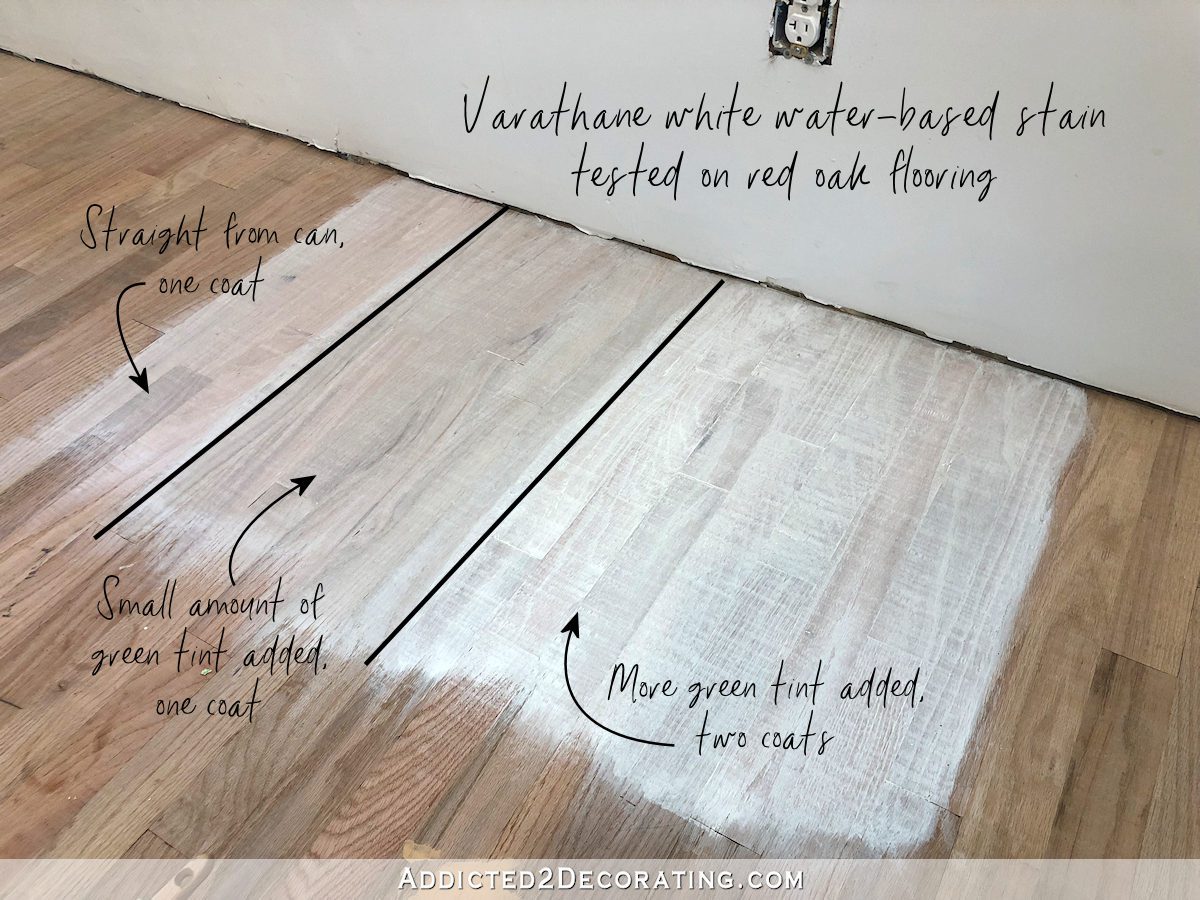
Staining Red Oak White
Staining red oak white creates a fresh, modern look. It transforms the traditional red oak into a light and airy piece. But achieving the perfect white stain requires careful steps. Let’s explore how to get the best results.
Optimal White Stains
Choosing the right white stain is crucial. Here are some top options:
- Whitewash Stain: Ideal for a subtle, milky finish.
- Pickling Stain: Provides a soft, weathered look.
- Gel Stain: Offers consistent coverage and easy application.
Testing the stain on a small area first helps. This ensures the desired effect before applying it to the entire surface.
Avoiding Yellowing
Preventing yellowing keeps the white stain looking fresh. Follow these tips:
- Use a Sealant: Apply a clear, water-based sealant to protect the wood.
- Avoid Oil-Based Stains: These can cause yellowing over time.
- Choose Quality Products: Invest in high-quality stains and sealants.
Regular maintenance also helps in preserving the white finish. Clean the surface with a mild soap and water solution to avoid buildup.
Credit: www.reddit.com
Preparing Red Oak For Staining
Preparing red oak for staining is a crucial step in achieving a beautiful finish. This process ensures the stain adheres properly and highlights the wood’s natural beauty. Follow these steps to prepare your red oak for a grey, black, or white stain.
Sanding Tips
Sanding is essential for a smooth and even stain application. Start with a coarse sandpaper, around 80-grit, to remove any rough spots or old finish. Then, move to a medium-grit sandpaper, like 120-grit, to smooth out the surface.
Finish with a fine-grit sandpaper, such as 220-grit, to ensure the wood is smooth. Always sand in the direction of the wood grain to avoid scratches. Use a sanding block or an orbital sander for best results.
- Start with 80-grit sandpaper.
- Move to 120-grit sandpaper.
- Finish with 220-grit sandpaper.
- Sand in the direction of the grain.
Cleaning The Surface
After sanding, it’s important to clean the surface thoroughly. Dust and debris can interfere with the stain application. Use a vacuum with a brush attachment to remove dust from the surface.
Next, wipe the wood with a tack cloth to pick up any remaining particles. For a deeper clean, you can use a damp cloth with a mild cleaner. Ensure the wood is completely dry before applying the stain.
- Vacuum the surface with a brush attachment.
- Wipe with a tack cloth.
- Use a damp cloth with a mild cleaner if needed.
- Ensure the wood is dry before staining.
Tools And Materials Needed
Staining red oak grey, black, or white can transform its appearance. To achieve the best results, you need the right tools and materials. Proper preparation ensures a smooth and even finish. Here, we will discuss the essential tools and recommended products required for staining red oak.
Essential Tools
Having the right tools is crucial for a successful staining project. Here are the must-have tools:
- Sandpaper: To smooth the wood surface before staining.
- Sanding block: Helps in holding the sandpaper and provides an even sanding surface.
- Tack cloth: Removes dust after sanding.
- Paintbrush: For applying stain on the wood.
- Foam brush: Useful for applying stain in tight spaces.
- Stir sticks: To mix the stain thoroughly before application.
- Drop cloth: Protects your workspace from spills and stains.
- Gloves: Keeps your hands clean and protected.
Recommended Products
Choosing the right stain and other products is equally important. Here are some recommended products:
- Wood stain: Choose a high-quality stain in grey, black, or white.
- Pre-stain wood conditioner: Helps the wood absorb the stain evenly.
- Topcoat or sealer: Protects the stained wood and enhances its durability.
- Mineral spirits: Useful for cleaning brushes and removing excess stain.
- Wood filler: Fills any cracks or holes in the wood surface.
With these tools and materials, you are ready to start staining your red oak. Proper preparation and the right products ensure a beautiful finish.

Credit: aloprofile.com
Common Staining Mistakes
Staining red oak grey, black, or white can be tricky. Many people make mistakes that affect the final look. Understanding these mistakes helps you avoid them.
Uneven Application
Uneven application is a common mistake. It can happen when the stain is not spread evenly. Always use a brush or cloth to apply the stain evenly.
Ensure that the stain is absorbed uniformly. This helps in achieving a consistent color. Work in small sections to maintain control over the application.
Using a quality brush can make a big difference. Cheap brushes often cause streaks. Choose a brush that holds the stain well.
Handling Drips And Runs
Drips and runs are another common issue. They can ruin the look of your stained wood. Always check for drips and runs while staining.
Use a cloth to wipe away any excess stain. Pay special attention to corners and edges. These areas are prone to drips.
Keep an eye on your work as you go. This helps in catching drips before they dry. A smooth, even finish is the goal.
Maintaining Stained Red Oak
Staining red oak can transform your wood into beautiful shades like grey, black, or white. But keeping it looking great requires proper maintenance. Below are some tips to help you maintain your stained red oak, ensuring its longevity and beauty.
Cleaning Tips
Regular cleaning is vital to keep your stained red oak looking fresh. Here are some easy tips:
- Dust the surface weekly with a soft, dry cloth.
- Vacuum the floor using a brush attachment to remove loose dirt.
- Use a damp mop with a gentle cleaner for deeper cleaning. Avoid harsh chemicals.
- Immediately wipe up spills to prevent staining and damage.
Regular Maintenance
Consistent maintenance helps preserve the color and finish of stained red oak. Follow these steps:
- Apply a fresh coat of sealant every few years to protect the stain.
- Use furniture pads under chairs and tables to prevent scratches.
- Avoid dragging heavy objects across the oak surface.
- Ensure your home maintains a stable humidity level to prevent wood warping.
For high-traffic areas, consider placing rugs or mats to reduce wear and tear on the oak.
Expert Tips For Best Results
Staining red oak in shades like grey, black, or white can transform its appearance. Getting the best results requires attention to detail and proper techniques. Here are some expert tips to help you achieve beautiful and consistent finishes.
Test Staining
Always test stain on a scrap piece of red oak. This helps you see how the wood absorbs the stain. Different pieces may absorb stain differently. Testing ensures the final result matches your vision.
Apply a small amount of stain using a clean cloth or brush. Let it dry completely before deciding. This gives you a clear idea of the final color. Make any necessary adjustments to achieve your desired shade.
Layering Techniques
Layering can create depth and richness in the color. Apply the first coat of stain and let it dry. Assess the color and apply additional layers if needed. Each layer will deepen the color.
For lighter shades like grey or white, use thin layers. Too much stain at once can overpower the wood’s natural grain. For darker shades like black, more layers may be necessary. Take your time to build up to the desired intensity.
Sand lightly between coats to ensure a smooth finish. This helps the stain adhere better and creates a professional look. Remember to wipe away any dust before applying the next layer.
Frequently Asked Questions
Can You Stain Red Oak Grey?
Yes, you can stain red oak grey. Red oak’s natural grain accepts grey stain well, creating a modern look. Ensure proper preparation and application for best results.
How To Stain Red Oak Black?
To stain red oak black, use a high-quality black wood stain. Sand the wood, apply the stain evenly, and wipe off excess. Seal with a clear coat.
Can White Stain Cover Red Oak?
White stain can cover red oak, providing a lighter, more contemporary finish. Proper sanding and multiple coats may be needed for even coverage.
Does Red Oak Need Special Prep For Staining?
Red oak requires thorough sanding and cleaning before staining. This ensures even stain absorption and a smooth finish.
Conclusion
Staining red oak grey, black, or white is achievable and rewarding. Each color brings a unique charm to your wood. Grey offers a modern, sleek look. Black provides a bold, dramatic finish. White creates a clean, bright appearance. Choose the stain that fits your style and project.
Just follow the proper steps for a smooth application. Enjoy the process and the beautiful results. Happy staining!