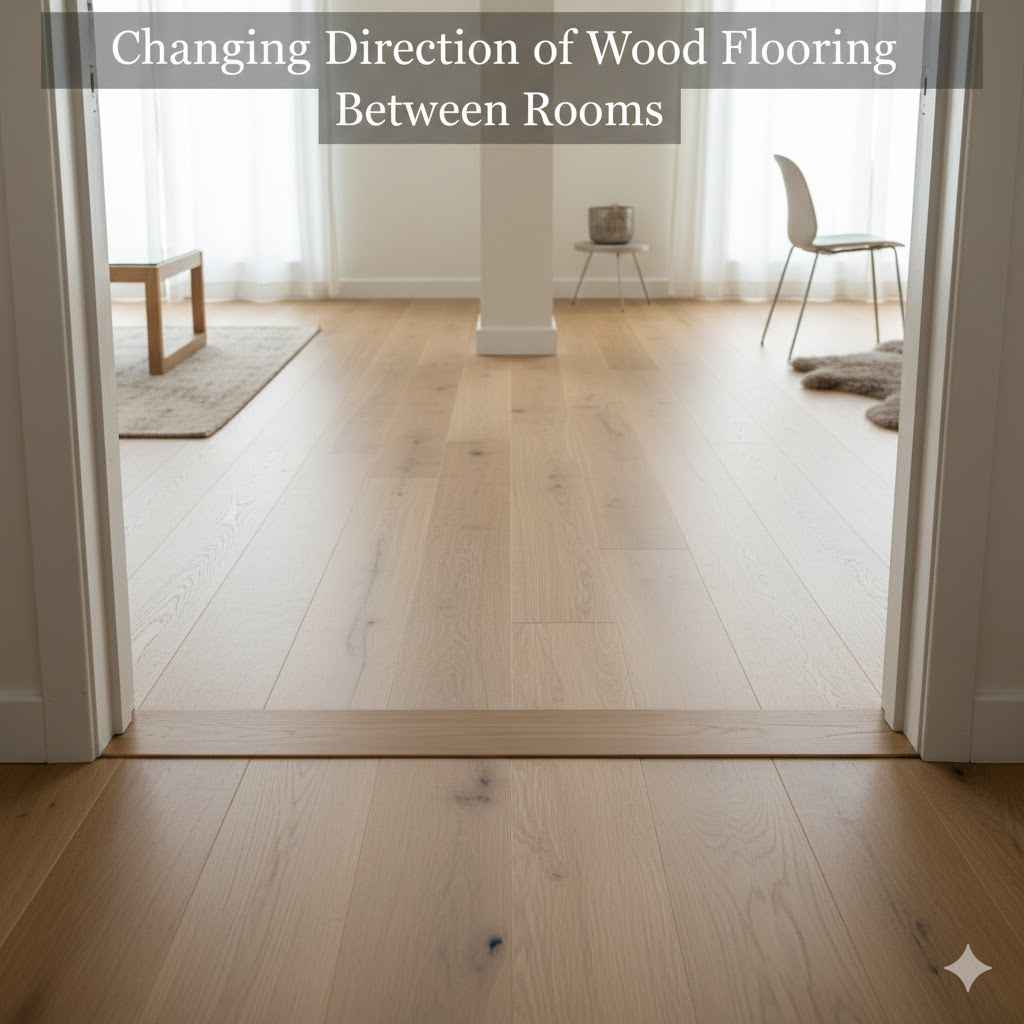
Changing Direction of Wood Flooring Between Rooms
Deciding how to lay your wood floors where one room meets another can seem tricky. Many homeowners wonder if they should keep the planks going straight or turn them. This is a common point of confusion for people doing their own flooring.
But don’t worry, it’s simpler than it looks. This guide will show you an easy way to figure out the best direction for your wood floors between rooms. We’ll walk you through it step-by-step so you can feel confident making the right choice.
Why Flooring Direction Matters Between Rooms
The way you lay your wood flooring planks in one room compared to the next can really change how your home looks and feels. It’s not just about aesthetics; it can also affect how spaces seem to connect or separate. This decision is a key part of a successful flooring project.
Getting it wrong can make a room feel smaller or the flow between areas awkward. Many people find this choice to be one of the more challenging aspects of installing wood floors, especially when aiming for a cohesive look throughout their home. This section will explore the main reasons why this choice is so important for the overall design and feel of your living space.
Visual Flow and Perception of Space
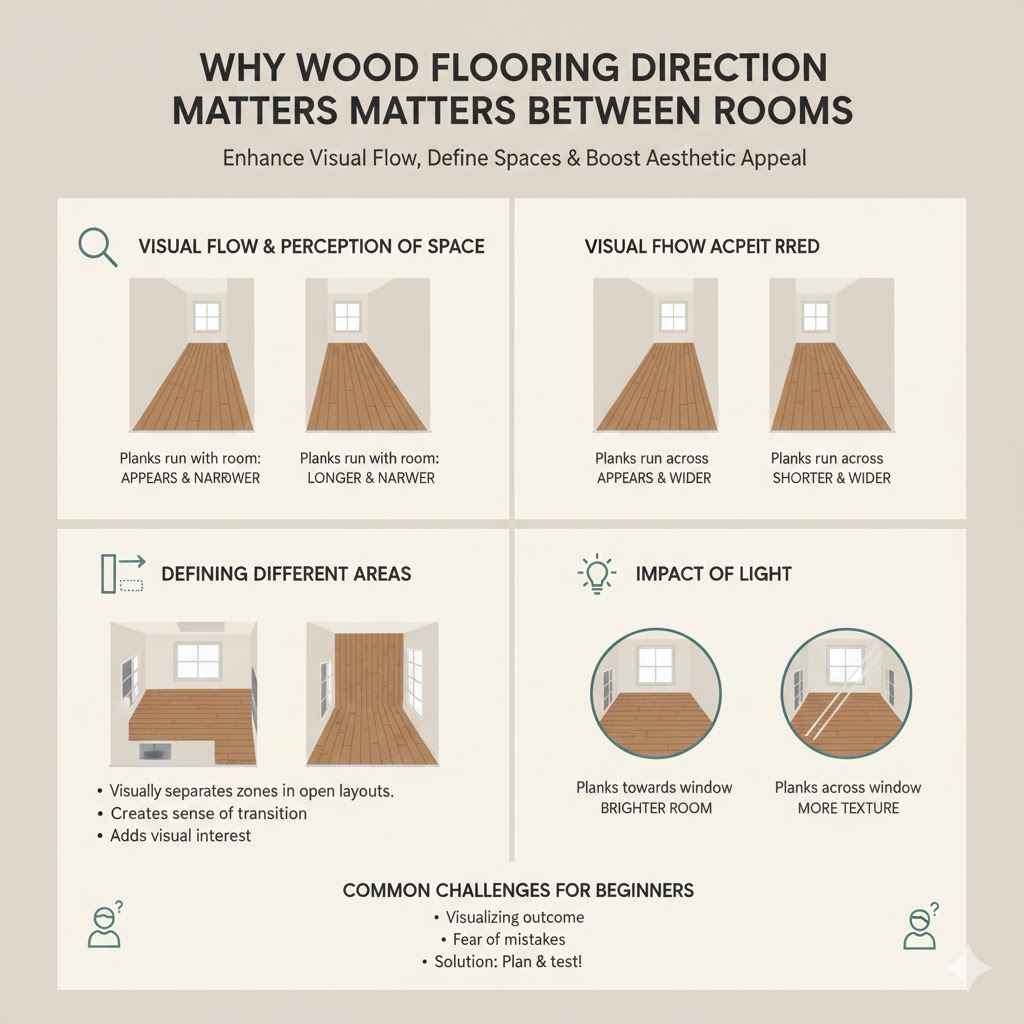
The direction of wood planks can trick the eye, making rooms appear larger or more connected. When planks run in the same direction across multiple rooms, it creates a continuous visual line. This can make hallways and open-plan areas feel longer and more expansive.
Conversely, changing the direction can break up a long, narrow space or define separate zones within a larger room. Think about how a long hallway can feel endless if the floorboards run with it. If you turn them across the hallway, it might feel shorter but wider.
For instance, in a home with a long, narrow living room that opens into a dining room, running the planks parallel to the length of the living room might emphasize its length. However, turning the planks to run parallel to the dining room’s width could make the dining area feel more prominent and potentially make the overall space feel wider when viewed together. The way light hits the planks also plays a role; planks that run towards a window can reflect light more effectively, brightening the room.
A study on visual perception found that the orientation of linear elements in a space significantly impacts perceived dimensions. In flooring, this translates to making spaces feel bigger or smaller, wider or narrower. For example, flooring laid perpendicular to the longest wall can make a room feel more balanced.
It’s a simple visual trick that designers and homeowners use to enhance the perceived size and flow of a home’s interior. This is why considering the direction is key for creating an appealing and functional living environment.
Defining Different Areas
Changing the direction of wood flooring between rooms is a smart way to visually separate distinct functional areas within an open-concept home. For example, in a large open space that combines a kitchen, dining area, and living room, you might run the wood planks in one direction in the kitchen and then change the direction in the dining area. This subtle shift helps to define each zone without the need for physical walls or barriers, maintaining an open feel while still providing clarity about where one area ends and another begins.
Consider a home where the entryway leads into a great room. The flooring in the entryway might run parallel to the entrance door to guide people in, while the flooring in the main living area could run in a different direction to distinguish it from the entryway. This creates a sense of transition and purpose for each space.
It’s a design choice that adds both visual interest and functional clarity to the home’s layout. This technique is particularly useful when you want to preserve the open-plan feel while still indicating the purpose of different zones.
- Aesthetic Appeal: Changing direction adds visual interest and can make your home look more dynamic and thoughtfully designed. It breaks up monotony.
- Room Separation: It helps define different zones in an open-plan layout without using physical dividers. This gives each area a distinct identity.
- Light Reflection: The direction of the grain can affect how light reflects off the floor. Running planks towards a window can make a room feel brighter.
- Floor Plank Durability Perception: While not affecting actual durability, the direction can sometimes influence how sturdy the floor appears visually.
Common Challenges for Beginners
For those new to flooring installation, deciding on the direction of wood planks can be a significant point of anxiety. Many beginners struggle with visualizing the final outcome. They might not know how a particular direction will affect the perceived size of a room or how it will look when transitioning from one space to another.
The sheer number of options can be overwhelming, and the fear of making a mistake that is difficult and expensive to fix is very real.
A common hurdle is understanding the impact of light and the shape of the room. Beginners might not consider how natural light enters a room and how the flooring direction interacts with it. They might also overlook how the shape of adjacent rooms will influence the overall visual flow.
Without prior experience, it’s hard to predict how changing direction will alter the perception of space. This often leads to indecision or choosing a direction based on guesswork rather than informed design principles.
The installation itself can also present challenges. Cutting planks at angles to accommodate changes in direction or to fit around doorways requires precision. Beginners might worry about complex cuts or transitions that look unprofessional.
The goal is to make it look seamless, and achieving that can seem daunting. This guide aims to simplify these decisions, offering clear advice to ease the process.
Changing Direction of Wood Flooring Between Rooms: Smart Guide
This section is your comprehensive guide to making the best choice for your wood flooring direction. We will break down the factors that influence this decision, offering practical tips and visual examples. Our aim is to equip you with the knowledge to confidently select the ideal plank orientation, ensuring a beautiful and cohesive look for your home.
We’ll cover everything from basic rules of thumb to more nuanced considerations that can elevate your flooring project from good to exceptional. Let’s explore how to achieve that perfect flow.
Understanding Wood Grain Direction
The wood grain direction refers to the pattern created by the lines in the wood itself. When you install wood flooring, the planks are typically laid with their length running in a particular direction. This direction can be along the longest wall of the room, towards the main light source (like a window), or in a pattern that complements the room’s shape and adjacent spaces.
The visual impact of the grain direction is significant; it can influence how space is perceived and how light interacts with the floor.
For example, laying planks parallel to the longest wall often makes a room feel longer and more streamlined. This is a common practice in hallways or long, rectangular rooms. If you have a room that feels too short, running the planks in the direction of the longest wall can create an illusion of greater length.
Conversely, if a room feels too narrow, running the planks across the width might make it appear wider. The visual effect is about guiding the eye.
The term “grain direction” also relates to how the wood was cut from the log. This affects the appearance of the grain. However, in the context of installation, it primarily means the orientation of the installed planks across your floor.
When changing direction between rooms, you are essentially deciding whether to continue this orientation or to turn the planks by 90 degrees or even diagonally. The choice impacts the overall visual narrative of your home’s flooring. Understanding this basic concept is the first step to making informed decisions.
The Golden Rule Laying Planks
There’s a widely accepted guiding principle for laying wood flooring, especially when starting a new installation or in a main living area: lay the planks parallel to the longest wall of the room. This rule is based on creating a sense of spaciousness and a natural visual flow. In most rectangular rooms, extending the length of the planks along the longest dimension helps to elongate the space, making it feel larger and more open.
This is a classic approach that generally yields pleasing results.
This principle is especially effective in square rooms as well, where the choice might seem less obvious. In such cases, laying planks parallel to the wall with the main entry point or the longest wall available can still provide a sense of direction and order. It helps orient the viewer and the eye as they enter the space.
When transitioning between rooms, continuing this direction can create a seamless feel. If room shapes differ significantly, you might need to adjust this rule, which we’ll discuss later.
Imagine a living room that is 15 feet long and 10 feet wide. The longest wall is 15 feet. Therefore, according to this rule, you would lay the planks running in the 15-foot direction.
If this room opens into a dining room that is 12 feet by 12 feet, you might continue the planks in the same direction if the flow is maintained, or choose a different direction based on the dining room’s specific layout and how it connects to other areas. The goal is visual harmony.
Light and Shadow Play
The way light interacts with your wood floor can dramatically change its appearance and the ambiance of a room. Wood planks have a natural grain and texture that reflects light differently depending on the angle. When light hits the slightly raised grain, it creates subtle shadows.
The direction you lay your planks will determine the direction of these shadows. This can enhance the three-dimensional quality of the flooring and add depth to the space.
If you have a window that provides abundant natural light, laying planks perpendicular to the window can make the room feel brighter. This is because the light will travel across the width of the planks, illuminating the surface more evenly and reducing glare. Planks laid parallel to the window might create more pronounced shadows along their length, which can be dramatic but might also make a room feel dimmer or more linear.
Consider a scenario where a hallway leads into a bedroom. If the hallway has a window at the far end, laying planks towards the window in the hallway will draw the eye and make the hallway feel longer and brighter. When you enter the bedroom, if that room also has a window on a side wall, you might choose to lay the planks in the bedroom parallel to that window to maximize light in that space.
This careful consideration of light sources and plank orientation is a key element of Changing Direction of Wood Flooring Between Rooms: Smart Guide.
Transitions Between Rooms
Creating smooth and attractive transitions between rooms is a crucial aspect of flooring installation. When changing the direction of wood flooring between rooms, you’ll need to consider how the planks meet. Often, a transition strip or threshold is used.
However, the way the planks are laid can influence the type and visibility of this transition.
If you change direction at a doorway, the transition strip will sit where the two sets of planks meet. For example, if planks run north-south in one room and east-west in the next, the transition will be along the line where these two directions intersect, typically at the doorway. The installer will need to carefully cut the planks to fit neatly against the transition strip.
Another method for changing direction involves a “feature strip” or a different inlay pattern at the point where the directions change. This can be a decorative element that highlights the transition. For instance, a single row of planks running perpendicular to the main direction can act as a subtle divider.
This adds an intentional design feature rather than just a functional joint.
A common scenario involves a living room flowing into a dining room. If the living room planks run parallel to the fireplace wall, you might change their direction in the dining room to run parallel to the dining table’s long axis. The doorway between these rooms becomes the point of transition.
A well-chosen transition strip that complements the wood color and style is essential for a polished look. Some installers might even mitre the planks to meet at a precise angle, creating a very clean visual break.
Common Transition Methods
- Flush Stair Nose Transition: Used when there’s a height difference, like a step down. The transition strip is shaped like a stair nose to create a safe and smooth edge.
- T-Molding Transition: This is the most common type for doorways between rooms of the same height. It’s shaped like a ‘T’ and covers the gap between the two flooring directions.
- Reducer Transition: Used when there’s a slight height difference between two flooring areas. It slopes down gradually from the higher level to the lower level.
- End Cap Transition: Typically used at the edge of a room, like against a sliding glass door or a patio door that doesn’t require a full threshold.
Each of these transition methods requires precise installation to ensure they lie flat and are securely fastened. The choice of transition strip should also complement the wood flooring and the overall decor. For example, a dark wood might look best with a dark metal transition, while a lighter wood could pair well with a natural wood or brushed nickel finish.
The goal is to make the transition as unobtrusive and aesthetically pleasing as possible.
When to Change Direction for Best Results
Deciding when to change flooring direction is more art than strict science, but there are key indicators to guide you. The primary driver is usually to enhance the perceived space and to visually connect or separate areas effectively. If two rooms are naturally well-connected and you want to create a unified feel, continuing the same direction might be best.
However, if you want to define distinct zones or make a space feel more balanced, changing direction is often the superior choice.
Consider a long, narrow hallway. If this hallway leads into a more open, square-shaped room, you might lay the planks lengthwise down the hallway to make it feel longer. Upon entering the square room, you could then change the direction of the planks to run parallel to the longest wall of that room (which might be the wall opposite the hallway entrance) or towards the main window.
This creates a clear separation between the circulation space and the living space.
Another scenario is when you have a room with an irregular shape or multiple entry points. In such cases, a single direction might not work well everywhere. You might choose a primary direction for the main part of the room and then change it in alcoves or distinct seating areas.
This allows you to tailor the flooring to the specific needs and layout of each section. The key is to always consider how the change will impact the flow and perception of the entire connected space.
Key Scenarios for Changing Direction
- Defining Open-Concept Zones: In large, open living areas that combine kitchen, dining, and living spaces, changing the direction of the wood flooring can subtly delineate these zones without physical walls. For example, planks could run parallel to the kitchen island in the kitchen area and then turn to run parallel to the dining table in the dining area.
- Improving Room Proportions: If a room feels too narrow, laying planks perpendicular to the longest wall can make it appear wider. If a room feels too short, laying planks parallel to the longest wall will make it seem longer. When transitioning between rooms, you can employ these techniques independently for each space to optimize their appearance.
- Highlighting Architectural Features: Sometimes, you might change the direction of your flooring to draw attention to a specific architectural element, like a fireplace, a unique window, or a built-in bookshelf. For instance, planks could be laid to angle towards a fireplace to emphasize its presence.
- Accommodating Traffic Flow: In high-traffic areas, especially entryways, laying planks in the direction of the primary foot traffic can sometimes give a sense of direction and purpose, guiding people into the home or into a main living area.
These scenarios illustrate how strategic changes in flooring direction can significantly enhance the design and functionality of a home. It’s about making deliberate choices that serve a visual or practical purpose, contributing to a well-designed living environment.
When NOT to Change Direction
While changing direction can be beneficial, there are times when maintaining a consistent flow is the better choice. Overuse of directional changes can make a home feel choppy and visually confusing. If your rooms are already small and numerous, or if you have a very traditional or minimalist design aesthetic, a single, consistent direction can create a sense of unity and calm.
One of the main reasons to avoid changing direction is when the rooms are small and naturally flow into one another without clear dividing lines. For instance, a series of small bedrooms off a single hallway might benefit from the same flooring direction throughout. This continuity can make the entire area feel larger and more cohesive.
If you have a particularly narrow hallway, continuing the planks down its length can visually extend it, making it feel less cramped.
Another consideration is the overall style of your home. A very modern or minimalist design often benefits from clean lines and a sense of simplicity. Introducing multiple changes in flooring direction might detract from this aesthetic.
In such cases, sticking to one direction, perhaps parallel to the longest wall in the main living area and continuing that through adjacent spaces, will reinforce the clean, uncluttered look.
The complexity of installation is also a factor. Changing direction requires more intricate cuts, especially around doorways and at the point of transition. If you are installing the flooring yourself or working with a less experienced installer, sticking to a single direction can simplify the process and reduce the risk of errors.
The visual result can still be very appealing without the added complexity and cost of multiple directional changes.
Consider a scenario where you have a long, open-plan living space that is L-shaped. If the “L” shape is very subtle and the entire area is meant to feel like one large entertaining space, forcing a change in direction might break up the flow unnaturally. In this case, continuing the planks in a single direction, perhaps following the longest continuous wall, would create a more unified and expansive feel.
Situations Favoring Consistent Direction
- Small, Connected Rooms: If you have several small rooms that open into each other, keeping the flooring direction consistent can make the entire area feel more expansive and less fragmented.
- Traditional or Minimalist Design: These styles often benefit from a sense of order and simplicity. A single, consistent flooring direction reinforces this aesthetic.
- Narrow Hallways: Laying planks lengthwise down a narrow hallway can visually elongate it, making it feel more spacious and less like a confined passage.
- Limited Budget or DIY Installation: A single direction is generally simpler and less costly to install, reducing labor time and the potential for errors.
By understanding when to maintain a consistent direction, you can avoid creating a visually cluttered or disconnected environment. The goal is always to enhance the beauty and functionality of your home, and sometimes, less is more when it comes to flooring direction.
How to Choose Your Direction
Choosing the right direction for your wood flooring involves a few simple steps that consider the room’s layout, light, and how it connects to other spaces. Start by looking at the primary light source in the room, usually a window or a significant light fixture. Consider the longest wall in the room.
Think about the main entry points and the general traffic flow. Lastly, consider how this room connects to adjacent rooms and what direction the flooring runs there.
A practical approach is to stand in the doorway of the room and imagine planks running in different directions. Visualize how they would look when the light hits them. Does one direction make the room feel bigger?
Does it draw your eye towards a focal point like a fi
If the room is a standard rectangle, laying the planks parallel to the longest wall is a safe and effective choice. This generally creates a sense of spaciousness and order. If this room connects to another room, you then need to decide whether to continue that direction or change it.
If the rooms are similar in shape and flow naturally, continuing the direction can create a beautiful, unbroken visual line. If the rooms have different purposes or shapes, a change in direction might be more appropriate.
Don’t forget to consider the wood species and its grain pattern. Some wood grains are more prominent than others. A highly figured wood might benefit from a direction that showcases its natural beauty, while a more uniform grain might be best laid to create a sense of spaciousness.
Ultimately, the choice should feel right to you and enhance the overall aesthetic of your home.
Step-by-Step Decision Process
- Assess the Room Shape: Identify the longest wall and the shortest wall in the room.
- Locate Light Sources: Determine where the primary windows or light fixtures are located.
- Observe Traffic Flow: Note the main entry points and how people naturally move through the space.
- Visualize Plank Orientation: Imagine planks running parallel to the longest wall, then parallel to the shortest wall, and then towards the main light source. See which looks best.
- Consider Adjacent Rooms: Look at the flooring direction in neighboring rooms and decide if continuity or a defined transition is desired.
- Test with Samples: If possible, lay out a few sample planks in different directions to see how they look in the actual room lighting.
By following these steps, you can make an informed decision that ensures your wood flooring not only looks beautiful but also enhances the functionality and perception of your living spaces. This process helps demystify the decision-making for Changing Direction of Wood Flooring Between Rooms: Smart Guide.
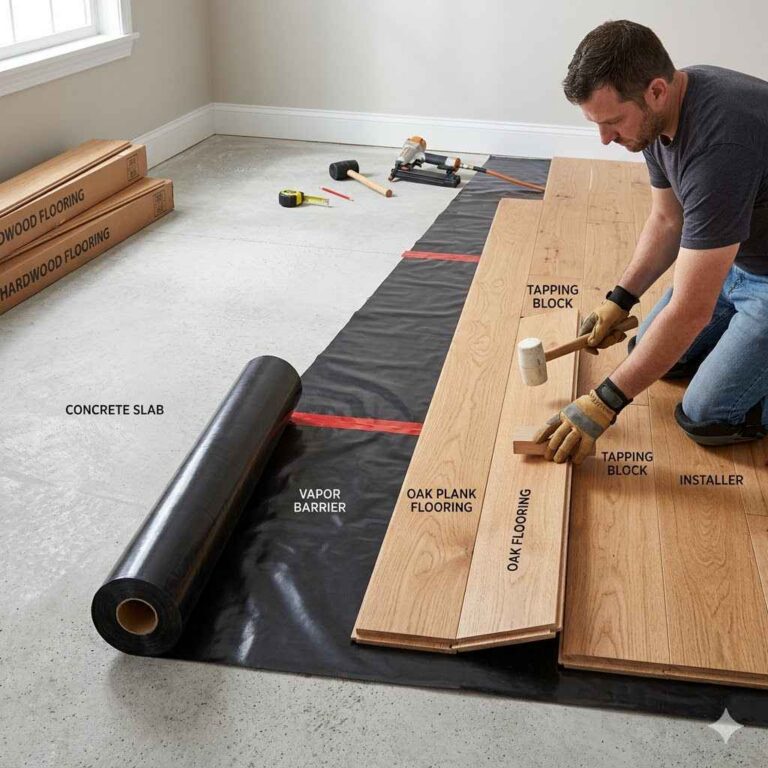
Technical Considerations for Installation
When changing the direction of wood flooring between rooms, there are several technical aspects to consider during installation. The most significant challenge is ensuring a clean and secure transition between the two different plank orientations. This typically occurs at doorways or other junctions where the direction shifts.
Expansion Gaps are crucial for all wood flooring. Wood expands and contracts with changes in humidity and temperature. Regardless of direction, installers must leave an expansion gap around the perimeter of the room.
This gap is usually covered by baseboards or trim. When changing direction, you need to ensure these gaps are maintained on all sides where the flooring meets a wall or fixed object.
Subfloor Preparation remains paramount. The subfloor must be clean, dry, level, and structurally sound. Any unevenness can lead to squeaks, gaps, or premature wear, regardless of the direction of the top flooring.
For engineered or laminate flooring, manufacturers often provide specific guidelines on acclimation and installation, which should always be followed.
Cutting and Fitting planks at transition points requires precision. When changing direction, planks will meet at a 90-degree angle. This means the ends of the planks will need to be cut squarely to fit against the transition strip or the adjoining planks.
For a professional look, particularly with solid hardwood, installers might employ a mitered cut where the planks meet at an angle, creating a very neat seam.
Fastening Methods can vary. Depending on the type of wood flooring (solid hardwood, engineered hardwood, or laminate), it can be installed by nailing, stapling, gluing, or using a click-lock system. When changing direction, the fastening method must be compatible with both orientations and secure enough to prevent movement at the transition.
For example, if using nails, the installer needs to ensure nails can be driven at appropriate intervals along the ends of the planks at the transition.
The choice of transition strip also has technical implications. A T-molding needs to be screwed or glued to the subfloor, spanning the gap between the two flooring sections. A flush stair nose, if needed, must be securely attached to the subfloor and the edge of the flooring to prevent tripping hazards.
The correct type and installation of the transition strip are vital for durability and safety.
Installation Best Practices
- Subfloor Leveling: Ensure the subfloor is perfectly flat. Unevenness will be more noticeable when planks change direction.
- Expansion Gap Maintenance: Always maintain the manufacturer-recommended expansion gap around the entire perimeter of the installed flooring.
- Precise Cutting: Make accurate cuts at all transition points. A dull saw blade or imprecise measurement can lead to visible gaps or ill-fitting planks.
- Secure Transitions: Properly install transition strips using appropriate fasteners (nails, screws, or adhesive) to prevent movement and ensure safety.
- Acclimation Period: Allow the wood flooring to acclimate to the room’s environment for the duration specified by the manufacturer before installation.
Adhering to these technical considerations will ensure that your wood flooring installation, including any changes in direction, is durable, safe, and visually appealing for years to come. This expertise is a key part of mastering Changing Direction of Wood Flooring Between Rooms: Smart Guide.
Visualizing Your Flooring Direction
It can be challenging to visualize how wood planks will look running in different directions, especially when planning a change between rooms. Fortunately, there are several ways to get a clearer picture before committing to installation. Simple tricks and digital tools can help you see the potential outcome and make a more confident decision.
This section will walk you through practical methods to visualize your flooring choices.
Using Sample Boards
One of the most effective ways to visualize your flooring direction is by using sample boards or even loose planks. Obtain a few sample pieces of your chosen wood flooring. You can then place these samples on your floor in different orientations within a room and between adjoining rooms.
Stand back and look at them from various angles, paying attention to how the light hits them and how they create lines across the space.
This hands-on approach is particularly useful when you want to change direction at a doorway. Place a few planks running in one direction in the first room and then place a few more running in the other direction in the adjoining space, meeting at the threshold. This allows you to see the transition point clearly.
You can also observe how the direction affects the perceived size and shape of each room.
For instance, in a living room that leads into a dining room, you can lay samples parallel to the longest wall of the living room. Then, in the dining area, lay samples parallel to the dining table’s length. See how this looks from the doorway and from different vantage points within each room.
This visual test is invaluable for confirming your decision before the actual installation begins, ensuring that the chosen direction aligns with your aesthetic goals.
Remember to try this at different times of the day to see how natural light affects the appearance of the planks. The way the grain catches the light can change significantly, and this visual test will help you understand that impact firsthand. It’s a simple, low-cost method that provides a realistic preview.
Tips for Using Sample Boards
- Multiple Directions: Try at least two different directional layouts for each room or transition area.
- Varying Light Conditions: View the samples in both natural daylight and artificial light at different times of the day.
- Observe from Multiple Angles: Look at the samples from the doorway, from the center of the room, and from seating areas.
- Consider Adjacent Rooms: If changing direction between rooms, place samples in both spaces to see how they relate to each other.
- Mimic Installation: Arrange the samples to simulate how full planks would be laid, including any potential transition strips.
This practical exercise provides a tangible preview, making the decision-making process for Changing Direction of Wood Flooring Between Rooms: Smart Guide much easier and more accurate.
Digital Visualization Tools
In today’s digital age, you don’t always need physical samples to visualize your flooring direction. Many online tools and apps can help you see how different layouts will look in your home. These tools range from simple interactive floor planners to sophisticated augmented reality (AR) apps.
Some flooring manufacturers offer online visualizers on their websites. You can upload a photo of your room and then digitally overlay different flooring options and directional patterns. This gives you a simulated view of the final result.
These tools are great for getting a general idea and comparing multiple looks quickly.
Augmented reality (AR) apps take this a step further. Using your smartphone or tablet, you can stand in your room and see the virtual flooring laid out on your actual floor in real-time. This provides a highly realistic preview of how the planks will look, including their direction.
Some AR apps even allow you to change the direction of the planks with a simple swipe, letting you compare options on the fly.
While digital tools are incredibly helpful, remember they are simulations. The actual appearance of the wood grain, the way light reflects, and the feel of the space can sometimes differ slightly in reality. However, these tools are excellent for narrowing down your choices and eliminating directions that clearly don’t work before you invest in samples or installation.
For example, if you’re considering changing direction at a doorway between your living room and kitchen, you can use an AR app to see how planks running one way in the living room and then turning 90 degrees in the kitchen looks. You can then switch it to see the reverse, or even a diagonal layout, all from the comfort of your home. This technology makes planning your Changing Direction of Wood Flooring Between Rooms: Smart Guide much more accessible.
Popular Visualization Methods
- Manufacturer Websites: Many flooring brands have online tools where you can upload photos and see different flooring options.
- Room Planner Apps: Apps like Homestyler or Planner 5D allow you to design entire rooms and add flooring with various directional options.
- Augmented Reality (AR) Apps: Apps from flooring retailers or independent developers let you see virtual flooring on your actual floor using your device’s camera.
- 3D Rendering Software: For a more professional approach, 3D modeling software can create detailed renderings of your space with specified flooring directions.
These digital aids empower you to experiment with different looks and make informed decisions about your wood flooring direction, ensuring a result you’ll love.
Real-Life Examples and Case Studies
Seeing how others have successfully implemented changes in wood flooring direction can provide valuable inspiration and practical insights. These real-world examples demonstrate the impact of thoughtful design choices. Let’s look at a few scenarios where changing direction enhanced a home’s aesthetic and functionality.
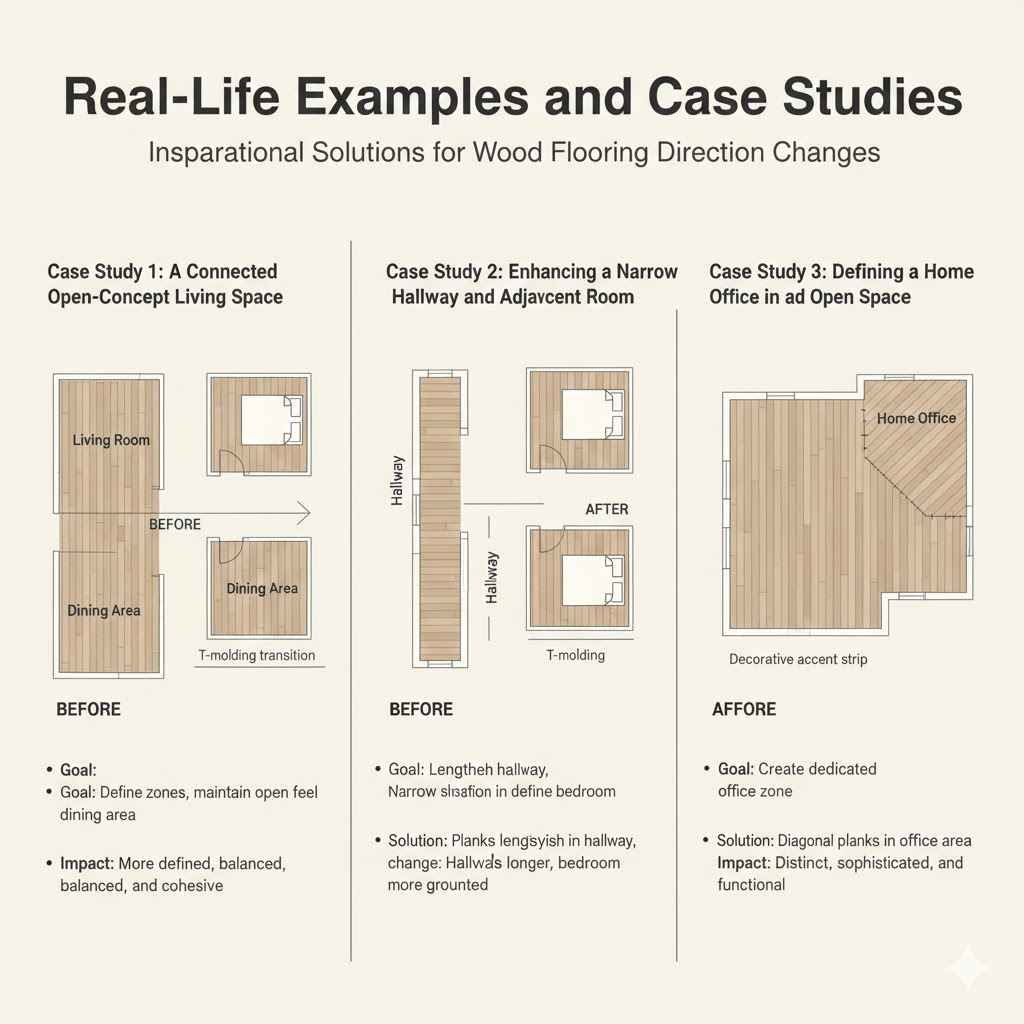
Case Study 1 A Connected Open-Concept Living Space
A homeowner in a suburban area had an open-concept living space that combined a living room, dining area, and kitchen. The original flooring was a single type of laminate throughout, but it ran in a direction that made the long living room feel even more elongated and the dining area feel a bit disconnected. The goal was to visually define the zones while maintaining an open feel and improving the proportions of the space.
The solution involved changing the direction of the wood-look vinyl planks. In the living room, the planks were laid parallel to the longest wall, which ran along the length of the room, making it feel more balanced. The homeowner wanted the dining area to feel like a distinct space for entertaining, so the planks in that zone were turned 90 degrees to run parallel to the dining table.
This created a subtle visual separation between the living and dining areas without using any physical barriers. A clean T-molding transition was installed at the doorway between the two zones.
The result was a more defined yet cohesive open-plan area. The living room felt more spacious and less like a hallway, while the dining area gained a sense of purpose and focus. The change in direction added visual interest and demonstrated how strategic flooring layout can significantly impact the perception and functionality of a home.
The homeowner reported that guests frequently complimented the flow and the sophisticated look of the flooring.
Case Study 2 Enhancing a Narrow Hallway and Adjacent Room
In a historic row house, a narrow hallway led to a bedroom. The original flooring ran perpendicular to the hallway, making the already tight space feel even shorter and more boxed in. The homeowner wanted to create a sense of flow and make the hallway feel longer and more welcoming.
The decision was made to lay the new engineered hardwood flooring with planks running lengthwise down the hallway, parallel to its longest dimension. This immediately made the hallway appear longer and more expansive. When the planks entered the bedroom, the direction was changed by 90 degrees to run parallel to the longest wall of the bedroom itself, which was opposite the hallway entrance.
This created a clear visual cue for entering the more private space.
The transition at the doorway was a simple, well-fitted T-molding. The effect was dramatic. The hallway felt significantly longer and brighter, drawing the eye towards the bedroom.
The bedroom, now with planks oriented to its longest dimension, felt more grounded and proportional. This example shows how a simple change in direction can transform the perceived dimensions of both circulation spaces and destination rooms, making the entire layout feel more intuitive and pleasing.
Case Study 3 Defining a Home Office in an Open Space
A homeowner wanted to create a dedicated home office within a larger open living area without building walls. The primary flooring in the open space ran in one direction, following the main flow from the entryway. To clearly demarcate the office zone, a different flooring direction was chosen for this specific area.
The office space was located in a corner of the larger room. The main flooring ran parallel to the primary wall of the open area. For the home office, the planks were laid at a 45-degree angle to the main flooring direction.
This diagonal orientation created a visually distinct area that felt separate, even though it was part of the larger open space. A decorative accent strip was used to mark the boundary between the main flooring and the angled office flooring.
The diagonal pattern added a unique design element and successfully defined the home office zone. It provided a sophisticated look without sacrificing the open feel of the main living area. The homeowner found that this subtle change in direction helped establish a clear boundary, mentally separating work from leisure time.
This illustrates how a more creative directional change can serve both aesthetic and functional purposes.
Frequently Asked Questions
Question: Should wood flooring direction always follow the longest wall
Answer: Not always, but it’s a common and often effective rule of thumb. Laying planks parallel to the longest wall can make a room feel longer and more spacious. However, consider light sources, traffic flow, and how the room connects to adjacent spaces, as these factors might suggest a different direction for the best visual outcome.
Question: How do I change wood flooring direction at a doorway
Answer: You typically use a transition strip, like a T-molding or a reducer, to bridge the gap where the planks from one direction meet the planks from another. The planks on either side are cut to fit neatly against the transition strip, which is secured to the subfloor. This creates a clean and safe boundary between the two flooring directions.
Question: Can I change direction at a diagonal
Answer: Yes, you can lay wood flooring at a diagonal, often at a 45-degree angle. This adds a unique visual flair and can make spaces feel wider. However, it’s more complex to install, requires more cuts, and generates more waste.
It’s best suited for defining specific zones or for aesthetic impact rather than for continuous flow.
Question: Does wood flooring direction affect room size perception
Answer: Yes, it significantly affects perception. Laying planks parallel to the longest wall can make a room seem longer. Laying them perpendicular to the longest wall or angled across the room can make a room appear wider.
Consistent direction across multiple rooms can make the entire area feel larger.
Question: How much extra flooring do I need if I change direction
Answer: Changing direction, especially at diagonals, generally requires more flooring due to increased cuts and waste. For a simple 90-degree change at doorways, you might need an extra 5-10% of material. For diagonal installations, you could need 15-20% or more, depending on the room’s complexity.
Summary
Making the choice for wood flooring direction between rooms is about balancing aesthetics with practicality. We explored how plank orientation impacts space perception, light reflection, and area definition. Key rules of thumb suggest laying planks parallel to the longest wall or towards light sources, but context is crucial.
Understanding how transitions work and when to maintain consistency versus when to change direction provides a clear path forward. Utilize sample boards and digital tools to visualize your options before installation.