DIY Kitchen Drawer Dividers: Easy Organization Tips
In the realm of home organization, the integration of DIY kitchen drawer dividers represents a strategic approach to maximizing spatial efficiency and enhancing functionality within culinary spaces. Utilizing modular design principles, these dividers facilitate customized compartmentalization, enabling seamless access to utensils and tools. Furthermore, the incorporation of sustainable materials in DIY projects aligns with contemporary eco-friendly practices while encouraging personal creativity.
Adopting effective storage solutions is imperative for optimizing workflow in the kitchen. Dive deeper into the transformative potential of DIY kitchen drawer dividers and discover innovative techniques to elevate your kitchen’s organization game.
Transform Your Space With DIY Kitchen Drawer Dividers
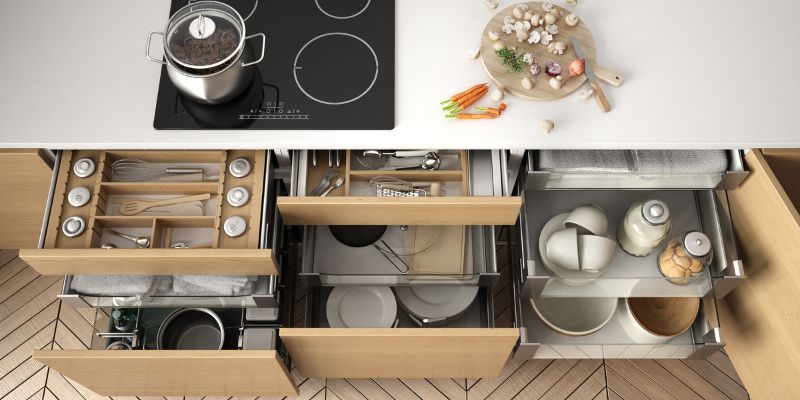
If your kitchen drawers are cluttered and disorganized, DIY kitchen drawer dividers offer an effective solution to enhance both functionality and aesthetics. With a variety of materials and designs to choose from, creating custom dividers allows for a tailored approach to organizing utensils, cutlery, and other kitchen items. This guide provides insights into the benefits of implementing DIY drawer dividers and step-by-step instructions to transform your kitchen storage into a streamlined, efficient space. Discover how easy it is to elevate your kitchen’s organization!
Understanding the Importance of Kitchen Drawer Organization
Benefits of an organized kitchen. Impact on cooking efficiency and accessibility.
Have you ever reached for a spatula and pulled out a whole avalanche of cooking utensils instead? That’s where kitchen drawer organization swoops in to save the day! An organized kitchen helps you find what you need quickly, making cooking a breeze. No one wants to play hide and seek with their measuring cups!
With everything in its place, you can cook like a pro in no time.
| Benefits of Organization | Impact on Cooking |
|---|---|
| Less Stress: A tidy space means less chaos. | Faster Cooking: Find utensils quickly. |
| More Space: Utilize your drawers well. | Better Creativity: Experiment with new recipes! |
So, grab those DIY kitchen drawer dividers and transform your kitchen from messy to marvelous!
Types of DIY Kitchen Drawer Dividers
Adjustable vs. fixed dividers. Materials to consider: wood, plastic, metal.
Choosing between adjustable and fixed dividers can feel like picking a favorite dessert—tough but fun! Adjustable dividers offer flexibility, allowing you to change sizes for all your spoons, forks, and secret snack stash. Fixed dividers, on the other hand, are sturdy and keep everything in its assigned space, so no more rogue spatulas!
| Type | Pros | Cons |
|---|---|---|
| Adjustable | Flexible, customizable | May wobble if not secured |
| Fixed | Sturdy, organized | Less flexible |
Now, let’s talk materials! Wood looks great and smells nice, plastic is lightweight and colorful, while metal is as tough as superhero armor. Pick what suits your style and watch those drawers transform!
Essential Tools and Materials for Creating Drawer Dividers
List of tools required for DIY projects. Recommended materials and their pros and cons.
Want to make your kitchen drawers neater? You’ll need some handy tools and materials! First up, grab a measuring tape—no more wild guesses! Next, a utility knife makes cutting easy.
A ruler ensures straight lines, while a drill is perfect for assembly. Don’t forget glue—super sticky is the way to go! Here’s a quick look at materials:
| Material | Pros | Cons |
|---|---|---|
| Wood | Durable, looks nice | Can be heavy |
| Cardboard | Light, easy to cut | Not very sturdy |
| Plastic | Waterproof, lightweight | Can bend or break |
Pick your favorite, and let your creativity shine!
Who knew organizing could be this fun?
Step-by-Step Guide to Building Your Own Drawer Dividers
Measuring your drawers accurately. Cutting materials to size. Assembly techniques.
First, grab a measuring tape and check your drawer’s width and length. Remember, a tight fit means no wobbly dividers! Write down the numbers—better safe than sorry!
Next, pick your material; wood is a classic, but cardboard is cheaper and can be quite snazzy if you color it. Cut each piece correctly according to your measurements, and keep your fingers safe; no one wants a band-aid fashion statement!
| Step | Action |
|---|---|
| 1 | Measure your drawers |
| 2 | Choose the material |
| 3 | Cut to size |
Finally, it’s assembly time! Use wood glue or small nails for the wooden ones, and feel free to channel your inner carpenter.
Line them up, stick them in, and soon you’ll have the fanciest drawer in town—perfect for stashing those sneaky forks and spoons!
Creative and Functional Design Ideas for Drawer Dividers
Customize designs for specific utensils and tools. Incorporating multifunctional features.
Designing your kitchen drawer dividers can be fun and useful. Customizing them for your utensils helps keep everything tidy. For example:
- Make separate sections for spoons, forks, and knives.
- Add a small space for measuring cups and spoons.
- Include a spot for cooking gadgets like peelers or whisks.
Think multifunctional! Some dividers can slide out to make grabbing items easier.
Others can have stacked layers to save space. With these design ideas, every tool will have its place!
Common Mistakes to Avoid When Making DIY Drawer Dividers
Overestimating drawer dimensions. Choosing the wrong materials for the intended use.
Making DIY drawer dividers can be fun, but some mistakes can ruin your project. One common error is overestimating drawer dimensions. Measure your drawers carefully, and double-check before cutting materials.
Another mistake is choosing the wrong materials. For example, using flimsy wood won’t hold up well. Instead, opt for sturdy materials that fit your needs.
- Measure twice, cut once.
- Consider the weight of items inside.
- Pick durable materials for better support.
Maintenance Tips for Long-lasting Drawer Dividers
Cleaning and care for different materials. When to replace or upgrade your dividers.
Keeping your kitchen drawer dividers in top shape is simple and fun! For plastic dividers, a quick wipe with soapy water will get rid of crumbs and spills. Wooden ones appreciate a gentle dusting and occasional oil treatment—think of it as a spa day for your drawers!
If you notice cracks or warping, it’s time for an upgrade. Old, worn dividers can make you feel like you’re searching for treasure in a junkyard. Check out the quick tips below!
| Material | Cleaning Method | Upgrade Time |
|---|---|---|
| Plastic | Soap and water | When scratched |
| Wood | Dust and oil | When cracked |
| Metal | Wipe with a cloth | When rusted |
Real-life Case Studies: Successful DIY Kitchen Drawer Divider Projects
Examples of different styles and needs. User testimonials and experiences.
Many people have taken on the challenge of making their own kitchen drawer dividers. One user, Sarah, shared how she transformed her chaotic junk drawer into a perfectly organized space with simple cardboard dividers. Another fan, Mike, crafted dividers from scrap wood, customizing them to fit his utensils.
Both reported not just finding things easily, but also enjoying the satisfaction of a job well done. Here’s a quick look at their projects:
| Name | Materials Used | Result |
|---|---|---|
| Sarah | Cardboard | Organized junk drawer |
| Mike | Scrap wood | Custom utensil divider |
Feeling inspired yet? If they can do it, so can you! Plus, you’ll get a chance to show off your fancy new dividers, which is way cooler than binge-watching another show, right?
FAQs about DIY Kitchen Drawer Dividers
Common questions and expert answers. Troubleshooting tips for DIY enthusiasts.
Many people have questions about making diy kitchen drawer dividers. Here are some common ones:
- What materials should I use? Plywood or MDF work well.
- How do I measure my drawers?Use a measuring tape for accuracy.
- What tools do I need? A saw, screws, and a drill are essential.
If you face issues, here are some tips:
- For uneven dividers, double-check your measurements.
- If they don’t fit, sand down the edges gently.
- Secure each piece tightly to avoid movement.
These FAQs and tips can help make your DIY project easier and more fun!
Conclusion
In conclusion, DIY kitchen drawer dividers not only enhance organization but also provide a personalized touch to your kitchen space. By utilizing simple materials and creative designs, you can maximize functionality and streamline your cooking and meal prep. Embrace the satisfaction of a tidy kitchen with these easy-to-make dividers, transforming clutter into order with your own hands.
FAQs
What Materials Are Best Suited For DIY Kitchen Drawer Dividers?
The best materials for DIY kitchen drawer dividers include wood, which offers durability and a classic look, and acrylic for a modern, sleek option. Foam board is a lightweight and inexpensive choice that can be easily cut to size. Additionally, PVC or plastic containers provide a functional and easily cleanable solution. Ultimately, the choice of material depends on your aesthetic preference, budget, and the specific needs of your drawers.
How Can I Measure My Kitchen Drawers To Create Custom Dividers?
To measure your kitchen drawers for custom dividers, start by measuring the interior length and width of the drawer using a tape measure. Next, determine the height of the drawer to ensure that the dividers fit properly without being too tall or too short. It’s helpful to measure the depth of the drawer as well, especially if you want to create multi-level dividers. Finally, sketch out your measurements and desired divider layout to guide your customization.
What Are Some Creative Designs For DIY Kitchen Drawer Dividers That Maximize Storage?
Creative designs for DIY kitchen drawer dividers include using repurposed materials like cardboard or wood to create custom-sized compartments for utensils and cutlery. Consider using acrylic or clear plastic containers to easily see the contents while keeping everything organized. Additionally, magnetic strips can be attached to the drawer sides for holding metal spice jars or tools, optimizing vertical space. Lastly, adjustable dividers made from bamboo or other sustainable materials can be constructed to fit various drawer sizes and can be rearranged as needed.
How Do I Securely Attach DIY Drawer Dividers Without Damaging The Drawer Itself?
To securely attach DIY drawer dividers without damaging the drawer, consider using removable adhesive strips or double-sided tape, which can provide a strong hold yet allow for easy removal. Another option is to use tension rods that fit snugly within the drawer, creating a divider without any adhesive or hardware. If you prefer a more permanent solution, you can use wood glue on a small piece of non-stick mat to prevent damage. Additionally, choose lightweight materials for the dividers to minimize any potential stress on the drawer itself.
Are There Any Tips For Organizing Kitchen Utensils And Gadgets Effectively Using Dividers?
Yes, using dividers can greatly improve the organization of kitchen utensils and gadgets. Start by categorizing your items into groups, such as cooking tools, baking utensils, and serving gadgets. Use adjustable or stackable dividers to create customizable sections in drawers, ensuring everything is easily accessible. Additionally, consider labeling each section for quicker identification and a more organized look.