DIY Wood Filler Stains Perfectly With Sawdust
Many folks love working with wood. Sometimes, you hit a snag. You might have small holes or cracks you need to fix.
A common trick is using your own sawdust to make wood filler. But getting this DIY wood filler to stain perfectly can feel tricky. You worry it will look different from the rest of your wood.
Don’t fret! We’ve got a super simple way to make your own wood filler that blends right in. Let’s get your project looking smooth and professional with this easy fix.
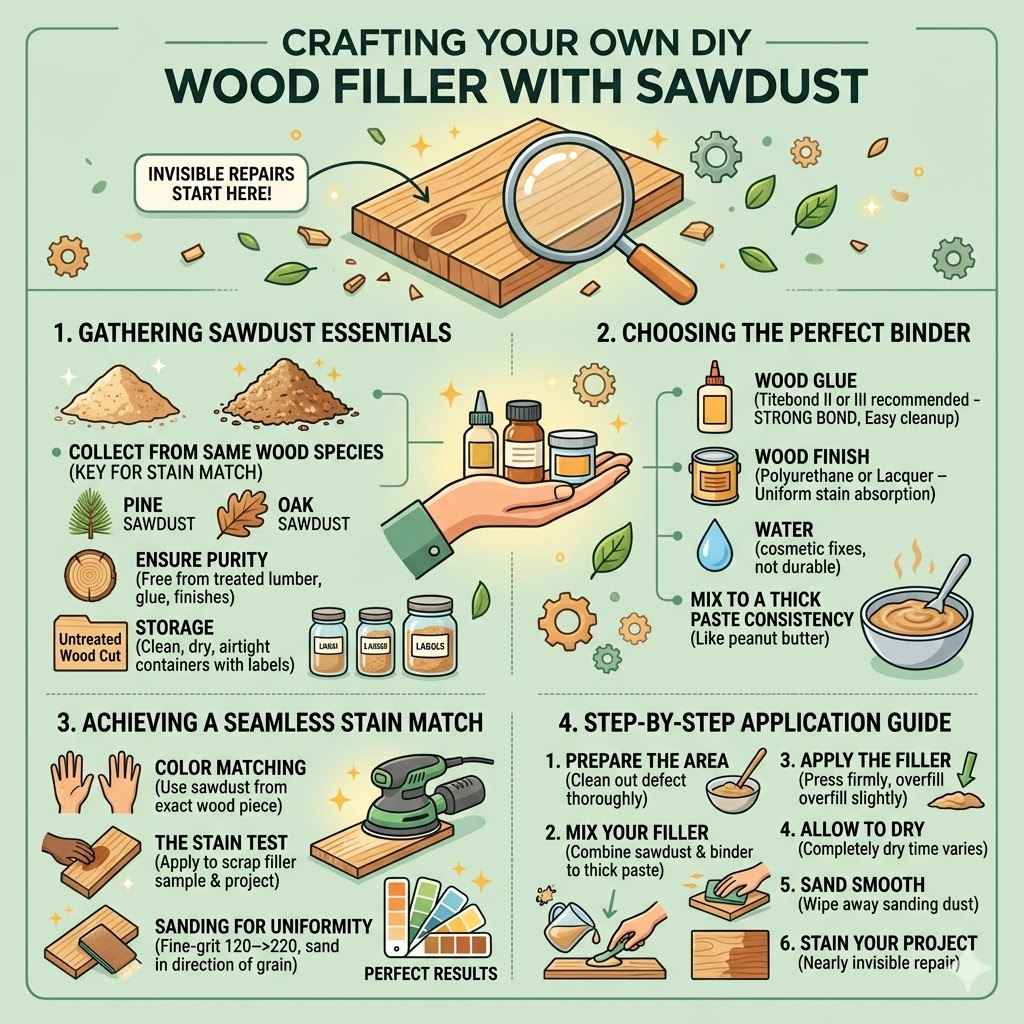
Crafting Your Own DIY Wood Filler With Sawdust
Making your own wood filler from sawdust is a smart way to save money and reuse materials. This method is popular because it’s cost-effective and uses readily available scraps from your woodworking projects. The main challenge for beginners is often achieving a filler that matches the wood’s color and takes stain evenly.
Many store-bought fillers can look out of place, especially on stained projects. This guide will show you how to create a blend that looks like part of the wood itself, making your repairs nearly invisible.
Gathering Your Sawdust Essentials
The first step to creating a great filler is collecting the right kind of sawdust. Not all sawdust is created equal for this purpose. You want sawdust that comes from the same type of wood you are repairing.
This is the most important step for a perfect stain match. If you mix hardwoods and softwoods, the color and grain will be off. Also, make sure your sawdust is clean.
Avoid dust from treated lumber or any wood that has glue or finishes on it. This will affect the appearance and how the filler accepts stain.
Choosing The Right Wood Species
Selecting sawdust from the same wood species you’re repairing is key to a seamless finish. Different wood types have distinct colors and grain patterns. For example, oak sawdust will look very different from pine sawdust.
If you’re working on a pine project, use pine sawdust. If it’s a maple table, collect maple sawdust. This ensures your DIY wood filler with sawdust that stains perfectly will blend in visually.
This simple step makes a huge difference in the final look of your project.
Ensuring Sawdust Purity
It’s vital that your sawdust is pure and free from contaminants. Sawdust that contains glue, paint, varnish, or oils from power tools will not take stain well. It might also create unwanted color variations.
Always sweep up sawdust from untreated, unfinished wood. If you’re unsure, it’s better to get fresh sawdust from a clean cut. A clean batch of sawdust is the foundation for a filler that looks natural and accepts stain uniformly.
Storage of Sawdust
Store your sawdust in a clean, dry container. Moisture can cause mold or clumping, making it unusable. Airtight containers are best to keep it fresh and prevent contamination.
Label your containers with the wood species. This will save you time later when you need a specific type of sawdust for repairs. Having a good supply of clean, sorted sawdust ready makes DIY repairs much easier and more effective.
The Perfect Binder For Your Filler
Once you have your clean sawdust, you need a binder to turn it into a workable paste. The binder not only holds the sawdust together but also influences how the filler accepts stain. Several options work well, and each has slight differences in how they interact with wood and finishes.
Choosing the right binder is crucial for creating a DIY wood filler with sawdust that stains perfectly and holds up over time.
Wood Glue As A Binder
Wood glue is a fantastic and common choice for binding sawdust. It creates a strong bond that is similar to the wood itself. Use a good quality wood glue, like Titebond II or III.
Mix the sawdust with just enough glue to form a thick paste. It should be firm enough to hold its shape but spreadable. This mixture dries hard and can be sanded smooth.
Wood glue is also water-based, making cleanup easy. For projects that require a strong, durable filler, wood glue is an excellent binder.
Using Wood Finish As A Binder
Another option is to use a wood finish, like polyurethane or lacquer, as your binder. This can be particularly useful if you plan to stain your project immediately after filling. The solvent in the finish can help the filler accept the stain more uniformly with the surrounding wood.
Mix your sawdust with a small amount of your chosen finish until you achieve a paste consistency. This method can sometimes lead to a slightly more flexible filler once dried. It’s a great way to ensure a cohesive look with your final stain application.
Water-Based Pastes For Easy Cleanup
For quick, easy repairs and simple cleanup, you can also create a paste with water. While not as strong as glue or finish binders, this can work for small cosmetic fixes. Mix sawdust with a bit of water to form a thick paste.
This is a temporary fix and may not hold up to heavy wear. It’s best for areas that won’t see much stress. This is the simplest method and good for minor touch-ups where durability isn’t the top priority.
Achieving A Seamless Stain Match
The ultimate goal is for your repaired area to be indistinguishable from the rest of the wood. This means your DIY wood filler with sawdust that stains perfectly must match the color and grain of the surrounding material. This is where precision and a little testing come into play.
If you get this part right, your repairs will truly disappear.
Color Matching Sawdust
The best way to match color is to use sawdust from the exact same wood species and, if possible, from the same piece of lumber. Even within the same species, wood can have slight variations in color. If you’re repairing an older piece, the wood may have darkened with age.
You might need to find sawdust from a similar aged piece or slightly adjust the binder color. For instance, a tiny bit of a complementary colored stain mixed into your filler can help achieve a more exact match. Always test your mix on a scrap piece first.
The Stain Test
Before applying the filler to your project, always perform a stain test. Mix a small batch of your filler and let it dry completely. Then, apply the stain you plan to use on your main project to a small piece of scrap wood and to your dried filler sample.
Let them both dry. Compare the color. If the filler looks too light, you might need to add a bit more pigment to your next batch or apply another coat of stain to the repaired area.
If it’s too dark, use lighter sawdust or less pigment. This step is non-negotiable for perfect results.
Sanding for Uniformity
Once your filler is completely dry, sand it smooth. Use fine-grit sandpaper, starting with around 120-grit and moving up to 220-grit or finer. Sand in the direction of the wood grain.
The goal is to make the surface of the filler flush with the surrounding wood. Even if the color isn’t perfect initially, proper sanding can help the stain absorb more uniformly. A smooth, level surface is crucial for the stain to look consistent across the repaired area.
Step-By-Step Application Guide
Applying your DIY wood filler is straightforward. Follow these steps to ensure a clean, effective repair that blends beautifully. This process is designed to be easy to follow, even for those new to woodworking.
Prepare The Area
Clean out the crack, hole, or defect thoroughly. Use a brush or a small vacuum to remove all dust and debris. This ensures the filler adheres properly and prevents any foreign particles from affecting the final appearance.
Mix Your Filler
In a small container, combine your clean sawdust with your chosen binder (wood glue, finish, or water). Mix until you achieve a thick paste consistency. It should be firm enough to hold its shape but spreadable.
Aim for a consistency similar to peanut butter.
Apply The Filler
Using a putty knife or a small spatula, press the filler firmly into the defect. Make sure to overfill it slightly, as the filler will likely shrink a little as it dries. Smooth the surface as much as possible, but don’t worry about it being perfectly flush yet.
You’ll sand it later.
Allow To Dry
Let the filler dry completely. Drying time will vary depending on the binder used and the humidity. Wood glue usually takes a few hours, while finishes might dry faster.
Be patient; applying stain to wet filler can ruin the color match.
Sand Smooth
Once dry, sand the filled area smooth using fine-grit sandpaper. Start with 120-grit and move up to 220-grit. Sand in the direction of the wood grain.
Ensure the surface is flush with the surrounding wood. Wipe away all sanding dust.
Stain Your Project
Apply your stain according to the manufacturer’s instructions. You’ll want to have already tested your stain on a scrap piece with the filler to ensure a good match. Your DIY wood filler with sawdust that stains perfectly should now be nearly invisible.
Troubleshooting Common Filler Issues
Even with the best intentions, sometimes your DIY wood filler might not turn out perfectly the first time. Don’t get discouraged! Most issues are easy to fix with a few adjustments.
Understanding what can go wrong helps you prevent problems and achieve the beautiful, seamless finish you’re aiming for with your DIY wood filler with sawdust that stains perfectly.
Filler Shrinks Too Much
Shrinkage is a common issue with DIY fillers. It happens because the binder dries and pulls the sawdust particles together. If your filler shrinks significantly, it will leave a noticeable indentation.
Cause
Using too much binder or not packing the filler tightly enough into the defect are the main reasons for excessive shrinkage. Some binders, like water-based ones, shrink more than others.
Solution
To combat shrinkage, you can mix your filler a bit thicker, using less binder. Also, try to overfill the defect slightly when applying. If shrinkage still occurs, you may need to apply a second thin layer of filler after the first has dried.
Ensure you pack the second layer firmly. For larger voids, consider using a commercial wood filler in addition to your sawdust mix, or a combination approach.
Filler Doesn’t Take Stain Evenly
This is perhaps the most frustrating problem. You want your repair to disappear, but the stained area stands out like a sore thumb.
Cause
Uneven stain absorption can be caused by using different types of wood sawdust, contamination in the sawdust, or using a binder that seals the sawdust too much. Also, if the filler wasn’t sanded perfectly smooth, the stain can catch on rough spots.
Solution
Always use sawdust from the same wood species. Ensure your sawdust is clean. If you used a finish as a binder, make sure it’s a type that allows for some stain penetration.
Thorough sanding to a smooth finish is critical. If the stain still doesn’t match, you might be able to lightly re-stain the repaired area or use a tinted topcoat to blend it in. Testing on a scrap is your best defense here.
Filler Cracks Or Falls Out
This usually indicates a problem with the binder or the application.
Cause
Using too little binder, or a binder that doesn’t create a strong bond, can lead to the filler cracking or becoming loose. If the defect is too deep or wide, a simple sawdust filler might not have enough structural integrity.
Solution
Ensure you are using enough binder to create a firm paste. Wood glue is generally the strongest binder. For deeper or wider repairs, you might need to build up the filler in layers, allowing each layer to dry.
For very structural repairs, a commercial product might be a better choice. Also, ensure the wood around the defect is stable and not prone to movement.
When To Use Store-Bought Filler
While making your own DIY wood filler with sawdust that stains perfectly is a fantastic option for many projects, there are times when a store-bought wood filler might be a better choice. Knowing the limitations of DIY fillers helps you select the right product for the job and ensures the best possible outcome for your woodworking projects.
Structural Repairs
For very large holes, deep gouges, or areas that will bear significant weight or stress, store-bought fillers are generally formulated for superior strength and durability. They often contain additives that provide better structural integrity than a simple sawdust and binder mix. For instance, if you’re repairing a load-bearing furniture leg, a commercial product designed for strength would be safer.
Complex Finishes
If your project involves a very intricate or multi-step finishing process, a commercially produced filler might offer more predictable results. Some specialty fillers are designed to work with specific types of stains, varnishes, or paints, and are tested for compatibility. Trying to match a unique stain color on a DIY filler can sometimes lead to an undesirable or inconsistent finish.
Time Constraints
When you’re on a tight deadline, the convenience of store-bought filler can be a lifesaver. You can buy it, use it, and often sand and finish it much faster than preparing, applying, and waiting for a DIY filler to dry. If you need to complete a project quickly, especially for a client or an event, pre-made fillers save valuable time.
Wood That’s Hard To Match
Some exotic hardwoods or very light-colored woods can be extremely difficult to match with sawdust. In these cases, a store-bought filler that comes in various colors or is known to accept stain very uniformly might be a more practical solution. Trying to find perfect sawdust color matches for rare woods is often not feasible.
Protecting Your Project With Clear Coats
Once your filler is applied, sanded, and stained, the final step is applying a protective finish. This finish not only protects the wood and your repair but also helps to unify the overall look of your project. A good clear coat can make a significant difference in how the stained DIY wood filler with sawdust that stains perfectly appears in the long run.
Types of Clear Coats
Common clear coats include polyurethane, lacquer, and varnish. Polyurethane offers excellent durability and water resistance, making it a good choice for tabletops and high-traffic items. Lacquer dries very quickly and is often used in professional settings for its smooth finish.
Varnish offers good protection and can come in various sheens, from matte to high gloss.
Application Process
Apply your chosen clear coat in thin, even layers. Always follow the manufacturer’s instructions regarding application methods, drying times, and the number of coats recommended. Sand lightly between coats with very fine-grit sandpaper (320-grit or higher) to ensure a smooth, professional finish.
This sanding step removes any dust nibs and creates a better surface for the next coat.
Blending The Finish
When you apply the clear coat over the repaired area, ensure you extend the finish slightly beyond the repaired spot. This helps to blend the repaired area seamlessly with the surrounding wood. A uniform finish across the entire piece will make the filler virtually invisible, contributing to the success of your DIY wood filler with sawdust that stains perfectly.

Frequently Asked Questions
Question: How do I get my sawdust filler to match the exact color of my wood?
Answer: The best way is to use sawdust from the same type of wood you are repairing. If your wood has aged and darkened, you might need to test a small amount of colored stain mixed into your filler to get the right shade. Always test your filler and stain on a scrap piece first.
Question: Can I use any kind of sawdust for my wood filler?
Answer: Ideally, you should use sawdust from the same wood species you are repairing. Also, ensure the sawdust is clean and free from any glue, paint, or finishes. Sawdust from treated wood should be avoided.
Question: How long does DIY wood filler with sawdust take to dry?
Answer: Drying time varies depending on the binder used. Wood glue might take a few hours. Finishes might dry faster.
Water-based mixtures dry relatively quickly. Always ensure it’s completely dry before sanding or staining.
Question: Will my sawdust filler be as strong as store-bought filler?
Answer: For minor repairs and cosmetic fixes, it can be very strong, especially when using wood glue. For areas that need to bear significant weight or stress, a commercially made filler might offer better structural integrity.
Question: Can I stain over my sawdust filler right after applying it?
Answer: No, it’s crucial to let the filler dry completely before sanding and staining. Staining wet filler will likely result in an uneven color and poor adhesion. Patience is key for a good match.
Summary
Creating your own DIY wood filler with sawdust is a rewarding skill. By selecting the right sawdust and binder, and testing your stain match carefully, you can achieve repairs that are virtually invisible. This method saves money and gives your projects a professional touch.
Enjoy making your wood projects look perfect!