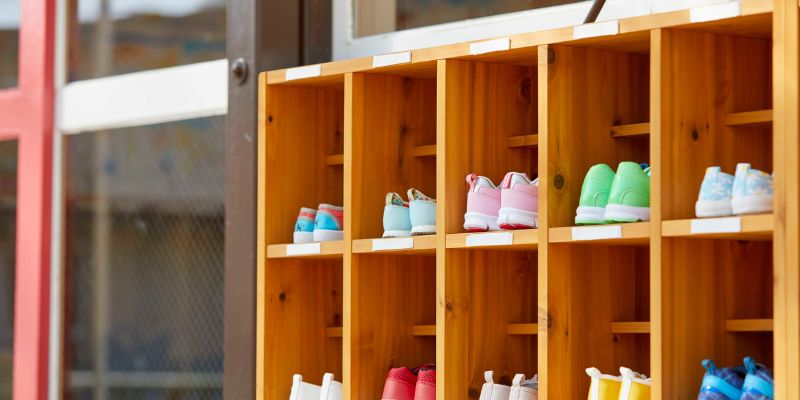
DIY Wooden Shoe Rack: Easy Steps To Build Your Own
In the realm of modular storage solutions, the DIY wooden shoe rack emerges as a testament to both functionality and craftsmanship. With an emphasis on sustainable materials and creative design, this project invites enthusiasts to explore advanced woodworking techniques—from precise joinery to the application of finishes that enhance durability and aesthetics. As living spaces evolve, the need for efficient organization becomes paramount, making custom-built furniture increasingly relevant. Embracing the art of do-it-yourself woodworking not only cultivates practical skills but also allows for personalization that mass-produced racks simply cannot offer.
Dive into the intricacies of constructing your own wooden shoe rack to elevate your space.
Create Your Own DIY Wooden Shoe Rack: A Step-By-Step Guide
This article delves into the world of DIY wooden shoe racks, offering a practical and stylish solution for maintaining an organized entryway. Readers will discover a range of creative designs, step-by-step instructions, and essential tips for crafting their own shoe storage unit. From choosing the right materials to finishing touches, the guide caters to various skill levels, ensuring a rewarding project for everyone. Embrace the art of DIY and transform your space with a custom wooden shoe rack that meets your needs.
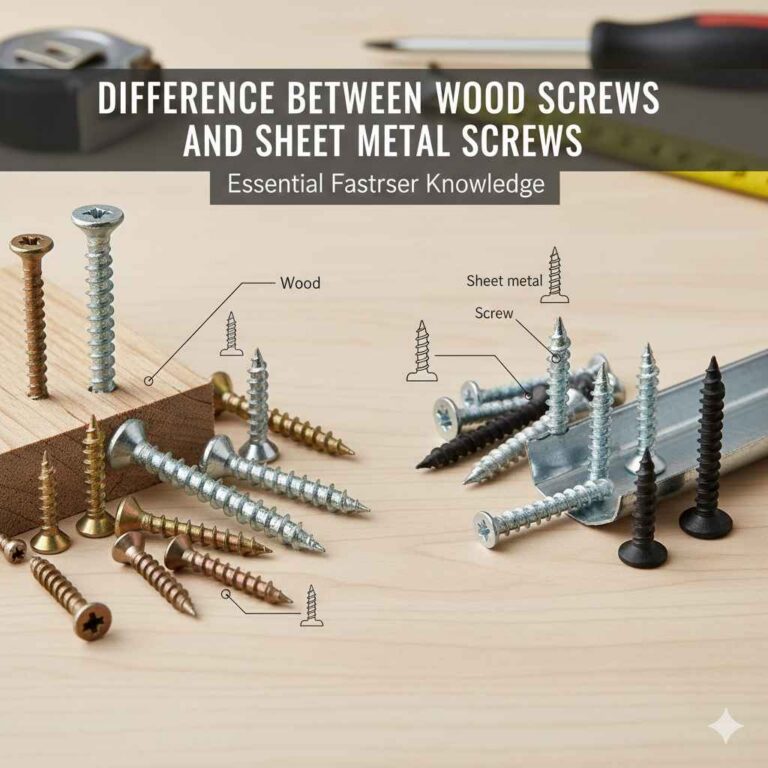
Materials Needed for Your DIY Wooden Shoe Rack
List of essential tools and materials. Types of wood recommended for durability.
Before you start building your wooden shoe rack, gather these essential materials. You’ll need tools like a saw, hammer, and measuring tape. Don’t forget wood glue! For the wood, choose options like pine or oak.
They’re tough and can handle your shoe collection, which may resemble a fashion runway! Here’s a quick overview:
| Tool/Material | Purpose |
|---|---|
| Saw | Cuts wood to size |
| Hammer | Secures wooden pieces |
| Measuring Tape | Ensures correct dimensions |
| Pine or Oak | Strong wood for durability |
With these tools and materials, you’re on your way to making a shoe rack that will stand strong against even the wildest shoe parties!
Step-by-Step Guide to Building a Wooden Shoe Rack
Detailed instructions on cutting the wood. Assembly process: from base to finishing touches.
Begin by cutting wood for the shoe rack. Measure the desired length and height. Use a saw to cut two side pieces, a top piece, and several shelves. Make sure each cut is straight and smooth.
Next, assemble the wooden pieces:
- Attach the side pieces to the base for support.
- Secure the top piece on top of the sides.
- Evenly space the shelves and attach them securely.
Finish by sanding the edges to avoid splinters, then apply a wood finish for protection and style. Your wooden shoe rack is now ready to use!
Design Ideas for Customizing Your Shoe Rack
Various styles (modern, rustic, etc.). Color and finish options to match your decor.
When customizing your shoe rack, think about different styles. You can choose from:
- Modern: Sleek lines and minimalistic designs fit well in contemporary spaces.
- Rustic: Natural wood finishes bring a cozy and warm feeling.
- Classic: Timeless looks that never go out of style.
Next, consider colors and finishes. A dark stain can make a bold statement, while light paints create a fresh look. Match the shoe rack to your room using:
- Soft pastels for a gentle touch
- Bold colors to stand out
- Natural wood for a warm vibe
These ideas help your shoe rack blend beautifully with your decor.
Space-Saving Techniques for Smaller Areas
Tips for compact shoe rack designs. Using vertical space and hidden storage.
Maximize your space with smart shoe rack designs. Use vertical space by adding shelves or stacking boxes. This keeps shoes off the floor and looks tidy.
Hidden storage is also useful. Consider benches with compartments or cabinets with doors to hide your shoes away.
- Add shelves above doorways for more storage.
- Choose racks that can fit under beds.
- Use clear bins for easy visibility.
Maintenance Tips for Your Wooden Shoe Rack
Best practices for cleaning and maintaining wood. Tips for prolonging the life of your rack.
Keeping your wooden shoe rack in top shape is easier than you think! Start by dusting it regularly to avoid a build-up of dirt. Use a soft cloth and a little bit of water, but no superheroes here—avoid soaking it, or you might have a water-damaged drama on your hands!
To prolong its life, keep it away from damp areas like the bathroom.
Too much humidity can turn your sturdy rack into a wobbly mess. Lastly, treat it to a little wood polish every now and then; it deserves a spa day too! Here are some quick tips:
| Tip | Description |
|---|---|
| Dust Regularly | Use a soft cloth to keep it clean. |
| Avoid Water | Don’t soak it—just a little damp cloth will do! |
| Keep Dry | Store it in a dry place, away from humidity. |
| Use Wood Polish | A little polish gives it shine and protection. |
Follow these tips, and your shoe rack will stand tall like a wooden superhero! 🦸♂️
Common Mistakes to Avoid When Building Your Shoe Rack
Missteps in measuring and cutting. Tips on choosing the right design for your space.
Building a shoe rack can be fun, but mistakes happen more often than you think! One common error is miscalculating measurements. Always double-check before cutting. Remember, a shoe rack should be your friend, not a jigsaw puzzle piece!
Choosing the right design is crucial too. A tall rack might look great, but will it fit in your cozy hallway? Consider keeping it low for easy access or adding some quirky shelves!
Here’s a quick table to help you avoid those shoe rack blunders:
| Mistake | Tip |
|---|---|
| Wrong measurements | Measure twice, cut once. |
| Picky design | Choose what fits your space. |
With a little thought and a sprinkle of humor, your DIY wooden shoe rack can become a stylish spot for all your kicks!
DIY Shoe Rack Inspirations from Others
Examples of unique shoe rack designs online. Customer photos and reviews for realworld inspiration.
Looking for ideas? You’ll find plenty of creative shoe racks online! Some folks turn old pallets into rustic masterpieces, while others stack shoes like they’re building a shoe skyscraper.
There’s even a design that uses old crates for a funky look. Don’t forget to check customer photos and reviews. They share real-life success stories, and sometimes their shoes look happier than they do!
| Design Idea | Customer Review |
|---|---|
| Rustic Pallet Rack | “I love the vintage look!My shoes are finally off the floor!” |
| Crate Stack | “Who knew crates could be so chic? My guests are impressed!” |
| Shoe Skyscraper | “It’s like my shoes are in a shoe hotel.They love it!” |
Frequently Asked Questions
Answers to common queries about DIY shoe racks. Troubleshooting tips for common issues.
Got questions about building a DIY wooden shoe rack? You’re not alone! Many people wonder about the best materials or how to make it look snazzy.
If you run into issues, like wobbly shelves, don’t fret! A little wood glue can be your best friend. Here’s a quick table to clear up common queries:
| Question | Answer |
|---|---|
| What wood should I use? | Pine is light and cheap, while oak is strong and shiny! |
| How do I keep it sturdy? | Screws are your trusty pals—use them! |
| What if it looks crooked? | Check that level! A little tweaking can fix it. |
With these tips, you’re on your way to becoming a shoe rack superstar!
Where to Buy Materials for Your Project
Best local stores and online retailers. Recommendations for ecofriendly materials.
Finding materials for your DIY wooden shoe rack is easy. Check out local stores like hardware shops and home improvement centers. They usually have everything you need. Online retailers like Amazon and Etsy also offer great options.
For eco-friendly materials, look for:
- Reclaimed wood – gives a rustic touch
- Sustainable bamboo – strong and stylish
- Low-VOC finishes – safe for your home
This way, you can build a shoe rack that is both beautiful and kind to the planet.
Conclusion
In conclusion, a DIY wooden shoe rack is a practical and stylish solution for organizing your footwear. Not only does it help declutter your space, but it also allows you to customize the design to match your home decor. With a few tools and some creativity, you can create a functional piece that enhances your entryway or closet.
Start your project today!
FAQs
What Materials Are Best Suited For Building A DIY Wooden Shoe Rack?
For a DIY wooden shoe rack, durable materials like plywood or solid wood are ideal due to their strength and aesthetic appeal. You can also use reclaimed wood for an eco-friendly option that adds character. Ensure you choose materials that are resistant to moisture if the rack will be placed in a humid area. Fasteners, finishing materials like wood glue, screws, and varnish can enhance the durability and appearance of your shoe rack.
How Can I Customize The Size Of A Wooden Shoe Rack To Fit My Entryway?
To customize the size of a wooden shoe rack for your entryway, first measure the available space, noting the width, depth, and height you desire. Sketch a design that accommodates your measurements, considering the number of shoes you’ll store and any additional features like shelves or seating. Choose a wood type and finish that complements your entryway decor. Finally, use the measurements and design to cut and assemble the wooden pieces, ensuring a snug fit.
What Tools Do I Need To Construct A Sturdy Wooden Shoe Rack At Home?
To construct a sturdy wooden shoe rack at home, you’ll need basic tools such as a saw (hand saw or power saw), a drill with appropriate drill bits, a measuring tape, and a square for accurate angles. Sandpaper or a sander will help smooth the surfaces, while wood glue and screws will provide strong joints. Additionally, a level is essential for ensuring the rack sits evenly. Finally, consider having clamps on hand to hold pieces together while the glue dries.
Are There Specific Designs Or Styles That Work Best For A DIY Wooden Shoe Rack?
Yes, some popular designs for a DIY wooden shoe rack include simple open shelving, tiered stacks, or cubby-style compartments. These styles promote easy access and organization, making them functional and aesthetically pleasing. Utilizing reclaimed wood can also enhance the design while being eco-friendly. Ultimately, the best style depends on your space, personal taste, and the number of shoes you need to store.
How Can I Finish Or Treat The Wood Of My Shoe Rack To Protect It From Moisture And Wear?
To protect your shoe rack from moisture and wear, start by sanding the wood to create a smooth surface. Apply a wood sealer or a water-resistant finish, such as polyurethane or marine varnish, to create a protective barrier. Ensure to apply multiple thin coats, allowing each one to dry thoroughly. Finally, consider using coasters or felt pads under shoes to prevent direct contact and further protection against moisture.