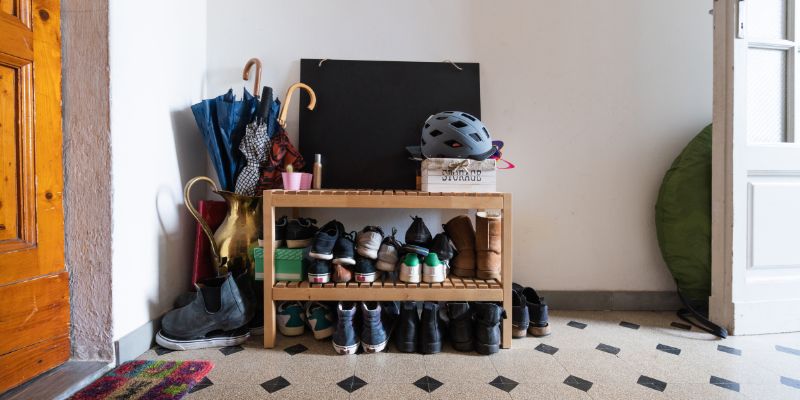
Easy Diy Shoe Rack: Simple Steps For A Stylish Solution
In the realm of home organization, maximizing space efficiency has become a paramount consideration, particularly in urban living environments where square footage is at a premium. An easy DIY shoe rack serves as an innovative solution, offering both functionality and aesthetic appeal. By leveraging basic materials and modular design principles, individuals can craft a personalized storage solution that not only declutters entryways but also showcases footwear collections. Understanding the technical specifications of the required tools and materials is crucial for a successful build.
Dive into the full article to uncover step-by-step processes that make this project a rewarding endeavor.
Create An Easy Diy Shoe Rack For Your Home Storage
This article provides an accessible guide to crafting an easy DIY shoe rack, ideal for maximizing space and organizing footwear at home. Readers will discover step-by-step instructions that ensure a seamless building experience, along with tips for selecting materials and personalizing the design to suit any decor. Whether you’re a seasoned DIY enthusiast or just starting, this project offers a practical solution to clutter while enhancing your living area. Get ready to transform your shoe storage effortlessly!
Benefits of Having a DIY Shoe Rack
Maximize space in small areas. Maintain shoe condition and longevity. Personalize design to match home decor.
Creating a DIY shoe rack offers many advantages. First, it helps to maximize space in small areas, making your home feel more organized. You can fit it into corners or small nooks. Second, having a shoe rack helps maintain shoe condition and longevity by keeping shoes off the floor and preventing damage.
Lastly, you can personalize the design to match your home decor. A customized look makes the rack not only functional but also attractive.
- Maximizes small spaces
- Maintains shoe condition
- Allows for personal design
Choosing the Right Materials for Your DIY Shoe Rack
Wood options: plywood, MDF, or reclaimed wood. Alternative materials: metal, plastic, or fabric. Tools required for assembly.
Making a shoe rack can be fun! First, think about your wood options. Plywood is strong and easy to find.
MDF is smooth and great for painting, but it can be heavy. If you want to save some trees, go for reclaimed wood. It adds character and a fun history! Not into wood?
Try metal for a modern look or plastic for something lightweight. Fabric shoe racks are also a great choice, especially if you’re short on space.
For assembly, you’ll need some basics like a saw, drill, and screws.
Don’t forget the tape measure! They say “measure twice, cut once,” but if you’re like me, you might need to measure three times. No one likes crooked shelves!
| Material | Pros | Cons |
|---|---|---|
| Plywood | Strong and versatile | Can be heavy |
| MDF | Good for paint | Heavy and can swell |
| Reclaimed Wood | Unique and eco-friendly | May need extra work |
| Metal | Modern appearance | Less warm feel |
| Plastic | Lightweight | Less stylish |
| Fabric | Soft and portable | May lack support |
Step-by-Step Guide to Building an Easy DIY Shoe Rack
Planning and measuring your space. Cutting materials to size. Assembling the shoe rack.
Ready to tame that shoe jungle? Start by measuring your space. Grab a tape measure and jot down the width and height where your new shoe rack will live. Now, cut your materials to size.
Use a saw and follow your measurements closely. Hint: Your fingers are more important than the wood, so be careful!
Next, it’s time to bring it all together.
Assemble the pieces using screws and glue. Make sure it’s stable; you don’t want it wobbling like a toddler on roller skates! Get your shoes organized and enjoy your creation.
You’re now a proud shoe rack architect!
| Step | Action | Tip |
|---|---|---|
| 1 | Measure your space | Double-check those numbers! |
| 2 | Cut materials | Keep fingers safe! |
| 3 | Assemble the rack | Stability is key! |
Design Ideas for Your DIY Shoe Rack
Vertical vs. horizontal shoe racks. Open shelves vs. enclosed storage. Decorative elements to enhance aesthetics.
Building your own shoe rack offers many design options. First, choose between vertical and horizontal designs. Vertical racks save space, while horizontal racks provide easy access.
Next, consider open shelves vs. enclosed storage. Open shelves display your shoes nicely, but enclosed storage keeps them safe from dust. Finally, add decorative elements.
Use paint, fabric, or decorative boxes to brighten up your rack. Here are some ideas:
- Bright colors or patterns for a fun look.
- Wood accents for a natural feel.
- Labels for easy organization.
Tips for Maintaining Your DIY Shoe Rack
Regular cleaning routines. Organizing shoes by type or frequency of use. Preventing wear and tear on materials.
To keep your DIY shoe rack looking shiny and spry, start with a regular cleaning routine. A quick weekly wipe can do wonders—think of it like giving your shoes a spa day! Organizing shoes by type or how often you wear them makes finding your favorite pair a breeze. Also, to prevent wear and tear, avoid stuffing too many shoes in one spot.
It’s like overcrowding a clown car—fun until it bursts!
| Tip | Description |
|---|---|
| Regular Cleaning | Dust and wipe your rack weekly. |
| Organize by Type | Group shoes by style or use. |
| Avoid Overcrowding | Give shoes some space to breathe. |
Cost-Effective Alternatives for DIY Shoe Storage
Upcycling old furniture into shoe racks. Using other household items creatively. Budgeting for materials and tools.
Transform old furniture into a shoe rack with some creativity. A wooden ladder or an old bookshelf can easily hold your shoes. Upcycling is not only fun but also friendly to your wallet.
You can also use items around the house, like:
- Plastic crates for easy stacking
- Cardboard boxes for a custom touch
- Hooks on the wall to hang sneakers
Budget wisely for materials and tools. Look for sales or use things you already have. A little planning goes a long way in creating a stylish shoe storage solution.
Common Mistakes to Avoid When Building a DIY Shoe Rack
Underestimating space requirements. Skipping safety measures during assembly. Choosing inappropriate materials for shoe storage.
Creating a DIY shoe rack can be fun, but mistakes can make it tricky. Here are some things to keep in mind:
- Underestimating space requirements: Always measure your space first to avoid overcrowding. Proper sizing is key!
- Skipping safety measures: Wear safety gear during assembly.This helps prevent accidents and keeps you safe.
- Choosing inappropriate materials: Use sturdy materials that can support the weight of your shoes. Avoid flimsy options.
By avoiding these pitfalls, your DIY project will be a success!
Inspiration: Real-life Examples of DIY Shoe Racks
Showcase diverse styles and implementations. Share success stories from DIY enthusiasts. Highlight online resources and communities for support.
There are many fun ways to create your own shoe racks. Some DIYers build stylish shelves from old crates, giving their shoes a cozy home. Others use PVC pipes for fun and quirky designs.
Online communities are bursting with ideas and success stories. From Pinterest to Instagram, you can find inspiring photos of unique shoe racks. Don’t forget to check forums for tips and tricks. Foster your inner artist and let your shoes have a special place!
| Style | Material | Source |
|---|---|---|
| Rustic Crates | Wood | |
| Quirky Pipes | PVC | |
| Wall-Mounted | Metal | YouTube |
Conclusion
In conclusion, creating an easy DIY shoe rack is a practical and rewarding project that can enhance your home organization. By following simple steps and utilizing accessible materials, you can craft a stylish, functional storage solution tailored to your space. Embrace your creativity, and enjoy the benefits of a clutter-free entryway while showcasing your favorite footwear.
Happy crafting!
FAQs
What Materials Do I Need To Build A Simple Diy Shoe Rack At Home?
To build a simple DIY shoe rack at home, you will need wooden boards (like plywood or pine), screws, or nails for assembly, and a power drill or hammer. Additionally, you might want sandpaper for smoothing edges and wood glue for extra stability. If desired, you can also use paint or varnish to finish the rack. Finally, consider using a measuring tape to ensure proper sizing and organization.
How Can I Customize A Shoe Rack Design To Fit My Available Space?
To customize a shoe rack design for your available space, start by measuring the dimensions of the area where you want to place it. Consider the number of shoes you need to store and choose a design that accommodates them, such as open shelving or cubbies. Materials and colors can be selected to match your existing decor, and you might opt for adjustable shelves to maximize flexibility. Lastly, adding features like hooks for accessories can enhance functionality while maintaining a tailored look.
What Are Some Tips For Organizing Shoes Effectively On A Diy Shoe Rack?
To organize shoes effectively on a DIY shoe rack, first categorize them by type—like sneakers, boots, and heels—to make selection easier. Use vertical space by incorporating shelves or cascading racks to maximize visibility and accessibility. Consider adding clear bins or labels to keep pairs together and make it easier to find specific shoes. Finally, regularly declutter your collection, keeping only the pairs you frequently wear to maintain an organized space.
Are There Any Budget-Friendly Diy Shoe Rack Ideas For Small Apartments?
Yes, there are several budget-friendly DIY shoe rack ideas for small apartments. One popular option is to repurpose wooden crates or pallets, stacking them to create a stylish storage solution. You can also use a small bookshelf or a ladder to display and organize shoes vertically, saving space. Additionally, consider using fabric bins or boxes to keep shoes organized and out of sight while maximizing your available space.
How Can I Incorporate Sustainable Materials Into My Diy Shoe Rack Project?
To incorporate sustainable materials into your DIY shoe rack project, consider using reclaimed wood from old furniture or pallets, which not only reduces waste but also adds character. Opt for environmentally friendly finishes, such as non-toxic stains or natural oils, to treat the surfaces. You can also use recycled metal or bioplastics for any hardware or structural components. Finally, look for sustainable alternatives, like bamboo, which is fast-growing and renewable, for any open shelving or accents.