How Long Does A Cherry Seed Take To Sprout
Thinking about growing your own cherry tree from seed can be super exciting! But if you’re new to this, you might wonder about How Long Does It Take a Cherry Seed to Sprout? Expert Tips.
It can seem a bit tricky because cherry seeds have special needs. Don’t worry, though! We’ve got a simple, step-by-step plan to help you get started.
You’ll learn all the tricks to give your cherry seed the best chance to sprout.
How Long Does A Cherry Seed Take To Sprout
This section explains the basic timeline and factors that influence how quickly a cherry seed will sprout. It sets expectations for new growers and highlights why patience is a virtue when starting fruit trees from seed. Understanding the general timeframe is the first step to successful germination.
Understanding The Germination Timeline
When you’re curious about how long it takes a cherry seed to sprout, it’s important to know that there isn’t one single answer. The process can take a while, and it’s often longer than people expect. This is because cherry seeds have a natural dormancy period they need to overcome before they can even think about sprouting.
Typically, you can expect a cherry seed to sprout anywhere from a few months to over a year. This wide range depends heavily on the variety of cherry and the conditions you provide for it. Some seeds might be eager to grow, while others need more encouragement.
This lengthy germination period is one of the main reasons why many gardeners find starting cherry trees from seed challenging. It requires a significant amount of patience and a commitment to following specific preparation steps. Without the right preparation, your cherry seed might never sprout.
Factors Affecting Sprouting Time
Several key elements play a big role in determining how long it takes for a cherry seed to sprout. Getting these right will greatly improve your chances of success.
-
Stratification Needs
Cherry seeds, like many fruit tree seeds, need a period of cold treatment called stratification. This mimics winter conditions, breaking the seed’s dormancy. Without proper stratification, the seed’s inner embryo won’t be ready to grow, no matter how warm or moist its environment is.
The duration of this cold period is critical and can range from 60 to 120 days or even more.
-
Seed Viability
Not all seeds are created equal, and even within a single cherry, some seeds are more viable than others. Viability refers to the seed’s ability to live and grow. Older seeds or those not properly stored may have a reduced chance of sprouting.
The freshness and quality of the seed are paramount for a timely germination.
-
Environmental Conditions
Once the seed is ready to sprout, the surrounding environment becomes the star. This includes factors like consistent moisture, the right temperature range, and adequate aeration. If the soil is too wet, the seed can rot; if it’s too dry, it will dehydrate.
The temperature needs to be consistently warm, usually between 70-80°F (21-27°C), to encourage the initial growth spurt.
Typical Cherry Seed Germination Stages
The journey from a hard seed to a tiny seedling involves several distinct stages. Understanding these helps you recognize when your seed is on its way.
-
Dormancy Break (Stratification)
This is the initial phase where the seed undergoes its required cold period. During stratification, the seed coat softens, and internal hormones are triggered, preparing the embryo for growth. This stage is passive, meaning you set up the conditions and wait.
-
Swelling and Root Emergence
After stratification, when the seed is placed in a warm, moist environment, the first visible sign of life is often the emergence of the radicle, which is the embryonic root. The seed will swell noticeably as it absorbs water, and then a small white root will push through the seed coat. This is a crucial step.
-
Shoot Development
Following root emergence, the shoot begins to grow upwards from the opposite end of the seed. This shoot will eventually develop into the stem and leaves of your young cherry plant. The speed of this development can vary based on the environment.
Preparing Your Cherry Seeds For Sprouting Expert Tips
This section details the essential preparation steps, focusing on stratification and scarification, to ensure cherry seeds are ready to germinate. It provides actionable advice that gardeners can follow to overcome the natural dormancy of these seeds. Proper preparation is the most critical factor in achieving successful sprouting.
The Importance of Stratification
Cherry seeds have a natural defense mechanism that prevents them from sprouting too early, perhaps during an unseasonably warm spell in winter. This mechanism is called dormancy, and for cherry seeds, it’s usually broken by a period of cold, moist conditions. This process is known as stratification.
Think of stratification as giving the seed a simulated winter. It tells the seed that spring is coming and it’s safe to start growing. Without this cold treatment, the seed’s internal programming won’t activate, and it simply won’t sprout, even if you provide ideal warmth and water.
The duration and temperature of stratification are key. Most cherry varieties require a cold period of at least 60 to 90 days, and some may need up to 120 days. The temperature should be consistently between 34°F and 41°F (1°C and 5°C), similar to what you’d find in a refrigerator.
Step-by-Step Stratification Process
Following these steps carefully will give your cherry seeds the best chance to germinate.
-
Clean the Seeds
First, thoroughly clean the cherry pits. Remove any leftover fruit flesh. You can do this by soaking them in water for a day or two, changing the water as needed, and then gently scrubbing them.
Any remaining fruit pulp can lead to mold during the stratification process, which can kill the seed.
-
Prepare the Stratification Medium
You’ll need a medium to hold moisture and keep the seeds separated. A common and effective medium is a mix of peat moss, vermiculite, or sand. Dampen this medium so it’s moist but not soaking wet; when you squeeze it, only a drop or two of water should come out.
-
Combine Seeds and Medium
Place the cleaned cherry pits into the moistened medium. Ensure they are well-distributed and not clumped together. This prevents them from touching each other, which can also help prevent mold spread.
-
Bagging and Refrigeration
Put the seed-and-medium mixture into a resealable plastic bag or a container with a lid. Label the bag with the type of cherry and the date you started the stratification. Then, place the bag in your refrigerator.
Avoid placing it in the coldest part of the fridge, like the back, where it might freeze.
-
Monitor and Maintain
Check the bag periodically, perhaps once every two weeks, to ensure the medium remains consistently moist. If it’s drying out, lightly mist it with water. Also, look for any signs of mold.
If mold appears, gently remove the affected seeds and medium, and consider replacing the medium with fresh, sterilized material.
Scarification For Tough Seed Coats
Some cherry seeds have exceptionally hard outer coats, making it difficult for water to penetrate and start the germination process, even after stratification. This tough outer layer is called the seed coat, and sometimes it needs a little help to soften. The process of weakening or breaking the seed coat to allow water absorption is called scarification.
While stratification is the primary dormancy breaker for cherries, scarification can be a helpful supplementary step for particularly stubborn seeds, ensuring they’re ready to absorb moisture once they’re out of the cold. It essentially gives the seed a head start in breaking through its protective shell.
There are a few ways to scarify cherry seeds, but it’s crucial to be gentle. You don’t want to damage the delicate embryo inside the seed. The goal is to create a small opening or thin the coat.
Methods of Scarification
-
Light Sanding
Using fine-grit sandpaper, you can gently rub the seed coat. Focus on the side opposite the hilum (the small scar where the seed was attached to the fruit). Rub just enough to create a tiny nick or thin the coat slightly.
Be very careful not to sand too deeply, as you could damage the embryo. This method requires a delicate touch and observation.
-
Soaking in Warm Water
Soaking the seeds in warm (not hot) water for 24-48 hours before stratification can sometimes help soften the seed coat. Change the water every 12 hours to keep it fresh and prevent mold growth. This is a less aggressive method than sanding and can be effective for many seeds.
-
Mechanical Nicking
With a sharp knife or razor blade, you can carefully make a tiny nick in the seed coat. Again, the hilum is a good area to target, as the embryo is not directly beneath it. The aim is to create a small opening for water to enter without damaging the inner seed parts.
This is best done with extreme precision.
Planting and Caring For Sprouted Cherry Seeds
This section guides the reader on what to do once the cherry seed has successfully sprouted, covering planting depth, soil requirements, watering, and initial care. It bridges the gap from germination to establishing a young seedling. Proper post-sprouting care is vital for the seedling’s survival and healthy growth.
When To Plant Your Seedling
Once you see the root emerging from the seed, it’s time to move it from its stratification environment into soil. This is a critical moment, as the young root is very delicate. You want to plant it as soon as you notice the root, usually about 1/4 to 1/2 inch long.
Planting too early means the seed might not have developed enough to withstand the shock of transplanting. Planting too late risks the root drying out or getting damaged. The goal is to get that root into a suitable growing medium as quickly as possible.
The ideal time to plant is when you can clearly see the white radicle emerging from the seed coat. This shows that the seed has successfully broken dormancy and is ready to begin absorbing nutrients and water from the soil.
Ideal Soil and Potting Mix
The right soil is crucial for a young cherry seedling. It needs to be well-draining, airy, and rich enough to provide nutrients. A heavy, compacted soil will suffocate the roots and can lead to rot.
A good potting mix for cherry seedlings typically includes a blend of compost, peat moss or coco coir, and perlite or coarse sand. This combination ensures good drainage, aeration, and moisture retention. Aim for a pH level between 6.0 and 7.0, which is slightly acidic to neutral.
For beginners, using a high-quality commercial seedling potting mix is a safe bet. These are formulated to provide the optimal balance of drainage and nutrients for young plants. You can also amend it further with some compost if desired.
Planting Depth and Method
When planting your sprouted cherry seed, the depth is very important. You want to place it so the root can anchor itself easily without being too exposed.
Gently place the seed with the root pointing downwards into a small pot or seed tray filled with your prepared potting mix. The seed itself should be just barely covered with soil, about 1/4 inch deep. The root should be allowed to spread out naturally.
If you are planting multiple seeds, ensure they have enough space so their roots do not compete too much. For instance, a 4-inch pot can usually accommodate 1-3 seeds spaced a couple of inches apart.
Watering and Light Requirements
After planting, water the soil gently but thoroughly. You want to ensure the soil is evenly moist, but not waterlogged. A spray bottle is often best for initial watering to avoid disturbing the seed.
Keep the pots in a warm location, ideally around 70-80°F (21-27°C), to encourage further growth. Once the seedling emerges from the soil, it will need bright, indirect light. A sunny windowsill is often perfect, but avoid direct, harsh sunlight initially, which can scorch the delicate leaves.
As the seedling grows, you’ll need to monitor the soil moisture regularly. Stick your finger about an inch into the soil; if it feels dry, it’s time to water again. Consistent moisture is key to healthy development.
Transplanting Seedlings
Once your cherry seedling has developed a few sets of true leaves and its roots have filled its initial pot, it’s time to transplant it into a larger container or, if conditions are right, into its permanent garden location. This usually happens when the seedling is several inches tall and appears sturdy.
When transplanting, handle the seedling by its leaves, not its stem, as the stem is fragile. Gently loosen the root ball from its current pot and place it into the new, larger pot or prepared garden hole. Ensure the top of the root ball is level with the surrounding soil.
Water thoroughly after transplanting to help settle the soil and reduce transplant shock.
Cherry trees need full sun (at least 6-8 hours per day) and well-draining soil to thrive. If planting outdoors, choose a location that is protected from strong winds and has good air circulation. The soil should be amended with compost to improve fertility and drainage.
When Will My Cherry Tree Fruit
This section addresses the long-term aspect of growing a cherry tree from seed: fruiting. It manages expectations regarding the time it takes for a seed-grown tree to mature and produce fruit, comparing it to grafted trees. Patience is emphasized as a critical virtue for seed-grown fruit trees.
Patience Is Key For Seed-Grown Trees
You’ve successfully sprouted your cherry seed and have a young seedling. Now comes the next long wait: fruiting. If you’re growing a cherry tree from seed, you need to understand that it will take significantly longer to produce fruit compared to trees bought from a nursery.
Nursery trees are often grafted onto mature rootstock, meaning they are essentially mature branches attached to a ready-to-grow base. This allows them to fruit much sooner. A tree grown from seed, however, must go through its entire juvenile phase from scratch.
The waiting period for a seed-grown cherry tree to bear fruit can range from 5 to 10 years, and sometimes even longer. This is a substantial investment of time and care. It’s a journey that requires dedication and a deep appreciation for the natural growth cycle of trees.
Genetic Variation And Fruit Quality
One of the reasons it takes so long is that the seedling is essentially a new, unique individual with its own genetic makeup. The fruit it produces might not be the same as the parent tree from which the seed was taken. This is known as genetic variation.
While you might get a delicious cherry, you could also end up with a variety that is less desirable in taste, size, or disease resistance. This unpredictability is a trade-off when growing from seed. Many people who grow fruit trees from seed do so for the joy of the process, the potential for discovering a new variety, or for the challenge, rather than for guaranteed fruit quality identical to the parent.
For those who prioritize predictable fruit quality and earlier harvest, purchasing a grafted tree from a reputable nursery is the recommended approach. Seed growing is more of an experiment and a long-term gardening project.
Factors Influencing Fruiting Time
Several factors, even after the seed has sprouted and grown into a sapling, influence when it will finally produce fruit. These are crucial to consider for any aspiring cherry grower.
-
Variety Of Cherry
Different cherry varieties have different maturation rates. Sweet cherries (Prunus avium) generally take longer to fruit than sour cherries (Prunus cerasus). The specific genetics of the parent tree also play a role.
Some varieties are naturally slow to mature and bear fruit.
-
Growing Conditions
Optimal growing conditions significantly impact how quickly a tree matures. This includes plenty of sunlight, well-draining soil, adequate water, and appropriate temperatures. A tree that struggles due to poor soil, insufficient light, or water stress will take much longer to reach its fruiting potential.
Proper care supports faster development.
-
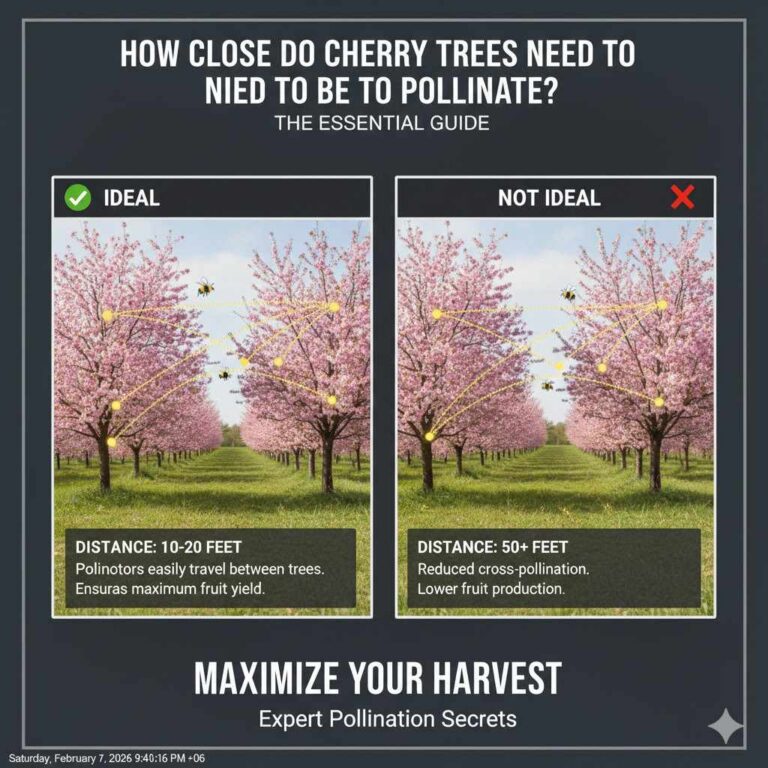
Pollination Needs
Most cherry trees require cross-pollination to produce fruit. This means you often need another compatible cherry tree variety growing nearby to produce pollen. Without a suitable pollinator, even a mature tree may not set fruit.
Understanding the pollination group of your cherry variety is essential for successful fruiting.
Frequently Asked Questions
Question: How long does it typically take for a cherry seed to sprout after stratification?
Answer: After proper stratification, a cherry seed can take anywhere from a few weeks to several months to sprout, with some varieties taking longer than others. Patience is key.
Question: Can I just plant a cherry pit in the ground and expect it to grow?
Answer: No, simply planting a cherry pit directly in the ground will likely not result in sprouting. Cherry seeds require a cold stratification period to break their dormancy before they can germinate.
Question: What is the best medium for stratifying cherry seeds?
Answer: A good medium for stratification is one that retains moisture but allows for good airflow, such as a mix of peat moss, vermiculite, or sand. Ensure it is damp, not wet.
Question: How do I know if my cherry seed is viable?
Answer: Viability is best determined by its ability to sprout after undergoing proper stratification and being planted in ideal conditions. If a seed has been properly prepared and doesn’t sprout after a reasonable time, it may not have been viable.
Question: Will a cherry tree grown from seed produce the same fruit as the parent tree?
Answer: Not necessarily. Trees grown from seed are genetically unique and may produce fruit that is different, and sometimes less desirable, than the parent tree.
Wrap Up
So, how long does it take a cherry seed to sprout expert tips are all about patience and preparation. Expect a germination timeline of several months to over a year, with stratification being the most crucial step. By following these expert tips, you can give your cherry seed the best chance to grow into a young tree, ready for its long journey to fruiting.