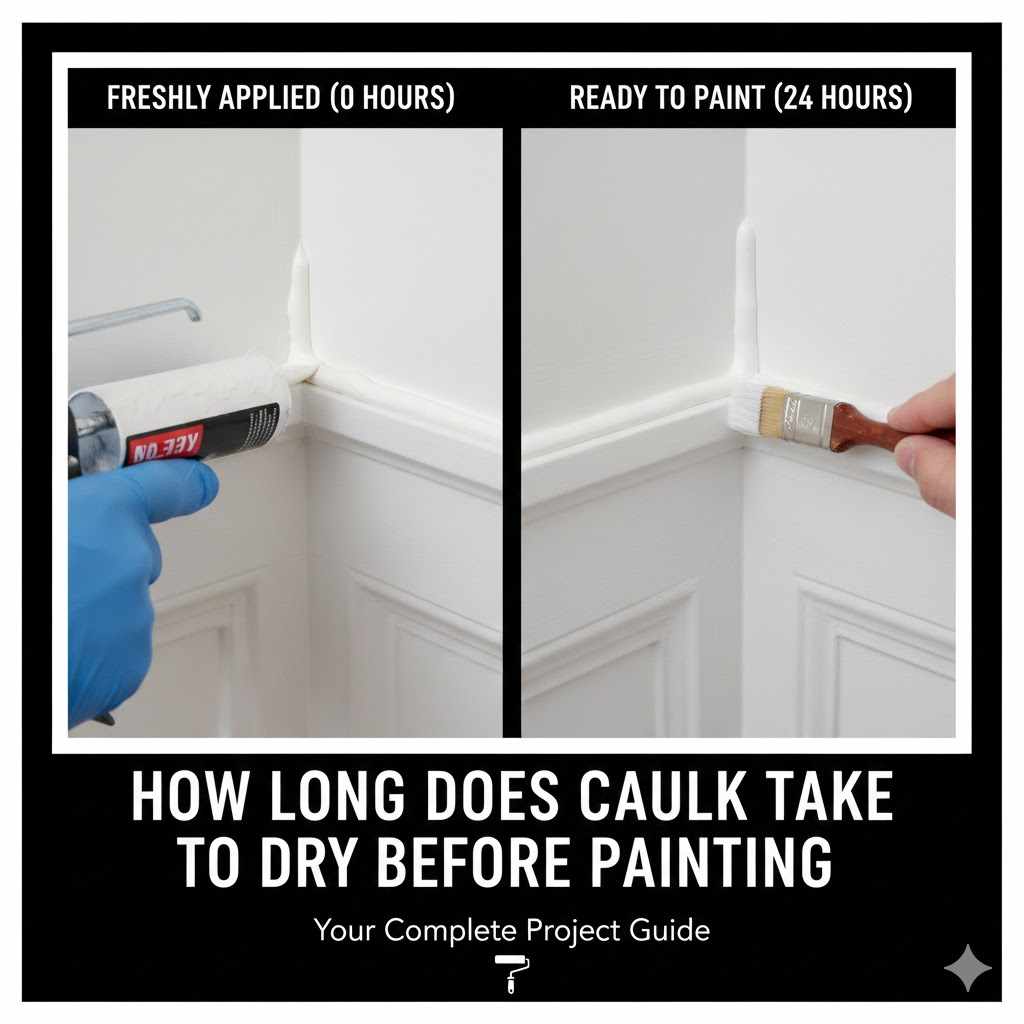
How Long Does Caulk Take to Dry Before Painting
Many people wonder, How Long Does Caulk Take to Dry Before Painting? It can be a tricky question, especially when you’re trying to finish a project quickly. You want your paint to look smooth and perfect, not lumpy or cracked. This guide will make it super simple.
We’ll walk you through everything step-by-step so you can get that painted finish just right. Ready to learn the easy way?
Understanding Caulk Drying Times
Knowing how long caulk needs to dry before painting is key to a professional-looking finish. Many DIYers get this part wrong. They rush to paint too soon.
This causes problems like peeling paint or caulk that doesn’t set right. We will cover the different types of caulk and how each one dries. This will help you pick the best caulk for your job and know when it’s ready for paint.
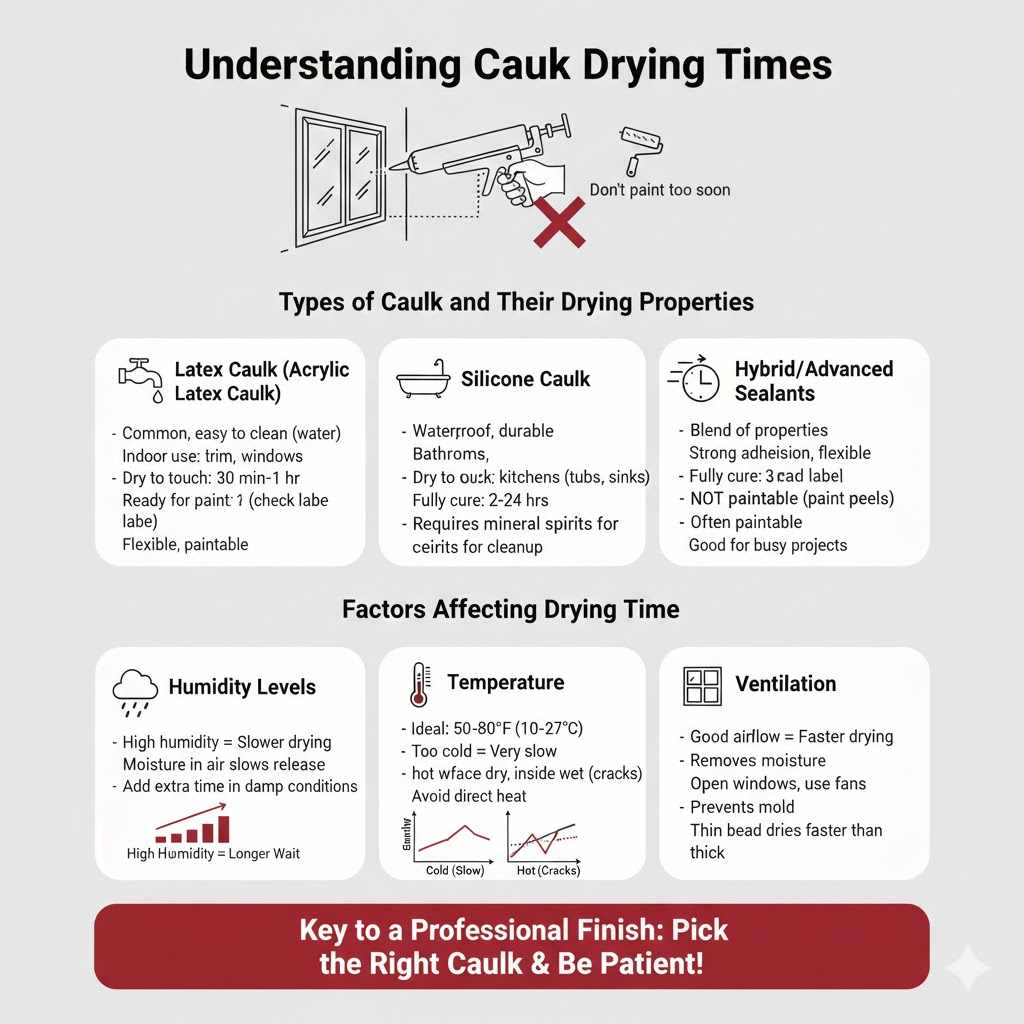
Types of Caulk and Their Drying Properties
There are many kinds of caulk available, and each behaves a bit differently when it comes to drying. The type you choose really impacts how long you have to wait before you can paint over it. Some dry very fast, while others need a lot more time.
Latex Caulk (Acrylic Latex Caulk)
Latex caulk is super common and easy to find. It’s great for indoor projects like sealing around baseboards, trim, and window frames. It cleans up easily with water, which is a big plus for beginners.
Drying time for latex caulk varies quite a bit. Factors like humidity and temperature play a big role. Generally, you can expect it to be dry to the touch in about 30 minutes to an hour.
However, “dry to the touch” doesn’t mean it’s fully cured and ready for paint. For painting, it’s best to wait at least 1 to 2 hours. In humid conditions, this wait time might need to be longer.
Always check the product label, as some newer formulas are designed to dry faster.
One benefit of latex caulk is its flexibility. It can expand and contract with temperature changes. This means it’s less likely to crack over time.
When it’s properly dry, it creates a smooth surface that paint adheres to well. If you paint too soon, the paint might pull or bubble as the caulk continues to cure underneath.
Silicone Caulk
Silicone caulk is known for its excellent waterproof properties. It’s often used in bathrooms and kitchens around tubs, sinks, and showers. It’s also very durable and can withstand extreme temperatures and moisture.
However, silicone caulk can be a bit trickier to work with and clean up than latex caulk. It usually requires mineral spirits for cleanup.
The drying time for silicone caulk is generally longer than latex caulk. It can take anywhere from 2 to 24 hours to fully cure. The “dry to touch” time might be a few hours, but it’s crucial to let it cure completely before painting.
Most silicone caulks are not paintable. Even if they claim to be paintable, the paint might not adhere well. It often peels off or cracks later.
For areas that need painting, it’s usually better to use a latex or acrylic caulk.
If you absolutely must paint over silicone, you might need to use a special primer designed for silicone. Even then, success isn’t guaranteed. Many professionals avoid painting silicone altogether.
They opt for paintable caulks for areas that will be painted. This avoids potential adhesion issues and ensures a better finished look for the painted surface.
Hybrid/Advanced Sealants
These are newer types of sealants that combine the best features of different caulks. They often offer excellent adhesion, flexibility, and can be painted over. Many of these advanced sealants are designed to cure faster than traditional options.
Some hybrid sealants can be painted over in as little as 30 minutes to an hour. This is a significant advantage for busy projects. They offer the waterproof strength of silicone with the paintability of latex.
Always read the packaging carefully. Manufacturers provide specific drying and painting guidelines. These can include recommended cure times under various environmental conditions.
Using these can save you a lot of waiting time.
Factors Affecting Drying Time
Several things can make caulk dry faster or slower. Understanding these will help you predict when you can paint.
Humidity Levels
High humidity means there’s a lot of moisture in the air. This can slow down the drying process for most types of caulk, especially water-based ones like latex. The caulk needs to release its moisture into the air to cure.
If the air is already full of moisture, this release happens much slower.
Imagine trying to dry your clothes on a very damp day. It takes much longer than on a dry, sunny day. Caulk is similar.
In very humid environments, a latex caulk that might normally dry in 1 hour could take 2 or even 3 hours to be ready for paint. For best results, try to caulk on days with moderate humidity if possible. If you can’t, be patient and add extra time to the drying period.
Temperature
Temperature is another important factor. Most caulks dry best in moderate temperatures, usually between 50°F and 80°F (10°C and 27°C). If it’s too cold, the drying process slows down significantly.
Some caulks might even freeze and become unusable.
Conversely, very high temperatures can sometimes cause caulk to dry too quickly on the surface. This can lead to cracking or an uneven texture. It might create a skin on top while the inside is still wet.
The ideal scenario is a warm, dry day. This promotes even curing. If you’re working in a cold garage or an unheated room, the caulk will take much longer to dry.
Consider using a small heater to warm the area slightly, but avoid direct heat that could damage the caulk.
Ventilation
Good airflow helps caulk dry properly. When you open windows or use fans, you help remove the moisture that the caulk is releasing. This speeds up the curing process.
Without good ventilation, the moisture can get trapped. This can lead to longer drying times and potential mold issues.
Think about how a damp basement smells. It’s because moisture is trapped there. A well-ventilated room allows for fresh air circulation.
This helps carry away the evaporating water from the caulk. If you’re caulking in a small, enclosed space like a closet or a bathroom without a fan, consider leaving the door open. You might also want to run a small fan to help move the air around.
This simple step can make a noticeable difference in how quickly your caulk dries.
Caulk Thickness and Application
The amount of caulk you apply matters. A thin, even bead will dry much faster than a thick, chunky application. When you apply caulk, aim for a consistent bead.
Don’t lay it on too thick.
If you use too much caulk, it takes longer for the moisture to escape from the center. This means the caulk may look dry on the outside but still be wet underneath. This can lead to issues when you try to paint.
The wet caulk might move or smear under the pressure of your paintbrush. It’s better to apply a neat, thin bead. If you need more coverage, you can always apply a second thin bead after the first has dried properly.
Proper application also makes for a cleaner line, which is easier to paint over.
How Long Does Caulk Take to Dry Before Painting A Step-by-Step Guide
Knowing the general drying times is helpful, but let’s break down the process of knowing when your caulk is ready. This guide will give you clear steps to follow for a perfect paint job.
Step 1 Inspecting the Caulk Surface
The first thing to do is visually inspect the caulk. Look at the bead you applied. Is it still shiny or glossy?
Most water-based caulks will start to lose their shine as they dry. They become more matte. If it still looks wet or very glossy, it’s likely not ready.
Also, gently touch the surface. You can do this with a clean fingertip. Does it feel wet or sticky?
If it leaves residue on your finger, it needs more time. The goal is for the surface to feel firm and dry to the touch. This is the first sign that curing is progressing well.
It’s important not to press too hard, as you don’t want to indent the caulk. Just a light touch is enough.
Step 2 The Finger Rub Test
This is a simple, practical test. Gently rub your finger across the caulk bead. If it smudges, transfers to your finger, or feels soft, it’s too wet to paint.
If it feels firm, dry, and doesn’t budge, it’s a good sign it’s ready.
Remember, this test checks if the surface has cured enough to handle light friction. It doesn’t mean the entire caulk bead is fully hardened. For most water-based caulks, passing the finger rub test indicates it’s ready for a coat of paint.
If you’re using a silicone caulk that claims to be paintable, you might need to wait much longer, even after it passes this test. Always refer to the product instructions for those specialized types.
Step 3 Checking the Product Label
Every caulk product is a little different. The manufacturer’s label is your best source of information. It will tell you the recommended drying and recoat times.
It will often specify the time needed before painting.
For example, one brand of acrylic latex caulk might say “paintable in 1 hour.” Another might suggest 2 hours. Always read and follow these instructions. They are based on the specific formula of the caulk.
If the label is hard to read or you’ve lost the packaging, a quick search online for the product name should bring up the technical data sheet, which has this information.
Step 4 Understanding “Dry” vs. “Cured”
This is a really important distinction. “Dry” means the surface feels solid and isn’t sticky. “Cured” means the caulk has reached its full hardness and durability.
For many latex caulks, it can be painted when it’s dry, but it may take days or even weeks to fully cure.
Painting over caulk that is dry but not fully cured is usually fine. However, if the caulk is still significantly wet in the middle, painting can cause problems. The paint layer might trap moisture.
This could lead to peeling or bubbling later on. So, ensure the caulk is at least dry to the touch and passes the finger rub test before you apply paint.
When Can You Paint After Caulking
Knowing the general timeframe helps, but let’s get more specific about when you can expect to pick up your paintbrush.
Typical Waiting Times for Different Caulk Types
As we’ve seen, the type of caulk is the biggest factor. Here’s a quick summary of common waiting times before painting:
- Acrylic Latex Caulk Generally ready to paint in 1-2 hours. In high humidity or cold, this can extend to 4-6 hours or more. Always ensure it’s dry to the touch and matte, not shiny.
- Paintable Silicone Caulk These are rare and often problematic. If the label says “paintable,” wait at least 24 hours. Even then, priming might be necessary for best results. Many pros avoid painting silicone.
- Advanced Hybrid Sealants Many of these are designed for speed. Some can be painted in as little as 30 minutes to 1 hour. Always check the specific product instructions.
These are general guidelines. Environmental conditions will always play a role. It’s better to wait a little longer than to paint too soon.
A common mistake is rushing this step. This can ruin the final look of your paint job. Patience here pays off with a smoother, longer-lasting finish.
Real-Life Scenarios and Tips
Let’s look at a couple of situations to see how these drying times play out.
Scenario 1: Kitchen Backsplash
- You just finished caulking around your new kitchen backsplash.
- It’s a warm, dry day with good airflow in the kitchen.
- You used a standard acrylic latex caulk.
- After 1 hour, you do the finger rub test. It feels dry and doesn’t smudge.
- You can likely proceed with painting the wall around the backsplash now.
Scenario 2: Bathroom Trim in Humid Weather
- You are caulking around the baseboards in a bathroom.
- It’s been raining for days, and the air feels very damp.
- You used a fast-drying acrylic latex caulk.
- After 2 hours, the caulk still looks a little shiny and feels slightly tacky.
- You should wait at least another 2-4 hours, or until it feels completely dry and matte. You might even need to run a dehumidifier or fan for a while.
Here are some extra tips to help you out:
- Use a Fan: Always use a fan or open windows to improve air circulation. This helps the caulk dry faster.
- Test a Small Area: If you’re unsure, test paint on a small, inconspicuous spot of caulk first. See how it adheres after the recommended drying time.
- Consider the Paint Type: Some paints are more forgiving than others. However, even with forgiving paints, if the caulk isn’t dry, you’ll have problems.
- Clean Up Promptly: While not directly related to drying time, clean up any excess caulk or smudges immediately with a damp cloth. Dried caulk is much harder to remove.
Understanding Curing Conditions
The environment where the caulk is applied significantly impacts its curing process. Think about it like baking. If your oven isn’t at the right temperature, your cake won’t turn out right.
Factors like temperature, humidity, and airflow are the “baking conditions” for caulk. When these are optimal (moderate temperature, low humidity, good airflow), the caulk cures efficiently. If conditions are poor (very cold, very humid, no airflow), the caulk takes much longer to cure.
A good example of this is in unheated garages or basements during winter. Even if the caulk says “paintable in 1 hour,” it could take all day or even days to dry in those conditions. Conversely, in a hot, dry climate, some caulks might dry so fast that it’s hard to tool them smoothly before they skin over.
Knowing these conditions helps you set realistic expectations. It also guides you on whether you need to take steps to improve the environment. This could involve using a heater or dehumidifier.
Proper curing ensures the caulk forms a strong, flexible seal that will last.
Maximizing Caulk Performance Before Painting
To get the best results when painting over caulk, you need to ensure it’s not only dry but also ready to accept paint. This means looking at a few more details.
Surface Preparation for Painting
Even when the caulk is dry, the surface needs to be ready for paint. Make sure the caulk bead is smooth and free of any dust or debris. If there are any rough spots or excess caulk, you might need to lightly sand them.
Use a very fine-grit sandpaper (like 220 grit or higher). Be gentle so you don’t damage the caulk.
Wipe away any sanding dust with a clean, dry cloth or a tack cloth. This is a crucial step for good paint adhesion. A clean surface ensures the paint bonds directly to the caulk and the surrounding material.
This helps prevent peeling and ensures a smooth finish. If you skip this, you might find your paint doesn’t stick well to the caulk.
Priming Over Caulk
For many water-based caulks, priming isn’t strictly necessary if they are fully dry. However, using a primer can offer several benefits. A primer acts as a bridge between the caulk and your paint.
It helps ensure the paint adheres evenly.
Priming can also help prevent the caulk from showing through the paint. Some caulks can have a different sheen or color that might be visible under lighter paint colors. A good quality primer will create a uniform surface.
It also helps the topcoat of paint stick better. This is especially helpful if you are painting with a dark color over a light caulk or vice versa. It helps to achieve consistent color.
For any caulk that isn’t explicitly labeled as “paintable,” or if you’re unsure, priming is always a good idea.
Common Mistakes to Avoid
Many people make a few common errors when dealing with caulk and painting. Being aware of these can save you a lot of headaches.
- Painting Wet Caulk: This is the most frequent mistake. It leads to peeling, cracking, or smearing. Always wait until it’s fully dry to the touch and no longer tacky.
- Using the Wrong Caulk: Not all caulks are paintable. Using a silicone caulk that isn’t designed for paint can lead to adhesion problems. Always check the label.
- Not Letting Caulk Cure Properly: Even if it feels dry, the caulk might still be curing. This can cause it to move or compress under the paint. Give it ample time.
- Skipping Prep Work: Dust, dirt, or uneven caulk beads will show through the paint. Take the time to clean and lightly sand if needed.
When to Call a Professional
While most caulking and painting jobs are suitable for DIYers, there are times when professional help is a good idea. If you’re dealing with a large area, very high humidity, or have had persistent problems with caulk adhesion in the past, a pro can help.
Professionals have access to specialized products and understand the nuances of different materials and environmental conditions. They can also ensure the job is done quickly and correctly the first time. This can save you time and money in the long run, especially if you’re aiming for a high-quality finish.
Don’t hesitate to get expert advice if you feel unsure about your project.

Frequently Asked Questions
Question: How long does bathroom caulk take to dry before painting
Answer: Bathroom caulk, especially if it’s silicone-based or in a humid environment, can take a while. For standard acrylic latex caulk in a bathroom, wait at least 2-4 hours, ensuring it’s dry to the touch and not shiny. If it’s silicone, it might not be paintable at all, or you’ll need a special primer and a much longer wait time, often 24 hours.
Question: Can I paint over caulk the same day
Answer: Yes, you can paint over some types of caulk the same day, but only if it’s a fast-drying, paintable formula like some acrylic latex or advanced hybrid sealants. You must ensure it is completely dry to the touch and no longer tacky. Always check the product label for specific recoat times, which can be as short as 30 minutes to an hour for some products.
Question: What happens if I paint caulk that is still wet
Answer: Painting wet caulk can cause several problems. The paint may not adhere properly, leading to peeling or bubbling later. The wet caulk might also smear or crack under the pressure of the brush or roller.
Moisture trapped under the paint can also lead to mold or mildew growth. It compromises the seal and the paint finish.
Question: Does temperature affect caulk drying time for painting
Answer: Yes, temperature significantly affects caulk drying time. Colder temperatures slow down the drying and curing process, while very hot temperatures can sometimes cause the surface to dry too quickly, leading to cracks. Most caulks dry best and fastest in moderate temperatures, typically between 50°F and 80°F (10°C and 27°C).
Question: How do I know if caulk is fully dry enough to paint
Answer: You can tell if caulk is dry enough to paint by its appearance and feel. It should lose its shine and look matte. It should also feel firm and dry to the touch; it won’t stick to your finger or smudge.
Gently rubbing a clean finger across the bead is a good test. Always refer to the product’s recommended drying time as a baseline.
Wrap Up
Knowing How Long Does Caulk Take to Dry Before Painting? is simple when you follow these steps. Always check your caulk type and read the label. Test the caulk’s dryness with your finger.
Ensure good airflow for faster drying. By being patient and preparing the surface, you’ll achieve a smooth, lasting painted finish. Happy painting!