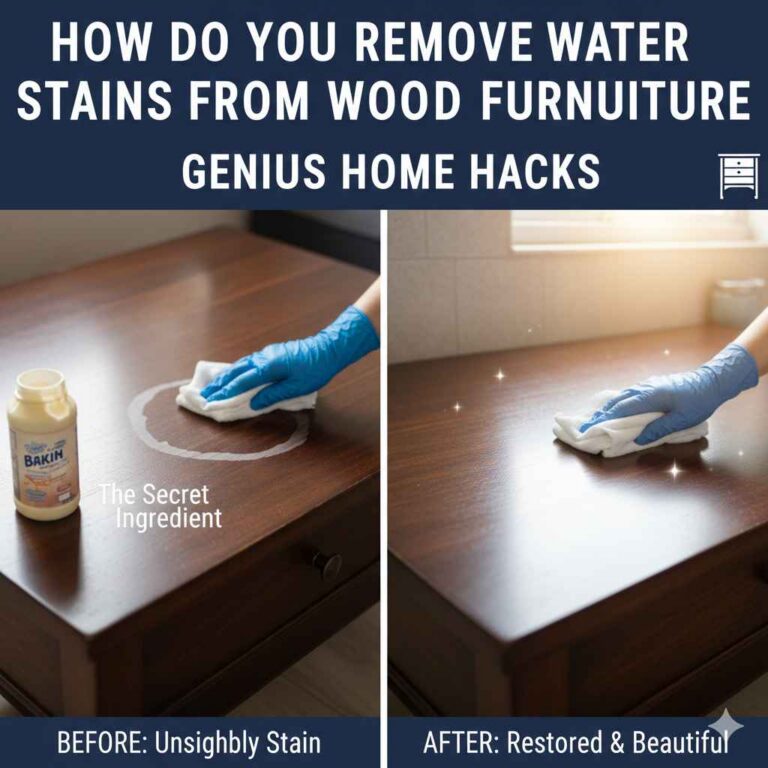
How Long Does Water-Based Stain Take to Dry
Figuring out how long water-based stain takes to dry can be a bit tricky, especially if you’re new to staining projects. You want your wood to look great, but waiting around for paint or stain to dry can feel like forever. Lots of people wonder about this exact question because drying times can change.
Don’t worry, we’ll make it super simple to understand. We’ll walk through everything you need to know step-by-step so your project moves along smoothly.
Understanding Water-Based Stain Drying Times
This section will explore the core factors that influence how long it takes for water-based stain to dry. We’ll break down what makes one project dry faster than another. This will help you plan your work better and get beautiful results without unnecessary delays.
Knowing these details will make your next staining job much easier and more successful.
The Science Behind Drying
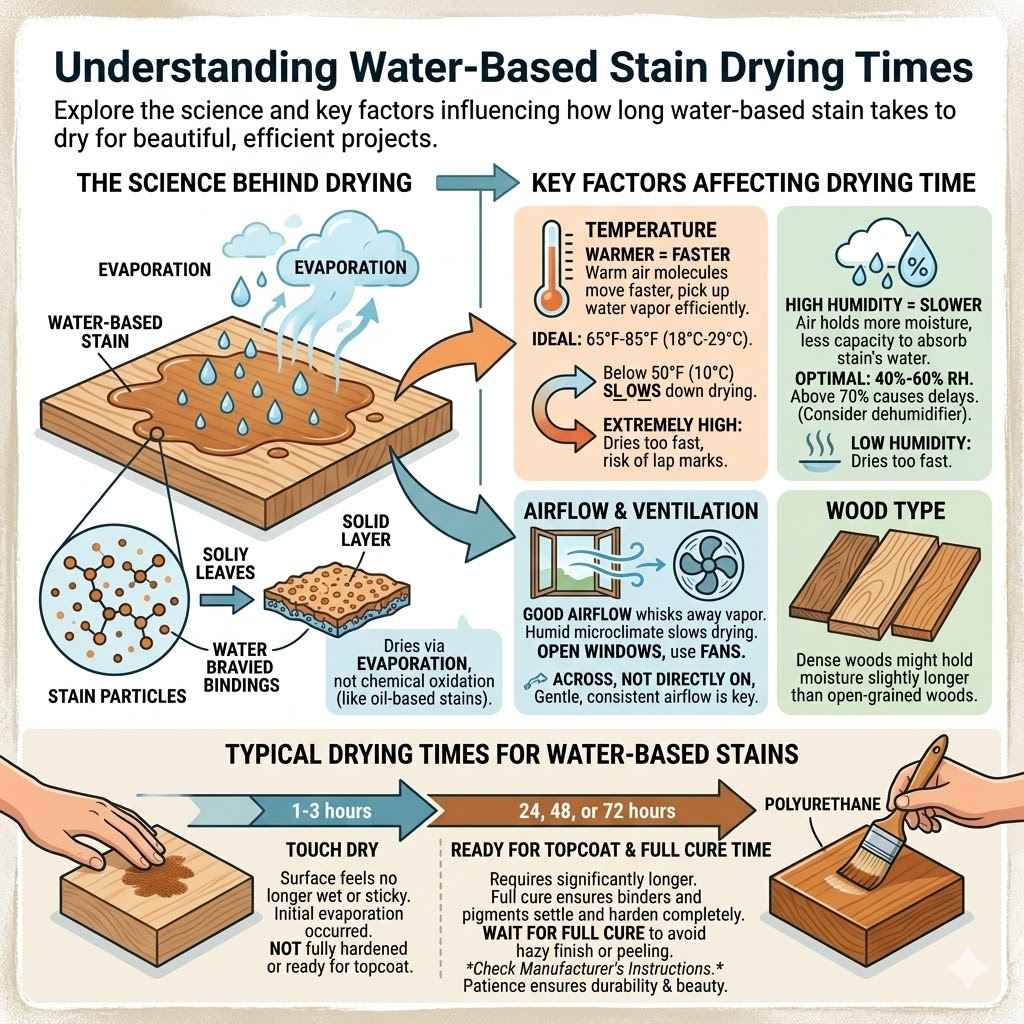
Water-based stains dry through a process called evaporation. The water in the stain turns into vapor and rises into the air. As the water leaves, the stain particles left behind start to stick together.
They form a solid layer on the wood’s surface. This is different from oil-based stains, which dry through oxidation, a chemical reaction.
For water-based stain, the speed of this evaporation is key. It depends on how much water is in the air and how warm it is. Think about how long it takes for a wet shirt to dry on a sunny day versus a damp one.
The same idea applies here. The better the air can take away the water, the faster the stain dries.
Key Factors Affecting Drying Time
Several things can speed up or slow down the drying process. Temperature plays a big role. Warmer air holds more moisture and helps evaporation happen faster.
Humidity is also important. High humidity means there’s already a lot of water in the air, making it harder for the stain’s water to escape.
Airflow is another major factor. When air moves freely around the wood, it carries away the evaporated water. This helps the stain dry much quicker.
Ventilation, like opening windows or using fans, is really helpful. The type of wood you’re staining can also make a small difference. Dense woods might hold onto moisture a bit longer than open-grained woods.
Temperature’s Role
Temperature is one of the most significant elements affecting drying times. Generally, warmer temperatures promote faster drying. This is because warmer air molecules move faster and can pick up water vapor more efficiently.
For water-based stains, ideal drying temperatures are typically between 65°F and 85°F (18°C to 29°C).
When temperatures drop below 50°F (10°C), the drying process can slow down considerably. This is because the water molecules have less energy, and the air’s capacity to hold moisture decreases. It’s generally not recommended to stain in very cold conditions, as it can affect the stain’s performance and the final look.
Extremely high temperatures, while speeding up evaporation, can sometimes cause the stain to dry too quickly on the surface, leading to lap marks or an uneven finish.
Humidity Impact
Humidity refers to the amount of water vapor present in the air. High humidity can significantly prolong drying times for water-based stains. When the air is already saturated with moisture, it has a reduced capacity to absorb more water from the stain.
Imagine trying to dry clothes on a very steamy day; it takes much longer.
For optimal drying, humidity levels should ideally be between 40% and 60%. Levels above 70% can cause major delays. If you are working in a humid environment, you might consider using a dehumidifier to lower the moisture content in the air.
Conversely, very dry air (low humidity) can sometimes cause the stain to dry too fast, which can be problematic for achieving a smooth, even coat.
Airflow and Ventilation
Good airflow is like a helpful breeze that whisks away the evaporating water from the wood surface. Without sufficient air movement, the moisture can get trapped around the wood, creating a humid microclimate that slows down drying. This is why opening windows or using fans is so effective.
Fans should be used to circulate air across the surface of the stained wood, not to blow directly on it. Direct, strong blasts of air can sometimes cause uneven drying or push the stain around, leading to streaks. Gentle, consistent airflow is the goal.
Ensuring good ventilation also helps remove any fumes and improves the overall working environment.
Typical Drying Times for Water-Based Stains
When people ask, “How Long Does Water-Based Stain Take to Dry?“, they usually want a general idea. For water-based stains, a good rule of thumb is that they are often dry to the touch within 1 to 3 hours. However, this is just the surface dry time.
This means you can lightly touch it without getting much stain on your finger.
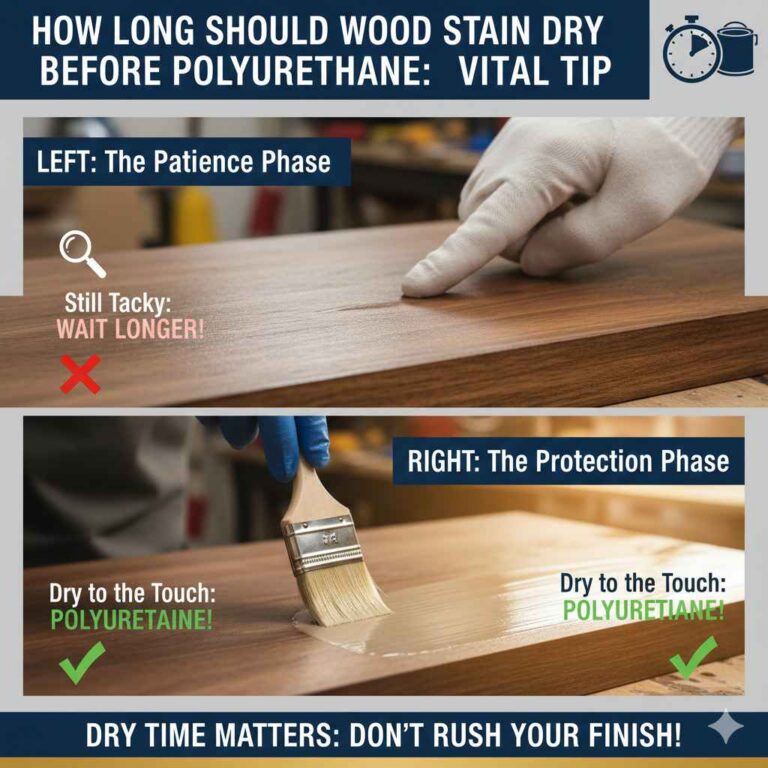
The wood might feel dry on top, but the stain underneath could still be wet. This is a very important distinction. For the stain to be fully cured and ready for a protective topcoat, it usually takes longer.
You’ll need to wait longer before applying polyurethane or another sealant.
Touch Dry vs. Ready for Topcoat
The term “touch dry” refers to the point when the surface of the stain no longer feels wet or sticky to the touch. This typically happens within a few hours. It’s a good indicator that the initial evaporation of water has occurred.
However, it does not mean the stain is fully hardened or ready for further finishing steps.
The wood needs time to fully cure. This curing process involves the remaining binders and pigments in the stain settling and hardening completely. Applying a topcoat too soon can trap moisture, lead to adhesion problems, or cause the topcoat to react poorly with the still-soft stain.
This can result in a hazy finish or peeling later on.
Full Cure Time
The full cure time for water-based stains can vary significantly. While some might be ready for a topcoat in 24 hours, others may require 48 to 72 hours, or even longer. This depends heavily on the specific product, application thickness, and environmental conditions.
Always check the manufacturer’s instructions on the stain can for the most accurate guidance.
Rushing the curing process is one of the most common mistakes DIYers make. It can compromise the durability and appearance of your finished project. Patience is truly a virtue when it comes to staining and finishing wood.
Waiting for the full cure ensures a long-lasting and beautiful result.
Factors That Influence Drying Speed Beyond Basics
Beyond the obvious environmental factors, other elements related to the stain itself and how it’s applied can also affect drying. Understanding these can help you troubleshoot or adjust your technique. This ensures you get the best possible finish every time.
Application Thickness
How much stain you put on the wood matters a lot. If you apply a very thin, even coat, it will dry much faster. This is because there is less liquid to evaporate.
A thicker application means more water needs to escape, naturally taking longer.
It’s usually better to apply multiple thin coats of stain than one very thick one. This not only helps with drying but also leads to a more uniform and controlled color. Excessive stain that isn’t wiped off properly can also create puddles or thick spots.
These areas will take significantly longer to dry and can cause problems with the final finish.
Thin Coats
Applying stain in thin coats is a fundamental technique for achieving a professional-looking finish. A thin coat allows the wood to absorb the stain evenly without leaving excess product on the surface. This excess would otherwise need to evaporate, extending drying times.
With a thin coat, the water content is lower, and the surface area to volume ratio is higher, facilitating quicker evaporation. This also means you have more control over the color depth. You can always add another thin coat to darken the wood if desired, rather than dealing with the long drying times of a thick application.
Thick Coats
Applying stain too thickly is a common mistake that leads to extended drying times and potential finishing issues. When stain is applied heavily, it creates a much deeper reservoir of liquid that must evaporate. This can make the surface appear dry while the bulk of the stain underneath remains wet for much longer.
Thick applications are also more prone to streaking, lap marks, and uneven color. They can trap moisture and prevent proper adhesion of topcoats, leading to premature failure of the finish. Always aim to wipe off excess stain thoroughly within the manufacturer’s recommended time frame to ensure even drying.
Type of Wood
Different types of wood have varying densities and pore structures. These differences can impact how quickly a stain penetrates and dries. Softwoods, like pine, have larger, more open pores.
They tend to absorb stain quickly and can sometimes dry faster.
Hardwoods, such as oak or maple, have denser wood fibers and smaller pores. They may absorb less stain initially, but their density can sometimes mean a slightly longer drying period. The key is that the wood’s ability to absorb and release moisture plays a role in the overall drying cycle.
Porous Woods
Woods like pine, fir, and cedar are considered porous. Their open grain structure means they readily accept stain, often resulting in a deeper color with a single coat. Because the stain can penetrate more easily, the water within the stain has more pathways to evaporate.
However, highly porous woods can sometimes become saturated if too much stain is applied. In such cases, the sheer volume of liquid can still lead to longer drying times, even with an open grain. It’s a balance between absorption and the ability of the wood to release moisture.
Dense Woods
Dense woods, such as oak, maple, cherry, and walnut, have tighter grain structures. They absorb less stain compared to porous woods. This might suggest faster drying due to less liquid being introduced.
However, the density of the wood itself can also impede the rate at which moisture escapes from within the stain.
Woodworkers often use pre-stain wood conditioners on dense woods. This helps the stain penetrate more evenly. While the conditioner itself needs time to dry, it can prevent blotchiness.
The wood’s structure, however, remains a factor in the stain’s ultimate drying and curing time.
Ventilation Quality
The quality of ventilation is more than just having some air movement. It’s about how effectively that air movement removes moisture. A room with a single, small window cracked open might have some airflow, but it won’t be as effective as a room with cross-ventilation.
Cross-ventilation, where air can enter from one side of the room and exit from another, creates a constant flow. This actively flushes out the humid air that surrounds the stained object. Fans placed strategically can significantly boost this effect, ensuring fresh, drier air is constantly interacting with the stained surface.
Cross Ventilation
Cross ventilation is a highly effective method for speeding up drying. It involves creating an air path through a space so that air can enter one opening and exit another. For example, opening a window on one side of a room and a door on the opposite side allows air to flow directly through the workspace.
This continuous movement of air prevents moisture from building up. It actively carries away the water vapor released from the stain, promoting a consistent and faster drying process. It’s a passive but powerful way to improve drying conditions.
Forced Airflow with Fans
Using fans introduces an active element to drying. Instead of relying solely on natural air currents, fans actively move air across the stained surface. This can dramatically reduce drying times, especially in enclosed spaces or during periods of low natural airflow.
It’s important to position fans so they create gentle circulation rather than direct, harsh blasts. Direct airflow can sometimes cause the surface to dry too quickly, leading to an uneven finish or cracking. The goal is to create a steady stream of air that efficiently removes moisture.
Tips for Faster and Better Drying
You can take several proactive steps to help your water-based stain dry faster and achieve a better overall finish. These are practical tips that make a real difference in your project outcomes.
Optimizing Environmental Conditions
Try to stain in the most favorable conditions possible. If you can, choose a day with moderate temperatures and lower humidity. Aim for a temperature between 65°F and 85°F (18°C to 29°C).
Keep humidity below 60% if you can. Using a dehumidifier can help indoors. Ensure good ventilation by opening windows and doors, or by using fans to create airflow.
Controlling Temperature
If you’re working indoors, maintaining a consistent, moderate temperature is ideal. Avoid areas that are too hot or too cold. If you’re in a garage, consider using a small space heater or opening doors to allow warmer air in, as long as humidity isn’t too high.
If it’s very cold outside, it might be worth waiting for a warmer day or moving your project to a more climate-controlled space. Extreme temperatures can not only slow drying but also affect the stain’s chemical properties and how it adheres to the wood.
Managing Humidity
For indoor projects, especially in basements or bathrooms, humidity can be a major obstacle. Using a dehumidifier can significantly speed up drying by removing excess moisture from the air. Place the dehumidifier in the same room as your project.
Empty the water collection tank regularly. If you don’t have a dehumidifier, opening windows and doors to create cross-breezes is the next best option. Sometimes, simply turning on an exhaust fan in a connected bathroom can help circulate air.
Proper Application Techniques
Apply stain in thin, even coats. Don’t let excess stain pool on the surface. Wipe off any excess product promptly according to the manufacturer’s instructions, usually within 5-15 minutes.
Work in manageable sections to prevent lap marks. This means staining a part of the piece, wiping off excess, and then moving to the next section before the first one dries too much. This ensures a consistent color and finish.
Wiping Off Excess Stain
Wiping off excess stain is critical. The stain that penetrates the wood creates the color. The stain left on the surface is just waste product that needs to dry.
Leaving too much on will lead to a sticky surface and long drying times.
Use a clean, lint-free cloth. Wipe with the grain of the wood. Make sure to get into any grooves or corners.
Some people use a second, clean, dry cloth to buff the surface after the initial wipe. This helps ensure all excess is removed.
Preventing Lap Marks
Lap marks happen when a newly applied section of stain overlaps with an area that has already started to dry. This creates a visible line where the color is darker or uneven. To avoid them, always work from one end of a surface to the other.
If you need to take a break, plan it strategically. Try to stop at a natural break in the wood, like an edge or a joint. When you resume, slightly overlap the previously stained, still-wet area.
This allows for a seamless transition.
Using Fans and Dehumidifiers
Place fans strategically to create good airflow. Aim them across the surface of the stained item, not directly at it. This encourages even drying.
A dehumidifier is excellent for reducing ambient humidity, which directly speeds up evaporation. Run it in the room where you are staining. Ensure it’s emptied regularly to maintain its effectiveness.
Strategic Fan Placement
The best fan placement creates a gentle, consistent breeze over the entire stained surface. If you’re staining a table, place a fan on a low setting a few feet away, angled to circulate air around the tabletop. Avoid placing fans too close or on high settings, which can cause uneven drying.
If working on vertical surfaces like cabinet doors or furniture legs, fans can be positioned to create a steady flow of air from bottom to top or side to side. The goal is constant air exchange to carry moisture away efficiently.
Dehumidifier Operation
A dehumidifier actively pulls moisture from the air. When using one for stain drying, set it to a moderate level. Too dry an environment can also cause issues, so aim for balanced conditions.
Keep the unit running throughout the drying period.
Regularly check and empty the water collection tank. Some dehumidifiers have continuous drain options, which can be very convenient for longer projects. The reduced humidity makes it significantly easier for the water in the stain to evaporate.
Troubleshooting Common Drying Issues
Sometimes, even with the best intentions, drying issues can pop up. Knowing how to identify and fix them can save your project.
Sticky Surfaces
A sticky surface often means the stain hasn’t fully dried or cured. This can happen if too much stain was applied, humidity is too high, or ventilation is poor.
Try improving airflow and lowering humidity. If it’s just slightly sticky, gently wiping with a clean cloth might help. For persistent stickiness, you might need to lightly scuff the surface with very fine sandpaper (220 grit or higher) and reapply a thin coat of stain, ensuring you wipe off excess properly.
Causes of Stickiness
Stickiness is usually a symptom of incomplete evaporation. This can be caused by applying the stain too thickly, leading to an excessive amount of water that the air can’t remove quickly enough. High humidity is another major culprit, as the air is already saturated and cannot absorb more moisture.
Poor ventilation traps the released water vapor near the surface.
Sometimes, the specific formulation of the stain can also contribute. Some stains are designed for slower drying to allow for better workability, but this can be an issue in less-than-ideal conditions. Ensure you are following the manufacturer’s recommendations for application and drying.
Solutions for Stickiness
The first step is to improve drying conditions: increase airflow with fans and reduce humidity with a dehumidifier or by opening windows. If the stickiness is minor, you can try lightly sanding the sticky area with very fine-grit sandpaper (220-320 grit) to remove the uncured layer. Then, wipe clean and let it dry further.
For more significant stickiness, you may need to carefully scrape off the affected area. Then, reapply a very thin, even coat of stain, ensuring you wipe off all excess promptly. Always allow ample drying time between coats and before applying a topcoat.
Uneven Color or Patchiness
Patchiness can occur if the stain was applied unevenly, excess was not wiped off properly, or if the wood wasn’t prepared well. It can also happen if the stain dried too quickly in some spots before more could be applied.
For minor patchiness, you can sometimes fix it by lightly sanding the area and reapplying a thin coat of stain. For severe patchiness, you might need to sand the entire piece down to the bare wood and start over, paying close attention to even application and wiping.
Causes of Patchiness
Uneven application is a primary cause of patchiness. This includes not spreading the stain evenly, inconsistent wiping of excess, or applying the stain in inconsistent thicknesses. If the wood surface isn’t smooth or has dust on it, the stain might not absorb uniformly, leading to blotchy areas.
Also, if sections dry too quickly, you can get lap marks that appear as darker or lighter patches. This is why consistent application and timely wiping are so important. Pre-stain conditioners can help prevent blotchiness on woods like pine or maple.
Fixing Patchiness
For minor patchiness, try sanding the affected area with fine-grit sandpaper (180-220 grit) to blend the color. Then, wipe clean and try to reapply a thin, even coat of stain, ensuring prompt wiping of excess. It’s crucial to work in long, continuous strokes with the grain.
If the patchiness is significant, you may need to sand the entire piece back to bare wood. This ensures a consistent starting point. Reapply the stain carefully, ensuring uniform coverage and prompt removal of excess.
Using a pre-stain conditioner on absorbent woods can help prevent blotchiness from happening in the first place.
Paint Not Adhering
If you’re applying a water-based paint over water-based stain and it’s not sticking, the stain likely wasn’t fully cured. Paint needs a solid, dry surface to adhere to.
The solution is to wait longer. If the paint is already applied and peeling, you’ll need to remove it, let the stain cure fully, and then reapply the paint. Sometimes, a light scuff-sanding of the cured stain can improve adhesion for the paint.
Why Paint Won’t Stick
Paint adhesion issues over stain are almost always related to the stain not being fully cured. Water-based stains, even when dry to the touch, continue to harden and cure over days. If paint is applied before this curing process is complete, it can trap residual moisture or oils from the stain.
This prevents the paint from forming a strong bond with the wood surface.
The paint might adhere initially, but it will likely peel, chip, or flake off over time as it fails to bond properly. Ensuring the stain has reached its full cure time is paramount for a durable paint finish.
Ensuring Paint Adhesion
The most critical step is to wait for the stain to fully cure. Refer to the stain manufacturer’s recommendations for cure times, which are typically longer than dry-to-touch times (often 24-72 hours or more). Once cured, you can lightly scuff-sand the stained surface with fine-grit sandpaper (around 220 grit).
This creates a slightly rougher surface for the paint to grip. Wipe away all dust with a tack cloth before applying your water-based paint. Using a high-quality primer designed for use over stained surfaces can also greatly improve paint adhesion and durability.
Comparing Water-Based vs. Oil-Based Stain Drying
Understanding the differences in drying times between water-based and oil-based stains can help you choose the right product and manage expectations.
Water-Based Stains
Water-based stains dry by evaporation. This generally means they dry faster to the touch. They are also easier to clean up with soap and water.
However, they may require more coats for deep color and can sometimes raise the grain of the wood.
Typical touch-dry times are 1-3 hours. Full cure might take 24-72 hours. This faster drying makes them convenient for projects with tight deadlines.
Oil-Based Stains
Oil-based stains dry through oxidation, a chemical reaction that takes longer. They typically have a longer dry-to-touch time, often 6-12 hours or more. They usually provide richer colors and penetrate wood well, often requiring fewer coats.
Cleanup requires mineral spirits or paint thinner. Full cure can take several days to a week or even longer. While slower, they are known for their durability and depth of color.
| Feature | Water-Based Stain | Oil-Based Stain |
|---|---|---|
| Drying Mechanism | Evaporation | Oxidation |
| Dry to Touch Time | 1-3 hours | 6-12+ hours |
| Full Cure Time | 24-72 hours | Several days to 1+ week |
| Cleanup | Soap and water | Mineral spirits |
| Color Depth | May require more coats | Rich, deep color often with fewer coats |
| Grain Raising | Can raise grain | Less grain raising |
Ease of Cleanup
The most significant practical difference for many DIYers is cleanup. Water-based stains are incredibly easy to clean. Brushes, rollers, rags, and your hands can all be cleaned with simple soap and water.
This makes the post-project cleanup much less of a chore.
Oil-based stains, on the other hand, require solvents like mineral spirits or paint thinner. These are often flammable and have strong fumes, making cleanup more involved and requiring proper disposal of waste materials. This ease of cleanup is a major advantage of water-based products for many home projects.
Penetration and Color
Oil-based stains are known for their ability to penetrate deeply into wood, often producing a richer, more lustrous color in fewer coats. This deep penetration can provide a more traditional wood look. They tend to be more forgiving with less desirable wood types, helping to even out the appearance.
Water-based stains might sit more on the surface or penetrate differently. While they offer a wide range of colors and are improving in depth and richness, achieving a very deep, dark color might require multiple coats. The final look can sometimes be less luminous than with oil-based stains, though this is increasingly a matter of specific product quality.

Frequently Asked Questions
Question: How long does it typically take for water-based stain to be completely dry
Answer: Water-based stain is usually dry to the touch in 1 to 3 hours, but it takes 24 to 72 hours or more to fully cure and be ready for a topcoat.
Question: Can I speed up the drying time of water-based stain
Answer: Yes, you can speed up drying by ensuring good airflow with fans, maintaining moderate temperatures, and keeping humidity levels low.
Question: What happens if I apply a topcoat too soon over water-based stain
Answer: Applying a topcoat too soon can trap moisture, leading to adhesion problems, a hazy finish, or peeling later on. Always wait for the stain to fully cure.
Question: Does wood type affect how long water-based stain takes to dry
Answer: Yes, denser woods may dry slightly slower than porous woods because their structure can affect how moisture evaporates from the stain.
Question: Is water-based stain harder to work with than oil-based stain
Answer: Water-based stain is generally easier to work with due to faster drying times and simple soap-and-water cleanup, although oil-based stains often offer deeper color with fewer coats.
Conclusion
So, how long does water-based stain take to dry? Generally, it’s dry to the touch in a few hours, but full curing takes 24 to 72 hours or longer. Factors like temperature, humidity, and airflow are key.
Applying thin coats and wiping off excess helps it dry faster and better. Follow these tips for a smooth, beautiful finish on your next project.