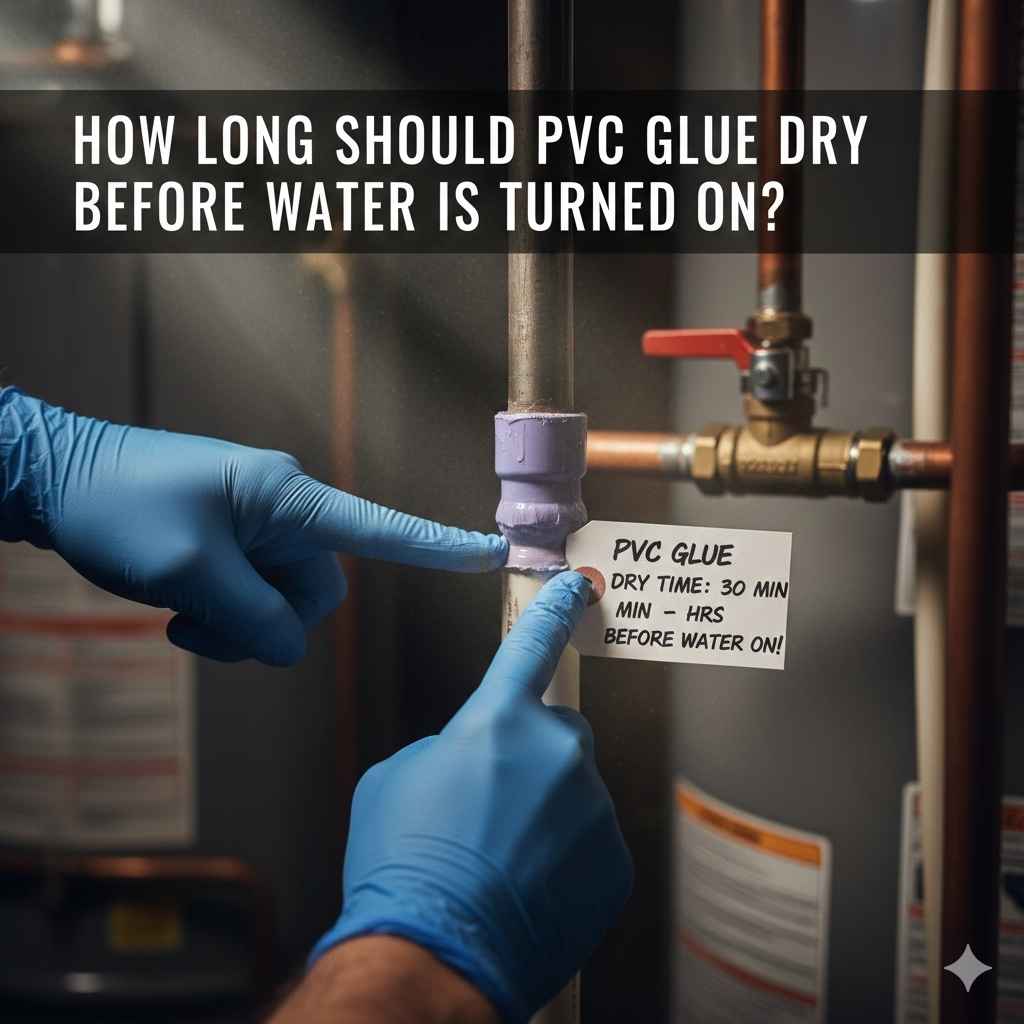
How Long Should PVC Glue Dry Before Water Is Turned On?
If you’re new to plumbing, figuring out How Long Should PVC Glue Dry Before Turning On Water? can feel tricky. You want to avoid leaks, but also don’t want to wait around forever. Don’t worry, it’s a manageable task! This post breaks down everything you need to know about PVC glue and drying times, offering a straightforward, step-by-step approach. We’ll explore the factors affecting drying, safe practices, and how to avoid plumbing problems. Let’s get started with the basics!
Understanding PVC Glue and Its Role in Plumbing
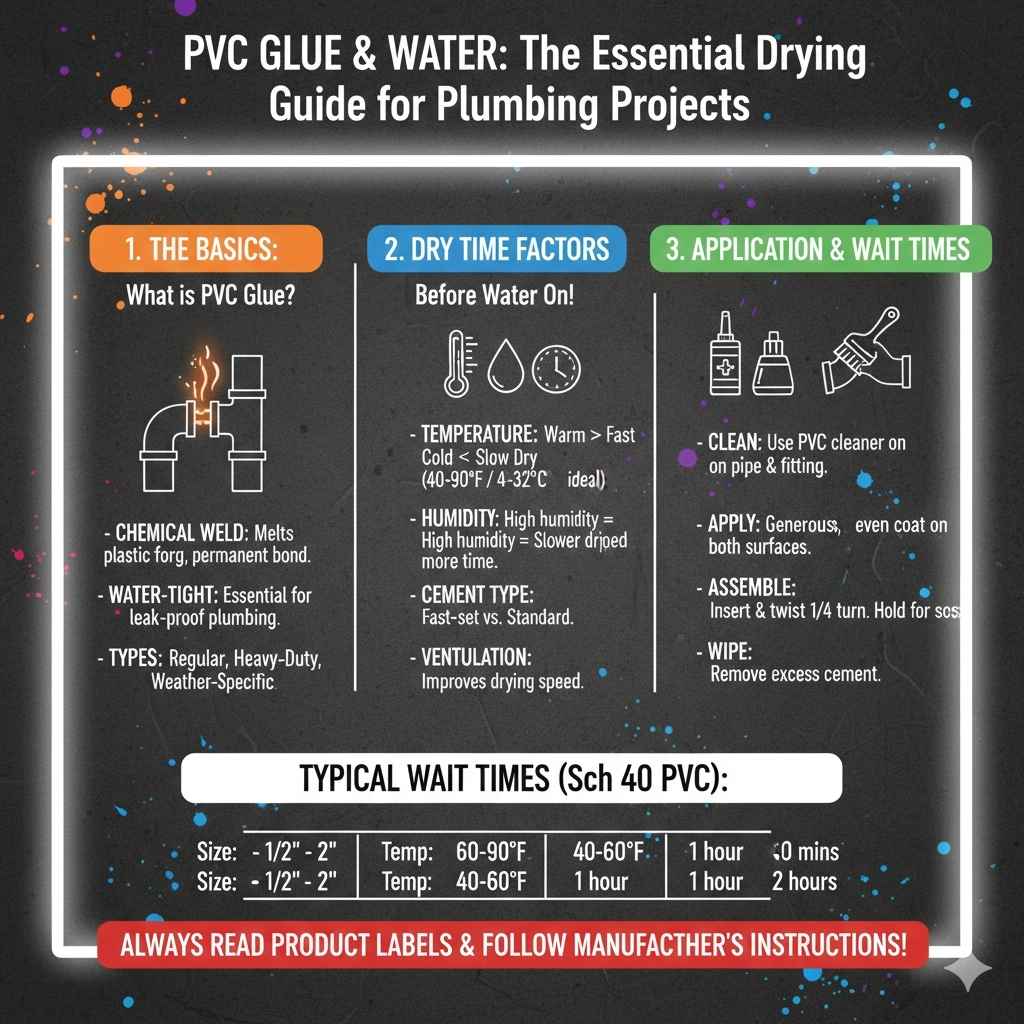
PVC glue, often called PVC cement or solvent cement, is a special adhesive used to join PVC (polyvinyl chloride) pipes and fittings. Unlike regular glue, PVC cement actually melts the plastic slightly, creating a chemical weld. This process creates a strong, permanent bond that is essential for water-tight plumbing systems. Choosing the right type of PVC cement is very important. There are different kinds for different purposes, like regular, heavy-duty, and even specific types for different water temperatures or pressures.
Be sure to check what’s recommended for your project to ensure you’re using the right stuff. The effectiveness of this glue depends on several factors, including the quality of the glue and the climate you’re working in.
The Chemical Welding Process
The chemical reaction that happens when you apply PVC cement is quite fascinating. When applied, the solvent in the cement softens the PVC surfaces of the pipe and fitting. As the pipe and fitting are joined and held together, the softened PVC molecules intermingle. Over time, as the solvent evaporates, the PVC materials fuse into a single, seamless structure. This bond is far stronger than any simple adhesive. This process creates a leak-proof seal that can withstand considerable water pressure. Knowing how this weld works helps you appreciate the importance of proper application and sufficient drying time. It also highlights why using the correct cement for the job is essential.
- Solvent Action: The solvent in the cement dissolves the top layer of PVC, preparing the surface for the bond.
- Molecular Intermingling: The dissolved PVC molecules mix, creating an integrated structure.
- Evaporation and Fusion: As the solvent evaporates, the PVC molecules solidify, creating a solid, welded joint.
- Strength and Durability: This process results in a very strong and lasting connection, capable of handling water pressure and various environmental conditions.
Factors Affecting Drying Time
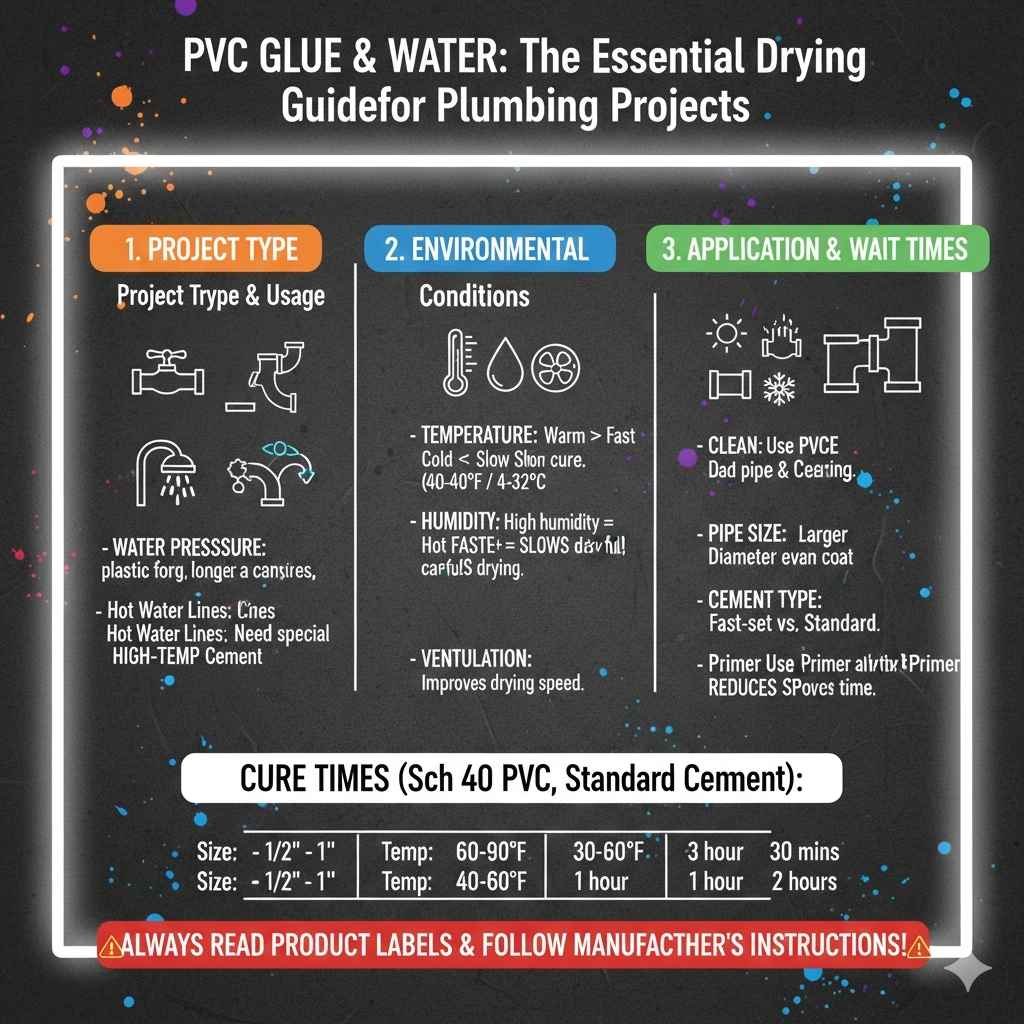
Several things influence how long it takes for PVC glue to dry before you can turn on the water. The environment where you’re working plays a big part. Humidity, temperature, and ventilation are all important. Temperature has the biggest effect. Warmer weather helps the cement dry faster, while cold weather slows it down. The diameter of the pipe is also important. Larger pipes usually need more time to fully cure due to the greater surface area and the amount of glue used. The type of cement you use also matters a lot. Different cements have different formulas, so drying times can vary. For example, fast-setting cements may dry faster than standard ones.
- Temperature: Warmer temperatures speed up drying, while colder temperatures slow it down. Aim for an ideal range between 40°F (4°C) and 90°F (32°C).
- Humidity: High humidity can extend drying times by slowing solvent evaporation.
- Pipe Size: Larger diameter pipes usually need more time to dry compared to smaller pipes.
- Cement Type: Fast-setting cements dry quicker than standard cements, but may not be as forgiving with application errors.
- Ventilation: Good ventilation helps the solvent evaporate faster, decreasing the drying time.
Proper Application Techniques
Good application of PVC glue is as vital as letting it dry properly. First, make sure both the pipe and fitting surfaces are clean and free of dirt, grease, and any other things that could interfere with the bond. Use a PVC cleaner for this. Next, apply a generous layer of cement to both surfaces – the inside of the fitting and the outside of the pipe. Don’t be shy; a good, even coating is key. Then, put the pipe and fitting together quickly and firmly, twisting them slightly to spread the cement. Hold them together for a few seconds to let the bond set. Following these steps helps make sure your plumbing job goes smoothly and securely.
- Surface Preparation: Clean the pipe and fitting surfaces using a PVC cleaner and a clean rag or brush. Get rid of all dirt, dust, and moisture.
- Cement Application: Apply a generous, even coat of PVC cement to both the inside of the fitting and the outside of the pipe.
- Assembly: Quickly insert the pipe into the fitting, twisting it a quarter-turn to evenly distribute the cement.
- Hold Time: Hold the pieces together firmly for the time suggested on the cement container, usually about 30 seconds.
- Wipe Excess: Remove any excess cement that oozes out with a clean rag.
How Long Should PVC Glue Dry Before Turning On Water? A Detailed Guide
The time you need to wait before turning the water on after using PVC glue depends on a few things. These include the size of the pipes, the weather, and the specific cement you use. It’s always best to check the product label for the exact drying time recommended by the manufacturer. However, some general guidelines can help you. For smaller pipes, like those used for household plumbing, you might be able to get away with a shorter wait. However, for larger pipes or when using the system under pressure, you’ll need to wait longer to guarantee the connection is completely sealed. Knowing these details will help ensure that your plumbing project is successful and leak-free.
General Drying Time Guidelines
These are general guidelines only, so always check the product’s label. The most important rule is to allow enough time for the glue to fully cure, ensuring a watertight seal. This will depend on the diameter of the pipe, the type of glue you’re using, and the environmental conditions. Smaller pipes typically require less waiting time than larger ones, and warm, dry environments will allow for faster drying than cold, humid ones. By carefully observing the recommended drying times, you minimize the risk of leaks and ensure your plumbing is reliable and lasts for a long time.
- Small Pipes (e.g., ½ inch to 1 inch): Allow at least 15 to 30 minutes before testing the system with low water pressure. For full water pressure, wait at least 1 to 2 hours.
- Medium Pipes (e.g., 1 ¼ inch to 2 inches): It’s best to wait at least 1 hour before applying low pressure. Wait 2 to 4 hours before turning on full pressure.
- Large Pipes (e.g., 3 inches and larger): Waiting times increase significantly. Let the glue dry for a minimum of 2 hours before applying low pressure. For full water pressure, give it at least 6 to 8 hours.
Testing Your Plumbing System Safely
After the glue has dried for the recommended time, you can safely test the plumbing system. Begin by slowly turning on the water. Start with a gentle flow, and carefully inspect all joints for any signs of leaks. Check around each fitting and pipe connection. If you don’t see any leaks, gradually increase the water pressure. Observe the connections as the pressure rises. If you find a leak, turn off the water immediately and let the joints dry for a longer period before retesting. This helps ensure that your plumbing system is working correctly. It gives you peace of mind and prevents potential water damage.
- Initial Water Fill: Slowly open the water valve to allow the system to fill with water.
- Low-Pressure Inspection: Examine each joint for leaks at low water pressure. Look closely at connections, especially where glue was applied.
- Pressure Increase: Gradually increase the water pressure and continue to observe all connections for any leaks.
- Leak Assessment: If any leaks are detected, turn off the water immediately and allow extra drying time.
- Final Inspection: After the system is at full pressure and no leaks are detected, verify all connections are secure and dry.
Troubleshooting Common Issues and Mistakes
Plumbing projects sometimes have problems. Several common issues can happen when using PVC glue. One problem is not cleaning the pipe and fitting surfaces well enough, which can lead to a weak bond. Another is not applying enough glue or applying it unevenly. It’s also important to avoid rushing the process and turning the water on too soon. If you notice any leaks after testing, don’t worry. You can usually fix them by turning off the water, letting the joint dry completely, and re-gluing the connection. By paying close attention to these common pitfalls, you can reduce the chance of problems and do a successful job.
- Leaking Joints: If you see water leaking, turn off the water immediately. Let the joint dry and reapply the cement.
- Insufficient Glue: Ensure you’re using enough cement to create a good seal. An even coat on both surfaces is key.
- Improper Surface Prep: Always clean the pipe and fitting surfaces to get rid of dust and moisture.
- Rushing the Process: Always follow the recommended drying times, especially for larger pipes.
- Using Old Cement: Check the expiration date on the cement container, as old cement may not work as well.
PVC Glue Drying in Different Situations
Understanding how the drying time of PVC glue is affected by different situations can help you plan your projects better. Different factors, such as the environment, the location of the plumbing work, and the type of pipes you are using, can affect the drying process. For example, if you’re working outside in cold weather, you’ll need to adjust the drying time to account for the slower evaporation of the solvent in the glue. Also, the type of water system, whether it is for a swimming pool or a sprinkler, can affect the drying time due to the specific pressure requirements.
Drying Time for Underground Plumbing
When working on underground plumbing, the environment can be different from above ground. Soil conditions can have an impact. Since the ground stays cooler than the air, it can slow down the drying process of PVC glue. It’s important to give the joints extra time to set and cure fully before backfilling the trench. The pressure within the pipes will also be higher, especially if you have a well or city water. Because of this, it’s really important to follow the manufacturer’s advice for drying times. Taking this approach helps you prevent future leaks and keep the underground plumbing safe.
- Soil Temperature: The ground temperature might be colder than the air temperature, impacting drying.
- Increased Pressure: Underground pipes may experience higher water pressure.
- Thorough Inspection: Always check all joints for leaks before backfilling the trench.
- Proper Sealing: Make sure the glue is applied correctly to withstand pressure and soil movement.
Drying Time in Swimming Pools
Plumbing for swimming pools often has unique needs, which influences the drying time of PVC glue. Pool systems usually operate under higher water pressure, and they must be completely watertight to prevent leaks and maintain water levels. The presence of chemicals, such as chlorine, requires careful attention to the bonds. You need to ensure the joints are fully cured before exposing them to these chemicals. Waiting longer can help reduce the possibility of leaks that could cause significant damage. Careful attention to detail is essential for swimming pool plumbing to ensure the long-term reliability of the system.
- High Pressure: Pool systems frequently operate at higher pressures than standard household plumbing.
- Chemical Exposure: The presence of pool chemicals can affect the bond.
- Water Tightness: Leaks can cause significant water loss and damage.
- Extended Drying: Always let the glue dry for the recommended time, or longer if needed, before introducing water and chemicals.
Drying in Sprinkler Systems
When working on sprinkler systems, the drying time for PVC glue is affected by the same basic rules but with a few extra things to consider. Sprinkler systems often have high pressure, especially when the system is operating. The quality of the connections is really important. Any leaks could lower water pressure and make the sprinklers work poorly. If you’re installing a new sprinkler system, you should always check the glue manufacturer’s recommendations. Giving the glue enough time to dry is especially important in sprinkler systems. It is key to preventing water wastage and ensuring that the lawn receives even watering.
- High Pressure: Sprinkler systems often operate at higher pressures than standard household plumbing.
- System Testing: Always test the entire system before burying the pipes to check for leaks.
- Weather Conditions: Be aware of the weather because it influences drying times, particularly in the case of low temperatures and damp environments.
- Thorough Inspection: Check every joint and connection very carefully before turning on the water.
Frequently Asked Questions
Question: Can I use PVC glue in cold weather?
Answer: Yes, but drying times will increase. It is better to work in temperatures above 40°F (4°C). If working in colder conditions, allow extra time for the glue to cure.
Question: What if I don’t wait long enough?
Answer: If you turn on the water too soon, the joints might leak. You’ll need to turn off the water, let the joint dry, and reapply the glue.
Question: Is there a way to speed up the drying process?
Answer: You can use a heat gun (carefully) or ensure good ventilation. However, always follow the manufacturer’s recommended drying times.
Question: How do I know if the glue has dried enough?
Answer: Gently tap the pipe near the joint. If it feels solid and doesn’t move, it’s likely dry. Always wait the recommended time and test with low pressure.
Question: Can I use PVC glue on CPVC pipes?
Answer: No. PVC glue is only for PVC pipes. You must use CPVC cement for CPVC pipes.
Final Thoughts
So, How Long Should PVC Glue Dry Before Turning On Water? Well, it depends on a few things, like pipe size, temperature, and what the glue maker says. The main thing is to allow enough time for the glue to make a strong seal. This keeps your pipes from leaking. If you follow the recommendations and take your time, you’ll be able to confidently handle your plumbing jobs. Remember to always double-check your work and to test the system with care. With some patience and the right methods, you can make a leak-free plumbing system. So, go ahead and get your projects done, and enjoy the peace of mind of a job well done!