How Long Should Treated Lumber Dry Before Painting: Key Answer
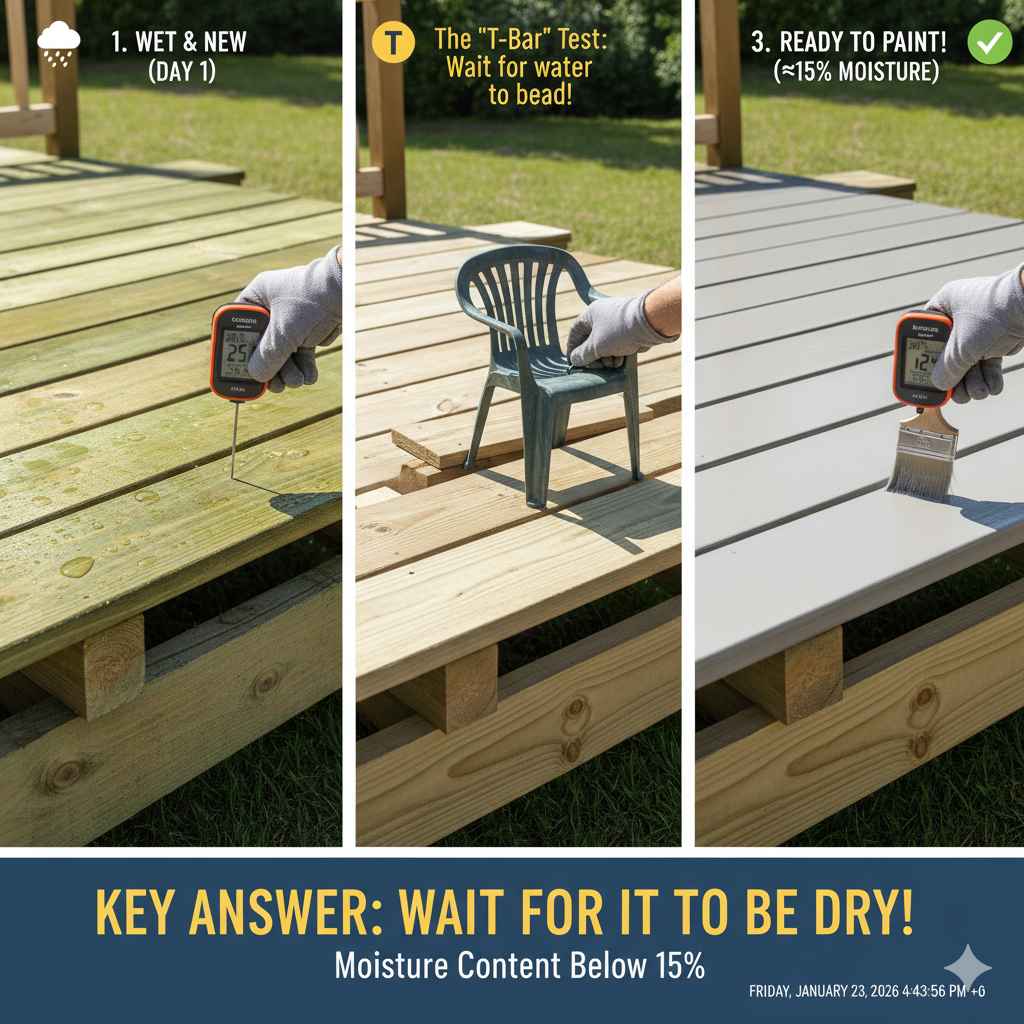
For best results, treated lumber should dry for several weeks to a few months before painting. The key is ensuring the moisture content is below 15%. The fastest way to check is with the “sprinkle test”—if water beads up, it’s too wet. If it soaks in, you’re ready to paint.
So, you’ve just built a beautiful new deck, fence, or playset with pressure-treated lumber. You’re excited to add that perfect coat of paint to finish the job and protect your hard work. But you’ve heard you need to wait before painting, and now you’re stuck. How long is long enough? This is one of the most common questions in DIY projects, and getting it wrong can turn your dream finish into a peeling nightmare.
Don’t worry, I’ve been there too! It’s frustrating to pause when you’re so close to the finish line. But a little patience now will save you a ton of time, money, and headaches later. In this guide, I’ll walk you through exactly how to know when your treated wood is ready, step-by-step. We’ll make it simple, clear, and foolproof. Let’s get you that beautiful, long-lasting paint job you’ve been dreaming of.
Why Waiting is a Must: A Quick Look at Treated Lumber
Before we talk about timing, let’s quickly cover why you have to wait in the first place. Understanding your material is the first step to becoming a confident DIYer!
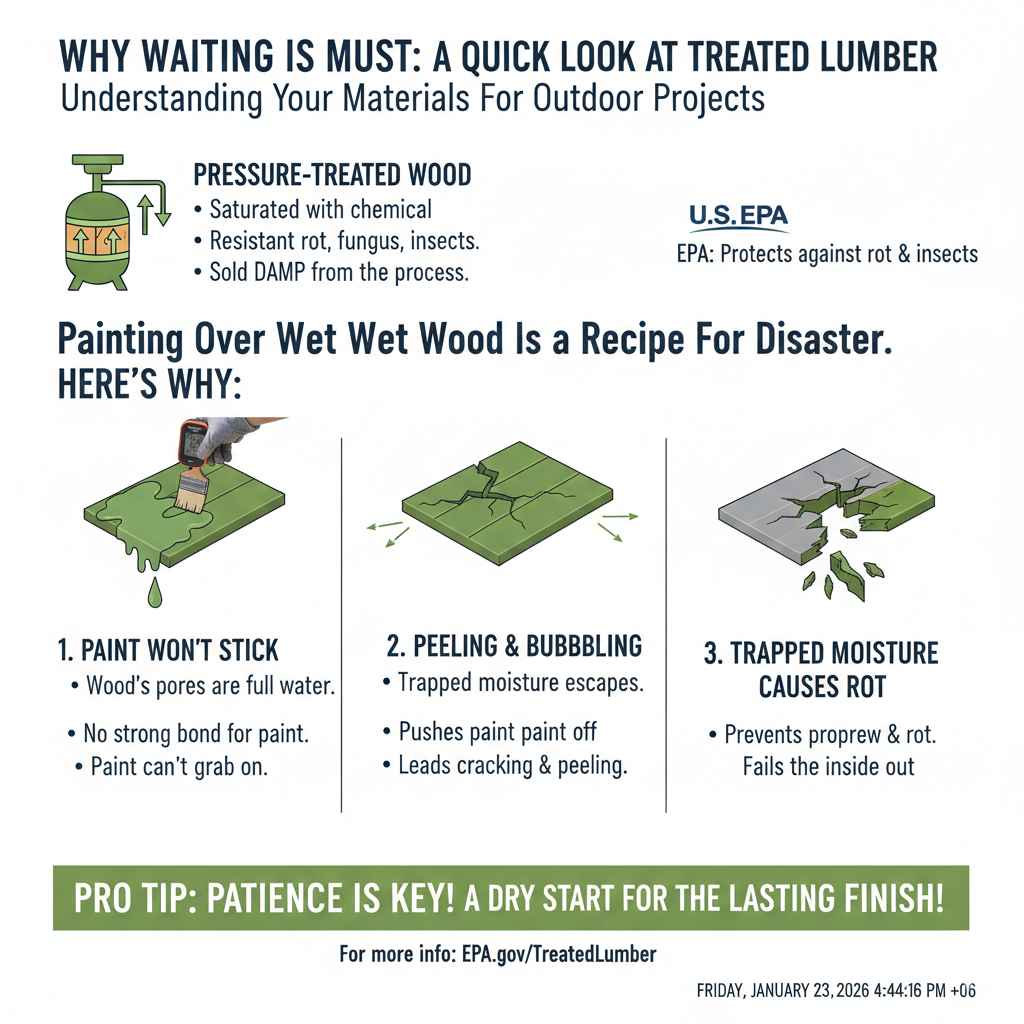
Pressure-treated wood is regular lumber that has been saturated with chemical preservatives. This process happens in a high-pressure tank that forces the protective chemicals deep into the wood fibers. As the U.S. Environmental Protection Agency (EPA) explains, these chemicals are what make the wood highly resistant to rot, fungus, and wood-boring insects. It’s a fantastic material for outdoor projects.
But here’s the catch: that process leaves the wood very wet. When you buy it from the store, it’s often still damp from the treatment. Painting over wet wood is a recipe for disaster. Here’s why:
- Paint Won’t Stick: Paint needs a dry, porous surface to grab onto. If the wood’s pores are full of water, the paint has nowhere to go and can’t form a strong bond.
- Peeling and Bubbling: As the trapped moisture eventually tries to escape, it will push the paint right off the surface, causing it to bubble, crack, and peel.
- Trapped Moisture Causes Rot: Ironically, painting too soon can trap moisture inside the wood, preventing it from ever drying properly. This can lead to mildew, mold, and even rot from the inside out—the very thing you were trying to prevent!
Simply put, waiting for the wood to dry is the single most important step for a successful paint job.
The Key Answer: General Drying Timelines
So, how long should treated lumber dry before painting? While there isn’t one magic number, we can work with some reliable estimates. The drying time depends heavily on the wood itself, your climate, and its storage conditions.
Here’s a helpful table to give you a starting point:
| Lumber & Climate Condition | Estimated Drying Time | Best Way to Check |
|---|---|---|
| Freshly Treated Lumber in a Hot, Dry Climate | 2 to 4 weeks | Moisture Meter & Sprinkle Test |
| Freshly Treated Lumber in a Humid or Cool Climate | 4 to 8 weeks (or longer) | Moisture Meter is highly recommended |
| Lumber That Has Been Rained On Recently | Add 2-3 sunny days to dry | Sprinkle Test |
| Kiln-Dried After Treatment (KDAT) Lumber | Ready almost immediately (check label) | Confirm with Sprinkle Test |
As you can see, “a few months” is a safe bet in many cases, but you don’t have to guess. There are two simple, foolproof methods to tell you exactly when your wood is ready.
How to Know for Sure: Two Simple Tests
Instead of just guessing based on a calendar, let’s use some simple science. These two tests will give you a definitive answer and the confidence to move forward.
Method 1: The Sprinkle Test (The Quick & Easy Way)
This is the classic, go-to test for any DIYer. It’s free, fast, and surprisingly effective. It tells you if the wood is still repelling water or ready to absorb a finish.
- Find a Spot: Choose a representative spot on your lumber. If it’s a deck, test a few boards in both sunny and shady areas.
- Add Water: Sprinkle a few drops of water onto the surface of the wood.
- Watch Closely: Observe the water for a few minutes.
- If the water beads up… the wood is still saturated with moisture and preservatives. It’s not ready yet. Wait another week or two and test again.
- If the water soaks in quickly… congratulations! The wood pores are open and ready to absorb primer and paint. You’re good to go.
The sprinkle test is a fantastic rule of thumb, but if you want to be 100% certain, the next method is for you.
Method 2: Using a Moisture Meter (The Professional’s Choice)
A moisture meter is a small, handheld device that gives you a precise reading of the moisture content inside the wood. It takes all the guesswork out of the equation. Once seen as a pro-only tool, they are now very affordable and a great addition to any DIYer’s toolbox.
The magic number you are looking for is a moisture content of 15% or less. Many pros prefer to wait until it’s down to 12%, but anything under 15% is a safe zone for painting.
Using one is incredibly easy:
- Turn the meter on and set it to the correct wood type if it has that option.
- Gently press the metal probes into the wood.
- Read the number on the digital screen. That’s your moisture content percentage!
Test several boards in different areas of your project to get an average reading. Once they consistently read below 15%, you can start your prep work with total confidence.
Key Factors That Influence Drying Time
Why does your neighbor’s deck dry in three weeks while yours takes two months? Several factors are at play. Understanding them can help you manage your project timeline.
- Climate and Weather: This is the biggest factor. A project in arid Arizona will dry much faster than one in humid Florida. Hot, sunny, and windy days will speed up drying, while cool, cloudy, or rainy weather can bring it to a halt.
- Sun Exposure: Boards that get direct sunlight all day will dry faster than boards in a shady or north-facing spot. This is why it’s important to test different areas of your project.
-
Type of Treated Lumber:
- Standard Wet-Treated: This is the most common type found at big-box stores. It’s sold wet and requires the longest drying time.
- KDAT (Kiln-Dried After Treatment): This lumber is put in a kiln after the chemical treatment to remove excess moisture. It costs more but is stable, lighter, and ready to paint almost immediately.
- Storage and Airflow: If you’re storing the lumber before building, proper storage is key. Stack the boards with small pieces of scrap wood (called “stickers”) between each layer. This allows air to circulate freely around all four sides of each board, promoting even and faster drying. A pile of lumber stacked flat on the ground will take forever to dry.
Step-by-Step Guide: Prepping and Painting Your Treated Lumber for a Flawless Finish
Once your lumber is finally dry, don’t jump straight to painting! Proper preparation is just as important as waiting. Following these steps will ensure your paint job looks amazing and lasts for years.
Step 1: Confirm It’s Dry
We’ve covered this, but it’s worth repeating. Use the sprinkle test or a moisture meter to confirm the wood is ready. Do not proceed until the moisture is below 15%.
Step 2: Clean the Wood Surface
Even new lumber needs a good cleaning. It can have dirt, grime, and a water-repellent film left over from the milling process. A clean surface is essential for paint adhesion.
- Use a dedicated deck cleaner or a simple mixture of mild soap and water.
- Apply the cleaner and scrub the surface with a stiff-bristle brush.
- Rinse the wood thoroughly with a garden hose. Avoid using a high-pressure washer, as it can be too aggressive and damage the wood fibers.
- Let the wood dry completely after cleaning, which usually takes 1-2 sunny days.
Step 3: Sanding (Optional but Recommended)
Sanding might seem like an extra chore, but it makes a big difference. A light sanding with 80 to 120-grit sandpaper will smooth out any rough spots or splinters and, more importantly, it opens up the wood pores. This allows the primer to get a much stronger grip on the wood. Always remember to wear a dust mask when sanding treated lumber.
Step 4: Choose the Right Primer and Paint
You can’t use just any paint. You need products designed for exterior use on treated wood.
- Primer: Always use a primer! It’s non-negotiable. Look for a high-quality exterior stain-blocking primer. This is crucial because the chemicals in treated wood can sometimes “bleed” through the paint, causing yellowish or greenish stains. A good primer prevents this and creates the perfect base for your paint.
- Paint: Choose a high-quality exterior acrylic latex paint. These paints are flexible, durable, and built to withstand the elements. They expand and contract with the wood as temperatures change, which reduces the chance of cracking and peeling.
Step 5: Apply the Primer
Check the weather forecast before you start. You want a dry day with moderate temperatures and low humidity—ideal conditions are usually listed on the paint can. Apply one even coat of primer to all surfaces of the wood. Let it dry completely according to the manufacturer’s instructions.
Step 6: Apply the Paint
Once the primer is fully cured, it’s time for the fun part! For the best protection and a rich color, apply two thin coats of paint rather than one thick coat. Allow the first coat to dry completely before applying the second. Thin coats dry faster and create a harder, more durable finish.
Painting vs. Staining Treated Lumber: Which Is Right for You?
Maybe you’re on the fence about whether to paint or stain. Both are great options, but they offer different looks and levels of maintenance. Here’s a quick comparison:
| Feature | Paint | Stain |
|---|---|---|
| Appearance | Creates an opaque, solid-color film on the wood surface. Hides the wood grain. | Penetrates the wood. Comes in transparent to semi-solid finishes that enhance the natural wood grain. |
| Protection | Offers excellent surface protection from UV rays and moisture, like a hard shell. | Sinks into the wood to seal it from moisture. UV protection varies by transparency (darker stains offer more). |
| Maintenance | Can chip or peel over time and may require scraping and sanding before repainting. | Tends to fade gracefully over time. Reapplication is usually easier—just clean and re-coat. |
Choose paint if: You want a specific solid color, maximum UV protection, or want to hide imperfections in the wood.
Choose stain if: You love the natural look of wood grain and prefer an easier maintenance routine down the road.
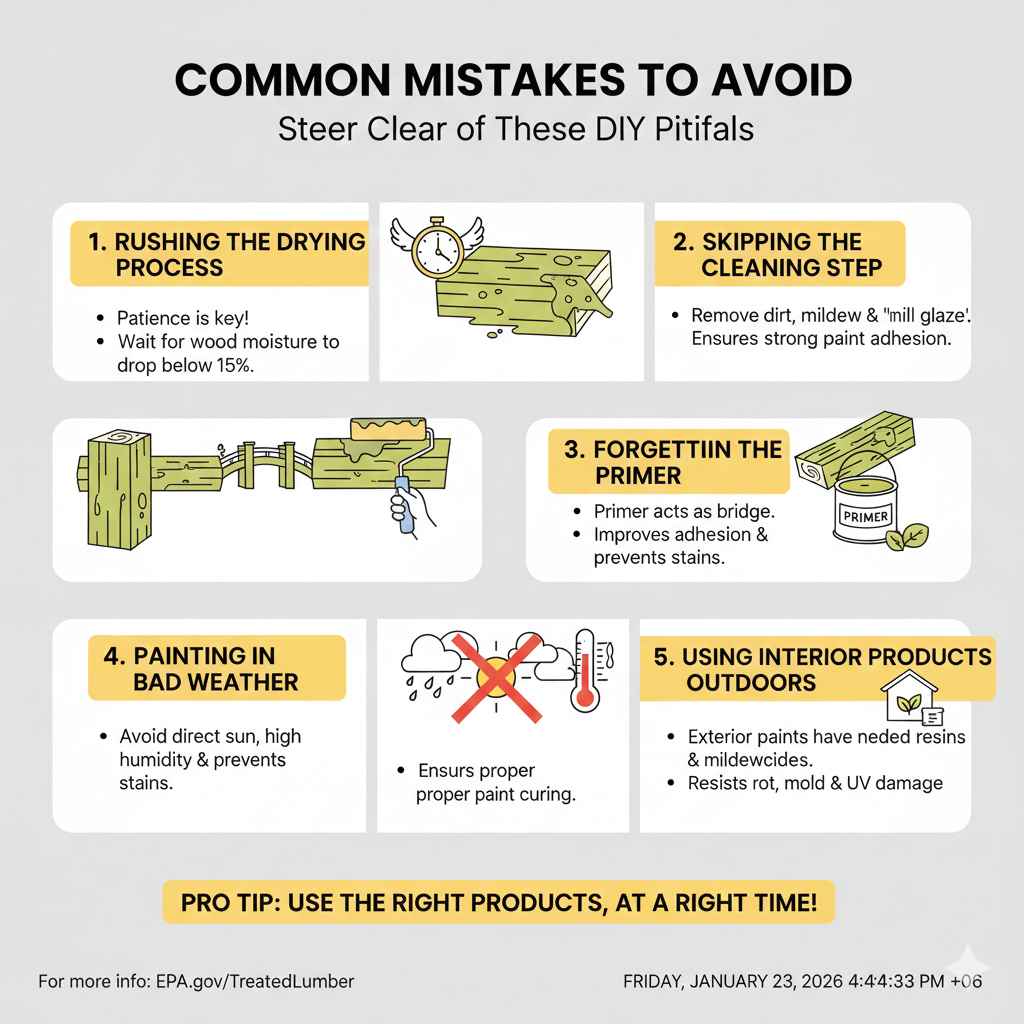
Common Mistakes to Avoid
I want you to succeed on your first try! Steer clear of these common pitfalls:
- Rushing the Drying Process: This is the #1 mistake. Patience is your best friend.
- Skipping the Cleaning Step: Painting over dirt or mill glaze is like building a house on a shaky foundation. The paint will fail.
- Forgetting the Primer: Primer is the bridge between the wood and the paint. Without it, you’ll get poor adhesion and potential stain bleed-through.
- Painting in Bad Weather: Don’t paint in direct, scorching sun, high humidity, or when rain is in the forecast. The paint won’t cure correctly.
- Using Interior Products Outdoors: Interior paints and primers lack the necessary resins and mildewcides to survive outside.
Frequently Asked Questions (FAQ)
1. What happens if I paint treated wood too soon?
If you paint treated wood while it’s still wet, the paint will not adhere properly. It will quickly bubble, crack, and peel as the moisture underneath tries to escape. You’ll have to scrape it all off and start over, wasting both time and money.
2. Can I use a fan or heater to speed up the drying process?
It’s best to let treated lumber dry naturally. Using fans to increase airflow can help, but applying direct heat from a heater can cause the wood to dry too quickly and unevenly. This can lead to warping, twisting, and cracking.
3. What is KDAT lumber and should I use it?
KDAT stands for “Kiln-Dried After Treatment.” This type of lumber is dried in a kiln after the chemical preservation process, so it arrives with a low moisture content. It’s more expensive but is ready to be painted or stained almost immediately, making it a great choice for projects with tight deadlines.
4. Do I really have to sand treated wood before painting?
While not absolutely required, sanding is highly recommended. A light sanding removes splinters, smooths the surface for a better-looking finish, and helps the primer adhere more strongly, leading to a more durable paint job.
5. How can I tell if my lumber is pressure-treated?
Pressure-treated wood often has a noticeable greenish or brownish tint. You can also look for a tag stapled to the end of the board, which provides information about the treatment. Sometimes, you’ll also see small, uniform slits or incisions on the surface, which help the preservatives penetrate deeper into the wood.
6. Is it better to paint or stain a new deck?
This is a personal preference. Staining celebrates the natural wood grain and is typically easier to maintain over the years, as it fades rather than peels. Painting offers endless color choices, hides imperfections, and provides a very durable surface barrier against moisture and UV rays.
7. How often will I need to repaint my treated wood fence or deck?
With proper prep and high-quality paint, you can expect the finish to last 3 to 5 years, and sometimes longer. The lifespan depends heavily on your climate and how much wear and tear the surface gets. A well-prepped job will always last longer.
Wrapping It Up
I know it can feel like a long wait, but understanding how long treated lumber should dry before painting is the key to a project you can be proud of for years to come. Remember, the wood tells you when it’s ready. Trust the simple sprinkle test or, for ultimate certainty, grab an inexpensive moisture meter. Your patience will be rewarded with a beautiful, durable finish that won’t peel, chip, or cause you headaches next season.
By taking the time to let the wood dry properly, clean it thoroughly, and use the right products, you’re not just painting wood—you’re protecting your investment and creating a professional-quality result. You’ve got this! Now you have all the knowledge you need to get the job done right. Happy building!