How Long Should Wood Stain Dry Before Polyurethane: Vital Tip
For oil-based wood stain, you should wait 24 to 48 hours before applying polyurethane. Water-based stains dry much faster, usually needing only 3 to 6 hours. Always remember that humidity, temperature, and wood type can affect these times, so a quick check with a clean rag is your best bet for a perfect finish.
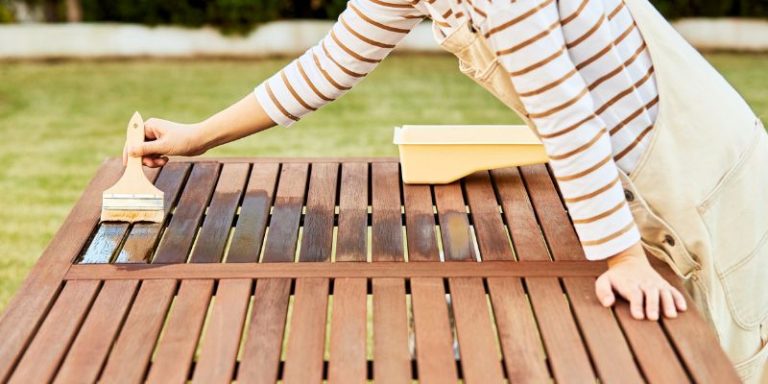
Hello there, fellow DIYer! I’m Md Meraj, and I’m so glad you’re here. If you’ve just applied a beautiful coat of stain to your wood project, you’re probably feeling excited. It’s that amazing moment when the wood grain pops and your vision starts coming to life. But then comes the big question: How long do you wait before sealing it with polyurethane? It’s a common worry, and getting it wrong can turn a beautiful project into a sticky mess.
Don’t worry, you’re in the right place! Getting the timing right is one of the most important steps for a professional-looking finish. Rushing it is a classic mistake, but I’m here to make sure you avoid it. In this guide, I’ll walk you through everything you need to know, from understanding drying times to performing a foolproof test. Let’s get that project finished perfectly.
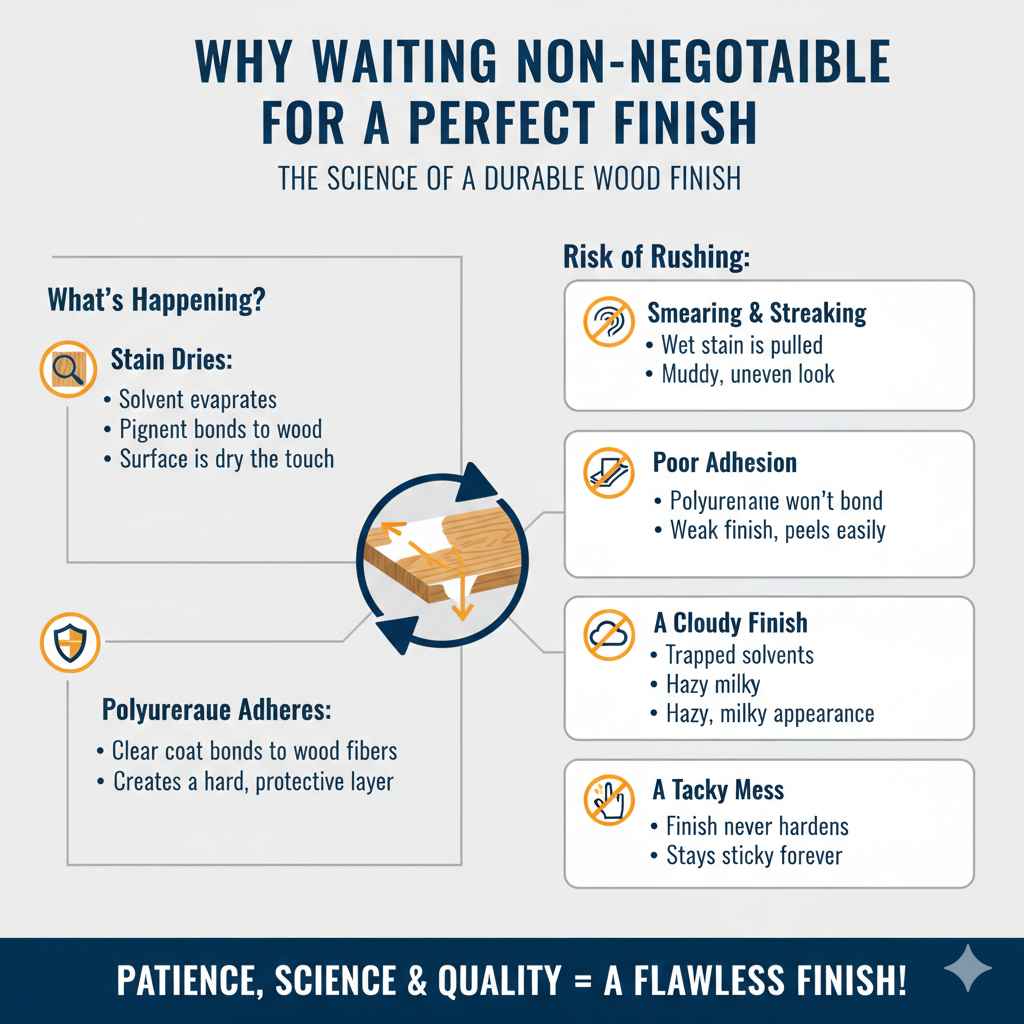
Why Waiting is Non-Negotiable for a Perfect Finish
You might be tempted to speed things up, but patience is truly your best friend here. Think of wood stain like this: it’s made of color pigments and a liquid carrier (either oil or water). When you apply it, the carrier needs to completely evaporate, leaving only the pigment bonded to the wood fibers.
What happens if you apply polyurethane over stain that hasn’t fully dried? The solvents in the polyurethane can actually “re-wet” the stain. This creates a few big problems:
- Smearing and Streaking: As you brush on the polyurethane, you’ll pull the wet stain with it, creating a muddy, uneven look. All your careful staining work will be ruined.
- Poor Adhesion: The polyurethane topcoat won’t be able to grab onto the wood properly. Instead, it will stick to the wet stain, leading to a weak finish that can easily peel or chip later.
- A Cloudy Finish: Trapped solvents from the stain can get stuck under the polyurethane layer, making your clear coat look hazy or milky.
- A Tacky Mess: The finish may never fully harden or “cure.” You could be left with a surface that feels sticky to the touch forever.
In short, waiting the proper amount of time ensures your stain is set and your polyurethane topcoat has a stable, dry surface to bond with. It’s the secret to that durable, crystal-clear finish we all want.
Oil-Based vs. Water-Based Stain: A Tale of Two Drying Times
The first step in figuring out your wait time is knowing what kind of stain you’re using. Stains generally fall into two categories: oil-based and water-based. They work differently and, most importantly, have very different drying schedules.
Oil-Based Stains
These are the traditional choice for many woodworkers. They use petroleum-based solvents, which penetrate deep into the wood and evaporate slowly. This slow drying time is actually a benefit for beginners, as it gives you more time to work with the stain and wipe away the excess without leaving lap marks.
- Typical Dry Time: 24 to 72 hours.
- Pros: Rich color, deep penetration, forgiving application.
- Cons: Longer dry time, strong fumes, requires mineral spirits for cleanup.
Water-Based Stains
A more modern option, water-based stains use water as the main solvent. They have come a long way and offer great results. They dry much faster because water evaporates more quickly than oil. This is great if you’re on a tight schedule, but it means you have to work faster to avoid a blotchy finish.
- Typical Dry Time: 2 to 6 hours.
- Pros: Fast drying, low odor, easy cleanup with soap and water.
- Cons: Can raise the wood grain, less forgiving to apply, dries very quickly.
At-a-Glance Comparison
Here’s a simple table to help you see the differences side-by-side.
| Feature | Oil-Based Stain | Water-Based Stain |
|---|---|---|
| Drying Time | Slow (24-72 hours) | Fast (2-6 hours) |
| Application | More forgiving, longer working time | Requires a quick, confident hand |
| Odor | Strong chemical smell | Low odor |
| Cleanup | Mineral spirits or paint thinner | Soap and water |
| Grain Effect | Enhances grain deeply | Can raise the wood grain (pre-wetting helps) |
4 Key Factors That Control Drying Time
The time listed on the can is just a starting point. Your specific environment plays a huge role in how long your stain will actually take to dry. Think of yourself as a scientist observing your project—these are your variables!
1. Temperature and Humidity (The Big Two)
This is the most critical factor. Stain dries through evaporation, and the air around your project dictates how fast that can happen.
- The Sweet Spot: The ideal condition is around 70°F (21°C) with 40-50% humidity. In this environment, the times on the can are most accurate.
- Cold & Damp: If you’re working in a cool basement or a humid garage (below 60°F or over 70% humidity), evaporation slows way down. Your 24-hour oil stain might need 48 or even 72 hours to dry.
- Hot & Dry: A very hot, dry day can make water-based stains dry almost instantly, making them hard to apply evenly. Oil-based stains will also dry faster.
2. Ventilation and Airflow
Good airflow helps carry the evaporating solvents away from the wood’s surface, speeding up the drying process. Working in a stuffy, closed room will trap the fumes and moisture, keeping the stain wet for longer. Always work in a well-ventilated area. You can use a fan to improve circulation, but don’t point it directly at your project, as this can cause the stain to dry unevenly and might blow dust onto the wet surface. Good ventilation is also crucial for your health, as recommended by the Consumer Product Safety Commission.
3. Wood Type
Different woods have different thirst levels. The porosity of the wood affects how much stain it soaks up and how quickly it dries.
- Porous Woods: Woods like pine, poplar, and fir are very absorbent. They drink up the stain quickly. The surface may feel dry faster, but make sure the stain is dry deep down.
- Dense Woods: Hardwoods like oak, maple, and cherry are less porous. The stain tends to sit more on the surface, which can sometimes mean a longer surface drying time.
4. Application Thickness
More is not better when it comes to stain. The goal is to apply a thin, even coat and—this is the most important part—wipe off all the excess. If you leave a thick, goopy layer of stain on the wood, you’re essentially creating a layer of paint. This thick film will take an incredibly long time to dry and may never cure properly, resulting in a sticky surface.
Drying Time Cheat Sheet
To make things easier, I’ve put together a quick reference table. Use this as a guide, but always remember to perform the “rag test” (more on that next!) before moving on.
| Stain Type | Environment | Estimated Drying Time Before Polyurethane |
|---|---|---|
| Oil-Based | Ideal (70°F, 50% humidity) | 24-48 hours |
| Oil-Based | Cool or Humid (<60°F or >70% humidity) | 48-72 hours, or even longer |
| Water-Based | Ideal (70°F, 50% humidity) | 3-6 hours |
| Water-Based | Cool or Humid (<60°F or >70% humidity) | 6-12 hours |
| Gel Stain | Ideal (70°F, 50% humidity) | 24 hours |
The Ultimate Test: How to Know for Sure Your Stain is Dry
Reading the can and checking the weather is great, but how do you know for sure that your project is ready for polyurethane? Here are three simple tests, with the last one being my absolute favorite for guaranteeing success.
1. The Sight Test
Look at the surface of the wood. A wet stain will have a glossy, uneven sheen. A fully dry stain should have a consistent, dull, and matte appearance across the entire piece. If you see any shiny or dark spots, it’s still wet. Give it more time.
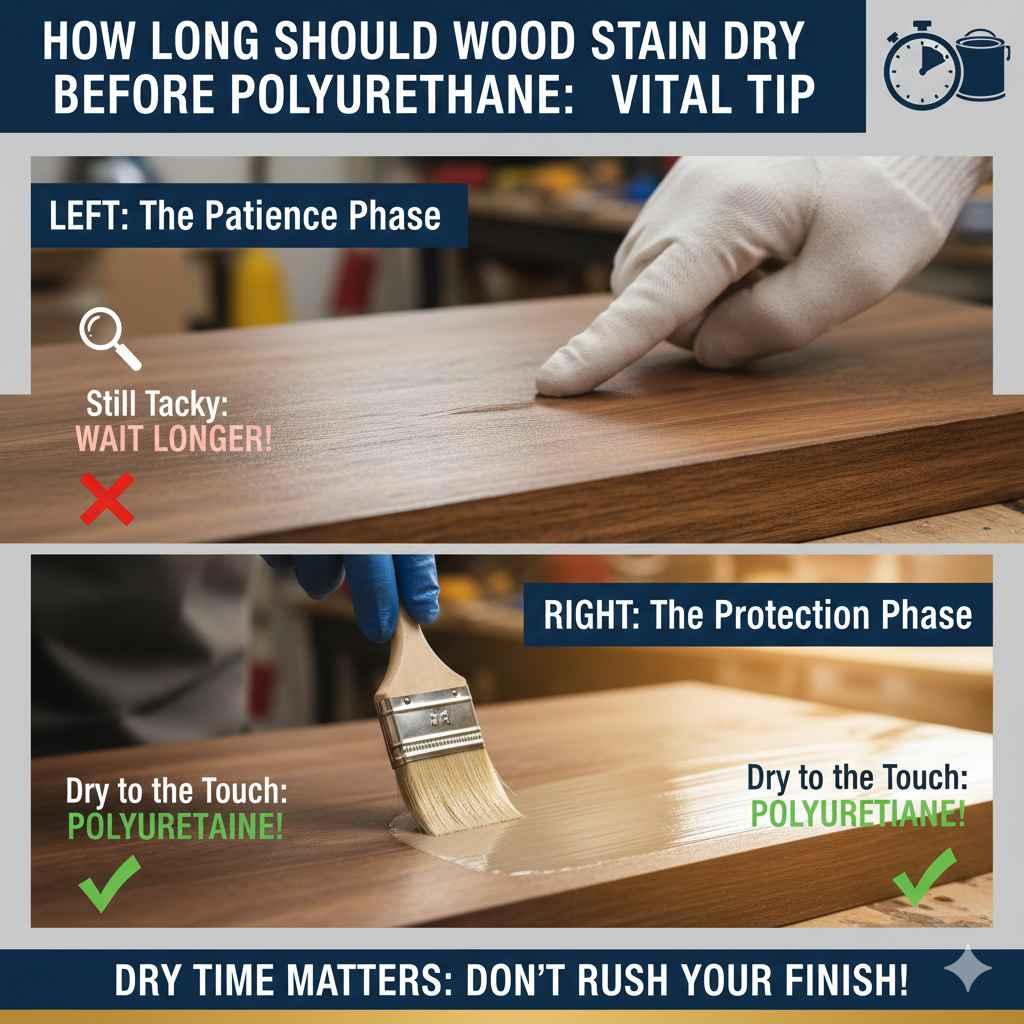
2. The Touch Test
This is a good preliminary check, but don’t rely on it alone. Find a hidden or inconspicuous spot on your project (like the underside of a tabletop or the back of a leg). Gently touch it with your fingertip. It should feel completely dry and cool, not sticky, tacky, or oily. If your finger leaves a mark, it’s not ready.
3. The Rag Test (The Foolproof Method)
This is the vital tip you need. It’s the most reliable way to know if your stain is ready for a topcoat. Here’s how you do it:
- Grab a clean, white, lint-free rag (an old t-shirt works well).
- Find an inconspicuous spot on your project.
- Firmly wipe the cloth across the stained surface.
- Examine the cloth. If you see any color transfer onto the rag, your stain is not yet dry.
It’s that simple. If the rag comes away clean, the pigments are fully bonded to the wood, and the solvents have evaporated. You are officially good to go! Wait another few hours and test again if there’s any color on the rag.
Step-by-Step Guide: From Bare Wood to a Flawless Finish
Let’s put it all together. Follow these steps for a perfect stain and polyurethane finish every time.
- Prep Your Wood: Sand your project smoothly, working your way up to 180 or 220-grit sandpaper. Clean off all the dust with a vacuum and a tack cloth. For softwoods like pine, consider using a pre-stain wood conditioner to prevent blotchiness.
- Apply the Stain: Following the manufacturer’s directions, apply a thin, even coat of stain using a brush or rag. Let it penetrate for the recommended time (usually 5-15 minutes).
- Wipe Off the Excess: This is crucial! Use a clean, dry rag to wipe off all the excess stain, going with the grain. Your goal is to color the wood, not create a film on top of it.
- Wait and Be Patient: Now the waiting begins. Set your project aside in a well-ventilated, dust-free area. Refer to our drying time chart and consider your environment.
- Perform the Rag Test: Once you think enough time has passed, perform the foolproof rag test. If the rag comes back clean, you’re ready for the next step.
- Apply Your First Coat of Polyurethane: Using a high-quality natural bristle brush for oil-based poly or a synthetic brush for water-based, apply a thin, even coat of your chosen polyurethane. For great tips on application, check out this guide from Wood Magazine.
- Sand Between Coats: After the first coat of polyurethane is dry (check the can for re-coat times), lightly sand the entire surface with very fine-grit sandpaper (220 or 320-grit). This scuffs up the surface to help the next coat adhere and smooths out any dust nibs. Clean off all the dust.
- Apply Additional Coats: Repeat steps 6 and 7 for a total of 2-3 coats. This builds a durable, protective layer.
- Let It Cure: Your project may feel dry to the touch in a few hours, but it isn’t fully “cured” or hardened. A full cure can take anywhere from 7 to 30 days. Be gentle with the piece during this time to avoid scratching the new finish.

Frequently Asked Questions
What happens if I apply polyurethane too early?
Applying polyurethane over wet stain will cause a disaster. The finish will likely smear, look cloudy, and feel tacky. It won’t adhere properly, leading to a weak finish that can easily peel or scratch off. In most cases, you would have to strip the entire piece down to bare wood and start over.
Can I use a hair dryer or heat gun to speed up the stain drying time?
I strongly advise against it. While it might seem like a good shortcut, applying direct heat can cause the stain to dry unevenly, creating dark spots and blotches. It can also heat the wood too quickly, causing it to crack. The best way to speed up drying is to increase airflow with a fan (not aimed directly at the surface) and control the room’s temperature and humidity.
Do I need to sand between the stain and the first coat of polyurethane?
No, you should never sand the stained wood before applying your first coat of polyurethane. Sanding will remove the color you just applied, creating light spots and an uneven finish. The only sanding you should do is on the bare wood before staining, and then very lightly between coats of polyurethane.
Can I use a water-based polyurethane over an oil-based stain?
Yes, you absolutely can! It’s a popular combination because you get the rich color of an oil stain with the fast-drying, low-odor benefits of a water-based topcoat. However, you must be extra certain the oil-based stain is completely and totally dry. I would recommend waiting a full 72 hours in ideal conditions and always performing the rag test before proceeding.
My stain is still sticky after 3 days. What did I do wrong?
This is almost always caused by applying the stain too heavily and not wiping off the excess. Stain is meant to penetrate the wood, not sit on top like paint. To fix it, get a rag dampened with mineral spirits (for oil-based stain) and gently wipe the surface. This should remove the excess, sticky stain. You may need to let it dry again and possibly apply a very light new coat.
How many coats of polyurethane do I need?
For most indoor projects like tables, shelves, or dressers, three coats of polyurethane is the gold standard for good protection and a beautiful depth. For surfaces that get less wear and tear, like picture frames, two coats are often sufficient. Always follow the directions on the can.
Your Path to a Flawless Finish
There you have it! The secret to knowing how long wood stain should dry before polyurethane isn’t a secret at all—it’s just a matter of understanding the basics and practicing a little patience. Remember to identify your stain type, consider your environment, and always, always trust the rag test.
Woodworking is a rewarding journey, and getting the finish right is the final, satisfying step. By taking your time and following these guidelines, you’re not just avoiding mistakes; you’re building the skills and confidence to create beautiful, durable pieces you can be proud of for years to come. Now go on and get that perfect finish—you’ve got this!