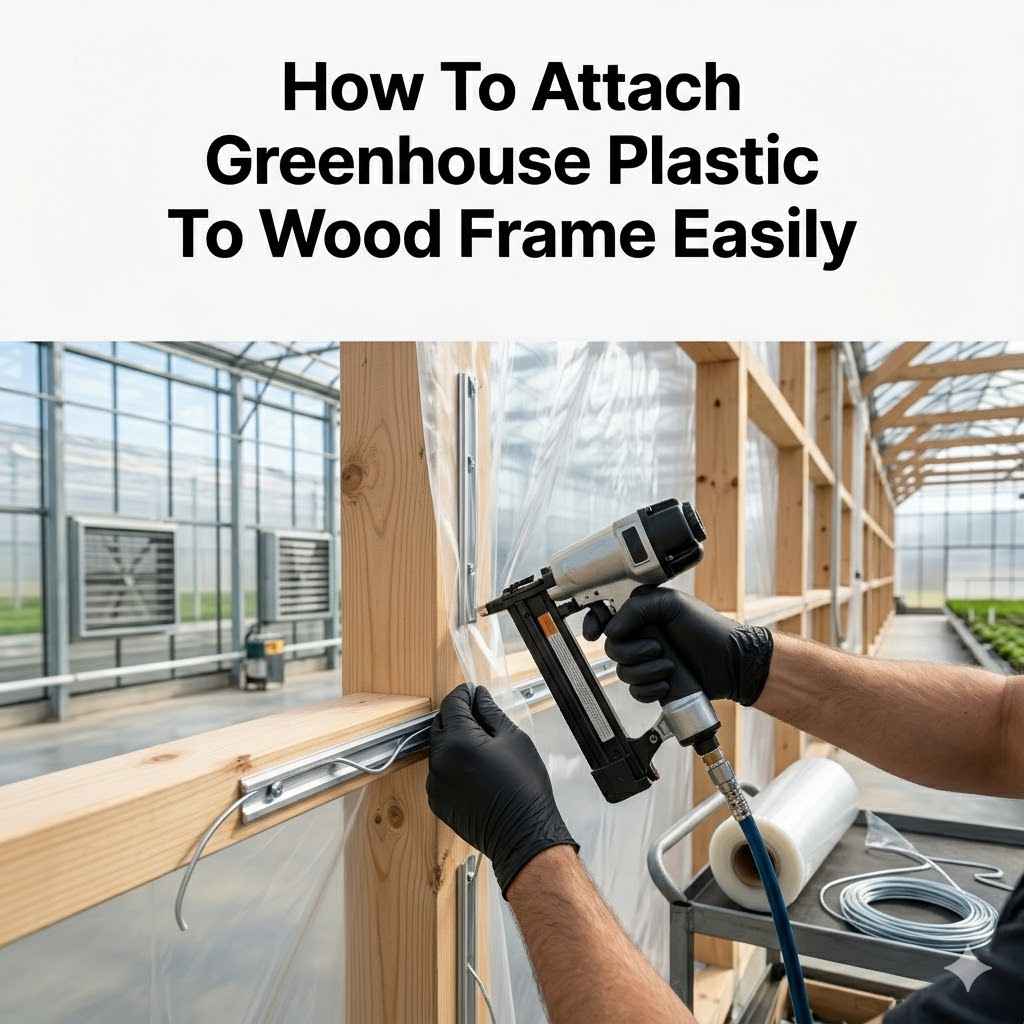
How To Attach Greenhouse Plastic To Wood Frame Easily
Getting your greenhouse plastic to stick to the wood frame can seem tricky at first. Many beginners worry about tearing the plastic or not getting a good, tight seal. It’s a common hurdle when building your own greenhouse.
But don’t fret! This guide breaks down exactly how to attach greenhouse plastic to wood frame easily. We’ll walk you through each step so you can build a sturdy, weather-tight greenhouse without the fuss.
Get ready to see how simple it can be.
Choosing The Right Greenhouse Plastic
Selecting the correct type of plastic is the very first step in ensuring a successful and long-lasting greenhouse structure. The material you choose will directly impact how well it attaches to the wood frame, its durability against weather, and how it performs in terms of light transmission and insulation. Different plastics offer varying levels of UV resistance, which is essential for preventing degradation from sunlight.
Understanding these properties helps you make an informed decision that aligns with your building goals and budget. This section will explore the most popular options, their pros and cons, and what makes them suitable for different greenhouse applications.
Polyethylene Film
Polyethylene film is a very popular choice for greenhouse coverings. It’s affordable and comes in various thicknesses, often measured in mils. Thicker mil films are more durable and offer better insulation.
-
UV Resistance
Look for polyethylene film specifically treated for UV resistance. Standard poly film will break down quickly in sunlight, becoming brittle and prone to tearing. UV-treated films can last for several years, making them a more economical choice in the long run.
This treatment is a chemical additive or coating applied during manufacturing.
-
Light Transmission
Polyethylene film generally offers excellent light transmission, allowing plenty of sunlight to reach your plants. Some films have special coatings that diffuse light, reducing hot spots and shadows, which can benefit plant growth. This diffusion can also help distribute heat more evenly within the greenhouse.
-
Cost Effectiveness
Compared to glass or polycarbonate panels, polyethylene film is significantly cheaper. This makes it an ideal option for DIY greenhouse builders on a budget or for temporary structures. The lower initial cost allows for more flexibility in design and size.
Polycarbonate Panels
Polycarbonate panels are another excellent option, known for their durability and versatility. They are often more expensive than polyethylene but offer superior strength and longevity.
-
Impact Resistance
Polycarbonate is incredibly strong and resistant to impact from hail, strong winds, and even accidental bumps. This makes it a great choice for areas prone to severe weather. It’s virtually unbreakable, unlike glass.
-
Insulation Properties
Many polycarbonate panels are double-walled or multi-walled, creating air pockets that provide excellent insulation. This helps to regulate the temperature inside the greenhouse, reducing heating and cooling costs. The air gaps act as a thermal barrier.
-
Light Diffusion
Most polycarbonate panels are designed to diffuse light, providing a more even distribution of sunlight within the greenhouse. This helps prevent scorching on plant leaves and promotes healthier growth. Some have an “opal” or frosted finish for this purpose.
PVC Vinyl Sheeting
PVC vinyl sheeting is often used for more temporary or specialized greenhouse structures, like hoop houses. It is less common for permanent builds but has its advantages.
-
Flexibility
PVC vinyl is very flexible and easy to work with, especially for curved structures like hoop houses. It can be stretched and molded to fit various shapes, making installation simpler for certain designs. Its pliability is a key feature for curved framing.
-
Water Resistance
This material is naturally water-resistant, which can be beneficial in humid environments or for greenhouses used to protect delicate plants from excessive moisture. It won’t rot or degrade when exposed to water.
-
Durability Considerations
While somewhat durable, PVC vinyl may not have the same UV resistance or long-term weatherability as high-quality polyethylene or polycarbonate. It can become brittle over time when exposed to prolonged sunlight. Its lifespan can vary greatly depending on the quality of the specific product.
Preparing Your Wood Frame For Plastic Attachment
Before you even think about stretching plastic, preparing your wooden frame is crucial. A well-prepared frame ensures the plastic attaches securely, preventing tears and leaks. This preparation involves making sure the wood is smooth, free of obstructions, and ready to receive the fastening materials.
Taking these steps upfront will save you a lot of hassle during the attachment process and contribute to the overall longevity of your greenhouse. We will cover sanding, checking for structural integrity, and preparing edges for a clean finish.
Sanding And Smoothing Wood Surfaces
Rough or splintered wood can easily snag and tear the greenhouse plastic. It’s essential to make the wood surfaces as smooth as possible.
-
Removing Splinters
Use sandpaper (around 100-120 grit) to smooth out any rough spots or splinters on the wood. Pay close attention to edges and corners where the plastic will be fastened. This creates a safe surface for the plastic.
-
Ensuring Evenness
Check for any raised nails or screws. Make sure they are hammered in or screwed down flush with the wood surface. Any protrusions can create weak points or puncture the plastic.
-
Cleaning Dust
After sanding, wipe down the entire frame with a damp cloth or tack cloth to remove all dust. Dust can interfere with the adhesion of some fasteners or tapes, so a clean surface is key.
Checking For Sharp Edges And Corners
Sharp edges are the enemy of greenhouse plastic. They concentrate stress and can cause tears, especially in windy conditions.
-
Rounding Off Edges
Gently round off any sharp edges or corners on the wood frame using sandpaper or a sanding block. This distributes the tension on the plastic more evenly. A slight radius is all that’s needed.
-
Using Edge Protection
Consider adding a rubber or plastic edging strip along sharp or critical points of the frame. This provides an extra layer of protection for the plastic. These strips can be attached with staples or adhesive.
-
Pre-Drilling Holes
If you plan to use screws to secure battens, pre-drill pilot holes. This prevents the wood from splitting and also helps create a cleaner finish, avoiding sharp edges from wood fragments.
Treating Or Sealing Wood (Optional)
While not always necessary, treating the wood can extend its life and prevent issues that might affect the plastic later.
-
Moisture Protection
If your greenhouse will be in a very damp environment, consider sealing the wood with a water-based sealant. This prevents rot and warping, which could compromise the frame’s integrity. Ensure the sealant is fully dry before applying plastic.
-
Avoiding Harsh Chemicals
Be cautious with wood treatments. Some strong chemical treatments can degrade or react with greenhouse plastics over time. Always check compatibility or opt for natural, plant-safe sealants if possible.
-
Allowing Full Curing
If you do seal the wood, make sure it is completely dry and cured before attaching the plastic. Any residual moisture or fumes could potentially damage the plastic or affect fasteners.
Best Methods To Attach Greenhouse Plastic To Wood Frame
Now that your frame is prepped and your plastic is chosen, it’s time for the main event. Attaching the plastic securely and evenly is key to a long-lasting, effective greenhouse. Several methods work well, and the best one for you might depend on the type of plastic, the frame design, and your tools.
We will explore the most common and reliable techniques, explaining how each one works and the materials you’ll need. This will empower you to choose the method that suits your project best and achieve a professional-looking finish.
Using Staples And Battens (Common Method)
This is a widely used and effective method for attaching greenhouse plastic, especially polyethylene film. It involves staples to hold the plastic initially and wooden or plastic strips (battens) to secure it permanently.
-
Stapling The Plastic
Start by loosely stapling the plastic to the wood frame. Use a heavy-duty staple gun with staples that are long enough to penetrate the plastic and go deep into the wood. Staple every 4-6 inches along the frame.
Don’t pull the plastic too tight at this stage; you want some give.
-
Applying Wooden Battens
Cut thin strips of wood (like lath or furring strips) or specialized plastic battens to size. These will go over the stapled plastic. The battens distribute the pressure from the screws over a larger area, preventing the staples from pulling through the plastic.
-
Screwing The Battens Down
Use screws to fasten the battens securely to the wood frame over the plastic. Use screws that are long enough to go through the batten, the plastic, and firmly into the wood frame. Space screws about every 6-8 inches.
Pull the plastic taut as you work your way along, ensuring a wrinkle-free finish.
-
Example Scenario
Imagine you are covering a 4-foot wide section of your greenhouse wall. You’d start at one corner, staple the plastic loosely along the top and one side. Then, you’d attach a batten along the top edge with screws, pulling the plastic taut as you go.
Next, you’d work down the side, stapling and then screwing the batten to secure it. You would repeat this process for all sides of the section.
Using Greenhouse Tape And Screws
Specialized greenhouse tape is designed to adhere strongly to plastic films and can be used in conjunction with screws for a durable attachment. This method is often quicker than using battens.
-
Applying Greenhouse Tape
Unroll the greenhouse tape along the edge of the wood frame where you want to attach the plastic. Peel off the backing and press the tape firmly onto the wood. This creates a strong adhesive bond that also acts as a cushion.
-
Positioning The Plastic
Carefully lay the greenhouse plastic over the taped area, ensuring it is positioned correctly and free of major wrinkles. Gently press the plastic onto the tape to adhere it.
-
Securing With Screws And Washers
Use screws with large washers to secure the plastic through the tape and into the wood frame. The washers prevent the screw heads from tearing the plastic. Space screws every 4-6 inches.
This method creates a very strong, sealed edge.
-
Advantages Of Tape
Greenhouse tape provides an excellent seal against drafts and moisture. It is also UV-resistant and designed to withstand the harsh greenhouse environment. This can be particularly useful for sealing seams or repairing small tears.
Using Wiggle Wire And Channel Systems
This professional-grade system is known for its strength and ease of use, especially for larger structures. It involves a metal channel attached to the frame and a specialized wire that locks the plastic into the channel.
-
Attaching The Channel
The aluminum or steel channel is screwed directly onto the wood frame. This channel has a specific profile designed to hold the wiggle wire securely. Ensure the channel is installed straight and true for the best results.
-
Inserting The Wiggle Wire
The wiggle wire, which has a wave-like pattern, is then pushed or “wiggled” into the channel, trapping the edge of the greenhouse plastic. The wave pattern helps it grip the plastic and the channel tightly.
-
Securing The Plastic
As you insert the wire, the plastic is pulled taut, creating a smooth, wrinkle-free surface. This system is very effective at holding the plastic firmly, even in high winds, and it’s also easy to replace the plastic later by simply removing and re-inserting the wire.
-
Durability And Longevity
Wiggle wire systems are highly durable and are used in commercial greenhouses for good reason. They offer a long-lasting solution that stands up to the demands of frequent use and extreme weather conditions. The metal components are designed to resist corrosion.
Using Snap Clamps (For Hoop Houses)
Snap clamps are a simple and effective solution specifically for attaching plastic to round or curved frames, such as those found in hoop houses.
-
Securing The Plastic
These clamps are designed to snap directly onto the tubing of your hoop house frame. They have a gripping mechanism that holds the greenhouse plastic tightly against the frame without the need for staples or screws into the tubing itself.
-
Ease Of Installation
Installation is incredibly quick and easy. You simply position the plastic over the frame, and then snap the clamps into place around the tubing and over the plastic. They can be spaced as needed for secure fastening.
-
Adjustability And Reusability
Snap clamps offer some adjustability and are reusable, making them a convenient option. If you need to adjust the tension of the plastic or replace it, the clamps can be easily removed and reattached. They are made from durable, UV-resistant plastic.
-
Cost-Effective Solution
For DIY hoop house builders, snap clamps are a very cost-effective way to attach greenhouse plastic securely. They eliminate the need for more complex fastening systems.
Tips For A Smooth And Wrinkle-Free Finish
Achieving a smooth, wrinkle-free surface on your greenhouse plastic not only looks better but also improves its performance. Wrinkles can create weak spots and affect light distribution. Following a few key tips during the installation process can make a significant difference.
We will cover important considerations like working in the right temperature, pulling the plastic taut, and managing corners effectively. These small details contribute greatly to the final appearance and functionality of your greenhouse.
Working In The Right Temperature
The temperature of the day you install your plastic is surprisingly important for achieving a smooth finish.
-
Plastic Behavior In Cold
On a cold day, plastic becomes less flexible and can be harder to stretch taut without risking tears. It will also shrink more as temperatures rise, potentially creating wrinkles.
-
Plastic Behavior In Heat
On a hot, sunny day, plastic expands. If you stretch it too tightly when it’s hot, it can become saggy and wrinkled when the temperature drops.
-
Ideal Conditions
The best time to attach greenhouse plastic is on a mild, overcast day. This allows the plastic to be flexible enough to stretch tightly without overstretching, and it will remain taut as the temperature fluctuates. Aim for temperatures between 60-70°F (15-21°C).
Pulling Plastic Taut During Installation
This is arguably the most critical step for a wrinkle-free result. Consistent tension is key.
-
Gentle But Firm Tension
As you attach the plastic, pull it gently but firmly. You want to eliminate slack without distorting the plastic or putting excessive stress on the frame. Imagine you are stretching a drum skin.
-
Working In Sections
Attach the plastic in manageable sections. Staple or loosely attach one edge, then move to the opposite edge, pulling it taut before securing it. Then, work on the remaining two edges.
This method helps to distribute tension evenly across the entire surface.
-
Assistance Helps
Having another person to help pull and hold the plastic taut while you secure it can make a huge difference. One person can manage the tension while the other fastens the plastic to the frame.
Managing Corners And Edges
Corners are often where wrinkles and tears start. Proper technique here is vital.
-
Folding Corners Neatly
When you reach a corner, fold the plastic neatly, like wrapping a gift. Avoid bunching or creating excess folds. Trim excess plastic if necessary, leaving enough to secure it properly.
-
Using Adhesive Tape Sparingly
For very tight corners, a small piece of strong greenhouse tape can help hold the fold in place before you secure it with battens or screws. However, overuse of tape can create bumps.
-
Double Checking Fasteners
Ensure all staples, screws, or clamps are driven in straight and flush. Any protruding hardware can create stress points and wrinkles. Regularly check that fasteners are holding securely.
Sealing Gaps For Draft Protection
Once the plastic is attached, sealing any small gaps is the final step to ensuring your greenhouse is energy-efficient.
-
Using Greenhouse Sealant
Specialized greenhouse sealants or durable, UV-resistant silicone caulk can be used to fill any minor gaps between the plastic and the frame or around attachment points.
-
Applying With Care
Apply the sealant in thin, even beads. Smooth it out with a wet finger or a caulking tool for a clean finish. Ensure the sealant is compatible with your greenhouse plastic.
-
Checking For Drafts
After installation, do a quick check for drafts. You can sometimes feel them, or on a windy day, you might see the plastic flutter slightly at a gap. Seal any areas you find.
Maintaining Your Greenhouse Plastic
Proper installation is only the beginning. To ensure your greenhouse plastic lasts as long as possible and continues to perform well, regular maintenance is essential. This involves cleaning, inspecting for damage, and making timely repairs.
A little attention over time will prevent small issues from becoming big problems, saving you money and effort in the long run. We will cover simple cleaning techniques, how to spot potential damage, and effective repair methods to keep your greenhouse in top condition.
Regular Cleaning Of The Plastic
A clean plastic surface allows for maximum light penetration, which is vital for plant growth.
-
Gentle Washing
Use a soft brush or sponge with mild soap and water to wash the exterior of your greenhouse plastic. Avoid abrasive cleaners or scrubbers that can scratch the surface and reduce light transmission.
-
Rinsing Thoroughly
Rinse the plastic completely with clean water to remove all soap residue. Leftover soap can attract dirt and grime. A hose with a spray nozzle works well for this.
-
Frequency Of Cleaning
The frequency of cleaning depends on your environment. In dusty or polluted areas, you might need to clean it every few months. In cleaner rural settings, once or twice a year might suffice.
Inspecting For Damage
Regular inspections help you catch problems early, before they escalate.
-
Looking For Tears And Punctures
Walk around your greenhouse and look closely for any signs of tears, punctures, or small holes. These are often caused by falling branches, pests, or stress points.
-
Checking Fasteners
Inspect all staples, screws, battens, and clamps to ensure they are still secure and haven’t loosened or pulled away. Loose fasteners can lead to larger tears.
-
Signs Of Degradation
Keep an eye out for signs of plastic degradation, such as brittleness, chalkiness, or significant fading. This indicates the plastic is nearing the end of its lifespan and may need replacement soon.
Making Timely Repairs
Addressing small tears or holes immediately will prevent them from growing and compromising the greenhouse environment.
-
Using Greenhouse Repair Tape
For small tears or punctures, specialized greenhouse repair tape is the best solution. It’s designed to be UV-resistant, waterproof, and flexible, creating a strong, long-lasting seal. Clean the area around the damage thoroughly before applying the tape.
-
Patching Larger Holes
For larger holes, you can cut a patch from spare greenhouse plastic. Apply a strong, UV-resistant adhesive or greenhouse tape around the edges of both the hole and the patch. Then, carefully press the patch over the hole, ensuring a complete seal.
-
Reinforcing Stress Points
If you notice areas where the plastic is starting to pull or show stress, reinforce them with extra staples, battens, or specialized tape before they tear completely.
Frequently Asked Questions
Question: What is the best type of plastic for a DIY greenhouse?
Answer: For DIY greenhouses, polyethylene film is a popular choice due to its affordability and ease of use. Look for UV-treated varieties for better durability. Polycarbonate panels offer superior strength and insulation but are more expensive.
Question: Can I use regular duct tape to attach greenhouse plastic?
Answer: It’s not recommended. Regular duct tape is not designed for outdoor UV exposure and will likely degrade quickly, losing its adhesion and leaving sticky residue. Use specialized greenhouse tape instead.
Question: How tight should I pull the greenhouse plastic?
Answer: You should pull the plastic taut enough to eliminate wrinkles and ensure a smooth surface, but not so tight that it puts excessive strain on the frame or risks tearing. Aim for a drum-like tension.
Question: What should I do if I have wrinkles in my greenhouse plastic after installation?
Answer: Minor wrinkles can sometimes be worked out by gently re-tightening the plastic, especially on a mild day. If they are significant and stubborn, they might indicate uneven tension during installation. For severe cases, you may need to re-attach sections.
Question: How long does greenhouse plastic typically last?
Answer: The lifespan of greenhouse plastic varies greatly depending on the type and quality. UV-treated polyethylene can last 3-5 years, while higher-quality films or polycarbonate panels can last 10 years or more. Proper maintenance and prompt repairs extend its life.
Summary
Attaching greenhouse plastic to a wood frame becomes straightforward with the right methods and preparation. You learned to select suitable plastics, prepare your frame by sanding and smoothing, and utilize techniques like staples with battens, greenhouse tape, or wiggle wire systems. Following tips for a smooth finish, such as working in mild temperatures and pulling the plastic taut, ensures a professional result.
Regular cleaning and prompt repairs will keep your greenhouse in excellent condition for years.