How To Clean Glass Light Fixtures: Effortless Shine
Quick Summary:
Cleaning glass light fixtures is simple and quick! Turn off the power, gently remove the glass shade, and wash it with mild soap and warm water. Dry thoroughly and reassemble. This easy method restores a beautiful, dust-free shine to your home’s lighting with minimal effort.
Welcome, home improvers! Are your beautiful glass light fixtures looking a bit dull and dusty? It’s a common sight, and sometimes, the thought of tackling it can feel a little daunting. But I’m here to tell you that getting that sparkling, like-new shine back is easier than you think! With a few simple steps and common household items, you can transform your dingy lamps and ceiling lights into dazzling focal points. Let’s banish that grime and bring back the brightness to your home, one fixture at a time. Get ready to see your lights in a whole new glow!
Why Cleaning Your Glass Light Fixtures Matters
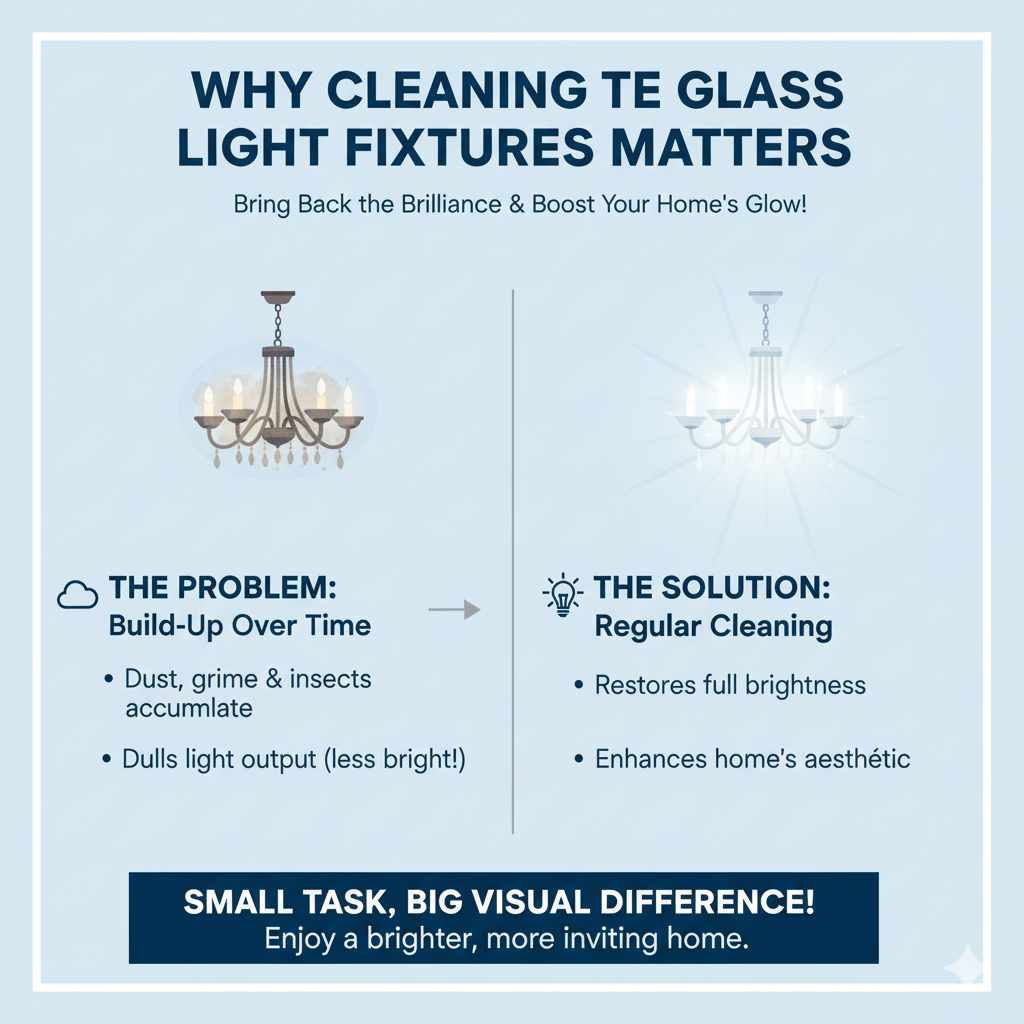
Over time, dust, grime, and even tiny insects can settle on your glass light fixtures. This build-up doesn’t just look unsightly; it actually dims the light your fixtures are supposed to provide. Imagine a beautiful chandelier or a sleek pendant light, dimmed by a layer of fuzz! It’s like trying to read a book in a dimly lit room when you know there’s a brighter bulb available. Regular cleaning ensures your lights are performing at their best, casting a warm and inviting glow throughout your home. Plus, a clean fixture is a beautiful fixture, enhancing your home’s overall aesthetic and making it feel more polished and cared for. It’s a small task that makes a big visual difference!
Gathering Your Cleaning Supplies
Before we dive into the cleaning process, let’s make sure you have everything you need. Having your supplies ready will make the job go much smoother and faster. Think of it like setting up your workbench before a woodworking project – preparation is key!
Essential Cleaning Tools and Materials:
- Safety First: A sturdy stepladder or stool. Always make sure it’s stable and placed on a level surface.
- Gloves: To protect your hands from cleaning solutions and keep fingerprints off the clean glass.
- Soft cloths: Microfiber cloths are excellent because they are lint-free and won’t scratch the glass. Have a few on hand – one for washing, one for rinsing, and one for drying.
- Mild dish soap: A gentle, everyday dish soap is perfect for cutting through grease and grime without damaging the glass.
- Warm water: The ideal temperature for dissolving dirt and soap.
- Optional: A soft-bristled brush (like a toothbrush) for stubborn spots or intricate details.
- Optional: Rubbing alcohol (isopropyl alcohol) for extra shine or to tackle sticky residue.
- A drop cloth or old towels: To protect your furniture or floor from any drips.
- A small bowl or bucket: For your cleaning solution.
When choosing your cleaning cloths, I always recommend microfiber. They’re fantastic for picking up dust and grime and leave a streak-free finish. You can find great microfiber cleaning cloths at most home goods stores or even online. For a deeper dive into choosing the right cleaning tools for your home, resources like the Environmental Protection Agency (EPA) offer insights into environmentally friendly cleaning practices.
Step-by-Step Guide: How to Clean Glass Light Fixtures
Now that we have our supplies, let’s get to the actual cleaning. I’ll walk you through each step so you can feel confident doing this yourself. Remember, patience and a gentle touch are your best tools here!
Step 1: Safety First – Turn Off the Power!
This is the most crucial step. Before you touch anything, make sure the light switch controlling the fixture is turned OFF. For an extra layer of safety, especially if you’re unsure which switch controls the light or if you’re working with older wiring, consider turning off the power to that circuit at your home’s breaker box. This prevents any accidental shocks.
If you’re not comfortable locating or operating your breaker box, it’s always best to consult an electrician. Safety is paramount in any home improvement task, just like when working with power tools. You can learn more about electrical safety from resources like the Occupational Safety and Health Administration (OSHA).
Step 2: Prepare Your Workspace
Place a drop cloth or old towels on the floor or furniture directly beneath the light fixture. This will catch any drips of water or cleaning solution, keeping your surroundings clean and dry. If you’re using a stepladder, ensure it’s securely positioned and that you have a stable footing.
Step 3: Gently Remove the Glass Shade
Most glass light fixtures have shades that can be carefully removed. Look for screws, clips, or a threaded ring holding the glass in place. Gently loosen these. If you’re unsure, consult your fixture’s manual if you still have it, or search online for your fixture’s model. Sometimes, you might need to gently twist the glass shade to release it. Work slowly and support the glass with one hand as you loosen the fasteners with the other. If the glass feels stuck, don’t force it – there might be a hidden clip or a bit of dried gunk. A gentle wiggle might help, but never yank!
Important Note: Some fixtures have glass that is permanently attached or requires a more complex removal process. If you can’t easily remove the glass, don’t worry! You can often clean it effectively while it’s still attached. We’ll cover that too.
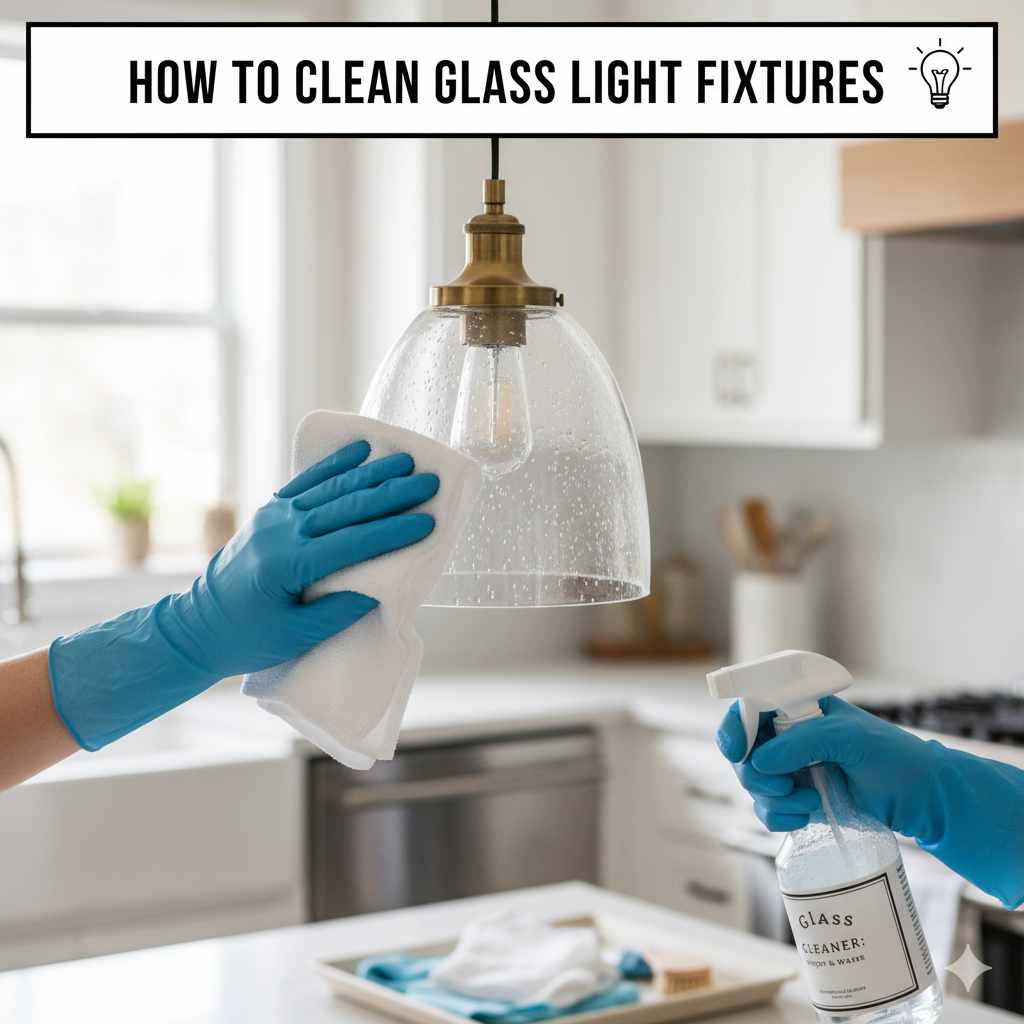
Step 4: Wash the Glass Shade
Once the glass shade is safely removed, take it to your sink or a designated cleaning area. Fill a bowl or your sink with warm water and add a few drops of mild dish soap. Submerge the glass shade and use a soft cloth or sponge to gently wash away dust and grime. For any stubborn spots, like dried insects or greasy build-up, you can use a soft-bristled brush (like an old toothbrush) or a slightly more concentrated soap solution on your cloth.
Avoid abrasive cleaners, scouring pads, or harsh chemicals like ammonia or bleach, as these can etch or damage the glass, especially if it has any special coatings or finishes. The goal is to be effective but gentle.
Step 5: Rinse Thoroughly
After washing, rinse the glass shade thoroughly under clean, warm running water. Make sure all traces of soap are gone. Soap residue can leave a cloudy film, which defeats the purpose of cleaning! Rinse until the water runs clear over the glass.
Step 6: Dry the Glass Shade
This is where you achieve that streak-free shine. Use a clean, dry microfiber cloth to gently dry the glass. Work from top to bottom, ensuring you get into any crevices. You can also let it air dry completely on a clean towel, but a gentle buff with a dry cloth often gives the best results and prevents water spots.
If you notice any streaks or smudges after drying, a little bit of rubbing alcohol on a clean cloth can help polish the glass to a brilliant shine. Just a small amount is needed!
Step 7: Clean the Fixture Base (Optional but Recommended)
While the glass shade is off, take a moment to wipe down the fixture’s base, socket, and any metal components. Use a slightly damp cloth for this, and be careful not to get water into any electrical parts. A dry cloth can then be used to buff any metal finishes. This makes the entire fixture look new again!
Step 8: Reassemble the Fixture
Once the glass shade is completely dry and clean, carefully reattach it to the fixture. Reverse the process you used to remove it. Make sure all screws or clips are snug but don’t overtighten, as this could crack the glass. If you had to remove a bulb to access the shade, screw it back in securely.
Step 9: Restore Power and Admire!
Turn the power back on at the breaker box if you turned it off. Then, flip the light switch. Step back and admire your work! Your glass light fixture should now be sparkling, and the light it casts will be brighter and more vibrant.
Cleaning Fixtures That Can’t Be Easily Removed
What if your glass shade is attached with silicone or is part of a sealed unit, making removal tricky? Don’t fret! You can still achieve a great clean.
Here’s how:
- Turn off the power and prepare your workspace as described in Steps 1 and 2.
- Prepare a cleaning solution in a bowl with warm water and a few drops of mild dish soap.
- Dip a microfiber cloth into the solution and wring it out very well. You want the cloth to be damp, not dripping wet.
- Gently wipe down the exterior of the glass shade. Work in sections, using a clean part of the cloth as it gets dirty.
- For tougher spots, you can try using a soft-bristled brush (like a toothbrush) dampened with your cleaning solution. Be careful not to scrub too hard.
- Rinse the cloth thoroughly in clean water, wring it out well, and wipe down the glass again to remove any soap residue.
- Use a dry microfiber cloth to buff the glass dry and remove any streaks.
- For the inside of the glass, this can be more challenging. If you can reach it with a slightly damp cloth (well wrung out!), do so. Sometimes, a long-handled duster can help remove loose dust from the inside before you attempt a damp wipe.
- Turn the power back on and enjoy the cleaner, brighter light!
Remember, the key here is minimal moisture. You don’t want any water seeping into the electrical components of the fixture.
Cleaning Different Types of Glass Fixtures
While the basic principles apply to most glass light fixtures, there are a few variations to consider.
Chandelier Glass
Chandeliers often have many small, delicate glass pieces or prisms. For these, it’s best to clean them individually if possible, or use a very gentle method. A damp microfiber cloth is your best friend. You might even consider a specialized chandelier cleaning spray, which can often be applied and allowed to drip dry (check manufacturer instructions!). Always ensure the power is off and have plenty of towels ready for drips.
Pendant Lights
Pendant lights, with their often sleek and modern designs, usually have removable glass shades similar to lamps. Follow the standard removal, washing, and reassembly steps. If the pendant has a very long cord, be extra careful when working on a ladder to avoid pulling on the fixture.
Flush-Mount Ceiling Lights
These are the fixtures that sit close to the ceiling. Many have glass covers that are held on by screws or a twist-lock mechanism. Be sure to support the glass as you remove it. If the glass is particularly heavy or difficult to remove, cleaning it in place (using the damp cloth method) might be safer.
Table and Floor Lamps
These are often the easiest. The shades are usually straightforward to remove, allowing for a thorough wash in the sink. Just be mindful of the lamp’s base and cord.
When to Call a Professional
While most glass light fixture cleaning is a DIY-friendly task, there are a few situations where it’s best to call in a professional:
- Complex Fixtures: If you have an antique, very intricate, or expensive chandelier with delicate crystals or wiring that looks beyond your comfort level.
- Electrical Concerns: If you notice any fraying wires, loose connections, or if you’re uncomfortable working around electrical components.
- Stubborn Stains: If you have a stain that you can’t identify or remove with gentle methods, a professional might have specialized solutions.
- Height or Accessibility Issues: If the fixture is in a very high or difficult-to-reach location and you don’t have a safe way to access it.
For general maintenance cleaning, however, you’ve got this!
Tips for Maintaining Sparkle Between Cleanings
Once you’ve got your fixtures looking spick and span, you’ll want to keep them that way! A little regular upkeep can go a long way.
Quick Dusting
A quick dusting with a dry microfiber cloth once a week or every other week can prevent a heavy build-up of dust. You can often do this without a ladder if the fixture is within reach.
Address Spills Immediately
If something spills near a fixture, wipe it up promptly. This prevents sticky residue from drying and becoming harder to remove later.
Use a Duster on a Pole
For hard-to-reach fixtures, a duster with an extendable pole can be a lifesaver for quick dusting sessions.
These small habits will make your deep cleaning sessions much easier and less frequent.
Troubleshooting Common Cleaning Issues
Even with the best intentions, you might run into a small snag. Here are a few common issues and how to solve them:
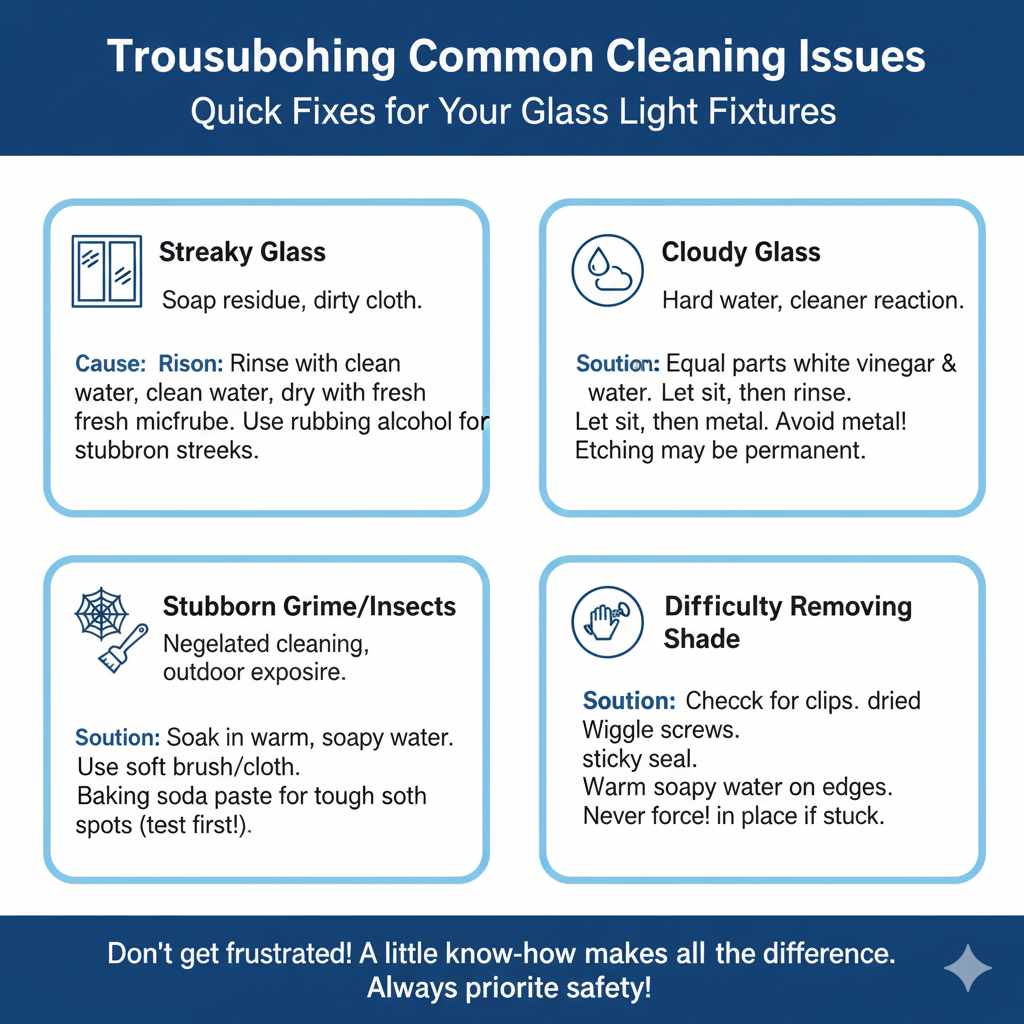
Streaky Glass
Cause: Soap residue left behind, or using a dirty cloth.
Solution: Rinse the glass thoroughly with clean water. Dry with a fresh, clean microfiber cloth. For stubborn streaks, use a small amount of rubbing alcohol on a clean cloth and buff gently. Ensure you’re using enough water to rinse but not so much that it can’t be dried effectively.
Cloudy Glass
Cause: Hard water mineral deposits, or a reaction with certain cleaning agents.
Solution: For hard water spots, a solution of equal parts white vinegar and water can often help. Let it sit for a few minutes, then rinse and dry. Avoid vinegar on any metal parts, as it can be corrosive. If the cloudiness is due to etching from a harsh cleaner, it may be permanent.
Stubborn Grime or Insect Residue
Cause: Neglected cleaning, or outdoor fixtures attracting insects.
Solution: Let the glass soak in warm, soapy water for a few minutes to loosen the grime. Use a soft-bristled brush (like an old toothbrush) or a soft cloth with a bit more pressure. For very tough spots, a paste of baking soda and water can sometimes help lift residue, but test in an inconspicuous area first and rinse very thoroughly.
Difficulty Removing Shade
Cause: Over-tightened screws, dried-on paint or gunk, or a sticky seal.
Solution: Double-check for any hidden clips or tabs. If screws are the issue, try gently wiggling them. If the glass seems stuck with gunk, try a little warm, soapy water around the edges to soften it. Never force it. If it’s truly stuck, consider cleaning it in place.
Frequently Asked Questions (FAQ)
Q1: How often should I clean my glass light fixtures?
A1: It’s a good idea to give them a quick dusting every 1-2 weeks. A more thorough washing, like the one described, is typically needed every 3-6 months, depending on your home environment (e.g., if you have pets, live near a busy road, or have many windows that are often open).
Q2: Can I use Windex or other glass cleaners?
A2: While Windex can work, mild dish soap and water is generally recommended for most glass fixtures. Some glass cleaners contain ammonia or alcohol, which can be harsh on certain finishes or seals over time. Always test in an inconspicuous area first if you choose to use a commercial cleaner.
Q3: What should I do if my fixture has crystal elements?
A3: Crystal elements are often more delicate. For best results, remove them if possible and clean them individually with a soft cloth dampened with mild soap and water, or a specialized crystal cleaner. Be very careful not to snag or break them. Allow them to dry completely before reattaching.
Q4: My fixture has a brass or metal finish. How do I clean that part?
A4: For brass or metal parts, use a damp cloth with just water or a very mild soap. Avoid getting cleaning solutions meant for glass on the metal, as it can cause discoloration or damage the finish. For tarnished metal, you might need a specific metal polish, but be sure it’s compatible with your fixture’s finish.
Q5: Is it safe to clean light fixtures while the bulbs are still in?
A5: Yes, as long as the power is OFF. You can leave the bulbs in. However, if you need to remove the bulb to access a screw or clip holding the glass, then do so. Just be sure the bulb is cool to the touch before handling.
Q6: Can I spray water directly onto the glass fixture while it’s still installed?
A6: It’s generally not recommended to spray water directly onto a fixture that is still installed, especially if the glass isn’t easily removable. Water can seep into the electrical components, which is a safety hazard. Always use a damp cloth that has been well wrung out.
Conclusion
There you have it! Cleaning your glass light fixtures is a straightforward process that can dramatically improve the look and feel of your home. By following these simple steps, gathering the right supplies, and prioritizing safety, you can achieve that beautiful, effortless shine without needing to call in the pros. Remember, a little bit of care goes a long way in making your home brighter and more welcoming. So, next time you notice that dust build-up, don’t hesitate – grab your microfiber cloths, and get ready to let your light fixtures truly shine! You’ve got the skills and the steps to make it happen, and the results will be well worth the small effort. Happy cleaning!