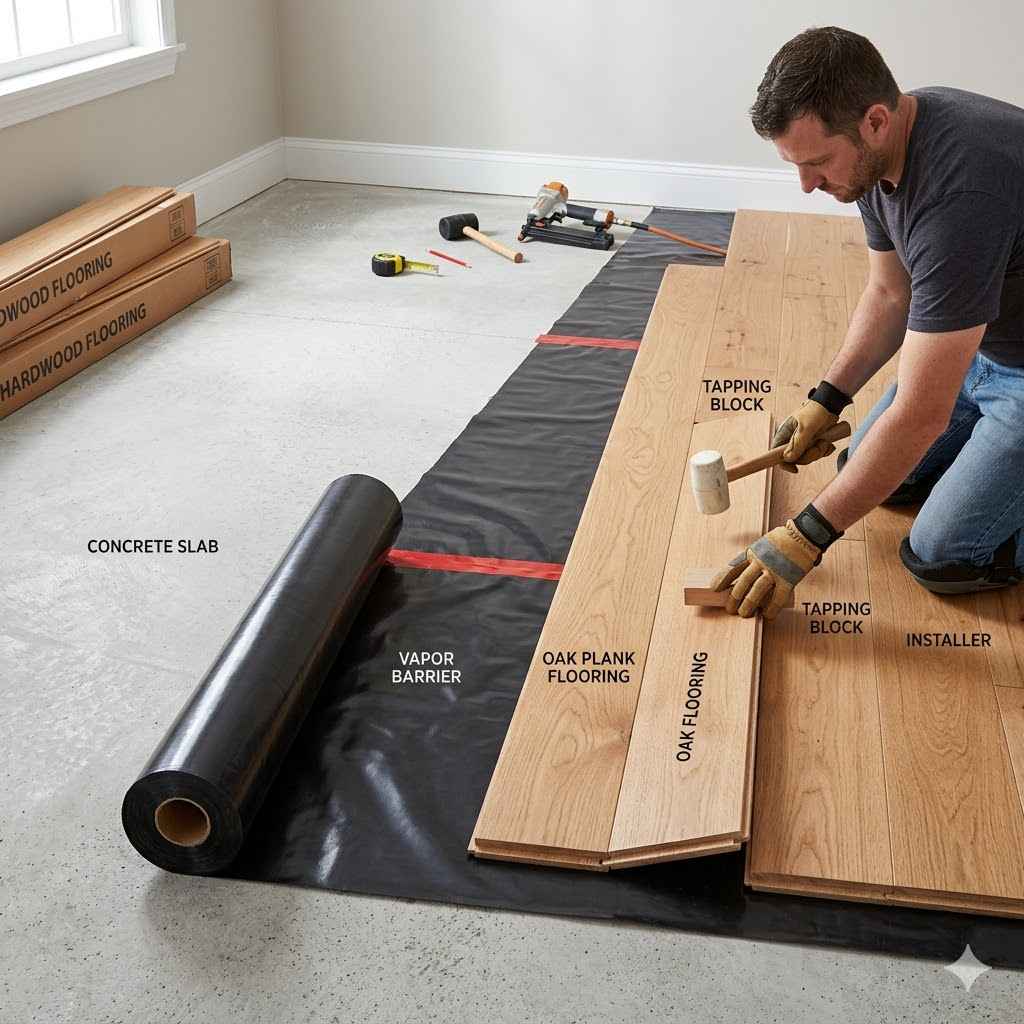
How to Install Wood Flooring on Concrete Slab
Installing wood flooring over a concrete slab might seem tricky, especially for folks new to DIY projects. Many homeowners worry about moisture and getting a level base, which can feel like big hurdles. But don’t stress! It’s totally doable with the right steps. We’ll guide you through How to Install Wood Flooring on a Concrete Slab simply and clearly, so you can achieve beautiful floors with confidence. Let’s get your project started right.
Preparing Your Concrete Slab for Wood Floors
Getting the concrete slab ready is the most important first step. A good foundation means your wood floors will look great and last for years. This part involves making sure the surface is clean, dry, and perfectly flat. If you skip these prep steps, you could end up with problems like squeaky floors or even damage down the line. We will cover everything you need to know to create the perfect base.
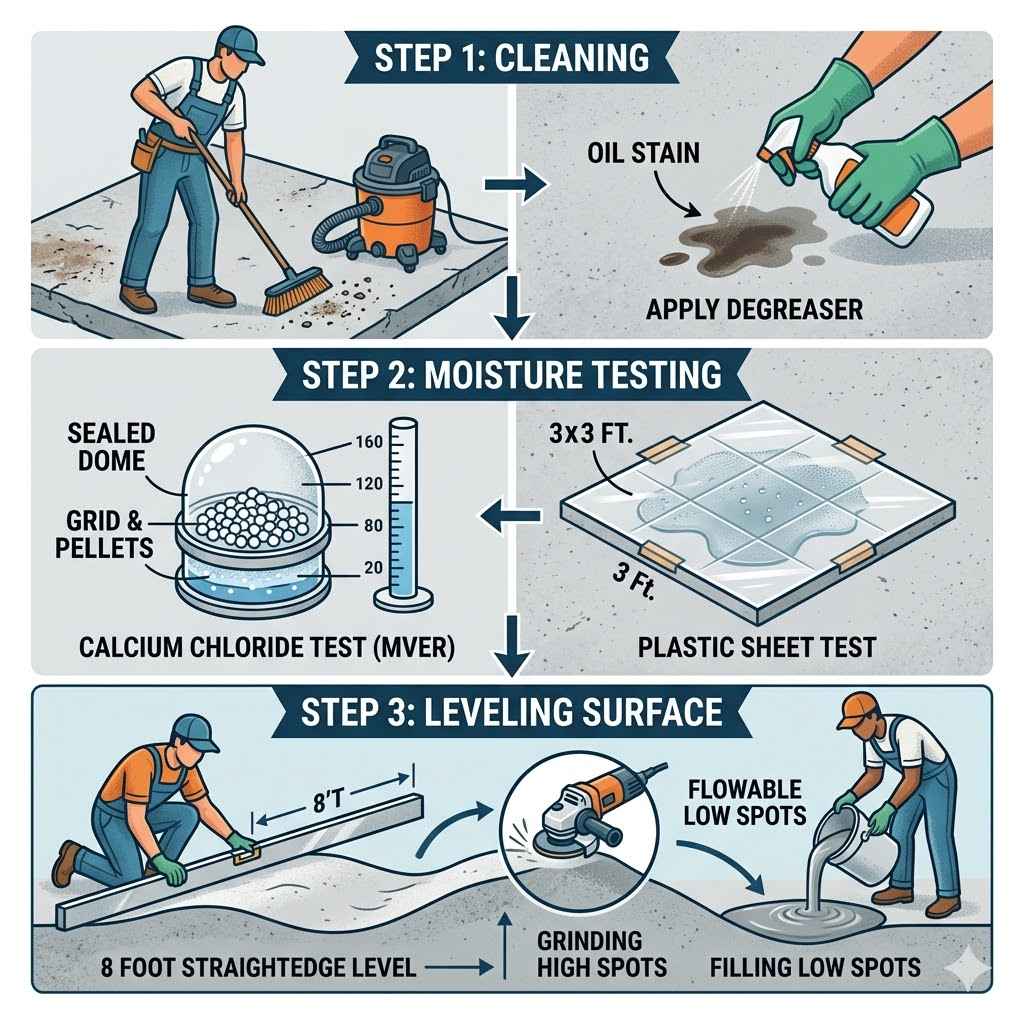
Cleaning the Concrete Surface
A clean slab is key to good adhesion and a smooth finish. You need to remove any dirt, dust, grease, or old adhesive. This ensures your new flooring will stick properly.
Remove all debris: Sweep or vacuum the entire floor area thoroughly. Pay close attention to corners and edges where dust can hide.
A clean concrete slab is essential for successful flooring installation. Any loose particles or contaminants can prevent adhesives from bonding correctly or cause unevenness. Think of it like preparing a canvas before painting; a clean surface leads to a better final artwork. For DIYers, this might involve renting a floor scrubber for larger areas or simply using a stiff broom and a shop vacuum.
Degrease any stains: Use a concrete degreaser for oily spots. Follow the product instructions carefully.
Grease and oil stains are common, especially in garages or basements that might have been used for car maintenance or hobbies. These substances act as barriers, preventing adhesives from making a solid connection with the concrete. Specialized concrete degreasers are formulated to break down these stubborn contaminants. Always ventilate the area well when using these products, and wear gloves and eye protection.
Wash and rinse thoroughly: After degreasing, wash the floor with a solution of water and a mild detergent. Rinse it multiple times to ensure no residue remains.
Washing helps remove any loosened grime and the degreaser itself. Multiple rinses are crucial because even a small amount of detergent residue can affect the bond of your flooring adhesive. Make sure each rinse water is clear before moving to the next. Letting the floor air dry completely afterward is a must.
Checking for Moisture Levels
Concrete can hold moisture, which is bad news for wood flooring. High moisture can cause wood to warp, swell, and even rot. You must test your slab before installing any wood.
The Calcium Chloride Test: This is a common method to measure the moisture vapor emission rate (MVER) from the concrete. You’ll need a test kit for this.
This test involves placing a sealed container with calcium chloride pellets onto a specific area of the concrete for 24 to 72 hours. The pellets absorb moisture from the air trapped under the container. After the test, you weigh the pellets to see how much moisture they absorbed. The kit provides a guide to interpret the results based on the weight change, telling you if the moisture level is acceptable for your chosen flooring.
The Plastic Sheet Test: Tape a 3×3 foot piece of plastic sheeting tightly to the concrete. Check for condensation or moisture under the plastic after 24 hours.
This is a simpler, less scientific test. If you see beads of water or a cloudy film on the underside of the plastic, it indicates moisture is rising from the slab. This test is good for a quick visual check but might not give you precise readings like the calcium chloride test. If you see moisture, you’ll need to address it before proceeding.
Understanding Moisture Limits: Different wood flooring types have different moisture tolerance levels. Always check the manufacturer’s recommendations.
Wood is a natural material that expands and contracts with changes in humidity and moisture. Installing wood flooring on a damp slab is a recipe for disaster, leading to cupping, crowning, or buckling. The acceptable moisture level will be specified by the wood flooring manufacturer, and it’s crucial to adhere to these guidelines. For instance, some engineered woods might tolerate slightly higher moisture than solid hardwoods.
Ensuring a Level Surface
Wood floors need a flat, level surface to lay properly. Any dips or high spots can cause problems. You might need to level or grind the concrete.
Use a long level or straightedge: Place a 6 or 8-foot level across the concrete. Check for gaps.
This is your primary tool for identifying unevenness. Lay the level across various sections of the slab, including in the middle and along the edges. If you can see light peeking through between the level and the concrete, or if the bubble is not centered, you have an uneven spot. This helps you pinpoint exactly where you need to make adjustments.
Grinding down high spots: If there are small humps, a concrete grinder can shave them down.
A concrete grinder is essentially a powerful tool with abrasive discs that can smooth down raised areas. This is a dusty job, so make sure to wear a dust mask and eye protection, and consider using a grinder with a dust shroud connected to a shop vacuum. It’s effective for localized high spots.
Self-leveling compound for low spots: For dips, a self-leveling compound can fill them in.
Self-leveling compounds are cementitious mixtures that, when mixed with water, flow easily and create a smooth, flat surface. You pour it into the low areas, and it spreads out. It’s important to follow the product’s instructions precisely for mixing and application to ensure it sets correctly and creates a durable, level surface. It hardens to a concrete-like finish.
Choosing the Right Wood Flooring and Underlayment
Selecting the correct wood flooring and an appropriate underlayment are vital for a successful installation over concrete. Not all wood floors are designed for this type of subfloor, and the right underlayment can make a huge difference in comfort and moisture protection.
Understanding Wood Flooring Types for Concrete Slabs
When installing wood floors on concrete, the type of wood you choose matters a lot. Some wood products are better suited for this situation than others due to their construction.
Solid Hardwood Flooring
Solid hardwood is made from a single piece of wood. While beautiful, it’s not always the best choice for concrete slabs, especially in basements or areas prone to moisture.
Challenges with Solid Hardwood: Solid wood expands and contracts significantly with humidity changes. On concrete, it’s more susceptible to moisture-related issues like cupping and warping.
Solid hardwood planks are milled from a single, solid piece of lumber. This means they are very sensitive to the moisture content in the air and the subfloor. If the concrete slab is even slightly damp, or if humidity levels fluctuate greatly, the wood can absorb moisture, causing it to swell. This swelling often leads to the edges of the planks lifting upwards, a condition known as cupping. Conversely, if the wood dries out too much, it can shrink and create gaps between the planks.
Installation Methods: Solid hardwood typically requires nailing or stapling to a wooden subfloor. For concrete, this often means installing a traditional wood subfloor over the concrete first, which adds height and cost.
Traditionally, solid hardwood is installed by mechanically fastening the planks to a wooden subfloor, like plywood or OSB. This is done using a flooring nailer or stapler. When laying solid hardwood directly on concrete, you cannot use this method. You would first need to build a traditional subfloor system on top of the concrete, which involves laying sleepers (strips of wood) with moisture barriers in between, and then attaching plywood to these sleepers. This creates a gap that allows for air circulation and provides a surface to nail the hardwood to.
When it might work: In very dry, climate-controlled environments with a robust moisture barrier, some installers might attempt to glue down solid hardwood. However, this is less common and riskier.
If you are installing in a location that is always kept at a stable temperature and humidity, and you are absolutely certain there is no risk of moisture from below, gluing down solid hardwood can be an option.
This requires a specialized adhesive designed for direct wood-to-concrete bonding. However, it’s critical to understand that even with the best precautions, the risk of moisture-related issues is higher compared to other flooring types. Many manufacturers will void warranties if solid hardwood is installed directly over concrete without a proper subfloor.
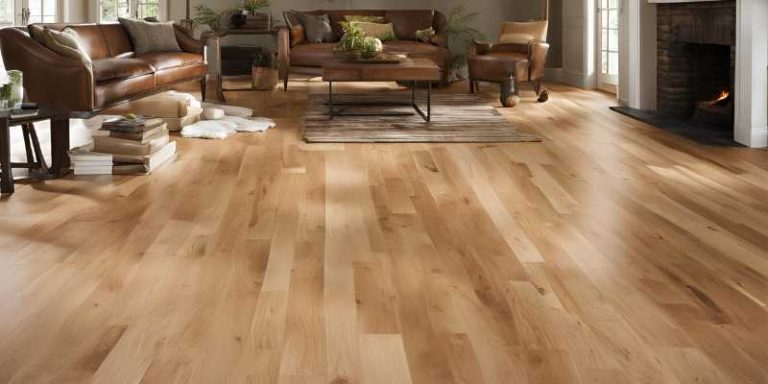
Engineered Hardwood Flooring
Engineered hardwood is constructed in layers. The top layer is real hardwood, but the core is made of plywood or high-density fiberboard. This makes it more stable.
Greater Dimensional Stability: The cross-ply construction of engineered wood helps it resist expansion and contraction caused by humidity changes. This makes it a much better choice for concrete slabs.
Engineered hardwood is designed to be more stable than solid hardwood. Imagine a sandwich where the top and bottom slices are real wood, and the filling is made of compressed layers of wood veneer or fiberboard, often oriented in alternating directions. This layered structure counteracts the natural tendency of wood to swell or shrink. As a result, engineered wood can handle more fluctuations in temperature and humidity without significant movement, making it ideal for installations where moisture control is a concern.
Versatile Installation Options: Engineered wood can be glued down, floated, or even nailed down (if a subfloor is installed). Gluing is a very popular method for concrete.
Because of its stable construction, engineered hardwood offers flexibility in how it’s installed. It can be directly adhered to a concrete slab using a strong adhesive. Alternatively, it can be installed as a “floating floor,” where planks are joined together but not attached to the subfloor, using a click-lock system and an underlayment. Some thicker engineered products can also be nailed down if a wooden subfloor is first installed over the concrete. The glue-down method is particularly common and effective on concrete.
Moisture Resistance: While not entirely waterproof, engineered wood is significantly more moisture-resistant than solid hardwood. This is a major advantage for concrete installations.
While still a wood product, engineered hardwood’s construction provides a degree of protection against moisture. The cross-laminated core is less prone to absorbing moisture and swelling compared to solid wood. This enhanced resistance means that if minor moisture vapor is present from the concrete, or if there are small spills that are cleaned up quickly, the engineered planks are less likely to suffer permanent damage. It’s important to remember that this is not an invitation to install in constantly wet areas like a shower.
Laminate Flooring
Laminate is made of composite wood pressed together. It has a photorealistic image layer and a clear protective wear layer on top.
Durability and Affordability: Laminate is known for being very durable, scratch-resistant, and generally more affordable than hardwood.
Laminate flooring is a popular choice for its resilience and cost-effectiveness. The top wear layer is incredibly tough, making it resistant to scratches, stains, and fading. This makes it suitable for high-traffic areas and homes with pets or children. Its realistic wood-look designs are achieved through high-definition printing, offering a wide range of aesthetic options at a fraction of the cost of real wood.
Installation over Concrete: Laminate is almost always installed as a floating floor, requiring an underlayment and vapor barrier over concrete.
Laminate flooring is designed to be installed as a floating floor. This means the planks are clicked together to form a single sheet that rests on top of the subfloor, rather than being glued or nailed down. Over a concrete slab, this requires an underlayment, which often includes a built-in moisture barrier. The vapor barrier is essential to prevent moisture from the concrete from migrating up into the laminate and causing damage, such as swelling or delamination.
Water Sensitivity: While some newer laminates offer improved water resistance, many can still be damaged by standing water or prolonged exposure to moisture.
Traditional laminate flooring is not waterproof. While it can handle everyday spills if cleaned up promptly, prolonged exposure to water or significant spills can cause the core material to swell and warp. Newer “water-resistant” or “waterproof” laminate options are available, which use different core materials or treatments to offer better protection, but it’s still important to follow manufacturer guidelines and address spills quickly.
Vinyl Plank Flooring (LVP)
Luxury Vinyl Plank (LVP) is a popular choice for its durability, water resistance, and ease of installation.
Waterproof Properties: Many LVP products are completely waterproof, making them excellent for areas prone to spills or moisture, like kitchens or basements.
Luxury Vinyl Plank flooring is renowned for its excellent water resistance. This makes it an ideal choice for areas where spills are common, such as kitchens, bathrooms, laundry rooms, and basements. Unlike wood or laminate, most LVP will not swell or be damaged by standing water, making cleanups far less stressful. This waterproof quality is a significant advantage for installations over concrete.
Installation Ease: LVP often comes with a click-lock system, making it a great DIY option. It can be floated or glued down.
The convenience of LVP installation is a major selling point for DIYers. Many LVP products feature a simple click-lock mechanism, allowing planks to be easily snapped together. This creates a floating floor that doesn’t require adhesives. Alternatively, LVP can also be glued directly to the subfloor for a more permanent installation. This versatility makes it adaptable to various skill levels and project requirements.
Comfort and Sound: LVP can be quite comfortable underfoot, and with the right underlayment, it can also help reduce noise.
Compared to harder flooring materials like tile or stone, LVP often provides a bit more cushioning, making it more comfortable to stand on for extended periods. When combined with a suitable underlayment, it can also significantly absorb sound, reducing the hollow “clacking” noise that can sometimes accompany walking on hard floors, especially in multi-story homes.
Selecting the Correct Underlayment
An underlayment is a layer placed between the concrete slab and your wood flooring. It offers several benefits, including cushioning, sound dampening, and moisture protection.
Moisture Barrier Underlayment
This is arguably the most critical type of underlayment for concrete. It prevents moisture vapor from rising from the slab and damaging your flooring.
Purpose of a Vapor Barrier: Concrete is porous and can emit moisture vapor from the ground. A vapor barrier stops this moisture from reaching the wood or laminate flooring.
Even seemingly dry concrete can release moisture vapor. This vapor can be absorbed by wood or laminate flooring, causing it to swell, warp, or delaminate over time. A vapor barrier, typically made of plastic sheeting or a specialized underlayment material, acts as a physical shield, preventing this moisture from migrating upwards into your floor. This protection is essential for the longevity of your flooring, especially for solid and engineered hardwoods.
Types of Vapor Barriers: Some underlayments have a built-in vapor barrier. You can also use a separate polyethylene sheeting, typically 6 mil thick.
You can find underlayment materials that come with an integrated vapor barrier. These are convenient as they combine two functions into one layer. If your chosen underlayment does not include this feature, you will need to install a separate vapor barrier. This is usually a sheet of heavy-duty plastic, like 6-mil polyethylene, which is laid over the concrete and overlapped at the seams, then taped securely.
Installation Technique: Ensure the vapor barrier is continuous and well-sealed. Overlap seams by at least 6 inches and tape them with a quality vapor barrier tape.
Proper installation is paramount for a vapor barrier to be effective. The goal is to create a completely sealed system. Overlap the edges of the plastic sheeting by at least 6 inches and use a specialized tape designed for vapor barriers to seal these seams. This ensures that no moisture can find its way through any gaps or openings. If you are using a pre-attached vapor barrier on an underlayment, follow the manufacturer’s instructions for taping any seams or edges.
Cushioning and Sound Absorption
Beyond moisture, an underlayment can make your floor more comfortable and quieter.
Comfort Underfoot: A thicker, denser underlayment can provide a softer feel when walking on the floor.
Walking on a hard concrete slab can be tiring. A good underlayment adds a layer of cushioning, making the floor more comfortable to stand and walk on. This is especially noticeable in areas where you spend a lot of time, like kitchens or living rooms. The thickness and density of the underlayment will determine the level of comfort it provides.
Noise Reduction: Certain underlayments are designed to absorb sound, reducing the impact noise that travels through floors and ceilings.
This is particularly important in apartments or multi-story homes. An underlayment with good acoustic properties can significantly dampen the sound of footsteps, preventing them from being a nuisance to people on lower floors or in adjacent rooms. Look for underlayments that specifically mention sound reduction or acoustic properties.
Underlayment Material Options
Different materials offer different benefits.
Foam Underlayment: Lightweight and good for basic cushioning and some moisture resistance.
Foam underlayments are commonly made from polyethylene or polyurethane. They are inexpensive and easy to cut and install. They offer a modest amount of cushioning and can help smooth out minor imperfections in the subfloor. Many foam underlayments also incorporate a built-in moisture barrier, making them a convenient all-in-one solution for concrete slabs. However, they may not offer the best sound dampening.
Cork Underlayment: Natural, sustainable, and offers good cushioning, sound insulation, and thermal properties.
Cork is an excellent natural material for underlayment. It provides good cushioning and is very effective at absorbing sound. Cork also has natural insulating properties, which can help keep your floor warmer in the winter. It is also resistant to mold and mildew. Cork underlayments are often available in various thicknesses and can be a great choice for a premium feel.
Rubber Underlayment: Excellent for sound dampening and comfort, often used in high-traffic areas.
Rubber underlayments are highly regarded for their superior sound-dampening capabilities and their ability to provide excellent comfort underfoot. They are made from recycled tires or synthetic rubber, making them a durable and resilient option. Rubber underlayments are ideal for areas where noise reduction is a priority, such as in apartments or homes with children and pets, as they effectively absorb impact sounds.
The Installation Process Step-by-Step
Now that you’ve chosen your flooring and underlayment, it’s time to get down to the installation. Follow these steps carefully for a professional-looking finish.
Step 1 Preparing the Underlayment and Vapor Barrier
This is where you lay the foundation for your new floor. Proper installation here is crucial.
Lay the vapor barrier: If your underlayment doesn’t have one, lay down 6-mil polyethylene sheeting. Overlap seams by 6 inches and tape them securely.
Begin by unrolling the polyethylene sheeting across the entire concrete slab. Ensure that you have enough material to cover the entire area, including extending up the walls slightly where the baseboards will eventually cover it. Overlap the edges of each sheet by at least 6 inches. Use a strong, adhesive tape designed for vapor barriers to seal these seams. This creates a continuous, unbroken barrier that will effectively block moisture vapor from reaching your flooring material.
Install the underlayment: Roll out your chosen underlayment over the vapor barrier (or use it if it has a built-in barrier). Cut to fit and tape seams if required by the manufacturer.
Once the vapor barrier is in place and sealed, you can begin laying the underlayment. Unroll the underlayment material according to the manufacturer’s instructions. If it’s a foam or cork roll, cut it to size using a utility knife. If the underlayment has seams, you may need to tape them together with the specified tape to keep them from shifting and to maintain a continuous layer. Ensure there are no wrinkles or gaps in the underlayment.
Acclimate the flooring: Let your wood or laminate flooring sit in the room where it will be installed for at least 48-72 hours. This allows the wood to adjust to the room’s temperature and humidity.
Before you even start laying planks, it’s vital to acclimate your flooring material. Remove it from its packaging and spread the planks out flat in the room where they will be installed.
This process, known as acclimation, allows the wood or laminate to absorb or release moisture to match the ambient conditions of the room. This greatly reduces the risk of the flooring expanding or contracting excessively after installation, which can lead to gaps or buckling.
Step 2 Installing the Wood or Laminate Flooring
This is the main event! Work carefully and systematically.
Start at the longest, straightest wall: Begin your installation along the main wall of the room. Ensure the first row is perfectly straight.
Identify the longest and straightest wall in your room. This is usually the best place to start your installation. You will typically start with the tongue side of the flooring plank facing the wall. If the tongue is facing the wall, you will need to carefully cut it off with a utility knife or saw to create a flat edge for a clean installation against the wall. Leave an expansion gap between the flooring and the wall.
Leave an expansion gap: Maintain a gap of about 1/4 to 1/2 inch around the perimeter of the room. This allows the flooring to expand and contract.
As you lay each row of planks, it’s crucial to leave a consistent gap between the flooring and the walls, as well as any fixed objects like cabinets or doorframes. This expansion gap is essential because wood and laminate flooring naturally expand and contract with changes in temperature and humidity. Without this gap, the flooring can buckle upwards or push against walls, leading to damage. This gap will be hidden by baseboards and trim later.
Connect the planks: Follow the manufacturer’s instructions for connecting the planks. Most use a click-lock system.
Modern wood and laminate flooring often use a click-lock or tongue-and-groove system that makes joining planks straightforward. You typically angle one plank into the groove of another and then press down to lock them together. For some systems, you might need to tap gently with a rubber mallet to ensure a tight fit. Always refer to the specific instructions for your flooring product, as locking mechanisms can vary.
Stagger the seams: For a natural look, stagger the end joints of the planks from one row to the next. Avoid lining them up.
To prevent your floor from looking like a checkerboard and to add structural strength, you should stagger the end joints of the planks. This means that the end of a plank in one row should not line up with the end of a plank in the adjacent row. A common recommendation is to stagger them by at least 6 inches. You can achieve this by starting some rows with a full plank, others with a half plank, and so on.
Cutting the last plank: You will likely need to cut the last plank in each row to fit. Measure carefully and use a saw for a clean cut.
The final plank in each row will almost always need to be cut to size. Measure the remaining space, taking into account the expansion gap. Use a miter saw, circular saw, or jigsaw to make your cuts. It’s often best to cut from the underside of the plank if using a jigsaw to avoid chipping the decorative surface. Always ensure your cuts are straight and accurate for a seamless finish.
Install the final row: The last row may need to be trimmed lengthwise. You might need a pull bar to snugly fit the last planks into place.
Fitting the very last row of planks can sometimes be the trickiest part. You may need to trim the width of the planks in this row. Once you have the correct width, use a pull bar, which is a specialized tool, to help gently pry and lock the final planks into the groove of the preceding row. This tool allows you to apply pressure without damaging the flooring.
Step 3 Finishing Touches
Once the flooring is in place, it’s time to clean up and add the final details.
Install baseboards and trim: Reinstall your baseboards and add any other trim pieces needed around the edges and doorways.
After the flooring is laid, you will need to cover the expansion gaps around the perimeter of the room. This is done by installing baseboards and quarter-round trim. The baseboards should be nailed to the walls, not the floor, so they can float independently. Quarter-round molding can be used to cover the gap between the bottom of the baseboard and the flooring.
Clean the floor: Sweep or vacuum the floor thoroughly to remove any dust and debris from the installation process.
Once all the trim is in place, give your new floor a thorough cleaning. Use a soft broom or a vacuum cleaner with a hard floor attachment to remove any dust, sawdust, or small particles that may have settled on the surface during installation. This will leave your new floor looking pristine and ready to be enjoyed.
Inspect your work: Walk around and check for any loose planks or uneven spots. Address any issues before considering the job complete.
Before you fully declare victory, take a walk around your newly installed floor. Look for any planks that seem loose or feel unsteady underfoot. Check that all the seams are tight and that the expansion gaps are consistent. If you find any minor issues, such as a plank that didn’t fully lock, now is the time to address them.
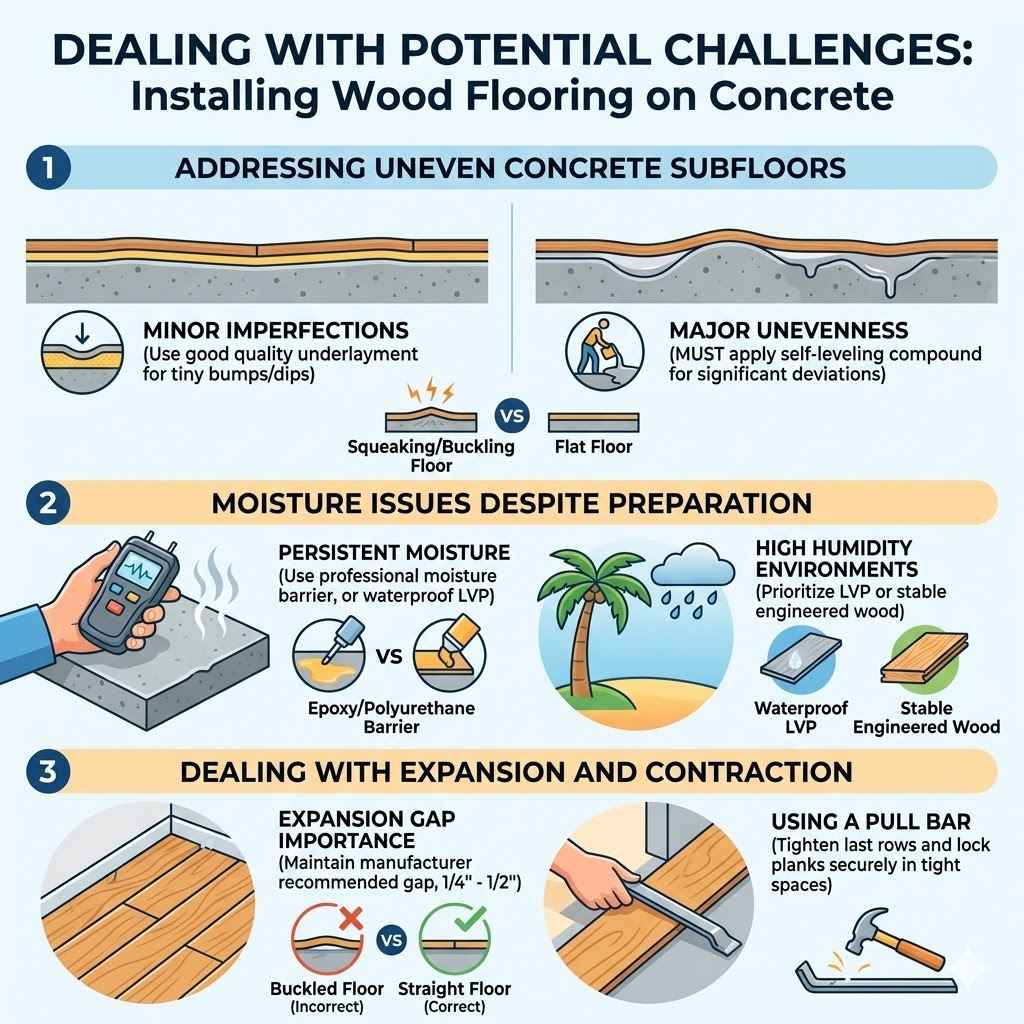
Dealing with Potential Challenges
Even with careful planning, you might run into a few bumps along the way. Knowing how to handle common issues can save you time and frustration.
Addressing Uneven Concrete Subfloors
We touched on this in the preparation phase, but it’s worth reiterating how crucial a level floor is.
Minor Imperfections: Small dips and humps can often be managed with the right underlayment or by careful placement of planks.
If your concrete has very minor imperfections that were not completely smoothed out during preparation, a good quality underlayment can often compensate for them. The underlayment provides a slight buffer, and the flexibility of engineered wood or laminate can help bridge tiny unevenness. However, significant dips or humps cannot be hidden this way and will require correction.
Major Unevenness: If the concrete is significantly out of level, you must use a self-leveling compound before proceeding with any flooring installation.
For significant dips or high spots, trying to install flooring directly over them will lead to a floor that squeaks, feels uneven, and can cause the flooring material to crack or delaminate over time. A self-leveling compound is designed to flow and spread out, creating a smooth, flat surface over large areas. This is a critical step that cannot be skipped if your concrete is severely uneven.
Moisture Issues Despite Preparation
Sometimes, moisture problems can persist or arise unexpectedly.
Persistent Moisture: If tests show ongoing high moisture levels, you might need a professional-grade moisture barrier or a different flooring type.
If you’ve performed moisture tests and consistently get readings that exceed the limits for your chosen flooring, even after basic preparation, you might need to invest in a more robust moisture mitigation system. This could involve applying a liquid-applied epoxy or polyurethane moisture barrier directly to the concrete. In some extreme cases, it might be necessary to reconsider the type of flooring altogether and opt for something like luxury vinyl plank (LVP) which is highly waterproof.
High Humidity Environments: In areas with very high ambient humidity, using moisture-resistant flooring like LVP or a highly stable engineered wood is essential.
Environments with consistently high humidity, such as coastal regions or poorly ventilated basements, pose a greater risk to wood and laminate flooring. In such conditions, prioritize flooring materials that are specifically designed to withstand moisture. Luxury vinyl plank (LVP) is an excellent choice for its waterproof nature. If you prefer wood, choose engineered hardwood with a high-quality core and top veneer, and ensure your vapor barrier and acclimation are done perfectly.
Dealing with Expansion and Contraction
Wood and laminate flooring will move. Proper installation accounts for this.
Expansion Gap Importance: Never skip the expansion gap around the perimeter. This is the most common reason for buckling.
The expansion gap is your flooring’s safety net. It provides the necessary space for the material to expand when humidity or temperature rises, and to contract when conditions cool down. If this gap is too small or non-existent, the expanding planks will have nowhere to go, forcing them upwards against walls or cabinets, leading to buckling. Always maintain the manufacturer-recommended gap, usually between 1/4 and 1/2 inch.
Using a Pull Bar: This tool is essential for tightening up rows and ensuring planks are fully locked, especially in tight spaces.
As you install planks, especially in the last row or in tight corners, you might find it difficult to get a tight fit. A pull bar is specifically designed for this purpose. It’s a metal bar with a hook on one end that you place against the edge of the last plank and tap with a hammer. This gently pulls the plank into the groove of the previous row, ensuring a snug, gap-free connection without damaging the flooring.
FAQ
Question: Can I install solid hardwood flooring directly on a concrete slab
Answer: It is generally not recommended to install solid hardwood flooring directly on a concrete slab due to its susceptibility to moisture. Solid hardwood expands and contracts significantly with humidity changes. If the concrete is damp, it can cause the wood to warp or cup.
It’s usually best to install a wooden subfloor over the concrete first or choose engineered wood or other moisture-resistant flooring options.
Question: What is the best type of flooring for a basement concrete slab
Answer: For basements, which are prone to moisture, luxury vinyl plank (LVP) is often the best choice because it is waterproof. Engineered hardwood with a strong moisture barrier and a good underlayment is also a viable option. Laminate flooring can work if it’s specifically designed for basement use and installed with a proper vapor barrier, but LVP is generally more forgiving.
Question: How thick should the expansion gap be
Answer: The expansion gap should typically be between 1/4 inch and 1/2 inch (approximately 6-12 mm) around the entire perimeter of the room. This gap allows the flooring material to expand and contract freely with changes in temperature and humidity. The exact measurement may vary slightly based on the type of flooring and the manufacturer’s recommendations.
Question: Do I need a vapor barrier if my concrete slab is sealed
Answer: Even if your concrete slab has been sealed, it is still highly recommended to use a vapor barrier or a moisture-resistant underlayment. Sealers can degrade over time, and concrete can still emit moisture vapor. A dedicated vapor barrier provides an extra layer of protection, ensuring the longevity of your wood or laminate flooring, especially in areas with potential moisture concerns.
Question: How can I test for moisture in my concrete slab
Answer: The most common methods are the Calcium Chloride Test and the Plastic Sheet Test. The Calcium Chloride Test measures the rate of moisture vapor emission from the concrete. The Plastic Sheet Test involves taping a sheet of plastic to the floor and checking for condensation after 24 hours.
Both methods help determine if moisture levels are within acceptable limits for flooring installation.
Summary
Installing wood flooring on a concrete slab is achievable with careful preparation and the right materials. Focus on a clean, level, and dry subfloor. Choose engineered wood, laminate, or vinyl plank flooring for better moisture resistance. Always use a proper underlayment with a vapor barrier. Following these steps ensures a beautiful and durable floor that you can enjoy for years.