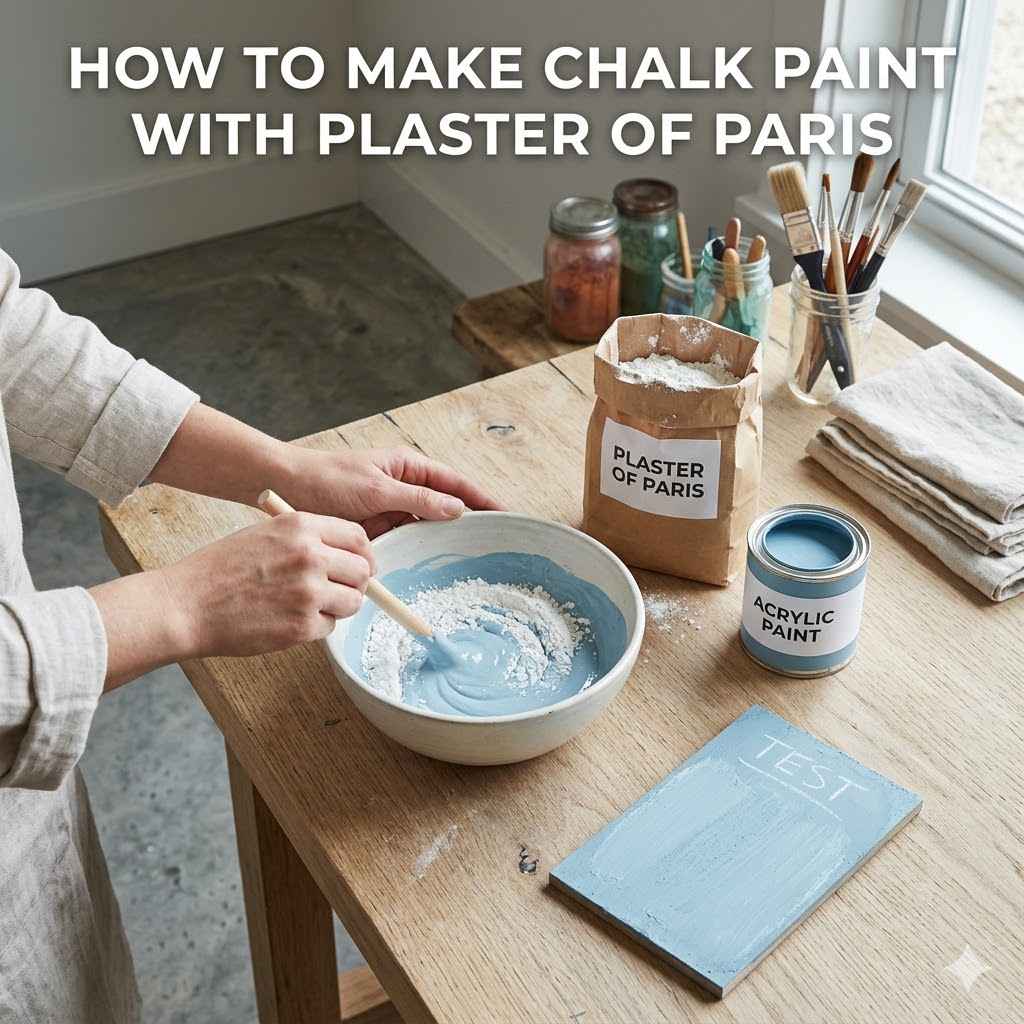
How to Make Chalk Paint with Plaster of Paris
Making your own chalk paint can be a fun and easy way to update old furniture. Many beginners find the idea a bit tricky, thinking it needs special ingredients. But actually,How to Make Chalk Paint with Plaster of Paris is simpler than you might guess.
You likely have most of what you need right at home! We’ll walk through it step-by-step. Get ready to transform your projects with this budget-friendly technique.
Create Your Own Chalk Paint Mix
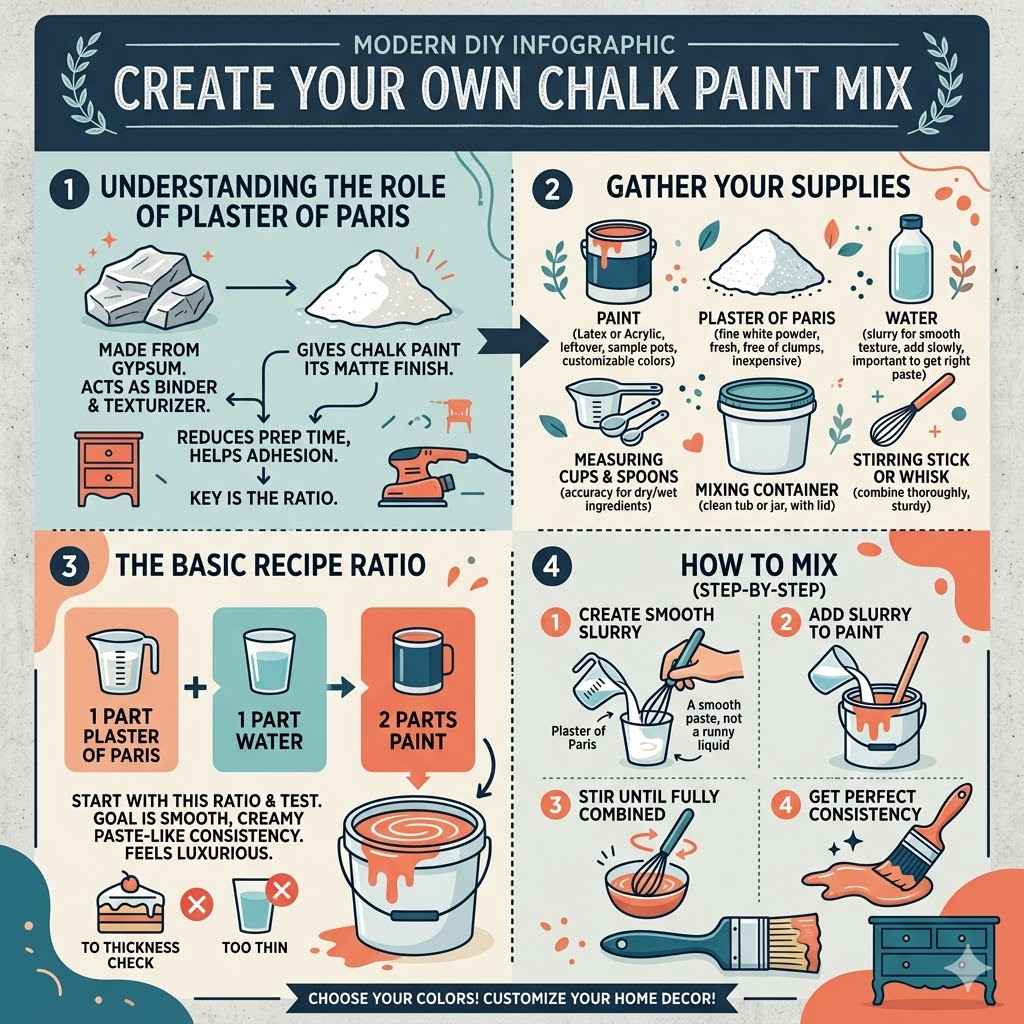
Making chalk paint at home is a rewarding DIY project that saves money and lets you customize colors. The magic behind chalk paint’s matte finish and easy adhesion comes from a simple thickening agent. Plaster of Paris is a popular choice because it’s readily available at most hardware stores and creates a smooth, chalky texture when mixed with paint.
This section covers the basic recipe and what you’ll need. We’ll explain why this method works so well for furniture painting. You will learn the exact ratios to get that perfect consistency.
Plus, we’ll talk about the simple tools you’ll need to get started.
Gather Your Supplies for Chalk Paint
To start making your own chalk paint, you’ll need a few basic items. Having everything ready before you begin makes the process smooth and enjoyable. Think of it like preparing for a simple baking recipe; the right ingredients and tools are key.
Paint: Any latex or acrylic paint will work. Sample pots are great for small projects. The color is up to you!
This is where you can get creative and match your home decor perfectly. You can use leftover paint from other projects too. It’s a great way to use up small amounts of paint that might otherwise go to waste.
Plaster of Paris: This fine white powder is the secret ingredient that gives chalk paint its signature texture. It’s often found in the drywall or craft sections of hardware stores. Look for a good quality brand.
It should be fresh and free of clumps. When it’s old, it can sometimes be harder to mix and might not give you the best results. It’s generally inexpensive, making it a cost-effective choice.
Water: Just a little bit of water is needed to create a smooth slurry with the Plaster of Paris. You won’t need much, and adding it slowly is important. Too much water can make your paint too thin, and that’s hard to fix later on.
Start with a small amount and add more only if needed. The goal is a smooth paste, not a runny liquid.
Measuring Cups and Spoons: Accuracy is important for getting the right consistency. Standard kitchen measuring tools will work perfectly. Having a set of different sizes means you can accurately measure both dry and wet ingredients.
This is especially helpful when you are trying to get the ratio of Plaster of Paris to paint just right.
Mixing Container: A clean, empty container is needed to mix your paint. An old plastic tub or a large jar works well. Make sure it’s large enough to hold all your paint and the Plaster of Paris mixture without overflowing.
A container with a lid can be useful if you want to save any leftover paint for later touch-ups. Clean it thoroughly after use.
Stirring Stick or Whisk: A wooden dowel, a strong plastic spoon, or even a small whisk can be used to combine the ingredients. You need something sturdy to ensure the Plaster of Paris is fully incorporated into the paint. A whisk can help break up any small lumps that might form.
Ensure it reaches the bottom of the container.
Understanding the Role of Plaster of Paris
Plaster of Paris is a white powder made from gypsum. When mixed with water, it hardens quickly. In chalk paint, it acts as a binder and a texturizer.
It gives the paint its characteristic matte, velvety finish. It also helps the paint adhere to surfaces without much sanding. This is a big reason why people love using it on furniture.
It reduces prep time significantly. Plaster of Paris absorbs moisture from the paint, creating that powdery feel we associate with chalk. It’s a simple chemical reaction that gives us fantastic results.
The key is the ratio. Too much Plaster of Paris can make the paint too thick and difficult to spread. Too little, and you won’t get the desired chalky effect.
The common ratio is about one part Plaster of Paris to two parts water, then mixed into the paint. This forms a sort of paste. This paste is then blended into your chosen paint color.
It’s essential to mix the Plaster of Paris with water first to avoid dry clumps in your paint. This pre-mixing step ensures a smooth, consistent texture throughout your homemade chalk paint.
The Basic Chalk Paint Recipe Ratio
The most common and effective ratio for making chalk paint is simple. You’ll generally use one part Plaster of Paris, one part water, and two parts paint. So, if you are using one cup of paint, you would mix half a cup of Plaster of Paris with half a cup of water first, and then add that mixture to the cup of paint.
This ratio can be adjusted slightly based on your desired consistency and the type of paint you are using.
Always start with this ratio and test it. You can always add a little more paint or a tiny bit more of the Plaster of Paris slurry if needed. The goal is a smooth, spreadable paint.
It shouldn’t be too thick like frosting or too thin like water. It should feel like a luxurious, creamy paint ready to coat your surface beautifully. This consistency allows for easy application with a brush or roller.
Here’s a breakdown of how to mix a small batch, perhaps for a picture frame or a small stool. For a small project, you might use:
- 1/4 cup of your chosen paint color.
- 2 tablespoons of Plaster of Paris.
- 2 tablespoons of water.
You would then mix the Plaster of Paris and water together first, creating a smooth paste. Once smooth, stir this paste into the 1/4 cup of paint until it’s fully combined and has a uniform texture. This makes about 1/2 cup of chalk paint.
How to Make Chalk Paint with Plaster of Paris Step-by-Step
Now that you have your supplies and know the basic ratio, let’s get to the actual process. This is where your DIY chalk paint comes to life. We will guide you through each step carefully.
It’s a very straightforward process, and the results are well worth the small effort involved. Think of this as a simple recipe you can follow with confidence.
This guide will detail the mixing process. You will learn how to combine the ingredients to achieve the perfect consistency. We will also discuss how to store any leftover paint.
This makes future touch-ups a breeze. Following these steps ensures you get the best out of your homemade chalk paint.
Step 1 Mixing Plaster of Paris and Water
The first crucial step is to create a smooth paste from the Plaster of Paris and water. In your clean mixing container, add your measured Plaster of Paris. Then, gradually add the measured water.
Do this slowly, stirring continuously. A whisk works very well here to break up any clumps.
You are aiming for a consistency similar to thick pancake batter or smooth yogurt. It should be lump-free. If it seems too thick, add a tiny bit more water, a teaspoon at a time.
If it becomes too thin, you can try adding a tiny bit more Plaster of Paris, but be very careful not to overdo it. The key is gradual additions and thorough mixing.
Once you have a smooth, creamy paste, set it aside for a moment. This pre-mixing ensures the Plaster of Paris dissolves properly. It prevents those gritty bits that can affect the final finish of your paint.
This step is simple but essential for a flawless result. Many beginners skip this, leading to less than ideal outcomes. Don’t skip it!
Step 2 Combining the Slurry with Paint
Now it’s time to add your prepared Plaster of Paris slurry to your chosen paint color. Pour the smooth paste into your container of paint. Stir gently at first.
Then, increase your stirring speed until the mixture is completely uniform. Make sure there are no streaks or unmixed parts.
Continue stirring until the paint has a smooth, creamy texture. It should look and feel like a rich, velvety paint. If you notice any small lumps remaining, keep stirring.
You can also use your stirring stick to mash them against the side of the container. A smooth texture is vital for an even application and a beautiful finish on your project.
Check the consistency. It should be easily spreadable with a brush. If it seems too thick, you can add a tiny amount of water, a tablespoon at a time, stirring well after each addition.
Be cautious, as too much water will thin the paint down too much. If it’s too thin, you can try adding a little more of the Plaster of Paris/water mixture you prepared earlier, again, very sparingly.
Step 3 Adjusting Consistency and Testing
After the initial mixing, it’s wise to check the consistency. Dip your stirring stick into the paint. When you pull it out, the paint should coat the stick smoothly and not drip off too quickly.
It should be thick enough to leave a visible trail on the stick for a few seconds.
If the paint is too thick, add a small amount of water, about a teaspoon, and stir well. Repeat this until you reach your desired consistency. If it’s too thin, you can add a bit more of the Plaster of Paris slurry you made earlier.
Remember to mix the Plaster of Paris with a little water first to make the slurry.
It’s always a good idea to test your paint on a scrap piece of wood or cardboard before painting your project. This allows you to see how it applies and how it dries. You can check for any imperfections and make final adjustments to the consistency if needed.
This simple test saves potential headaches later on.
Step 4 Storing Your Homemade Chalk Paint
If you have leftover chalk paint, you can store it for future use. Pour the paint into an airtight container. Glass jars with tight-fitting lids or plastic food storage containers work well.
Label the container with the color and date you made it. Store it in a cool, dry place. Properly stored, homemade chalk paint can last for several weeks, or even months.
When you are ready to use stored paint, give it a good stir. It might separate slightly, which is normal. If it seems a little thick, you can add a splash of water to loosen it up.
Always check the consistency before using. If you notice any mold or an unpleasant odor, it’s best to discard it and make a fresh batch. This ensures you are working with good quality paint.
Tips for Using Your Homemade Chalk Paint
Using your homemade chalk paint is almost as enjoyable as making it. It applies beautifully, offering a smooth, velvety finish that’s perfect for distressing or leaving as is. This section provides advice on application, drying times, and achieving the best results for your projects.
We’ll help you get the most out of your creative endeavors.
You’ll find that this paint adheres well to most surfaces with minimal preparation. We will cover what surfaces work best and how to prepare them. Also, we will talk about the topcoats you should use to seal your finished piece.
These tips will elevate your DIY projects from good to great.
Surface Preparation for Best Adhesion
While chalk paint is known for its excellent adhesion, a little preparation goes a long way. Most surfaces don’t require extensive sanding before applying chalk paint. However, cleaning the surface thoroughly is essential.
Dust, grease, and grime can prevent the paint from sticking properly.
For most projects, simply wipe down the item with a damp cloth and a mild cleaner. For very glossy surfaces or those prone to bleeding (like old wood or dark laminate), a light scuff sanding can improve adhesion. Use fine-grit sandpaper, around 150-220 grit, to create a slight ‘tooth’ for the paint to grab onto.
After sanding, wipe away all dust with a tack cloth or a damp rag.
If you are painting over a dark or potentially bleeding surface, consider using a primer first. A good quality stain-blocking primer can prevent tannins or dark colors from showing through your new chalk paint finish. This is especially important for furniture that has a history or unknown finishes.
A primer acts as a barrier, ensuring your chalk paint color remains true and vibrant.
Consider these points for different surfaces:
Unfinished Wood: Clean and dust. Light sanding is optional but recommended for a smoother finish. No primer is usually needed unless the wood is prone to bleeding (like cedar or pine).
Previously Painted or Varnished Surfaces: Clean well. Lightly scuff sand to provide a better grip for the chalk paint. If the previous finish is dark or peeling, a primer is a good idea.
Laminate or Melamine: Clean thoroughly. Light sanding is highly recommended. A good quality bonding primer is often necessary for best adhesion.
Chalk paint can adhere to laminate, but it needs extra help.
Metal: Clean off any rust or debris. Light sanding is good. A metal-specific primer or a rust-inhibiting primer is usually best before applying chalk paint.
Glass or Ceramic: Clean with rubbing alcohol to remove any residue. A bonding primer is usually required. Chalk paint alone may not adhere well long-term to very smooth, non-porous surfaces like glass.
The goal is a clean, slightly textured surface for the paint to adhere to. This ensures your beautiful chalk paint finish lasts for years to come. Proper prep work is the foundation of any successful painting project.
It prevents issues like peeling or chipping down the road.
Application Techniques for a Smooth Finish
When applying your homemade chalk paint, use a good quality synthetic bristle brush or a foam brush for a smooth finish. For a more textured look, a natural bristle brush can be used. Apply the paint in thin, even coats.
Avoid overloading your brush, which can lead to drips and an uneven surface.
Brush strokes are often part of the charm of chalk paint. You can brush in one direction for a more uniform look, or use varied strokes for a more artistic feel. If you are going for a distressed look, you can apply the paint in different directions.
This will make sanding easier later on.
Allow each coat to dry completely before applying the next. Drying times can vary depending on humidity and temperature, but generally, each coat dries relatively quickly. This is one of the advantages of using chalk paint.
You can often complete a project in a single day. This efficiency makes it a favorite for quick makeovers.
Consider these application tips:
Thin Coats are Key: Resist the urge to apply thick coats. Thin coats build up coverage gradually and result in a much smoother, more professional finish. Thick coats can also take longer to dry and may crack.
Work in Sections: If you’re painting a large piece, work on one section at a time. This helps maintain a wet edge and prevents lap marks. Lap marks occur when a freshly painted area overlaps with an area that has already started to dry, creating an uneven line.
Brush Strokes: Decide on the look you want. For a very smooth finish, try to keep your brush strokes consistent in direction. For a more rustic or distressed look, varied strokes are fine.
Some people even use a damp brush to blend strokes as they go.
Drying Between Coats: Patience is a virtue. Always let one coat dry before starting the next. Rushing this process can lead to smudging or peeling.
Your homemade chalk paint will typically be dry to the touch within 30-60 minutes.
Drying and Curing Times
Once you’ve applied your final coat of chalk paint, it needs time to dry and cure. Chalk paint dries to the touch relatively quickly. This means you can usually apply a second coat within an hour or two.
However, ‘dry to the touch’ is different from ‘cured’. Curing is the process where the paint hardens completely and reaches its maximum durability.
The full curing process for chalk paint can take anywhere from 7 to 30 days, depending on the environment. During this time, the paint is still somewhat delicate. Avoid heavy use or scrubbing the surface.
Gentle cleaning is fine, but avoid harsh chemicals or abrasive materials.
The Plaster of Paris in the paint mixture absorbs moisture, and as this moisture evaporates over time, the paint hardens. This gradual hardening is what gives chalk paint its durable finish. Understanding this difference between drying and curing helps you care for your painted items properly.
It ensures your hard work lasts.
Here’s a general timeline to keep in mind:
Dry to the touch: 30 minutes to 1 hour. You can lightly touch the surface without leaving a mark.
Recoat: 1-2 hours. Once dry to the touch, you can apply another coat of paint.
Ready for Wax or Sealant: 2-4 hours. After the final coat has dried, it’s usually ready for a topcoat.
Full Cure: 7-30 days. The paint will reach its maximum hardness and durability during this period. Handle with care until fully cured.
Think of the curing time as the paint settling in and becoming as strong as it can be. While you can use your painted item gently after applying a topcoat, it’s wise to be extra careful during the first few weeks. This will ensure your beautiful finish stands the test of time.
Sealing Your Chalk Paint Project
Because chalk paint has a porous, matte finish, it almost always needs a topcoat for protection. The two most popular options are wax and a water-based polycrylic or sealant. Both offer protection, but they give slightly different looks and durability levels.
Furniture wax is traditional for chalk paint. It provides a beautiful, soft sheen and enhances the matte finish. It’s easy to apply with a wax brush or a lint-free cloth.
For best results, apply wax in thin coats and buff it well with a clean, soft cloth. Wax offers good protection against scuffs and light spills. It’s also relatively easy to repair or reapply if needed.
A water-based polycrylic or sealant offers more durable protection, especially for high-traffic surfaces like tabletops or drawer fronts. It dries clear and can be applied in multiple coats for added resilience. Choose a matte or satin finish polycrylic to maintain a similar look to the chalk paint.
Avoid high-gloss sealants unless you want a very different sheen.
Here are some sealants to consider:
Clear Furniture Wax: This is the most common choice for chalk paint. It gives a soft, matte to satin sheen and a smooth feel. It protects against minor wear and tear.
It also deepens the color slightly.
Dark or Antiquing Wax: This wax has a tinted color. It can be used all over to add an aged look or in crevices to highlight details and add depth. It is often applied over a clear wax layer.
Water-Based Polycrylic: This offers excellent durability and is more water-resistant than wax. It comes in various sheens (matte, satin, semi-gloss). It’s ideal for surfaces that see heavy use, like dining tables or kitchen cabinets.
Water-Based Polyurethane: Similar to polycrylic but can sometimes yellow over time, especially lighter colors. Polycrylic is generally preferred for chalk paint projects for its clarity.
Always follow the manufacturer’s instructions for your chosen sealant. Test on a scrap piece first if you are unsure about the finish. Proper sealing is the final step that makes your DIY chalk paint project both beautiful and long-lasting.
Common Issues and How to Fix Them
Even with the simplest methods, DIY projects can sometimes present challenges. When you learn How to Make Chalk Paint with Plaster of Paris, you might encounter a few common issues. Don’t worry, most problems have easy fixes.
This section will help you troubleshoot and ensure your chalk paint project turns out just as you envisioned. We aim to make your crafting experience as smooth as possible.
We will cover common problems like paint being too thick or too thin, and how to deal with paint bleeding through. Knowing these solutions means you can confidently tackle any project. You’ll be able to enjoy the process and the fantastic results without frustration.
Let’s look at how to resolve these typical hiccups.
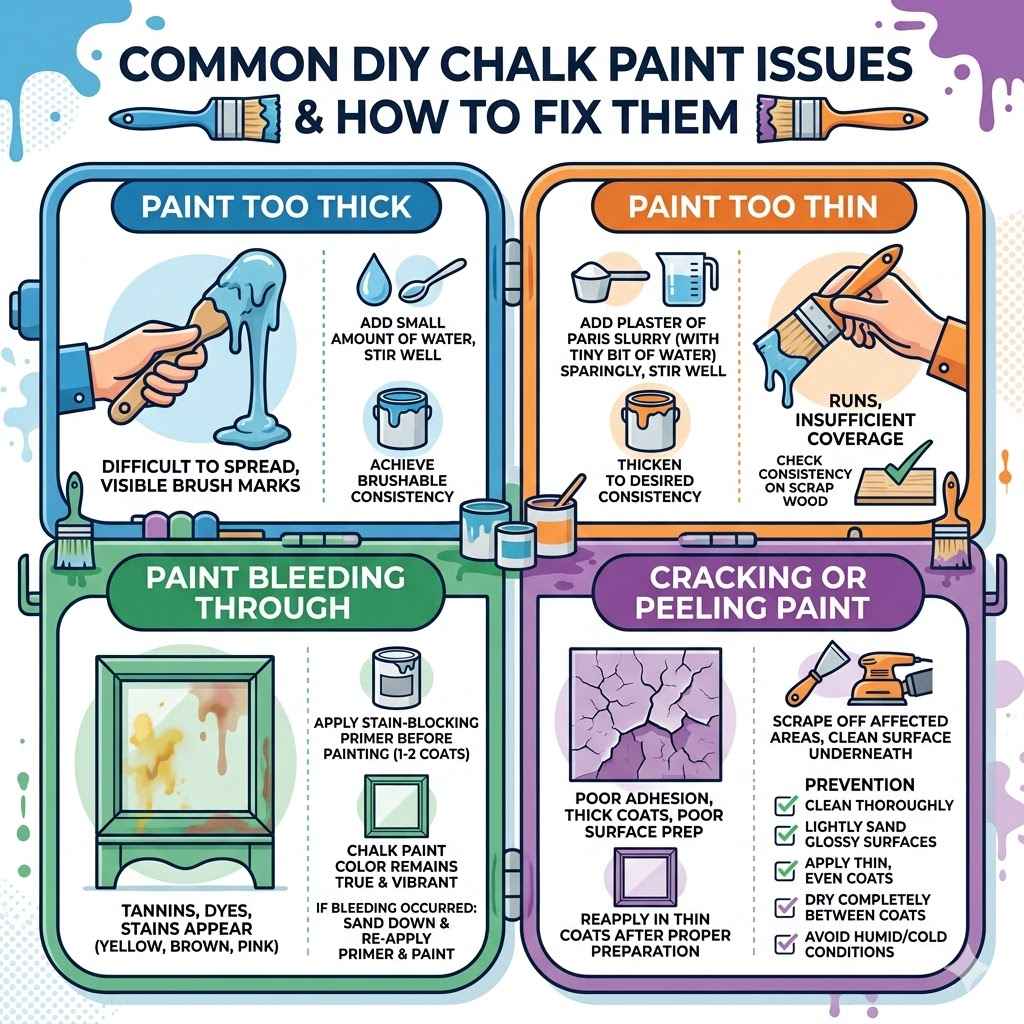
Paint Too Thick or Too Thin
If your chalk paint is too thick, it will be difficult to spread evenly and may leave brush marks. The fix is simple: add a small amount of water. Start with about a teaspoon of water and stir it in thoroughly.
Continue adding water, a little at a time, until you achieve a smooth, brushable consistency. Be careful not to add too much water, as this can make the paint too runny.
Conversely, if your paint is too thin, it might run or not provide enough coverage. This is usually because there wasn’t enough Plaster of Paris or too much water was added initially. To fix thin paint, you can add a bit more Plaster of Paris mixed with a tiny bit of water to form a slurry.
Add this slurry sparingly, stirring well after each addition, until the paint thickens to your desired consistency. It’s easier to fix thin paint by adding more of the thickening agent, but do it slowly.
Remember that paint consistency can change as it sits. If your paint thickens up after being stored, simply stir in a little water to loosen it. Always test your paint’s consistency on a scrap piece before painting your project.
This ensures you’ve got it just right.
Paint Bleeding Through (Tannins and Dyes)
Sometimes, especially when painting old wood or dark laminates, colors or tannins can ‘bleed’ through your chalk paint. This shows up as yellow, brown, or even pinkish stains that appear on the surface of your fresh paint. This is caused by chemicals in the original material leaching through the new paint layer.
It’s a common issue but has a straightforward solution.
The best way to prevent and fix bleeding is by using a good quality stain-blocking primer before you apply your chalk paint. Apply one or two coats of primer according to the manufacturer’s instructions. Ensure it dries completely.
Once primed, your chalk paint color should remain true and vibrant without any underlying colors showing through.
If you’ve already applied your chalk paint and notice bleeding, you’ll need to sand down the affected areas until the original color is gone. Then, apply your stain-blocking primer to those spots. Once the primer is dry, you can touch up the area with your chalk paint.
For large-scale bleeding, it might be necessary to prime the entire piece again. Prevention with primer is always easier than correction.
Cracking or Peeling Paint
Chalk paint can sometimes crack or peel if the surface wasn’t properly prepared or if the paint layers are too thick. Thick, heavy coats of any paint are more prone to cracking as they dry, especially if the underlying layers haven’t fully adhered. This is why thin, even coats are so important.
If you notice cracking or peeling, the best approach is usually to scrape off the affected areas. Ensure the surface underneath is clean and smooth. For peeling, it’s a sign of poor adhesion.
You might need to sand down the area until the paint comes away easily. Then, reapply your chalk paint in thin coats after proper surface preparation. This might involve light sanding and cleaning.
To prevent cracking and peeling in the future:
- Always clean your surface thoroughly before painting.
- Lightly sand glossy or smooth surfaces to create grip.
- Apply your chalk paint in thin, even coats. Let each coat dry completely.
- Avoid painting in extremely humid or cold conditions, as this can affect drying and adhesion.
- Ensure your topcoat (wax or sealant) is applied correctly after the paint has dried.
These steps help ensure a smooth, long-lasting finish. Adhesion is key to preventing these issues. If the paint is not adhering well, it will eventually lift off.
Uneven or Streaky Finish
An uneven or streaky finish can be frustrating, but it’s often due to application technique or paint consistency. If your paint is too thick, it can leave visible brush marks. If it’s too thin, it might not cover well, leading to streaky appearance as you apply subsequent coats.
Using the right brush is also important. A high-quality synthetic brush is great for smooth finishes. Apply paint in long, even strokes, maintaining a wet edge to blend smoothly.
If you notice streaks as you paint, try to gently smooth them out before the paint dries. Sometimes, a light sanding with very fine-grit sandpaper (like 320 or 400 grit) after the paint has dried can help even out minor streaks.
For a perfectly smooth finish, consider using a foam roller for larger flat areas. It can help achieve a more uniform look with fewer visible brush strokes. Always remember that chalk paint is meant to be forgiving, so minor imperfections can often be sanded or buffed out.
The beauty of DIY is the ability to adjust and refine as you go.
Frequently Asked Questions
Question: Can I use any type of paint with Plaster of Paris?
Answer: Yes, you can use most water-based paints like latex or acrylics. Sample pots from paint stores work great for small projects. Avoid oil-based paints, as they won’t mix well with Plaster of Paris.
Question: How much Plaster of Paris should I use?
Answer: A common starting ratio is 1 part Plaster of Paris to 1 part water, mixed into 2 parts paint. You can adjust this slightly for desired consistency. Always start with less and add more if needed.
Question: Will my chalk paint have a strong odor?
Answer: Homemade chalk paint typically has very little odor. The main smell will be from the paint itself. It’s much less potent than many commercial paints.
Question: How long does homemade chalk paint last?
Answer: If stored in an airtight container in a cool, dry place, your homemade chalk paint can last for several weeks to a few months. Stir it well before each use.
Question: Do I need to sand furniture before using chalk paint?
Answer: For most surfaces, a thorough cleaning is enough. Lightly sanding glossy surfaces helps with adhesion. Older wood that might bleed might need a primer.
Conclusion
Learning How to Make Chalk Paint with Plaster of Paris is a simple and effective DIY skill. You can transform furniture with budget-friendly, homemade paint. This process requires just a few common materials and easy steps.
You’ll achieve a beautiful, matte finish perfect for any project. Start creating your own custom colors today!