How To Paint A Light Switch Cover: Proven Essential
Yes, you can absolutely paint a light switch cover! Properly preparing, priming, and painting plastic or metal switch plates will give your room a fresh, updated look without needing to replace them. This simple DIY task is quick, affordable, and makes a huge visual impact when done correctly.
Have you ever noticed how those plain white plastic light switch covers seem to clash with your freshly painted walls? It is a small detail, but often, those little squares draw the eye right where you don’t want them to go. Fixing this doesn’t require hiring a pro or spending a lot of money. You can easily paint them to match your new décor perfectly. Many folks worry about the paint peeling or looking messy, but that is usually because of skipping a few essential prep steps. Don’t worry! I am going to walk you through every easy step to ensure your painted covers look professional and last for years. We will cover everything from the safest way to remove them to the best paint choices for a durable finish.
Why Painting Light Switch Covers is a Proven Essential DIY Task
Switch plates are the unsung heroes of room décor. They cover the messy wiring and offer a clean boundary between the wall and the electrical box. When you refresh a room, leaving old, yellowed, or mismatched covers makes the whole effort look unfinished.
Painting them is essential for a few key reasons:
- Cost Savings: Buying new specialty covers (like metal or decorative plastic ones) can add up quickly, especially if you have many switches. A can of spray paint costs much less.
- Perfect Color Match: You can achieve an exact match to your custom wall color, something store-bought covers rarely offer.
- Quick Refresh: This is one of the fastest ways to update a room. You can often complete the entire project in an afternoon.
- Hiding Wear: Old covers often have scratches or yellowing from age and sunlight. A fresh coat of paint hides all those imperfections beautifully.

Gathering Your Essential Tools and Supplies
Before we start tearing things apart, let’s make sure we have everything we need. Having all your supplies ready makes the job smooth and fast. We are aiming for a professional, smooth finish, so preparation materials are just as important as the paint itself.
The Shopping List: What You Need
Here is a simple list of what you will need for this project. Remember, safety first—we always start by turning off the power!
- Screwdriver: A Phillips head is most common, but sometimes a flathead works best for these small screws.
- Painter’s Tape: High-quality blue tape works wonders for protecting surfaces.
- Fine-Grit Sandpaper (220-grit or higher): This is crucial for creating “tooth” on the plastic.
- Primer: Use a high-adhesion primer, especially if the cover is plastic. Look for primers labeled “For Plastic” or “Bonding Primer.”
- Paint: High-quality interior latex paint (matched to your wall color) or spray paint formulated for plastics.
- Cleaning Supplies: Mild soap (like dish soap) and water, or a degreaser like mineral spirits.
- Drying/Curing Area: A well-ventilated space, like a garage or porch, or even a cardboard box lined with newspaper.
- Safety Gear: Work gloves and safety glasses.
Safety First: Turning Off the Power
This is the most important step, and we never skip it. Painting is fun, but working around electricity is serious business.
- Locate the Breaker: Go to your home’s main electrical panel (breaker box).
- Identify the Circuit: Flip the circuit breaker that controls the room you are working in. If you aren’t sure which one it is, turn off the main power to the whole house—it takes longer, but it is the safest route if you are unsure.
- Test the Switch: Return to the switch plate you plan to paint. Try flipping the switch on and off. If the light does not turn on, the power is off.
- Double-Check: For absolute certainty, use a non-contact voltage tester (a great tool for any DIYer!) to touch the screws or the plate itself before you start unscrewing anything. If it beeps or lights up, the power is still on—go back and find the right breaker!
Step-by-Step Guide: How to Paint a Light Switch Cover Like a Pro
We break this down into four manageable phases: Removal, Preparation, Painting, and Reinstallation. Follow these steps closely, and you will have beautiful, lasting results.
Phase 1: Careful Removal
Removing the plate without damaging the wall or the switch mechanism is key.
- Unscrew the Plate: Using your screwdriver, carefully remove the two (or sometimes three) screws holding the cover plate in place. Keep these tiny screws safe! A magnetic tray or a small bowl works perfectly to keep them contained.
- Remove the Cover: Gently pull the cover plate straight off the wall. It should come away easily.
- Inspect the Wall: Take a moment to look at the wall area revealed underneath. If there is any dirt, dust, or old paint residue around the edges, gently wipe it away with a damp cloth.
Phase 2: The Non-Negotiable Preparation Work
This phase is where most people rush, leading to paint that peels or looks uneven. For plastic covers, preparation is 80% of the job.
Cleaning the Surface
Paint needs a clean, oil-free surface to stick to.
- Wash Thoroughly: Use warm water, a drop of mild dish soap, and a soft sponge or cloth. Scrub away any oils, fingerprints, or grime from the cover.
- Rinse and Dry: Rinse the plate well with clean water and let it air dry completely. If you are in a hurry, you can use a hairdryer on a low, cool setting.
Creating “Tooth” with Sanding
If your plate is smooth plastic, the paint will slide right off. Sanding creates microscopic scratches—or “tooth”—that the primer can grab onto.
- Choose Your Grit: Use 220-grit or even finer sandpaper (300-grit). We are not trying to remove material, just scuff the surface.
- Lightly Sand: Gently rub the entire surface of the cover plate. You don’t need to sand hard; you just need to dull the shine.
- Wipe Down Again: Use a tack cloth or a cloth lightly dampened with mineral spirits to wipe away all the sanding dust. This dust must be gone before priming.
Taping Off the Screw Holes (Optional but Recommended)
If you want a perfectly clean finish around the screw holes, you have two good options:
- Option A: Tape and Cut: Place a small piece of painter’s tape over the screw holes on the back of the plate. Paint the plate, let it dry, and then carefully peel the tape off the front.
- Option B: Paint First, Drill Later: Some pros prefer to just paint right over the holes and use a drill bit (without the drill running) to gently poke the paint out of the hole after the paint has fully cured.
Phase 3: Priming and Painting for Durability
Primer is your insurance policy against chipping and peeling. Never skip the primer, especially on plastic.
The Importance of the Right Primer
For plastic switch plates, you must use a primer that specifically bonds to slick surfaces. Standard drywall primer won’t cut it. Look for bonding primers or those specifically designed for plastics or multi-surface use.
- Apply Primer: Whether using spray or brush-on primer, apply a thin, even coat. Thin coats dry faster and look smoother than one thick, gloppy coat.
- Let it Cure: Follow the manufacturer’s instructions for drying time. For spray primers, this is usually 30 minutes to an hour.
- Second Coat (If Needed): If the original color is very dark or the plastic is very shiny, a second light coat of primer ensures full coverage and the best adhesion for your topcoat.
Applying the Topcoat Color
This is where your vision comes to life!
If using Spray Paint (Recommended for Smoothness):
- Ventilation is Key: Work outside or in a very well-ventilated area.
- Technique: Hold the can about 10–12 inches away. Use smooth, sweeping motions, overlapping each pass slightly. Do not hold the can still over one spot, or the paint will run.
- Multiple Thin Coats: Apply two or three very light coats rather than one heavy one. Allow each coat to flash (dry slightly) before applying the next.
If using Brush-On Paint (For a perfect wall match):
- Use a Quality Brush: A high-quality synthetic brush designed for smooth finishes will prevent brush marks.
- Thin Application: Dip only the very tip of your brush into the paint. Apply the paint thinly. You may need 3–4 coats to achieve full opacity and a smooth finish that hides the underlying plastic texture.
- Directional Painting: Try to paint in the same direction for every coat to keep the texture consistent.
Phase 4: Curing and Reinstallation
Patience now pays off later. If you rush to put the cover back on, you risk smudging the paint or having it peel off the first time you touch the switch.
- Cure Time: While the paint might feel dry to the touch in an hour, it needs time to fully cure and harden. For the best durability, let the painted covers sit undisturbed for at least 24 to 48 hours, especially if they are plastic. This ensures the paint has reached maximum hardness.
- Inspect and Touch Up: Once fully cured, inspect the covers. If you painted over the screw holes, use the tip of a screwdriver or a small drill bit to gently clear the paint from the threads and the center opening.
- Reinstall: Align the cover plate over the electrical box and gently secure the screws. Do not overtighten the screws, as this can crack the plate or the paint finish.
- Restore Power: Go back to your breaker box and flip the circuit back on. Enjoy your perfectly matched, refreshed light switch cover!
Material Comparison: Plastic vs. Metal Switch Plates
The material of your existing cover slightly changes the preparation needed. Metal is generally easier to adhere to than plastic, but both require good prep.
| Feature | Plastic Covers | Metal Covers |
|---|---|---|
| Sanding Requirement | Crucial. Must scuff the slick surface thoroughly to create tooth. | Recommended, but less critical than plastic. A light scuff is usually enough. |
| Primer Necessity | Essential. Must use a bonding primer formulated for plastics. | Highly recommended for best adhesion and longevity. |
| Paint Choice | Spray paint formulated for plastic works best for thin, even coats. | Spray paint or high-quality brush-on latex works well. |
| Durability Risk | Higher risk of chipping if primer is skipped or curing time is rushed. | Lower risk, as metal is more rigid, but still susceptible to minor scratches. |
Tips for Achieving a Factory-Smooth Finish
The difference between a DIY job and a professional look often comes down to technique, especially when using spray paint. Here are a few mentor-approved tips to keep your paint looking flawless.
Use the Right Temperature and Humidity
Paint adheres and dries best within a specific range. Check the paint can for recommended conditions.
- Temperature: Ideal painting temperature is usually between 50°F and 85°F (10°C and 29°C). Too cold, and the paint won’t cure properly; too hot, and it might dry before it levels out.
- Humidity: High humidity slows down the drying process significantly. If it’s very muggy, wait for a drier day or use fans to help circulate air in your drying area.
The “Half-Overlap” Spray Technique
When spraying, you must keep the can moving. Think of painting as laying down thin, overlapping blankets of color.
When you start a new pass, begin spraying just before the edge of the previous pass, and stop spraying just after you pass the edge. This overlapping technique ensures there are no lines or gaps between your spray strokes, leading to a perfectly uniform surface. This is a technique professional painters use extensively, as noted by many construction resources like the National Park Service preservation standards regarding proper finish application.
Avoid Over-Handling
Every time you touch the cover—even with gloves—you transfer oils or leave fingerprints. Once the first coat of primer is dry, try to handle the plate only by the edges or while wearing clean cotton gloves until the final coat is fully cured.
Troubleshooting Common Painting Issues
Even with the best preparation, sometimes things go slightly sideways. Here is how to fix the most common issues homeowners face when painting switch plates.
| Problem | Likely Cause | Easy Fix |
|---|---|---|
| Paint is Peeling/Flaking | Surface was not clean, or the primer did not bond (common with bare plastic). | Gently scrape off the loose paint. Clean the area well, sand it aggressively to create tooth, and re-prime using a bonding primer. |
| Paint Looks Orange-Peel Texture | The paint was sprayed too heavily or from too close. | If wet, stop immediately. If dry, lightly sand the textured area with 320-grit paper and apply another very light mist coat from a slightly farther distance. |
| Switch Plate Looks Yellow/Discolored After Painting | The old plastic was yellowed by UV light, and the new paint is too thin to cover it. | Allow the paint to cure fully. Sand lightly and apply one more full coat of primer, followed by your topcoat. |
| Paint is Sticky After 24 Hours | Humidity is too high, or the paint type used requires a longer cure time. | Move the plates to a warmer, drier area with good airflow (like near a dehumidifier or fan). Wait another 24 hours before touching them. |
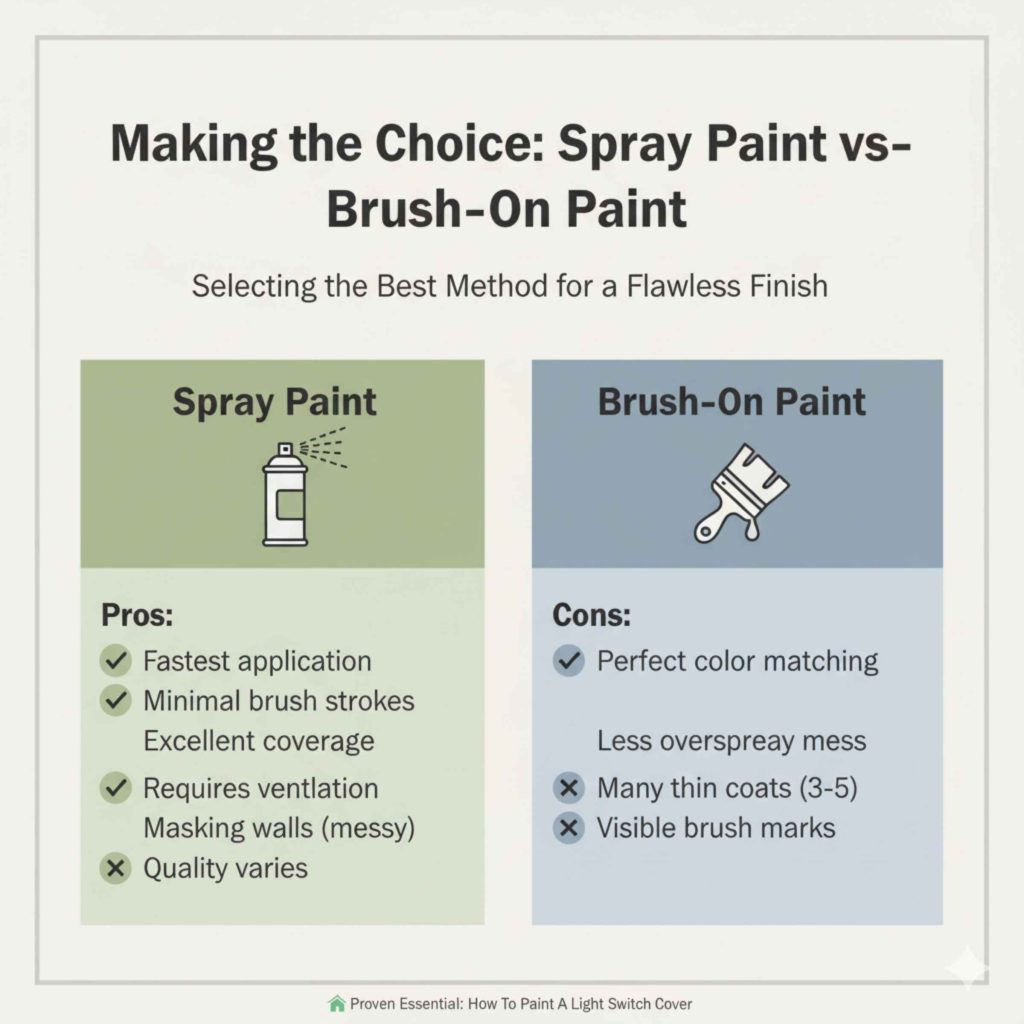
Making the Choice: Spray Paint vs. Brush-On Paint
Both methods work, but they yield different results. For the beginner, spray paint is often the path of least resistance for achieving a smooth, uniform coat on a small, flat item like a switch cover.
When to Choose Spray Paint
Spray paint is excellent for achieving that smooth, factory-like finish because it atomizes the paint, letting it settle evenly.
- Pros: Fastest application, minimal brush strokes, excellent coverage with thin layers.
- Cons: Requires excellent ventilation, masking off surrounding walls if spraying in place (which we advise against), and the paint quality varies widely.
When to Choose Brush-On Paint
If you have a very specific, custom color mixed at the paint store that only comes in liquid form, brush painting is necessary.
- Pros: Perfect color matching to your existing wall paint, less overspray mess.
- Cons: Requires many thin coats (3–5) to avoid visible brush marks, takes more time to apply neatly.
Frequently Asked Questions (FAQ) About Painting Switch Covers
Q1: Can I paint the light switch cover while it is still on the wall?
While you can technically paint it in place, it is strongly discouraged. You risk getting paint on the wall edges or the switch mechanism, and you cannot properly prep or prime the sides of the plate. Removal is the only way to guarantee a professional, lasting job.
Q2: Do I need to use a special primer for plastic switch plates?
Yes, absolutely! Standard primers often won’t stick to slick plastic. You must use a “bonding primer” or a primer specifically labeled for use on plastics to ensure the paint adheres properly and doesn’t peel off later.
Q3: How long should I wait before touching or reinstalling the painted covers?
While the paint might be dry to the touch in an hour, for maximum durability, allow the covers to cure for at least 24 to 48 hours in a well-ventilated area. This curing process hardens the paint film significantly.
Q4: What kind of paint works best for matching wall color?
If your walls are painted with standard interior latex paint, you should use the exact same brand and sheen of interior latex paint for your covers. Bring a small chip of the old paint to the store if you don’t know the exact name for a perfect match.
Q5: Is it safe to paint over metal switch plates?
Yes, metal plates paint very well, but you must still clean and lightly sand them first. Always use a metal-friendly primer (or a good bonding primer) to prevent rust or peeling down the line.
Q6: What if I paint over the screw holes?
If you paint over the screw holes, wait until the paint is completely cured (48 hours). Then, take the original screw and gently turn it into the hole. This action will carve out the paint threads, allowing the screw to go back in smoothly without cracking the finish.
Q7: Can I paint the actual toggle switch mechanism (the part you flip)?
It is generally not recommended to paint the actual toggle switch or dimmer mechanism. Paint buildup can interfere with the internal contacts, causing the switch to stick, fail prematurely, or even become a potential fire hazard if the paint interferes with the operation. Stick to painting only the cover plate.
Conclusion: Confidence in a Fresh Coat
Painting a light switch cover might seem like a tiny task in the grand scheme of home improvement, but as you’ve seen, doing it right makes a massive visual difference. By respecting the power-off safety step, diligently prepping the surface by cleaning and sanding, and using a high-adhesion primer, you move this from a frustrating chore to a simple, rewarding DIY success. You now possess the proven steps to achieve a smooth, durable finish that perfectly integrates with your décor. Go ahead, take those covers off, give them the attention they deserve, and enjoy the professional look you created with your own hands. That small detail will make your entire room feel polished and complete!