How to Plumb a Shower Faucet: Expert DIY Guide
Are you ready to tackle a home improvement project that can transform your daily routine? Installing a shower faucet may seem daunting, but with a little guidance, you can handle it like a pro.
Imagine the satisfaction of turning on your new shower, knowing you installed it yourself. This guide will walk you through each step, breaking down the process into simple tasks you can easily follow. Whether you’re updating an old fixture or starting from scratch, you’ll discover the secrets to plumbing a shower faucet with confidence.
Stick with us, and by the end of this article, you’ll not only gain a new skill but also the pride of a job well done. Ready to dive in? Let’s get started!
Tools And Materials Needed
You need basic tools for this job. A pipe wrench is vital. It helps to twist pipes. A screwdriver is also needed. It tightens screws well. You will need plumber’s tape. This tape stops leaks. Don’t forget a level. It keeps things straight. A bucket catches water. Water can spill. Safety goggles protect eyes. Make sure to wear them.
Gather materials for plumbing. Copper pipes are often used. They are strong. PVC pipes work too. They are light. Pipe fittings are essential. They connect pipes. Use plumber’s putty. It seals joints. Have washers ready. They prevent leaks. Valves control water flow. Make sure to have them.
Preparing The Work Area
First, turn off the water supply to your shower. Look for the main water valve in your home. It is usually in the basement or near the water heater. Turn the valve to the right to shut it off. This stops water from coming into the house. Make sure the water is off by turning on a faucet. No water should come out. If water still flows, check the valve again.
Remove all items around the shower area. This includes shampoo bottles, soaps, and towels. You need clear space to work. Place a towel or mat on the floor. This keeps your tools organized and prevents slipping. Ensure the shower area is dry. Wipe any water with a cloth. This makes the work area safe and ready for plumbing tasks.
Removing Old Faucet
Start by turning off the water supply. This stops water flow. Use a wrench to loosen the nuts and screws. Be careful not to damage the pipes. If the nuts are stuck, use a penetrating oil. This helps in loosening them. Keep a bucket nearby. It catches any remaining water.
Hold the faucet firmly. Gently pull it away from the wall. Check for any hidden screws. Remove them if found. Be patient and avoid rushing. This prevents damage to the wall. Once the faucet is free, inspect the pipes. Ensure they are clean and free of debris.
Installing The New Faucet
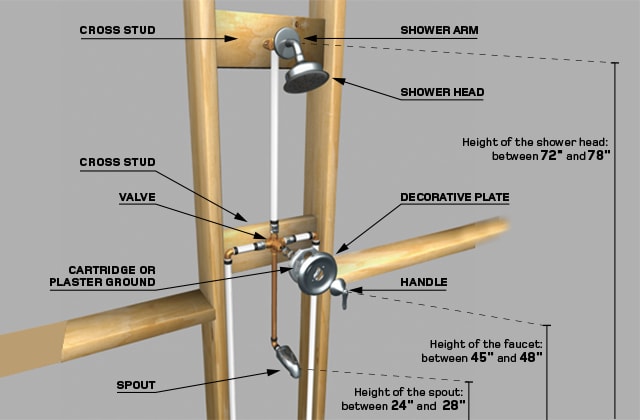
Start by placing the new fixturein the shower wall. Make sure it is level and sits comfortably. Use a measuring tape to get the right spot. Align it with the previous plumbing holes. This helps in fitting pipes easily. Check if it stays firm. A loose fixture can cause leaks. Ensure the screws are tight. This keeps the fixture in place.
Attach the hot and cold water pipesto the fixture. Use a wrench to tighten connections. Ensure no gaps remain. Gaps can lead to water loss. Be careful with the pipe threads. Wrap them with tape to stop leaks. Turn the water on slowly. Check for any drips or leaks. Tighten the connections again if needed.
Securing Connections
Nuts and bolts must be tightened firmlysecure. Loose parts can cause leaks. Leaks can lead to water damage. Tight connections prevent future problems.
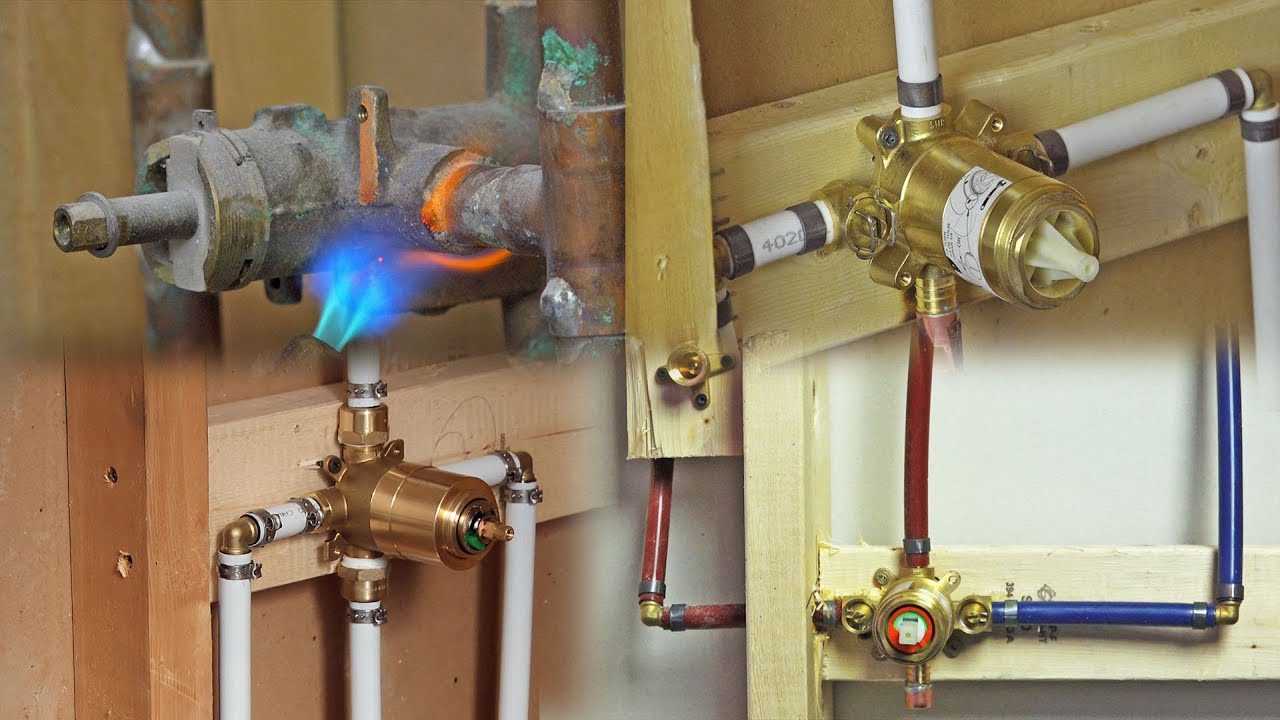
Sealant helps stop leaks. Apply sealant around joints. Use a thin layerfor better results. Let the sealant dry completely. Dry sealant forms a strong barrier. This barrier keeps water from escaping. Always choose a good quality sealant. Quality sealant lasts longer. Reapply if necessary. Check for any gaps after drying.

Credit: www.familyhandyman.com
Testing The Installation
Turn on the watergently. Watch the faucet closely. Look for any drips or leaks. Check all connections. Ensure everything stays dry.
Use a flashlight if needed. Inspect each joint carefully. Feel for wetness with your fingers. Tighten fittings if leaks appear. Use a wrench for adjustments.
Observe the water flow. Make sure it’s smooth. No sputtering or spraying. Listen for unusual sounds. Check the pressure. It should be consistent.
Turn off the water. Recheck all parts. Ensure nothing is damaged. Repeat the test for safety. Confirm the faucet is secure.
Troubleshooting Common Issues
Low water pressurecan be a big problem. First, check the showerhead for blockages. Mineral deposits often cause this. Use vinegar to clean it. Soak the showerhead in it overnight. Rinse well in the morning. Is the pressure still low? Check the water valve. It might be partly closed. Open it fully. If pressure is still a problem, look at the pipes. They might be old and need replacing.
Leaks can waste a lot of water. First, find where the leak is. Check around the faucet. Tighten any loose parts. Use a wrench if needed. Replace worn-out washers. They cause most leaks. Make sure they fit well. Use plumber’s tape for a better seal. Wrap it around threads before tightening. Test the faucet. Turn it on and off. Look for drips. If it still leaks, call a plumber.

Credit: www.youtube.com
Maintenance Tips
Keep your shower faucet clean. Use a soft cloth and mild soap. Wipe the faucet gently. This removes dirt and soap scum. Regular cleaning prevents buildup. Buildup can cause problems. It keeps the faucet shiny. A clean faucet works better. Make cleaning a weekly habit.
Check the faucet often. Look for signs of wear. Worn parts may leak. Leaks waste water. They can damage walls. Listen for strange sounds. Feel for loose handles. These are signs of wear. Fix problems early. Regular inspections save money. They keep your faucet working well. Always be alert for wear.
Credit: www.rona.ca
Frequently Asked Questions
How Do I Start Plumbing A Shower Faucet?
Begin by turning off the water supply to the shower. Remove the old faucet carefully and clean the area. Install the new faucet according to the manufacturer’s instructions. Ensure all connections are tight and leak-free. Turn the water supply back on and test the faucet for proper function.
What Tools Are Needed For Shower Faucet Plumbing?
You’ll need a wrench, screwdriver, plumber’s tape, and possibly a pipe cutter. These tools help with removing the old faucet and installing the new one. Having the right tools ensures a successful installation. Always follow the manufacturer’s instructions for specific tool requirements.
Can I Plumb A Shower Faucet Myself?
Yes, you can plumb a shower faucet yourself with basic plumbing skills. Ensure you have the necessary tools and follow step-by-step instructions carefully. If you encounter difficulties, consulting a professional plumber is advisable to avoid potential damage or leaks.
How Long Does It Take To Plumb A Shower Faucet?
Plumbing a shower faucet typically takes about 1-2 hours for most DIY enthusiasts. Time may vary depending on your experience and the complexity of the installation. Ensure you set aside enough time to complete the task without rushing, ensuring a quality installation.
Conclusion
Plumbing a shower faucet can be simple with the right tools. Follow the steps carefully to ensure good results. Always prioritize safety and double-check your connections. Leaks can be avoided with proper installation. Don’t rush the process; take your time.
Seek professional help if you face challenges. Your shower should work well after proper plumbing. Enjoy your new, well-installed faucet. Regular maintenance keeps it functioning smoothly. With practice, plumbing tasks get easier. Soon, you’ll feel more confident in handling other projects.