How To Remove Glued Labels From Plastic Containers Genius
To remove glued labels from plastic containers, first try soaking the container in hot, soapy water. If residue remains, apply cooking oil or rubbing alcohol to the sticky area, let it sit for a few minutes, then scrub it away with a cloth or plastic scraper. For stubborn labels, gently heating the area with a hair dryer can loosen the adhesive.
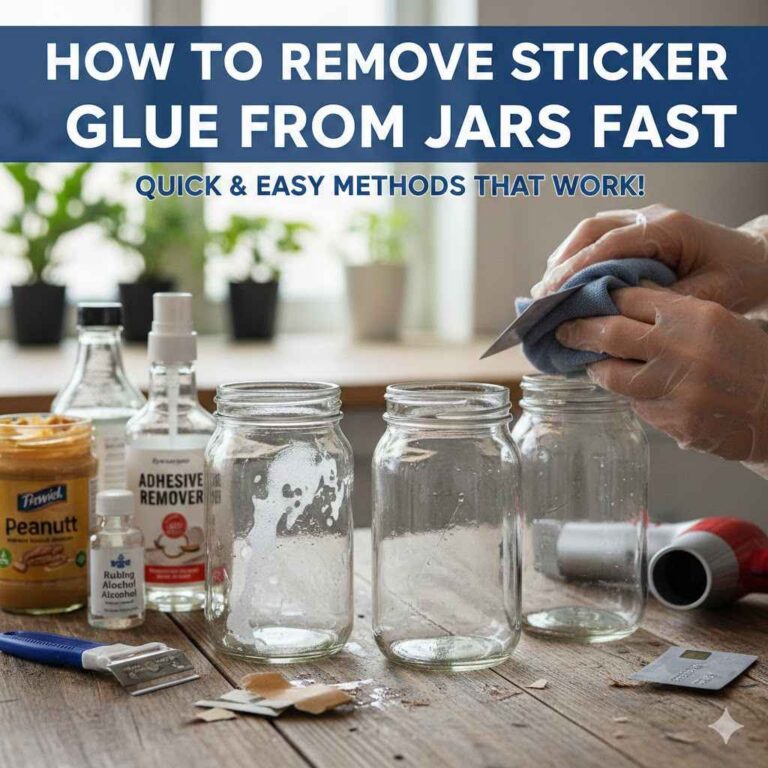
Have you ever tried to reuse a perfectly good plastic container, only to be stopped by a stubborn, sticky label? You peel, you scrape, and you’re left with a frustrating, gummy mess. It’s a common problem we all face. Those labels seem to be glued on for life! But don’t worry, you don’t have to throw that container away. I’m here to show you a few simple, genius ways to get them sparkling clean. In this guide, we will walk through several easy methods using things you probably already have at home. Let’s get those containers ready for a new life!
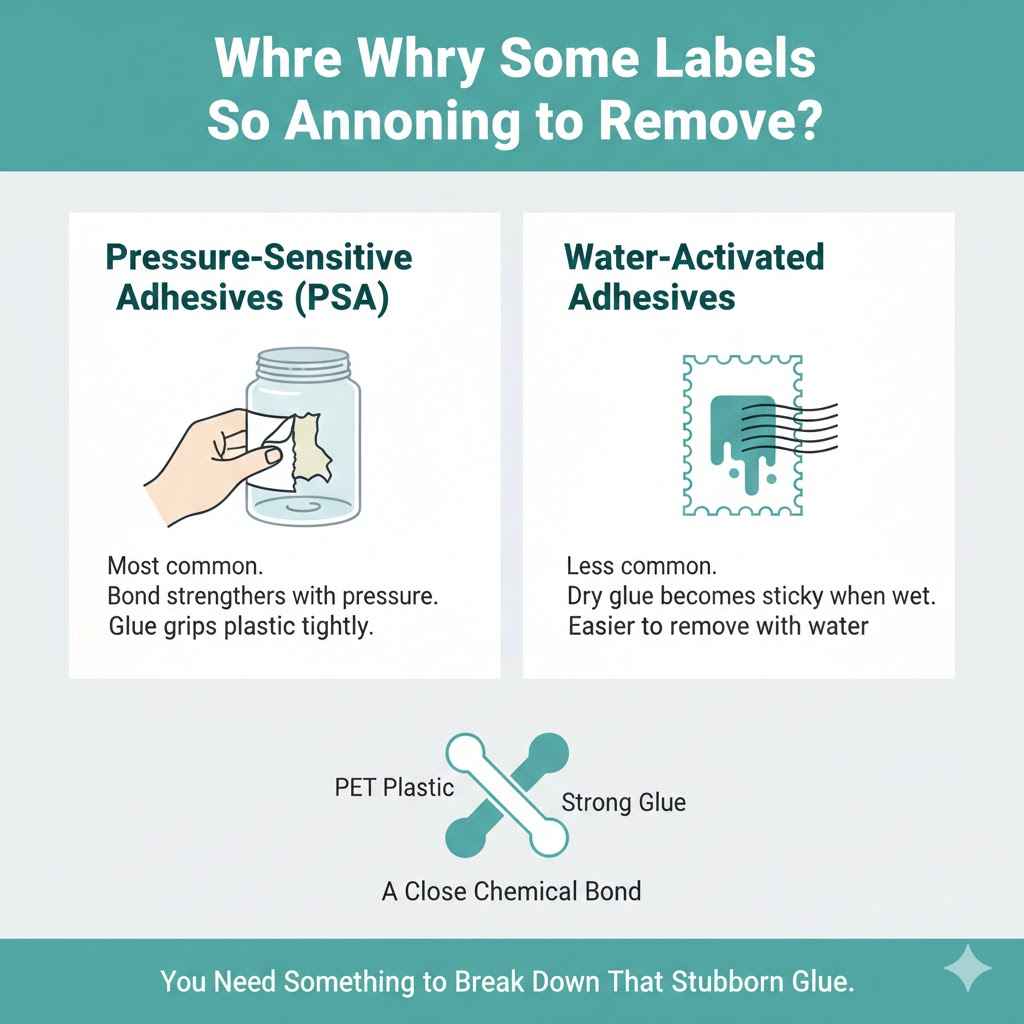
Why Are Some Labels So Annoying to Remove?
Before we jump into the solutions, it helps to know what we’re up against. Think of it like a woodworking project—understanding your materials is the first step to success. The labels on plastic containers are designed to stay put through shipping, handling, and changing temperatures. This means manufacturers use some seriously strong glues, or adhesives.
There are generally two types of adhesives you’ll encounter:
- Pressure-Sensitive Adhesives (PSAs): These are the most common. They work like the sticky side of tape. The bond gets stronger the more pressure is applied. This is why just peeling them off often leaves behind that tacky, torn paper look. The glue is designed to grip the plastic surface tightly.
- Water-Activated Adhesives: These are less common on plastics but you might find them occasionally. Think of a postage stamp. The glue is dry until it gets wet, then it becomes sticky. While these are easier to remove with just water, they aren’t used as often on waterproof plastic containers for obvious reasons.
The plastic itself also plays a role. Plastic is a petroleum-based product, and so are many strong adhesives. This means they can sometimes form a very close chemical bond, making them extra difficult to separate. That’s why a simple scrape doesn’t always work. You need something to break down or dissolve that stubborn glue. The good news is, you don’t need harsh chemicals or special tools. The right household item can do the trick perfectly.
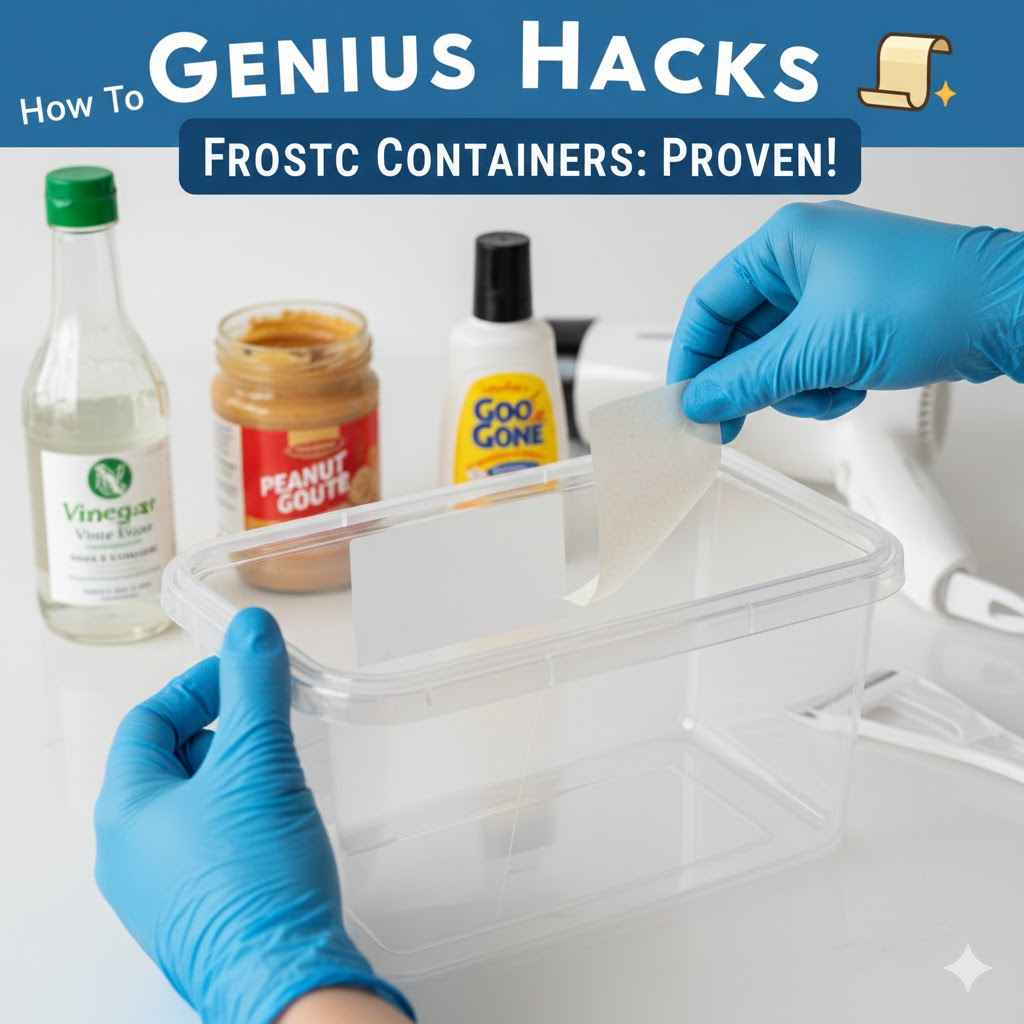
Gather Your Supplies: Your Label-Removal Toolkit
You don’t need a fancy workshop to tackle this project. Most of the items you’ll need are probably already in your kitchen or bathroom cabinet. Having them ready will make the process smooth and quick. It’s like setting out your screws and drill bits before you start building—preparation is key!
Essential Items:
- A Plastic Scraper or Old Credit Card: This is your best friend for gently scraping away softened labels and glue without scratching the plastic. Avoid metal scrapers, as they can easily damage the container.
- Soft Cloths or Paper Towels: You’ll need these for applying solutions and wiping away the sticky mess. Microfiber cloths work great.
- Dish Soap: A basic, gentle dish soap is perfect for the initial cleaning and soaking steps.
- A Sink or Basin: You’ll need something to hold warm water for soaking the containers.
Your “Secret Weapon” Ingredients (Choose one or more):
- Cooking Oil: Any kind will do! Vegetable oil, olive oil, or even coconut oil works wonders to dissolve sticky adhesives.
- Rubbing Alcohol (Isopropyl Alcohol): A powerful solvent that breaks down many types of glue quickly.
- White Vinegar: Its mild acidity helps to break down adhesive bonds.
- Baking Soda: When mixed with oil or water to form a paste, it acts as a gentle abrasive to scrub away residue.
- Hair Dryer: A simple household tool that uses heat to soften the glue, making the label peel off cleanly.
- Commercial “Goo” Remover: Products like Goo Gone or WD-40 are specifically designed for this job and are very effective on the toughest labels.
Having these simple items on hand means you’re ready for any type of stubborn label. Now, let’s get to the fun part—actually getting them off!
Method 1: The Warm Water and Soap Soak
Let’s start with the simplest and most gentle method. Just like soaking a dirty pan makes it easier to clean, soaking a labeled container can work wonders. This method is perfect for paper labels that aren’t coated in plastic.
Step-by-Step Guide:
- Fill Your Sink: Fill a sink or a large basin with warm to hot water. The hotter the water, the better it will soften the glue, but be careful not to make it so hot that it warps the plastic. Just hot tap water is usually fine.
- Add Some Soap: Squirt a generous amount of dish soap into the water and swish it around to create some suds. The soap helps to break down both the paper and the adhesive.
- Submerge the Container: Place your plastic container in the soapy water. If it floats, you can place something heavy inside it (like a mug or another dish) to keep the label fully submerged.
- Let It Soak: This is where patience comes in. Let the container soak for at least 30 minutes. For really stubborn labels, you might want to leave it for a few hours or even overnight.
- Peel and Scrape: After soaking, the label should be soft and saturated. Try peeling it off with your fingernail. It should come off much more easily. For any remaining bits, use your plastic scraper or an old credit card to gently scrape them away.
- Wash and Dry: Once the label is gone, give the container a final wash with fresh soap and water to remove any lingering glue residue. Dry it off, and it’s ready to use!
This method is always my first try because it’s so easy and uses things you already have. If it doesn’t quite do the trick, or if you’re left with a sticky patch, don’t worry. It’s time to move on to our next technique.
Method 2: The Oil and Scrape Technique
If the soak didn’t fully work, it’s likely you’re dealing with a stronger, oil-based adhesive. So, what’s the best way to fight an oil-based glue? With oil! This sounds counterintuitive, but the oil works to dissolve the adhesive, breaking down its stickiness.
Step-by-Step Guide:
- Dry the Container: Make sure the container and the label area are completely dry before you start. Oil and water don’t mix, so this step is important for the oil to work its magic directly on the glue.
- Apply the Oil: Dab a generous amount of cooking oil (vegetable, olive, or coconut oil works well) directly onto the label and any remaining sticky residue. You can use a paper towel or your fingers to spread it around, making sure the entire area is saturated.
- Let It Sit: Allow the oil to soak into the label for at least 15-30 minutes. This gives it time to penetrate the paper and start dissolving the glue underneath. You’ll see the oil soaking through the paper label.
- Scrape Away the Mess: Take your plastic scraper or old credit card and start scraping at the edge of the label. You should find that the label and the glue underneath have turned into a soft, gunky substance that scrapes away easily. Work your way across the entire label.
- Wipe and Wash: Once all the sticky stuff is gone, you’ll be left with an oily container. Just wipe off the excess oil with a paper towel, then wash the container thoroughly with warm water and dish soap to remove all the oil.
This method is fantastic for that gummy residue that soap and water can’t seem to touch. For an extra boost, you can make a paste by mixing equal parts oil and baking soda. The baking soda adds a gentle scrubbing action that helps lift the glue even faster.
Method 3: The Hair Dryer Heat Trick
Sometimes, the problem isn’t the glue itself, but the label covering it. Many labels have a thin plastic or waxy coating that prevents water or oil from getting to the adhesive underneath. In these cases, heat is your best tool. A little warmth from a hair dryer can soften the glue enough to let you peel the entire label off in one piece—the most satisfying feeling!
Step-by-Step Guide:
- Prepare Your Workspace: Find a comfortable spot near a power outlet. Make sure the plastic container is clean and dry.
- Heat the Label: Turn your hair dryer on to a medium or high heat setting. Hold it about 2-3 inches away from the label. Move the hair dryer back and forth across the entire surface of the label, focusing especially on the edges. Do this for about 30 to 60 seconds.
- Check the Heat: Be careful not to overheat one spot, as this could warp or melt thin plastic. You just want the label to be warm to the touch, not scorching hot. You can learn more about how different plastics react to heat from resources like the Plastics for Change educational blog.
- Time to Peel: While the label is still warm, use your fingernail or the corner of a plastic scraper to lift one of the edges. If you’ve heated it enough, the label should peel off smoothly and cleanly. Pull slowly and steadily for the best result.
- Tackle Any Leftovers: If any sticky residue is left behind, you can use the oil method (Method 2) to quickly clean it up. A small dab of oil on a paper towel should wipe it right off.
- Final Clean: Give the container a quick wash with soap and water to remove any finger smudges or trace residue.
This is my go-to method for price tags and glossy, plastic-coated product labels. It’s fast, clean, and incredibly effective.
Method 4: Using Solvents Like Rubbing Alcohol or Vinegar
For the truly tough, chemically-engineered adhesives, you may need to bring in a solvent. Don’t worry, you don’t need anything from a science lab. Simple household items like rubbing alcohol or white vinegar are excellent solvents that can break down stubborn glue without damaging most plastics. Always test on a small, hidden spot first!
Step-by-Step Guide:
- Choose Your Solvent: Grab either rubbing alcohol (the higher the percentage, the better) or plain white vinegar from your pantry.
- Apply to the Label: Soak a paper towel or cotton ball with your chosen solvent. Place it directly over the label or sticky residue. For a container with a curved surface, you might need to hold it in place for a few minutes.
- Let It Penetrate: Allow the solvent to sit for 5-10 minutes. This gives it time to work its way through the paper and dissolve the glue. Rubbing alcohol works faster than vinegar, so you may need less soaking time.
- Scrub and Wipe: After soaking, the glue should be significantly weakened. Use a cloth or the rough side of a sponge to scrub the area. The label and glue should start to ball up and come right off. For tougher spots, use your plastic scraper.
- Rinse Thoroughly: Both alcohol and vinegar have strong smells. Once the label is completely gone, wash the container very well with soap and warm water to remove any remaining solvent and its odor. As a safety note, ensure you are working in a well-ventilated area, especially when using rubbing alcohol, as recommended by health agencies like the CDC.
This method is a step up in power and is great for adhesives that don’t respond to oil or heat. Just remember that little spot test to be safe!
Comparing The Methods: Which One Is Right For You?
With so many options, how do you choose the right one? It depends on the type of label and what you have on hand. Here’s a simple table to help you decide.
| Method | Best For | Pros | Cons |
|---|---|---|---|
| Hot Water & Soap | Simple paper labels, water-based glues. | Easiest, uses basic supplies, very safe. | Slow, not effective on strong or waterproof labels. |
| Cooking Oil | Gummy, sticky residue left after peeling. | Excellent at dissolving glue, safe, non-toxic. | Can be messy, requires a final wash to remove oil. |
| Hair Dryer (Heat) | Plastic-coated or vinyl labels, price tags. | Fast, clean, often removes the label in one piece. | Risk of melting or warping thin plastic if overheated. |
| Rubbing Alcohol / Vinegar | Very strong, stubborn adhesives. | Powerful and effective, works quickly. | Strong odor, requires good ventilation, should test first. |
| Commercial Products | Extremely difficult, aged-on adhesives. | Specially formulated for the job, very powerful. | Costs money, may contain harsh chemicals. |
My advice is to always start with Method 1 and work your way down the list. Most of the time, one of the first two methods will solve your problem perfectly.
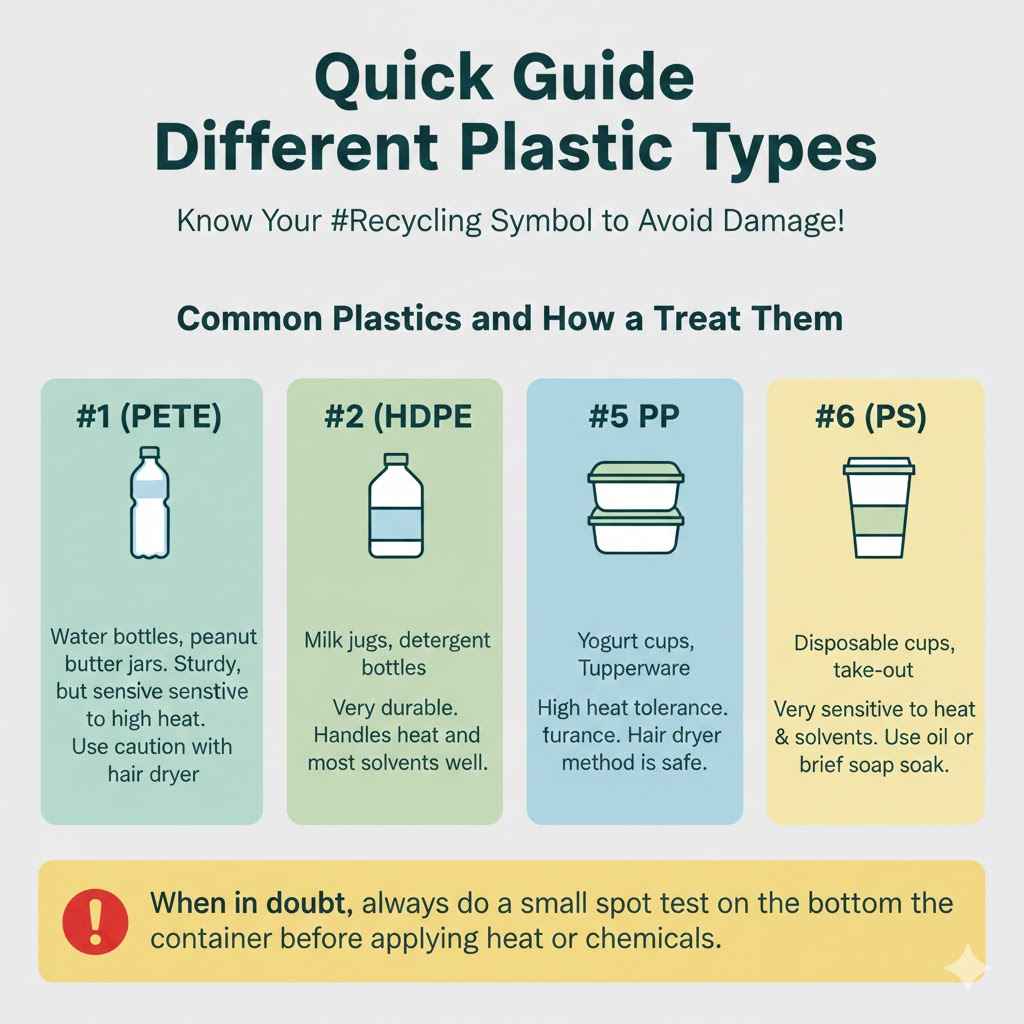
A Quick Guide to Different Plastic Types
Just like we use different types of wood for different projects, plastic containers come in various types. Knowing a little about them can help you choose the best label removal method and avoid damaging your container. You can usually find the plastic type indicated by a number inside the little recycling symbol.
Common Plastics and How to Treat Them:
- #1 (PETE): This is common for water bottles and peanut butter jars. It’s fairly sturdy but can be sensitive to high heat. Be cautious when using a hair dryer.
- #2 (HDPE): Used for milk jugs and detergent bottles. This plastic is very durable and can handle heat and most solvents well.
- #5 (PP): Found in yogurt cups and reusable food containers (like Tupperware). It has a high heat tolerance, making the hair dryer method very safe for this type.
- #6 (PS): This is polystyrene, used for disposable cups and take-out containers. It is very sensitive to both heat and solvents like alcohol, which can cause it to warp or even dissolve. Be very gentle with this type, sticking to oil or a brief soap soak.
When in doubt, always do a small spot test on the bottom of the container before applying any heat or chemicals to the main body.
Frequently Asked Questions (FAQ)
1. Can I use a metal scraper to remove labels?
I strongly advise against it. Metal scrapers, like a putty knife or a razor blade, can easily gouge and scratch the surface of the plastic, leaving permanent marks. Always stick to a plastic scraper, the edge of an old credit card, or even just your fingernail.
2. Will these methods discolor my plastic container?
The methods using water, soap, and oil are completely safe and will not cause discoloration. Solvents like rubbing alcohol or vinegar are generally safe on most common plastics (like HDPE and PP), but it’s always smart to test a small, inconspicuous area first, just in case.
3. What if a “shadow” of the label is still visible after I remove the glue?
Sometimes, especially on older containers, the plastic that was under the label is protected from sunlight and wear, making it look newer or a different shade than the surrounding area. Unfortunately, this isn’t something you can wash off. The best solution is simply to use the container, and over time, the color difference will likely even out.
4. Can I use nail polish remover (acetone)?
Acetone is a very strong solvent and will melt or cloud many types of plastic. I recommend avoiding it for this job unless you are absolutely sure the plastic can handle it (and you’ve tested it). Rubbing alcohol is a much safer and usually effective alternative.
5. How can I remove a label from a soft, flexible plastic bottle?
For flexible bottles, like for shampoo or lotion, the hair dryer method works exceptionally well. The heat makes the bottle slightly more pliable and helps the label release cleanly. Just be careful not to squeeze the bottle while it’s hot. The oil method is also a great, safe choice.
6. Is it safe to use commercial goo removers on food containers?
If you use a commercial product like Goo Gone, make sure you wash the container extremely well with hot, soapy water afterward. These products are petroleum-based, so you want to ensure no residue is left before you use the container for food storage. Read the product’s instructions carefully for safety information.
7. What is the fastest method if I’m in a hurry?
The hair dryer method is typically the fastest, especially for plastic-coated labels. It often takes less than a minute to heat and peel the label off. For any leftover residue, a quick wipe with an alcohol-soaked cotton ball will finish the job in seconds.
Your Containers Are Ready for a New Purpose!
And there you have it! You are now equipped with a whole toolbox of simple, effective techniques to defeat even the most stubborn glued-on labels. No longer do you need to be frustrated by that sticky, torn-paper mess. By starting with a simple soap soak and moving on to oil, heat, or a mild solvent if needed, you can restore almost any plastic container to a clean, useful state.
Reusing these containers is not only great for organizing your workshop, pantry, or craft room, but it’s also a wonderful way to reduce waste. It’s a small DIY project that has a positive impact. So go ahead, look at that pile of jars and containers with new eyes. With a little bit of know-how and a few common household items, you can give them a second life. Happy de-labeling!