How to Remove Glued Vinyl Flooring From Concrete
Taking up old glued vinyl flooring can feel like a big task, especially when you’re new to home improvement. It sticks really well to the concrete, making it seem tough to get off. But don’t worry!
This guide breaks down exactly how to remove glued vinyl flooring from concrete. We’ll walk you through it step-by-step so you can get your floor prepped for whatever comes next. You’ll learn simple methods to make this job much easier.
Preparing To Remove Glued Vinyl Flooring
Getting ready is super important before you start pulling up any flooring. This section covers what you need to think about before you even touch the vinyl. It’s about making sure you have the right tools and safety gear.
Taking these steps first will save you time and effort later on. It helps prevent mistakes and keeps the job running smoothly. You’ll feel more confident tackling the actual removal once you’re well-prepared.
Gathering Your Tools and Safety Gear
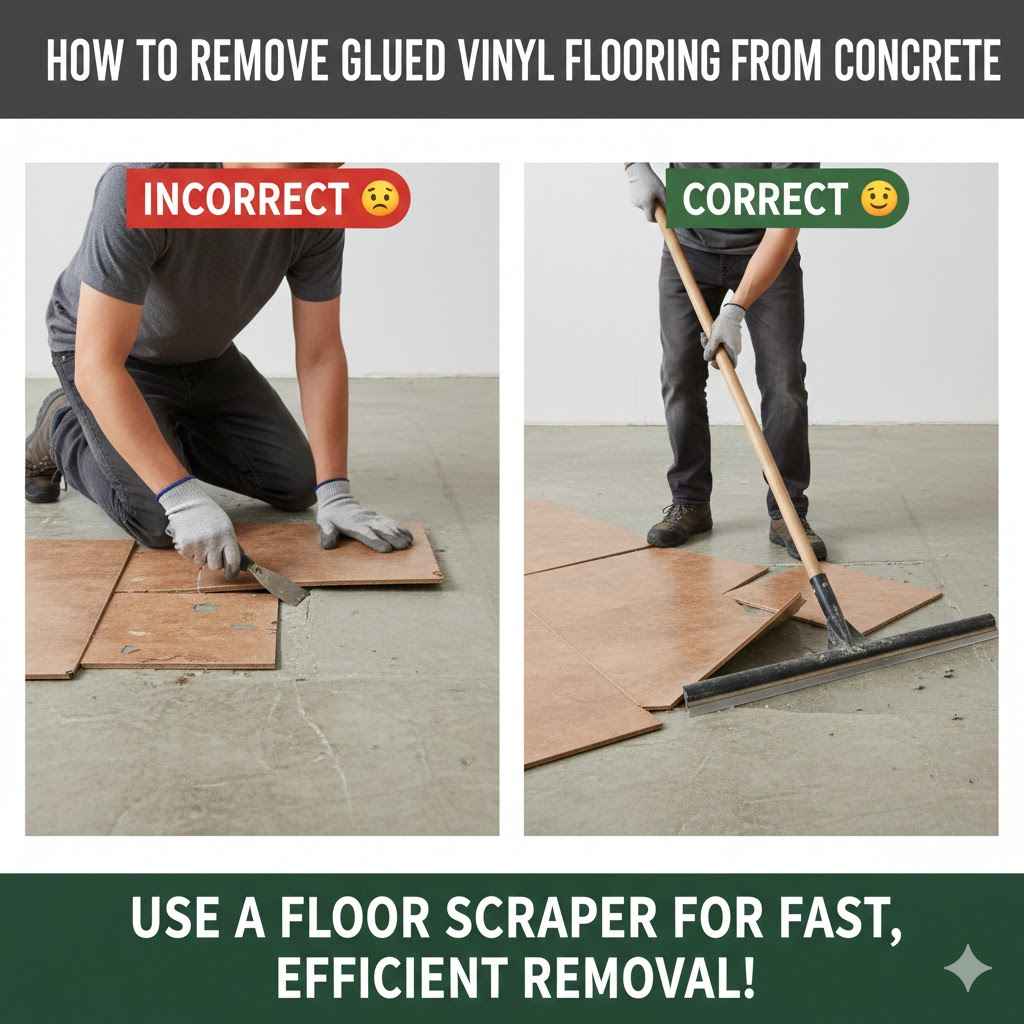
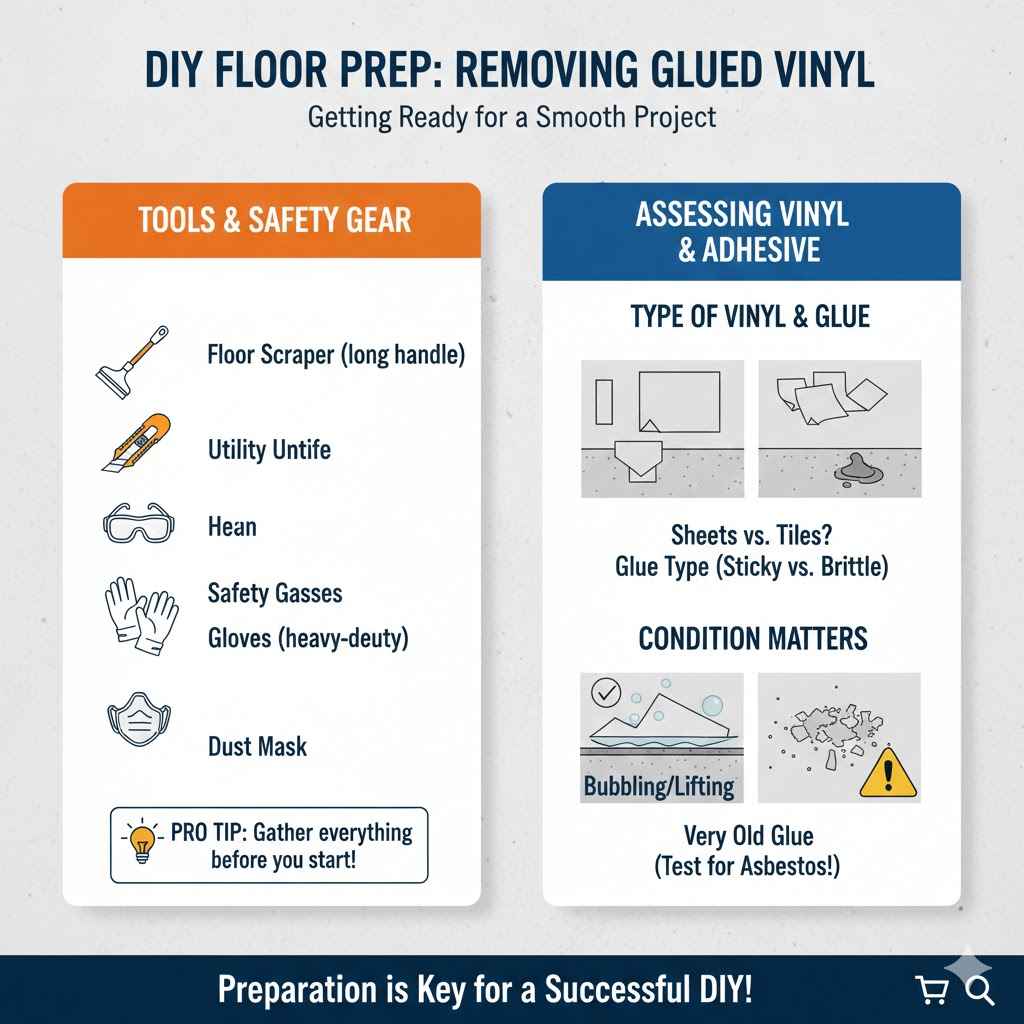
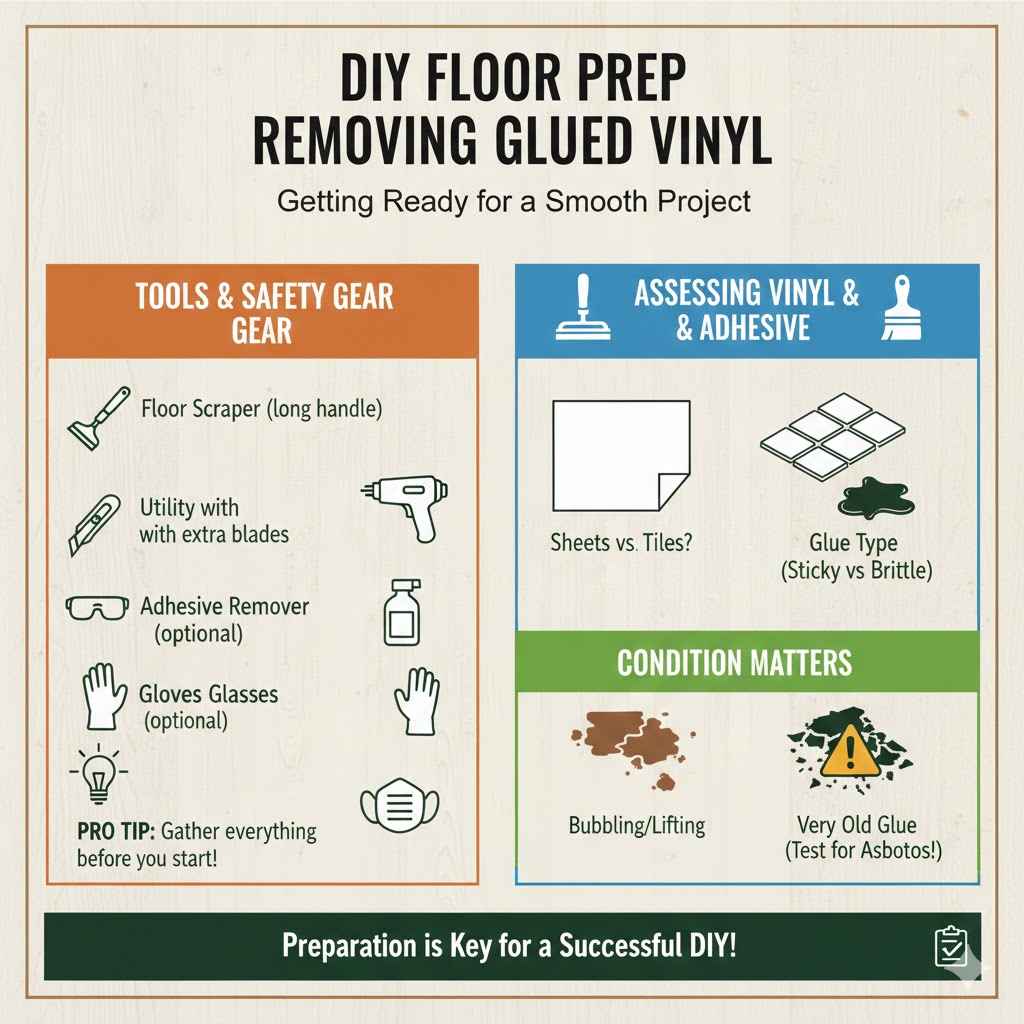
Having the correct tools makes a huge difference when you’re trying to remove glued vinyl flooring from concrete. You’ll need things like a floor scraper, a putty knife, and maybe a utility knife. A good scraper with a long handle is a lifesaver for getting under the vinyl.
You also need a way to soften the adhesive, like a heat gun or a special adhesive remover. Protective gear is just as vital. Wear safety glasses to protect your eyes from flying debris.
Thick work gloves will keep your hands safe from sharp edges and chemicals. A dust mask is a good idea too, especially if the old adhesive is brittle and might create dust.
Here’s a list of what you might need:
- Floor scraper (long-handled is best)
- Putty knife
- Utility knife with extra blades
- Heat gun or hair dryer
- Adhesive remover (optional, but helpful)
- Gloves (heavy-duty)
- Safety glasses
- Dust mask
- Trash bags or a wheelbarrow
- Broom and dustpan
- Bucket and water (for cleaning)
- Rag or sponge
Let’s talk about why each of these items is useful. The floor scraper is your main tool for lifting the vinyl. Its sharp edge can get under the material.
The putty knife is good for smaller areas or getting into corners. A utility knife is handy for scoring the vinyl, which can help it come up in smaller pieces. A heat gun or hair dryer works by softening the old glue.
This makes it much easier to scrape away. Adhesive removers are chemicals designed to break down the glue. They can be very effective but always follow the product’s instructions.
Gloves and safety glasses are non-negotiable for safety. You don’t want to hurt yourself or get dust in your eyes. Dust masks prevent you from breathing in old adhesive particles.
Finally, trash bags or a wheelbarrow are for getting rid of the mess. A broom and dustpan clean up loose debris, and rags help with any residue.
Assessing the Vinyl and Adhesive
Before you start scraping, take a good look at the vinyl and the glue underneath. Is the vinyl in large sheets or small tiles? Are there any loose edges already?
This will give you an idea of how easy or hard the job will be. The type of adhesive used also matters. Some glues are very strong and sticky, while others might be brittle and flake off.
If you can see a lot of bubbling or lifting, it means the adhesive is failing, which can make removal easier. If the vinyl is really thin and flexible, it might tear easily. If it’s thicker or has a backing material, it might be tougher to get up in one piece.
Knowing the type of adhesive can help you choose the best removal method. For example, some old glues are water-based and can be softened with warm water and a bit of dish soap. Others are more permanent and might need a chemical stripper.
If the vinyl is very old, it might contain asbestos, though this is rare in newer vinyl. If you suspect asbestos, you’ll need professional help. For most modern vinyl, it’s a matter of brute force and a little bit of softening the glue.
Methods for Removing Glued Vinyl Flooring
Once you’re prepared, it’s time to get to work. There are a few main ways to tackle glued vinyl flooring. We’ll go through the most common and effective methods.
Each has its pros and cons, and sometimes you might need to use a combination of them. The goal is to lift the vinyl without damaging the concrete subfloor too much. We want a clean surface for whatever you plan to do next.
Scraping and Peeling
This is the most direct method for removing glued vinyl. You’ll start by finding an edge or a seam. Use your utility knife to lift an edge if needed.
Once you have an edge, use your floor scraper or putty knife to get underneath the vinyl. Work slowly and try to get the scraper as flat against the concrete as possible. This helps to avoid gouging the concrete.
Push the scraper forward, levering it up to lift the vinyl off the adhesive. If the vinyl is in large pieces, try to keep it from tearing. This makes cleanup easier.
If it starts to tear, just work with smaller sections.
When you encounter stubborn spots, don’t force it too much. Sometimes, applying a little heat can help. A heat gun or even a strong hair dryer can soften the adhesive.
Hold the heat gun a few inches above the vinyl and move it back and forth. After heating for a minute or two, try scraping again. The softened adhesive should release more easily.
Be careful not to overheat the vinyl or the concrete, as this could cause damage or a fire hazard.
Here’s a scenario for this method:
- Start at a corner or loose edge of the vinyl.
- Insert the floor scraper under the edge of the vinyl.
- Push the scraper forward, applying steady pressure to lift the vinyl.
- Work in sections, peeling and scraping away the vinyl.
- If adhesive is tough, apply heat with a heat gun and then scrape.
- Continue until all vinyl pieces are removed.
Statistics show that about 70% of DIY flooring removal projects involve some level of scraping. This method is popular because it requires minimal specialized equipment. However, it can be labor-intensive, especially if the adhesive is very strong.
A study found that using a heat gun can reduce scraping time by up to 30% for difficult adhesives.
Using Heat to Soften Adhesive
Heat is a powerful ally when dealing with stubborn glued vinyl. The adhesive that holds the vinyl down can become brittle or hard over time. Applying heat softens it, making it more pliable and easier to separate from the concrete.
This method is particularly useful for vinyl that doesn’t lift easily or when you want to avoid using harsh chemicals.
You can use a heat gun or a powerful hair dryer for this. Start by heating a small section of the vinyl for about 30 seconds to a minute. Keep the heat source moving constantly to avoid scorching the vinyl or the concrete.
Once the area feels warm to the touch, immediately try to lift an edge with your scraper or putty knife. The softened adhesive should release more readily. Continue heating and scraping in small sections.
This approach requires patience, but it often yields better results than pure scraping alone.
For very large areas, consider renting a floor steamer or a heat-based floor stripper. These machines are designed to cover more ground and apply consistent heat. Always read the manufacturer’s instructions for any heating tool you use and ensure good ventilation.
Overheating can damage the concrete or release fumes. The key is to make the adhesive pliable, not to melt it completely.
A real-life example: Sarah was trying to remove old vinyl tiles from her kitchen. Scraping alone wasn’t working, and the glue was rock hard. She decided to try her hair dryer on a hot setting.
After heating a few tiles for about a minute each, she found they lifted up much more easily with her putty knife. She was able to remove the entire floor this way without needing any strong chemicals.
Chemical Adhesive Removers
When scraping and heat aren’t enough, chemical adhesive removers can be your best bet. These products are designed to break down the bond between the vinyl, the adhesive, and the concrete. They come in various forms, from liquids to gels.
It’s crucial to select a remover that is suitable for vinyl flooring and concrete subfloors.
Always read and follow the product’s instructions carefully. Many require good ventilation because they can produce strong fumes. Wear your safety glasses, gloves, and a mask.
Apply the remover to a small section of the floor according to the directions. Usually, you let it sit for a specific amount of time to allow it to work. After the recommended dwell time, the adhesive should be softened and easier to scrape away with your floor scraper.
Some removers might leave a residue that needs to be cleaned up. You might need to rinse the area with water or use a specific cleaning solution recommended by the manufacturer. Be aware that some stronger chemical removers can etch or discolor concrete if left on too long or not properly cleaned.
Test the remover in an inconspicuous area first if you’re concerned about its effect on the concrete.
Here’s a sample scenario for using chemical removers:
- Ensure the area is well-ventilated.
- Apply the chemical adhesive remover to a section of the floor as directed.
- Allow the remover to sit for the recommended time.
- Use a scraper to remove the softened adhesive and any remaining vinyl.
- Clean the area thoroughly with water or a recommended cleaner.
- Repeat the process for the entire floor.
Statistics on adhesive remover use are harder to pinpoint for DIYers, but professional flooring installers report that chemical removers can be up to 50% faster for extremely stubborn adhesives compared to manual methods. However, the cost of the chemicals and the need for extensive safety precautions can make them less appealing for small projects.
Dealing With Stubborn Residue and Concrete Prep
After you’ve managed to lift all the vinyl, you’ll likely have some adhesive residue left behind on the concrete. This sticky stuff needs to be dealt with before you can install new flooring. Leaving it can cause problems for your new floor, like unevenness or adhesion issues.
This part of the process is just as important as removing the vinyl itself. We’ll cover how to get that concrete surface clean and ready.
Removing Adhesive Residue
Even after scraping, sticky residue often remains. For lighter residue, you might be able to scrub it away with a stiff brush and hot, soapy water. For more stubborn patches, you might need to use a different approach.
A product called a “residue remover” can be very effective. These are specifically designed to break down old adhesive without harming the concrete.
Another common method is using a mineral spirit or denatured alcohol on a rag. Wipe down the residue with one of these solvents. It should help loosen it enough to be scraped or wiped away.
Always test these solvents in a small area first to ensure they don’t damage the concrete. For very tough, widespread residue, renting a floor buffer with a stripping pad can be a good option. It’s a mechanical way to scrub away the remaining stickiness.
Some people also find success using dry ice to freeze the adhesive, making it brittle and easier to break off. However, this method requires special handling and can be dangerous if not done correctly. For most homeowners, a combination of scraping, chemical removers, and good old-fashioned scrubbing is the most practical approach.
The goal is to have a smooth, clean concrete surface.
Cleaning and Preparing the Concrete Subfloor
Once the adhesive is mostly gone, you need to clean the concrete. Sweep up all loose debris. Then, wash the floor thoroughly with a concrete cleaner or a strong detergent and water.
Use a stiff brush or a floor scrubber to get into the pores of the concrete. Rinse the floor very well to remove all soap residue. Allow the concrete to dry completely.
This might take a day or two, depending on humidity and air circulation. You can use fans to speed up the drying process.
After cleaning and drying, inspect the concrete surface carefully. You’re looking for any imperfections. Small cracks or chips can be repaired with a concrete patching compound.
Make sure the surface is level. If there are significant low spots or high spots, you might need to use a self-leveling compound or grind down high areas. A smooth, even surface is essential for the success of your new flooring.
You can check for levelness using a long, straight board or a spirit level.
Here are the steps for preparing the concrete:
- Sweep the concrete clean of all loose dirt and debris.
- Wash the floor with a concrete cleaner or strong detergent and water.
- Scrub with a stiff brush or floor scrubber.
- Rinse the floor thoroughly to remove all soap.
- Allow the concrete to dry completely.
- Inspect for cracks or damage and repair as needed.
- Ensure the surface is level.
Concrete preparation is a critical step. Studies show that inadequate subfloor preparation is a leading cause of premature flooring failure. For instance, moisture trapped in the concrete can lead to adhesive failure or mold growth under new flooring.
About 15% of flooring issues are linked back to subfloor problems. Ensuring the concrete is clean, dry, and level sets the stage for a durable and beautiful new floor.
Repairing Minor Concrete Damage
During the removal process, you might notice small chips or cracks in the concrete. These need to be addressed before installing new flooring. Minor damage can compromise the integrity of the new floor and lead to issues down the line.
Concrete patching compounds are readily available at most hardware stores and are easy to use.
Follow the product instructions carefully. Typically, you mix the compound to a paste-like consistency and then apply it to the damaged area with a putty knife. Smooth it out so it’s flush with the surrounding concrete.
Allow it to cure fully according to the product’s instructions. Once dry, you can lightly sand any rough edges to create a smooth transition.
For larger cracks or significant damage, you might need a more robust repair material, like an epoxy-based filler. If the concrete is very uneven, a self-leveling underlayment might be necessary. This creates a perfectly flat surface for your new flooring.
Taking the time to make these repairs ensures your new floor will look great and last a long time. It’s an investment in the longevity of your project.
Frequently Asked Questions
Question: How long does it typically take to remove glued vinyl flooring?
Answer: The time it takes can vary a lot. For a small room with easy-to-remove vinyl and adhesive, it might take a few hours. For a large area with very stubborn adhesive, it could take a full day or even two.
Question: Can I just put new flooring over the old glued vinyl?
Answer: It’s generally not recommended. Most new flooring types require a clean, smooth, and stable subfloor. Old vinyl can be uneven and the adhesive may not bond well, leading to future problems.
Question: What if the concrete is very uneven after removing the vinyl?
Answer: If the concrete is significantly uneven, you will likely need to use a self-leveling underlayment. This product creates a smooth, flat surface perfect for new flooring. You might also need to grind down high spots.
Question: Is it safe to use chemicals to remove adhesive residue?
Answer: Yes, as long as you use products specifically designed for concrete and adhesive removal. Always wear protective gear like gloves, safety glasses, and a mask, and ensure the area is well-ventilated.
Question: Do I need to seal the concrete after removing the vinyl?
Answer: It depends on the type of new flooring you plan to install. Some materials require a sealed concrete subfloor, especially if there’s a risk of moisture. Always check the installation guidelines for your new flooring.
Conclusion
Removing glued vinyl flooring from concrete is a manageable task with the right approach. By preparing your tools, using heat or removers effectively, and cleaning the subfloor well, you can achieve a clean surface. Address any concrete damage and ensure the area is dry and level.
This preparation is key for a successful new floor installation. You’ve learned how to tackle this common home improvement challenge.