How to Easily Remove Grout from Tile: Your 5-Step Guide
To remove grout from tile, follow this 5-step guide. It explains the exact process in a concise and accurate manner.
Grout can accumulate on tiles over time, leading to a dull and dirty appearance. Whether you’re renovating your bathroom or simply wanting to refresh its look, knowing how to remove grout from tile is essential. While the task may seem daunting at first, with the right steps and tools, it can be easily accomplished.
In this guide, we will provide you with a step-by-step process to effectively remove grout from your tiles, restoring their original shine and cleanliness. By following these simple instructions, you’ll be able to tackle this common household chore and achieve professional-looking results. Let’s get started!
Step 1: Prepare The Area
Prepare your work area by gathering the necessary tools and materials for removing grout from tile in this comprehensive step-by-step guide.
Before diving into the grout removal process, it’s crucial to prepare the area properly. By taking a few necessary precautions, you can ensure a smooth and efficient task ahead.
Clearing The Tile Surface
The first step in preparing the area is to clear the tile surface of any loose debris. Use a broom or vacuum cleaner to remove dirt, dust, and any other particles that could interfere with the grout removal process. This will help create a clean and even surface for better access to the grout.
Protecting Surrounding Areas
While removing grout, it’s important to protect the surrounding areas from potential damage. To safeguard adjacent surfaces, cover them with tape or plastic sheets. This will prevent accidental scratches or stains during the grout removal process.
You should also protect yourself during the task. Wear safety goggles to shield your eyes from flying debris, and use gloves to protect your hands from any potential irritation.
Step 2: Choose The Right Grout Removal Method
After assessing the condition of your tile and grout, it’s time to choose the most suitable grout removal method. Here are two popular options:
Manual Grout Removal
If you prefer a hands-on approach, manual grout removal is the way to go. While it requires more effort, it allows for better control and precision. Here’s how to do it:
- Carefully inspect the grout lines and identify any loose or damaged grout.
- Prepare a grout removal tool such as a grout saw or grout scraper.
- Hold the tool at a 45-degree angle against the grout line.
- Apply gentle pressure and start scraping away the grout.
- Work in small sections to avoid damaging the surrounding tiles.
- Repeat the process until all the old grout has been removed.
- Clean the area with a damp cloth to remove any residue.
Power Tool Grout Removal
If you’re dealing with a large area or stubborn grout, power tool grout removal can save you time and effort. Here’s how to use a power tool for grout removal:
- Ensure you have the appropriate safety gear, including goggles and a dust mask.
- Select a grout removal attachment for your power tool, such as a grout removal bit or oscillating multi-tool blade.
- Set the power tool to the appropriate speed and power settings.
- Hold the tool at a slight angle against the grout line.
- Turn on the power tool and gently guide it along the grout line, allowing the tool to do the work.
- Be cautious not to apply too much pressure, as it may damage the tiles.
- Continue the process until all the grout has been removed.
- Take breaks to avoid overheating the power tool.
- Afterward, clean the area thoroughly to remove any dust or debris.
Choosing the right grout removal method is crucial for achieving the best results. Consider the size of the project, the condition of the grout, and your comfort level with the chosen method. Whichever option you choose, be patient and methodical to ensure successful grout removal.
Step 3: Start Removing The Grout
Easily remove grout from tiles with this step-by-step guide. Follow step 3 to start the grout removal process.
Once you have prepared the tools and protected the surrounding area, it’s time to start removing the grout from your tiles. This step requires careful attention and precision to avoid damaging your tiles. There are two main methods you can use: using a grout saw or knife and using a grout removal tool or oscillating multi-tool.
Using a Grout Saw or Knife
Using a grout saw or knife is one of the most common methods for removing grout. It is a manual process that requires patience and a steady hand. Here’s how you can do it:
1. Hold the grout saw or knife at a 45-degree angle to the grout line. This will allow the saw or knife to dig into the grout without scratching the surrounding tiles. Make sure to wear protective goggles and gloves before you begin.
2. Start by making a shallow cut along the grout line. Be careful not to press too hard to avoid damaging the tiles. Take it slow and steady, focusing on one grout line at a time.
3. Once you have made the initial cut, go back and deepen the groove. Use the saw or knife to dig into the grout, gradually removing it from the tile surface. Work in small sections, making sure to clear the grout debris as you go.
4. Continue this process along the entire length of the grout line. Take breaks if needed to rest your hand and maintain accuracy. Remember, it’s important to be patient and take your time to achieve the best results.
5. After removing the grout, clean the tiles with a damp cloth to remove any remaining grout dust or debris. This will help reveal the clean surface of the tiles.
Using a Grout Removal Tool or Oscillating Multi-Tool
Another effective method for grout removal is using a grout removal tool or oscillating multi-tool. This power tool makes the process quicker and easier, especially for larger areas or tough grout. Here’s how you can use it:
1. Insert the appropriate grout removal blade or attachment into your grout removal tool or oscillating multi-tool. Make sure it is securely in place before you begin.
2. Hold the tool at a 45-degree angle to the grout line, just like you would with a grout saw or knife. Always remember to wear protective goggles and gloves for safety.
3. Turn on the power tool and slowly guide it along the grout line. Let the tool do the work, allowing the blade or attachment to vibrate and break apart the grout. Keep a firm grip on the tool but avoid applying excessive pressure, as it may damage the tiles.
4. Work in small sections and move methodically across the grout lines. Take breaks if needed to prevent overheating the tool or straining your hand.
5. Once you have removed the grout, use a damp cloth to clean the tiles. Wipe away any remaining grout dust or debris to reveal the clean surface of the tiles.
By following these step-by-step instructions, you can successfully remove grout from your tiles using either a grout saw or knife, or a grout removal tool or oscillating multi-tool. Pick the method that suits your preference and needs, and remember to work with caution and patience to achieve the best results.
Step 4: Clean Up The Area
To complete the grout removal process, the fourth step involves thoroughly cleaning the area. This ensures a smooth and tidy finish, leaving the tile looking good as new.
Cleaning Out Removed Grout
Once you have successfully removed the grout from your tiles using the appropriate tool, it’s time to move on to the next important step – cleaning up the area. This step is crucial to ensure that you don’t leave behind any loose grout or debris that could potentially cause damage to your tiles or affect the appearance of your newly cleaned tiles. Here’s what you need to do to effectively clean out the removed grout:
1. Start by using a soft-bristled brush or a damp cloth to carefully sweep away any loose grout particles from the tile surface. Make sure to reach into the grout lines and corners to remove every last bit of debris.
2. If you notice any lingering grout haze or residue on the tiles, you can use a grout haze remover specifically designed for tile surfaces. Apply the remover according to the manufacturer’s instructions, and gently scrub the affected areas with a sponge or soft cloth. This will help you achieve a clean, streak-free finish.
Removing Residual Dust And Debris
After clearing out the removed grout, you may still have some residual dust and debris to deal with. To ensure a thorough clean-up, follow these additional steps:
- Use a vacuum cleaner with a brush attachment or a dry microfiber cloth to remove any remaining dust or loose particles from the tile surface. Work your way across the entire area, paying special attention to the grout lines and corners.
- For stubborn dirt or stains, consider using a mild detergent solution or a tile cleaner specifically formulated for your tile type. Apply the cleaner to the affected areas, and gently scrub with a soft brush or sponge. Rinse thoroughly with clean water to remove any cleaning residue.
- Finally, wipe down the entire tile surface with a clean, dry cloth to ensure it is completely dry and free from any cleaning solution residue. This will prevent any water spots or streaks from forming as the surface dries.
By following these steps and taking the time to clean up the area properly, you can ensure that your newly cleaned tiles look their best and last for years to come. Now that the cleaning process is complete, you can move on to the final step – sealing the grout to protect it from future stains and damage.
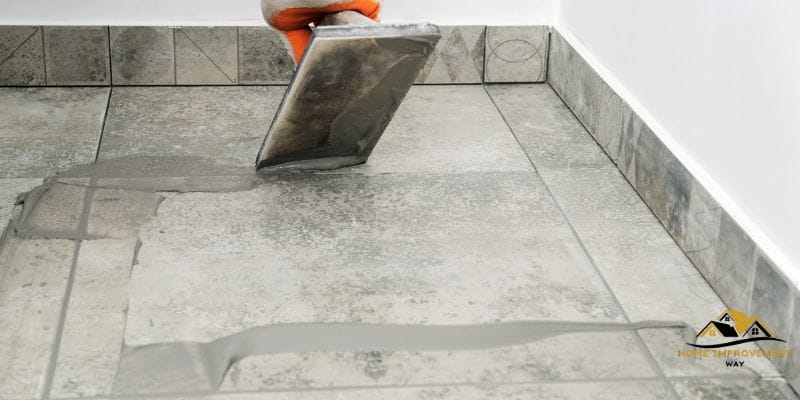
Step 5: Apply New Grout
To apply new grout, follow step 5 of this comprehensive guide on how to remove grout from tiles. This easy-to-follow process ensures a seamless and professional-looking finish for your tile project.
Once you have successfully removed the old grout from your tiles using the previous steps, it’s time to apply the new grout. This step will give your tiles a fresh and clean look, enhancing the overall appearance of your space.
Preparing The Grout Mixture
Before you start applying the new grout, you need to prepare the grout mixture. Follow these simple steps:
- Gather the necessary materials: a clean bucket, a mixing stick, and unsanded grout powder.
- Pour the desired amount of unsanded grout powder into the clean bucket. Make sure to read the manufacturer’s instructions for the correct water-to-grout ratio.
- Add water to the bucket gradually, while stirring the mixture with the mixing stick. Continue adding small amounts of water until the grout reaches a smooth and creamy consistency, similar to toothpaste.
Applying The New Grout
Now that your grout mixture is ready, it’s time to apply it to the tile joints. Follow these steps for a smooth and successful application:
- Dip a grout float into the prepared grout mixture, making sure the float is coated evenly.
- Hold the float at a 45-degree angle and apply the grout diagonally across the tile joints, ensuring complete coverage.
- Use the float to press the grout into the joints, filling them completely and removing any excess grout on the tile surface.
- Continue this process until all the tile joints are filled with the new grout, taking care not to apply too much pressure.
- Allow the newly applied grout to set for the recommended time period mentioned on the grout packaging. This usually takes about 15 to 30 minutes.
By following these simple steps, you can easily apply new grout to your tiles, giving them a fresh and attractive appearance. Remember to take your time and work carefully to achieve professional-looking results. In the next step, we will talk about the final and important step of the grouting process – cleaning excess grout from the tile surface. So, stay tuned!
Conclusion
Removing grout from tile can be a simple process if you follow these step-by-step instructions. By using a grout removal tool, protecting the surrounding areas, applying the right technique, and being patient, your tiles can look brand new again. Remember to take safety precautions and consult a professional if needed.
With these tips, you can tackle grout removal like a pro and achieve the results you desire. Happy cleaning!