How To Remove Vinyl Flooring Glue From Concrete
Removing old vinyl flooring glue from a concrete floor can seem like a big job, especially if you’re new to home projects. You might worry about damaging the concrete or making a huge mess. But don’t worry!
This guide will show you exactly how to Remove Vinyl Flooring Glue from Concrete with simple steps. We’ll make this task easy and help you get your concrete floor ready for its next chapter. Let’s get started!
Safely Remove Vinyl Flooring Glue From Concrete
Tackling stubborn vinyl flooring glue on concrete requires a careful approach. Many DIYers find this process challenging because the adhesives can be very strong and become hardened over time. The goal is to loosen and lift the glue without scraping away too much of the concrete surface itself.
This section covers the foundational methods and safety precautions essential for any successful glue removal project. It’s about preparing the area and understanding the materials you’re working with before you begin.
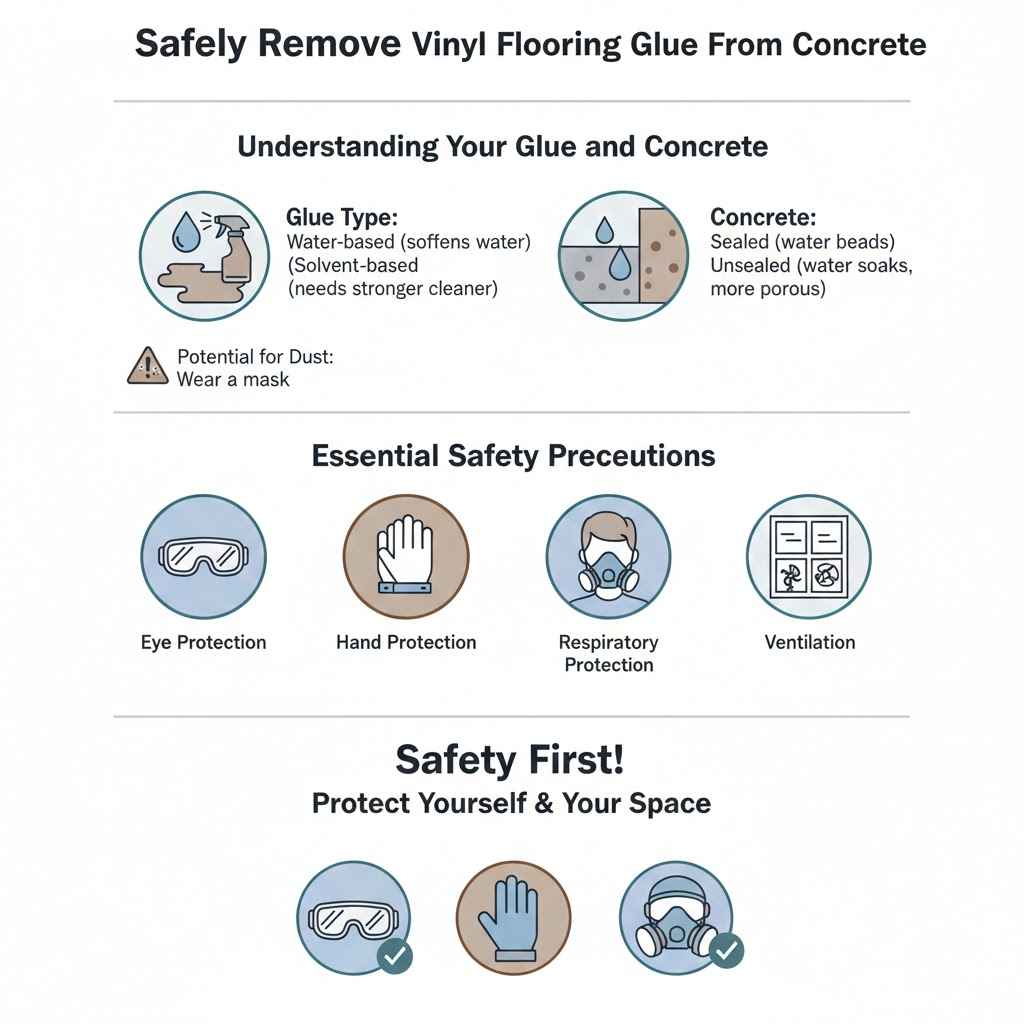
Understanding Your Glue and Concrete
Before you start, it’s good to know what kind of glue you’re dealing with. Some vinyl flooring glues are water-based, while others are solvent-based. This difference can affect which cleaning methods work best.
Water-based glues are usually easier to remove. Solvent-based glues might need stronger cleaners. Also, look at your concrete.
Is it sealed or unsealed? Sealed concrete is more resistant to stains and damage from cleaning products. Unsealed concrete can absorb liquids more easily, so you’ll want to be extra careful with solvents.
Knowing these details helps you pick the right tools and cleaners.
- Glue Type Identification: Sometimes the old flooring packaging or installer notes can tell you the glue type. If not, you might need to do a small test spot. A bit of water sprayed on a small area can show if the glue softens. If it does, it’s likely water-based. If water doesn’t affect it much, it might be solvent-based.
- Concrete Surface Assessment: Check for existing sealers. A simple test is to put a drop of water on the concrete. If it beads up, it’s likely sealed. If it soaks in quickly, it’s probably unsealed. Unsealed concrete is more porous and needs gentler treatment.
- Potential for Dust: When dealing with old glue, especially if scraping is involved, dust can become an issue. Always ensure good ventilation and consider wearing a dust mask to protect your lungs.
Essential Safety Precautions
Safety comes first when you Remove Vinyl Flooring Glue from Concrete. You’ll be using tools and sometimes chemicals. Always wear safety glasses to protect your eyes from flying debris or splashes.
Gloves are a must to keep your hands safe from harsh cleaners and rough materials. Good ventilation is also key, especially if you use any chemical removers. Open windows and doors to let fresh air circulate.
If you’re using a powerful cleaner, you might even want to wear a respirator mask. It’s better to be safe than sorry when working on home improvement projects.
- Eye Protection: Safety glasses are non-negotiable. They shield your eyes from dust, glue particles, and any cleaning solutions you might use.
- Hand Protection: Use sturdy work gloves. They protect your skin from chemicals and also prevent cuts or scrapes if you’re using scraping tools. Different types of gloves offer varying levels of protection, so choose based on the cleaners you select.
- Respiratory Protection: For airborne dust or strong fumes from chemical removers, a dust mask or a respirator is highly recommended. This is especially important in enclosed spaces.
- Ventilation: Ensure the area is well-ventilated. Open all windows and doors, or use fans to move air through the space. This helps dissipate fumes and reduces the risk of inhaling harmful vapors.
Step-By-Step Guide to Remove Vinyl Flooring Glue
Preparing Your Workspace
Before you get your hands dirty, it’s important to get your workspace ready. This makes the whole process smoother and cleaner. First, clear out all furniture and decor from the room.
You don’t want anything getting in the way or being damaged. Then, sweep the floor thoroughly. Removing loose dirt and debris will prevent it from being ground into the concrete as you work.
If there are any large, loose pieces of vinyl or glue, try to peel or pry them up by hand or with a putty knife first. This saves you effort later.
- Clear the Area: Remove all furniture, rugs, and any other items from the floor space. This ensures you have plenty of room to work and prevents damage to your belongings.
- Sweep Thoroughly: Use a stiff-bristled broom to sweep away all loose dirt, dust, and debris. Getting the floor clean upfront prevents these particles from becoming a problem later.
- Initial Glue Removal: Try to lift any large, loose pieces of vinyl and dried glue by hand or with a putty knife. These are usually the easiest to remove and will make subsequent steps more efficient.
Mechanical Removal Methods
Sometimes, the best way to remove stubborn glue is with a little elbow grease and the right tools. Mechanical methods involve physically scraping or lifting the adhesive from the concrete surface. This can be done using simple hand tools or more powerful equipment depending on the amount of glue and your comfort level.
Always start with the least aggressive method and move to stronger ones if needed. This helps protect the concrete from damage. You want to remove the glue, not the concrete itself.
- Putty Knife or Scraper: For smaller areas or less stubborn glue, a sturdy putty knife or a floor scraper can be very effective. Hold the blade at a low angle to the concrete and push firmly to lift the glue. Work in small sections, and be patient.
- Scraping Tool with Extension Handle: For larger areas, a floor scraper with a long handle is much more comfortable and efficient. It allows you to stand up while scraping, reducing strain on your back and knees. These tools often have sharp blades that can tackle hardened adhesives.
- Power Scraper or Floor Sander: For very tough, widespread glue, you might consider renting a power scraper or a floor sander. These machines are more aggressive and can remove glue quickly, but they require more skill to operate without damaging the concrete. Always follow the manufacturer’s instructions carefully.
Chemical Removal Solutions
When mechanical methods aren’t enough, chemical solutions can help break down the vinyl flooring glue. These removers work by softening or dissolving the adhesive, making it easier to wipe or scrape away. It’s crucial to choose a remover that is safe for concrete and to follow the product instructions precisely.
Always test a small, inconspicuous area first to ensure it doesn’t discolor or damage your concrete. Proper ventilation and safety gear are absolutely essential when using any chemical products.
-
Citrus-Based Removers: These are often a good starting point. They are generally safer, less toxic, and have a pleasant smell compared to harsher chemicals. They work by breaking down the adhesive’s bonds.Citrus-based removers use natural solvents found in citrus fruits. They are biodegradable and less likely to cause respiratory irritation. They are effective on many types of adhesives, especially those that are not extremely old or hardened.
Apply the remover generously to the glue residue. Allow it to sit for the time recommended on the product label, which can range from 15 minutes to several hours. The solvent works to loosen the glue’s grip on the concrete.
-
Mineral Spirits or Acetone: For tougher adhesives, stronger solvents like mineral spirits or acetone might be needed. Use these sparingly and with extreme caution. They are flammable and have strong fumes, so ventilation is critical.Mineral spirits are a petroleum-distilled solvent used for cleaning paint brushes and thinning oil-based paints. They are effective at dissolving many types of stubborn adhesives. Acetone is a powerful solvent, often found in nail polish remover, and it can quickly break down strong glues.
However, acetone can also damage sealers on concrete and may leave a residue. When using either, apply a small amount to a rag and dab it onto the glue. Let it work for a short period, then try to scrape.
-
Commercial Adhesive Removers: There are many specialized products designed specifically for removing flooring adhesives. Look for products labeled for use on concrete.These commercial removers are formulated to be effective and, in many cases, safer for concrete surfaces than generic solvents. They often come with clear instructions on application and dwell time. Some are designed to work quickly, while others require longer contact.
Always read the product details to ensure it matches the type of glue you’re trying to remove and is compatible with your concrete.
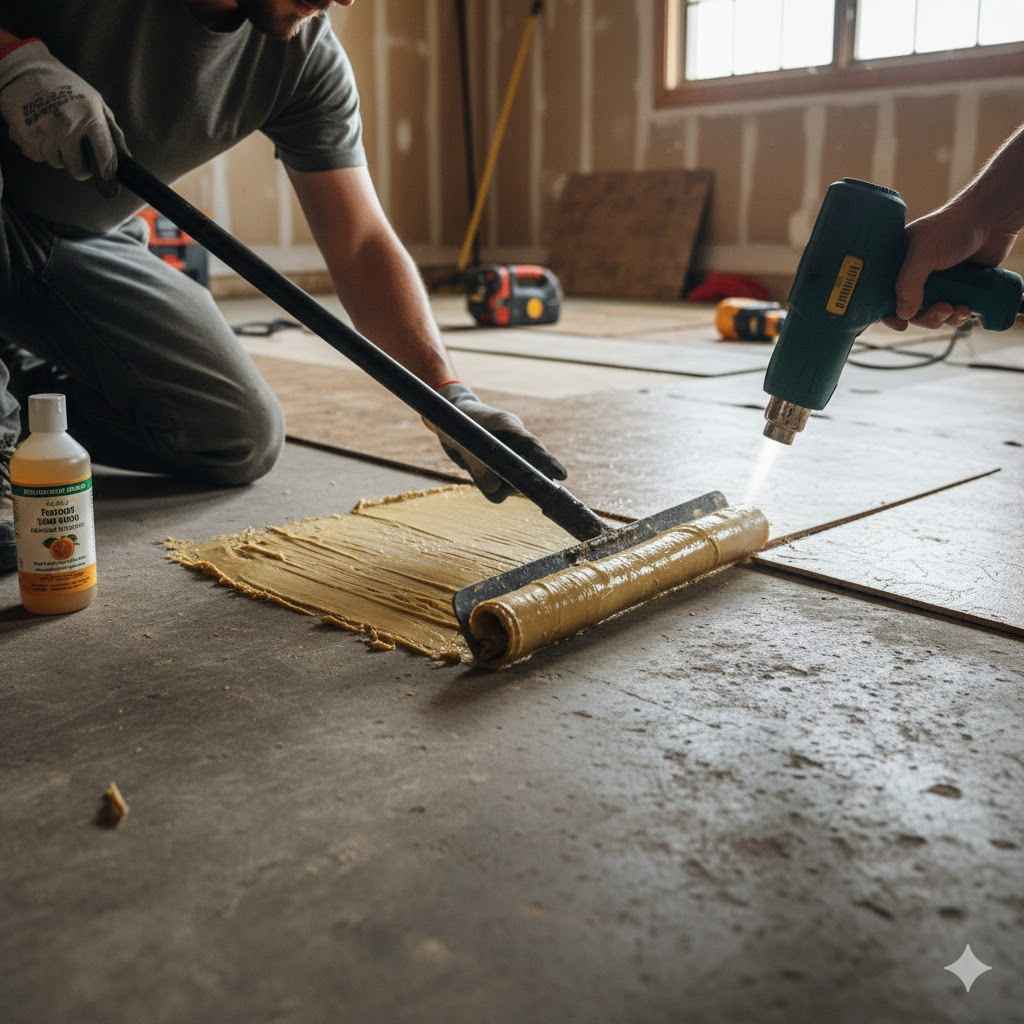
The Steaming Method
For extremely persistent glue residue, steam can be a surprisingly effective tool. The heat and moisture from the steam soften the adhesive, making it much easier to scrape away. This method is particularly good for older, hardened glues that resist other treatments.
It’s also a more environmentally friendly option as it uses only water. However, you need to be careful not to oversaturate the concrete, especially if it’s unsealed.
- How Steam Works: The heat from the steam penetrates the glue and the concrete surface slightly, breaking down the chemical bonds that hold the adhesive to the concrete. The moisture helps to lubricate the surface.
- Using a Steamer: You can rent a wallpaper steamer or purchase a portable steam cleaner for this purpose. Hold the steam plate over a small section of the glue for a minute or two. The glue should start to bubble and soften.
- Scraping After Steaming: Immediately after steaming a section, use a putty knife or scraper to lift the softened glue. Work quickly before the glue cools and hardens again. You may need to repeat the steaming and scraping process a few times for complete removal.
Cleaning and Neutralizing
After you’ve removed the bulk of the vinyl flooring glue, you’ll need to clean the concrete surface thoroughly. This removes any remaining residue, cleaner chemicals, and dust. Rinsing well is important, especially if you used chemical removers.
Some cleaners can leave a film or affect the concrete if not removed. You might want to use a mild detergent and water for a good scrub. After rinsing, ensure the concrete dries completely before moving on to any new flooring or treatment.
- Wash the Surface: Use a stiff brush and a solution of warm water and a mild detergent or a concrete cleaner. Scrub the entire area to remove any remaining glue particles or cleaning solution residue.
- Rinse Thoroughly: Rinse the floor with clean water multiple times. You want to ensure all traces of cleaning products are gone. A wet vacuum can be very helpful for removing rinse water efficiently.
- Neutralize (If Necessary): If you used strong chemical removers, check the product instructions. Some may require a neutralizing step. This typically involves a specific solution or just a thorough rinse with water.
- Dry the Concrete: Allow the concrete to dry completely. This can take 24-48 hours, depending on humidity and airflow. You can speed this up with fans or a dehumidifier.
Dealing with Tough Residue and Stains
Stubborn Glue Spots
Sometimes, even after all your efforts, a few stubborn spots of glue might remain. These can be frustrating. For these small, persistent areas, you can often use a combination of heat and a scraper.
A heat gun, used very carefully, can soften these spots enough to be scraped away. Be cautious not to overheat the concrete, which could cause damage or discoloration. Another option is a specialized adhesive remover gel that can be applied directly to the spot and left to work.
- Heat Gun Application: Set a heat gun on a low to medium setting. Hold it a few inches away from the glue spot, moving it constantly to avoid concentrating heat in one area. Once the glue softens and becomes pliable, carefully scrape it away with a putty knife.
- Spot Treatment Gels: If you have a particularly tough spot, consider a gel-type adhesive remover. These stick to the spot and work their magic over time. Follow the product directions precisely.
- Scrubbing with a Stiff Brush: For minor, slightly sticky residue, sometimes vigorous scrubbing with a stiff wire brush after applying a suitable cleaner can work. Ensure you’re using a brush that won’t damage the concrete.
Stains Left Behind
After removing the glue, you might notice dark or discolored marks on the concrete. These are stains. They can be caused by the glue itself, the removers you used, or moisture trapped under the old flooring.
Removing stains can be more difficult than removing the glue. For light stains, a good cleaning might be enough. For tougher ones, you might need a concrete cleaner or a poultice.
A poultice is a paste that draws stains out of the concrete as it dries.
- Basic Cleaning for Light Stains: Sometimes, a thorough scrubbing with a concrete cleaner and water is sufficient to lift light discolorations. Ensure you rinse the area very well afterward.
- Using a Poultice: To make a poultice, mix an absorbent material like diatomaceous earth, baking soda, or talc with a cleaning agent (like hydrogen peroxide or a commercial stain remover) to form a thick paste. Apply this paste to the stain, cover it with plastic wrap, and tape the edges. Let it sit for 24-48 hours. As the poultice dries, it absorbs the stain from the concrete.
- Testing Stain Removers: Always test any stain remover or poultice on a small, hidden area of your concrete first. This is to ensure it doesn’t create a new stain or damage the concrete’s appearance.
When to Call a Professional
While many glue removal tasks are manageable for a DIYer, there are times when calling a professional is the best choice. If you have a very large area to cover, or if the glue is extremely old and hardened, professional equipment might be necessary. Contractors have specialized tools like large industrial grinders or chemical stripping machines that can do the job faster and more effectively.
If you’re concerned about damaging your concrete or if you’ve tried several methods without success, a professional can save you time, effort, and potential mistakes.
- Large Area Projects: If you’re dealing with hundreds of square feet of glued flooring, the sheer scale of the task might warrant professional help.
- Extremely Difficult Adhesives: Some historical or industrial adhesives are exceptionally hard to remove. Professionals have access to industrial-grade chemicals and equipment.
- Concerns About Concrete Damage: If your concrete is valuable or has a delicate finish, a professional can ensure the removal process doesn’t cause permanent damage.
- Time Constraints: If you have a tight deadline for completing the project, a professional team can often complete the work much faster than an individual.
Tools and Materials You Might Need
Essential Tools for Glue Removal
Gathering the right tools before you start will make the process of removing vinyl flooring glue from concrete much smoother. You don’t need a lot of fancy equipment. Many common household tools can do the job.
Having a good variety means you’re prepared for different types of glue and concrete conditions. It’s always better to have more options than to be stuck without the right tool mid-project.
- Putty Knives and Scrapers: A range of sizes, from small ones for tight spots to larger, heavy-duty floor scrapers for wider areas. Look for sturdy metal blades.
- Stiff-Bristled Broom and Dustpan: For initial cleanup and sweeping away debris.
- Shop Vacuum: Essential for cleaning up dust and small debris as you work, and for removing liquid messes.
- Buckets: For holding water, cleaning solutions, or for rinsing tools.
- Gloves and Safety Glasses: As mentioned before, these are critical for protection.
- Heat Gun or Hair Dryer: Can be helpful for softening stubborn spots.
Chemicals and Cleaners
The choice of chemicals will depend on the type of glue you’re removing and your comfort level with strong solvents. Always read labels carefully and follow instructions. Some options are more eco-friendly than others.
It’s a good idea to have a couple of different types on hand just in case one doesn’t work as well as you hoped.
- Water and Mild Detergent: Your first line of defense for general cleaning and rinsing.
- Citrus-Based Adhesive Removers: Effective and generally safer.
- Mineral Spirits or Acetone: For tougher jobs, use with caution and good ventilation.
- Commercial Adhesive Removers: Products specifically designed for the task.
- Concrete Cleaner: A specialized cleaner for concrete surfaces can help with residual grime.
Optional but Helpful Items
Beyond the basics, a few extra items can make your glue removal project significantly easier and more efficient. These are not always strictly necessary, but they can be real time-savers and improve the overall outcome. Think about what might make the physical labor less taxing or the cleanup more thorough.
- Floor Scraper with Extension Handle: For comfortable, upright scraping over large areas.
- Steam Cleaner or Wallpaper Steamer: Excellent for softening old, hardened glue.
- Wet/Dry Vacuum: Far more effective than a regular vacuum for sucking up liquids and wet debris.
- Plastic Sheeting and Tape: To protect surrounding areas from splashes or dust.
- Fans: To improve ventilation and help the concrete dry faster.
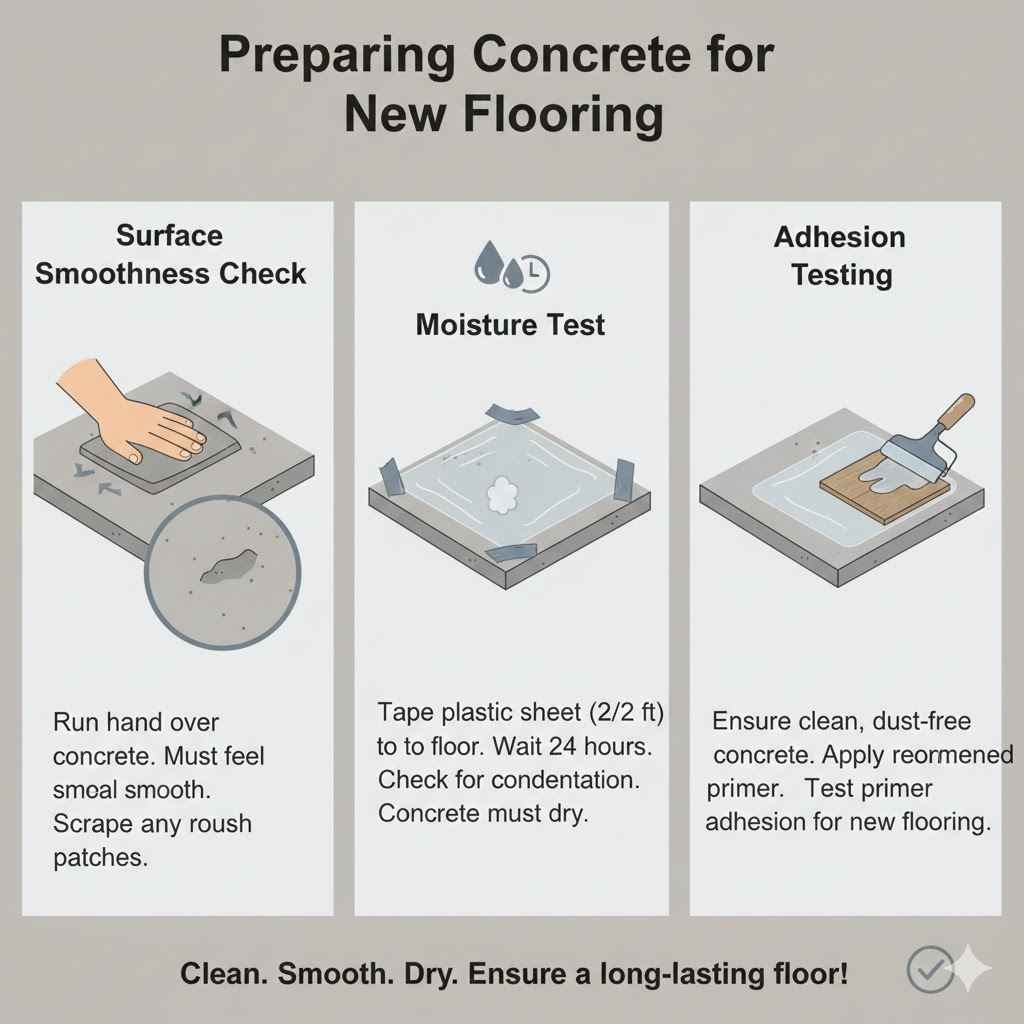
Preparing Concrete for New Flooring
Once you have successfully managed to Remove Vinyl Flooring Glue from Concrete, the next crucial step is to prepare the floor for whatever comes next. This could mean applying a new floor covering, sealing the concrete, or simply leaving it bare. A clean, smooth, and dry concrete surface is essential for the longevity and appearance of any new installation.
Skipping this preparation can lead to problems down the road, like adhesive failure or uneven surfaces. Taking the time to do this right ensures your hard work pays off.
- Surface Smoothness Check: After all glue and residue are gone, run your hand over the concrete. It should feel smooth. If there are any rough patches or remnants of glue, address them now.
- Moisture Test: Before installing new flooring, always perform a moisture test on the concrete. This ensures the concrete is dry enough, preventing issues like mold or adhesive failure. A common test is taping a 2×2 foot square of plastic sheeting to the floor. Check it after 24 hours for condensation.
- Adhesion Testing: If you plan to use adhesive for new flooring, ensure the concrete is clean and free of dust. Some flooring manufacturers recommend specific primers or surface treatments for optimal adhesion.
Frequently Asked Questions
Question: How long does it take to remove vinyl flooring glue from concrete
Answer: The time it takes can vary a lot. For a small area with easy-to-remove glue, it might take a few hours. For a large room with very stubborn, old glue, it could take a full day or even two.
It really depends on the amount of glue, how hardened it is, and the methods you use.
Question: Can I just paint over the old vinyl glue on concrete
Answer: It’s generally not recommended to paint directly over old vinyl glue. The glue might bleed through the paint, or the paint might not stick well to the glue. It’s best to remove the glue first for a smooth, durable finish.
Question: Is it safe to use a strong chemical like a paint stripper
Answer: While some paint strippers can remove glue, they are often very harsh. They can damage the concrete surface, release strong fumes, and are not always designed for concrete. It’s safer to use products specifically made for adhesive removal or gentler solvents.
Question: Will scraping damage my concrete floor
Answer: If you scrape too aggressively or use very sharp tools at the wrong angle, you can nick or scratch the concrete. Start with less aggressive methods and lighter tools. Using a putty knife at a low angle and with steady pressure is usually safe.
Question: What’s the easiest way to remove vinyl flooring glue
Answer: The easiest way often involves a combination of methods. Start with mechanical scraping for loose bits. For tougher areas, steaming can soften the glue effectively, making it easy to scrape.
Always follow up with a good cleaning.
Wrap Up
Successfully removing vinyl flooring glue from concrete is achievable with the right approach. You’ve learned about safety, different removal methods, and what to do afterward. By following these steps, you can prepare your concrete floor for its next phase.
Take your time, use the right tools, and don’t be afraid to try different techniques. Your clean concrete surface awaits.