How To Replace Lamp Shades Styrene: Essential Guide
Quick Summary: Replacing a styrene lamp shade is a straightforward DIY project. Follow these simple steps to easily swap out an old shade for a new one, enhancing your lamp’s look and your room’s ambiance in no time. You’ll need just a few basic tools and a new shade.
Hello there! Are you looking to give your favorite lamp a fresh new look, or perhaps your current lampshade is looking a bit tired? Maybe it’s cracked, faded, or just not your style anymore. You might be surprised to learn that replacing a styrene lampshade is a wonderfully simple DIY task that anyone can tackle. It’s a fantastic way to refresh a room’s decor without needing to buy a whole new lamp. We’ll walk through this process step-by-step, making it easy and enjoyable. By the end, you’ll have a beautifully updated lamp and the confidence that comes with doing it yourself!
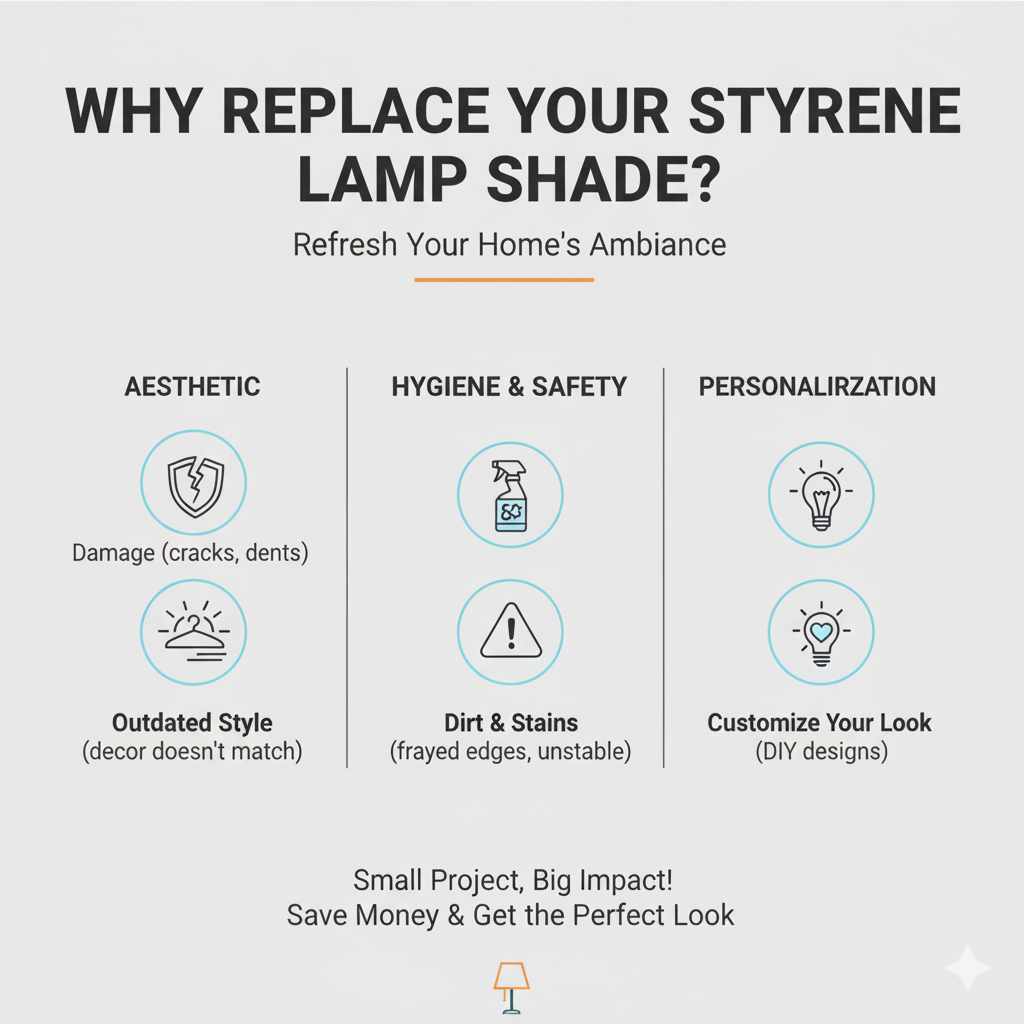
Why Replace Your Styrene Lamp Shade?
Styrene lampshades are quite common. They’re popular because they are generally affordable, lightweight, and can be printed with a vast array of designs and textures. However, like anything, they can age and show wear. Here are a few common reasons why you might want to replace yours:
- Damage: Cracks, tears, or dents can make a shade unsightly and even unsafe.
- Fading: Prolonged exposure to sunlight can cause colors to fade, diminishing the shade’s aesthetic appeal.
- Outdated Style: Your interior design tastes might have changed, and the current shade no longer fits your decor.
- Dirt and Stains: Some materials can be difficult to clean, and stubborn stains can be a real eyesore.
- Personalization: You might simply want to customize your lamp with a shade that perfectly matches your personality and room.
Whatever the reason, knowing how to replace it yourself saves money and lets you achieve exactly the look you desire. It’s a small project with a big impact!
Understanding Your Lamp’s Structure
Before we dive into the replacement process, it’s helpful to understand how your lampshade attaches to the lamp base. Most table lamps and some floor lamps have a few common attachment systems. Identifying yours will make the process smoother.
Common Lampshade Attachment Types
The way your shade connects to the lamp is usually determined by a small piece called a “harp” and a “finial.”
- Harp and Finial: This is the most common system for table lamps. A metal piece called a harp curves up from the socket, and the lampshade has a spider fitter that rests on top of the harp. A decorative knob, called a finial, screws onto a threaded rod at the top of the harp to secure the shade.
- Uno Fitter: This type of fitter is built directly into the lampshade. It has a ring that slides up over the light bulb socket, fitting snugly around it. There’s no harp involved with an uno fitter.
- Downbridge (or Fitterless) Shade: These shades are often found on floor lamps or older-style lamps. They don’t have a specific fitter type. Instead, the shade attaches directly to a metal arm or bracket that extends from the lamp base.
For this guide, we’ll focus primarily on the most common type: the harp and finial system. If your lamp uses an uno fitter or a downbridge shade, the removal and attachment steps will be slightly different, but the core idea of swapping out the shade remains the same.
Tools and Materials You’ll Need
The great news is you don’t need a workshop full of specialized tools for this job. Most of what you need, you probably already have around the house!
Here’s a simple list of what to gather:
- New Lampshade: The star of the show! Make sure it fits your lamp’s size and style. We’ll discuss how to choose one shortly.
- Pliers (Optional, but helpful): Needle-nose pliers can be useful if the finial is tight or if you need to gently adjust the harp.
- Soft Cloth or Towel: To protect your lamp base and the new shade from scratches.
- Ladder or Stool (if needed): For taller floor lamps.
That’s really it! Simple, right?
How to Choose the Right Replacement Shade
Selecting the perfect new lampshade is almost as important as the replacement process itself. A well-chosen shade can dramatically change the look and feel of your lamp and the room. Here are some key considerations:
Size Matters
The dimensions of your new shade should be proportional to your lamp base. A good rule of thumb is:
- Height: The shade’s height should generally be about 2/3 to 3/4 of the height of the lamp base (from the bottom of the base to the socket).
- Width: The shade’s bottom diameter should be about twice the width of the lamp base.
- Depth: The top diameter of the shade should be about half to two-thirds of the bottom diameter.
It’s also important to ensure that when the lamp is on, the shade hides the light bulb but not the socket itself. You don’t want the bulb peeking out from the top or bottom.
Style and Shape
Lampshades come in a dizzying array of shapes and styles. Some popular ones include:
- Drum: Straight sides, cylindrical shape.
- Empire: Tapered sides, wider at the bottom than the top.
- Bell: Gently curved sides, wider at the bottom.
- Square/Rectangular: Adds a modern or geometric touch.
- Pleated: Offers a more traditional or romantic look.
Consider the overall style of your lamp and your room. A sleek, modern lamp might look best with a drum or square shade, while a more traditional lamp could suit an empire or bell shape.
Color and Material
The color and material of the shade affect how light is diffused and the mood it creates. Light-colored shades (like white, cream, or light pastels) will allow more light to pass through, creating a brighter, more ambient glow. Darker or thicker materials will absorb more light, creating a more subdued, focused light. Styrene itself is a plastic material that often has a fabric or paper covering. When buying a new shade, you’ll find many options made from fabric, linen, silk, paper, and of course, styrene with various decorative finishes.
Fitter Type
Crucially, ensure your new shade has the correct fitter type to match your lamp. If you have a harp, look for a “spider” fitter. If you have an uno fitter, make sure the new shade has an uno fitter that matches your socket size (usually 1/2 inch or 1 1/16 inch). If you’re unsure, take a picture of your lamp’s socket area or bring the old shade with you to the store.
For more detailed guidance on choosing the right size and style, you can consult resources like Lamps Plus’s guide on selecting lampshades.
Step-by-Step: How to Replace Your Styrene Lamp Shade
Ready to get started? This process is designed to be quick and easy. Let’s walk through it!
Step 1: Safety First – Unplug Your Lamp
This is the most critical step. Before you do anything else, make sure your lamp is unplugged from the wall outlet. This prevents any accidental shocks.
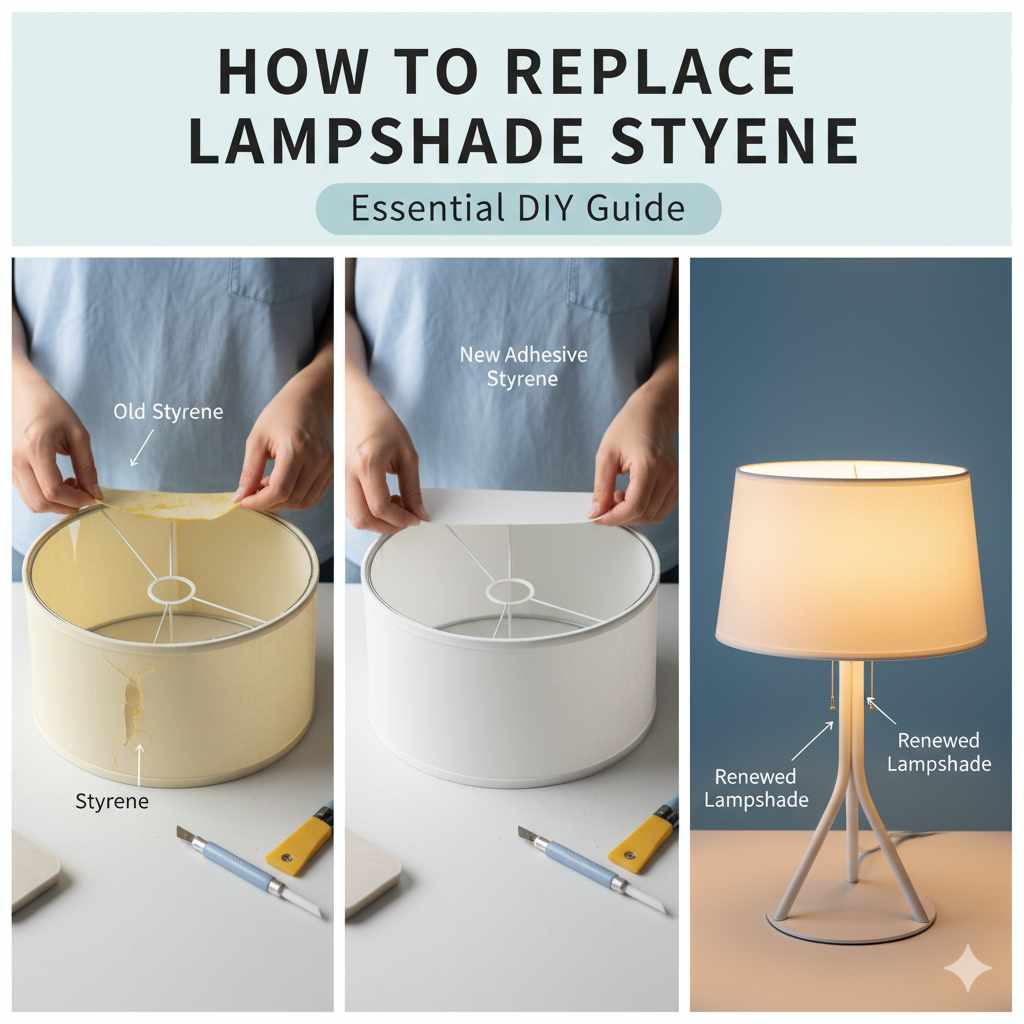
Step 2: Remove the Finial
The finial is the decorative knob or piece that screws onto the very top of the harp, holding the lampshade in place. Simply unscrew it by turning it counter-clockwise. If it’s tight, you can use your fingers. If it’s stuck, a pair of needle-nose pliers can help, but be gentle so you don’t damage the finial or the threaded rod.
Step 3: Remove the Old Lampshade
Once the finial is off, the lampshade will be loose. Carefully lift the lampshade straight up and off the harp. It might be a little snug, so wiggle it gently if needed. Place the old shade aside on a soft surface to avoid scratching it or your furniture.
Step 4: Assess and Adjust the Harp (If Necessary)
With the shade removed, you’ll see the harp clearly. For most lamps, the harp simply slots into a U-shaped bracket at the socket. Sometimes, the harp might be slightly bent or not positioned correctly. If your new shade seems to sit too high or too low, you might need to adjust the harp’s position. You can gently pull the harp forward or backward to adjust its angle, or in some cases, lift it slightly out of its socket and reposition it. Be careful not to bend the harp too much, as it can weaken the metal. If the harp is bent or damaged, you might need to replace it. Replacement harps are readily available at hardware stores or online.
If your lamp has an uno fitter, you would simply unscrew the old shade from around the socket. No harp is involved in this case.
Step 5: Place the New Lampshade
Take your new lampshade and carefully place it onto the harp. The spider fitter inside the top of the shade should rest on top of the harp. Make sure it’s centered and sits level.
Step 6: Reattach the Finial
Now, screw the finial back onto the threaded rod at the top of the harp. Turn it clockwise until it’s snug. Don’t overtighten it, as this can damage the shade or the finial.
Step 7: Plug In and Test
Plug your lamp back into the outlet and turn it on. Check that the shade sits correctly, doesn’t wobble, and that the light looks good. Congratulations, you’ve successfully replaced your lampshade!
Tips for Working with Styrene Shades
Styrene is a durable material, but it’s still good to handle it with care. Here are some tips:
- Handle with Care: While styrene is strong, sharp impacts can cause cracks. Always handle your new shade by its fitter or frame, not by pushing directly on the styrene surface.
- Cleaning: Styrene shades can usually be wiped clean with a damp cloth. For tougher spots, a mild soap solution can be used, but always test in an inconspicuous area first. Avoid abrasive cleaners or harsh chemicals, which can damage the finish. For detailed cleaning advice, manufacturers often provide specific recommendations.
- UV Protection: If your lamp is in direct sunlight, consider that UV rays can eventually degrade even styrene. Rotating your lamp or using UV-filtering bulbs can help extend the life of your shade.
- Fire Safety: Always ensure your lampshade is rated for the wattage of the bulb you are using. Using a bulb that is too high in wattage can cause overheating, which is a fire hazard. Check the lamp’s label for maximum wattage recommendations. The National Fire Protection Association (NFPA) provides excellent resources on home fire safety, including tips for lighting.
Troubleshooting Common Issues
Even with a simple project, you might encounter a small hiccup. Here are a few common issues and how to fix them:
Issue: New shade doesn’t fit the harp.
Solution: Double-check the fitter type. Most likely, your new shade has a spider fitter, but it might be designed for a different harp size (e.g., some are made for uno fitters). Ensure it’s a spider fitter. If it is, and it’s still not fitting right, the harp itself might be the wrong size or shape for your lamp. You may need to purchase a replacement harp that matches your lamp’s socket. A common harp size is 7 inches, but this can vary.
Issue: Shade wobbles or sits crooked.
Solution: This usually means the harp isn’t centered or is bent. Gently adjust the harp to make it straight and centered over the socket. Ensure the shade is sitting evenly on the harp. Sometimes, the fitter inside the shade might be slightly warped; if so, you might need to exchange the shade.
Issue: Finial won’t screw on.
Solution: Make sure you’re threading it correctly onto the rod. If the threads seem damaged on either the finial or the rod, you might need to replace the finial or the entire harp. Gently try to clean any debris from the threads.
Issue: Shade is too tall or too short.
Solution: This comes down to choosing the right size shade initially. If you’ve already purchased it, you can sometimes adjust the harp’s position to make a slight difference. However, for significant height discrepancies, you may need to exchange the shade for one with more appropriate dimensions.
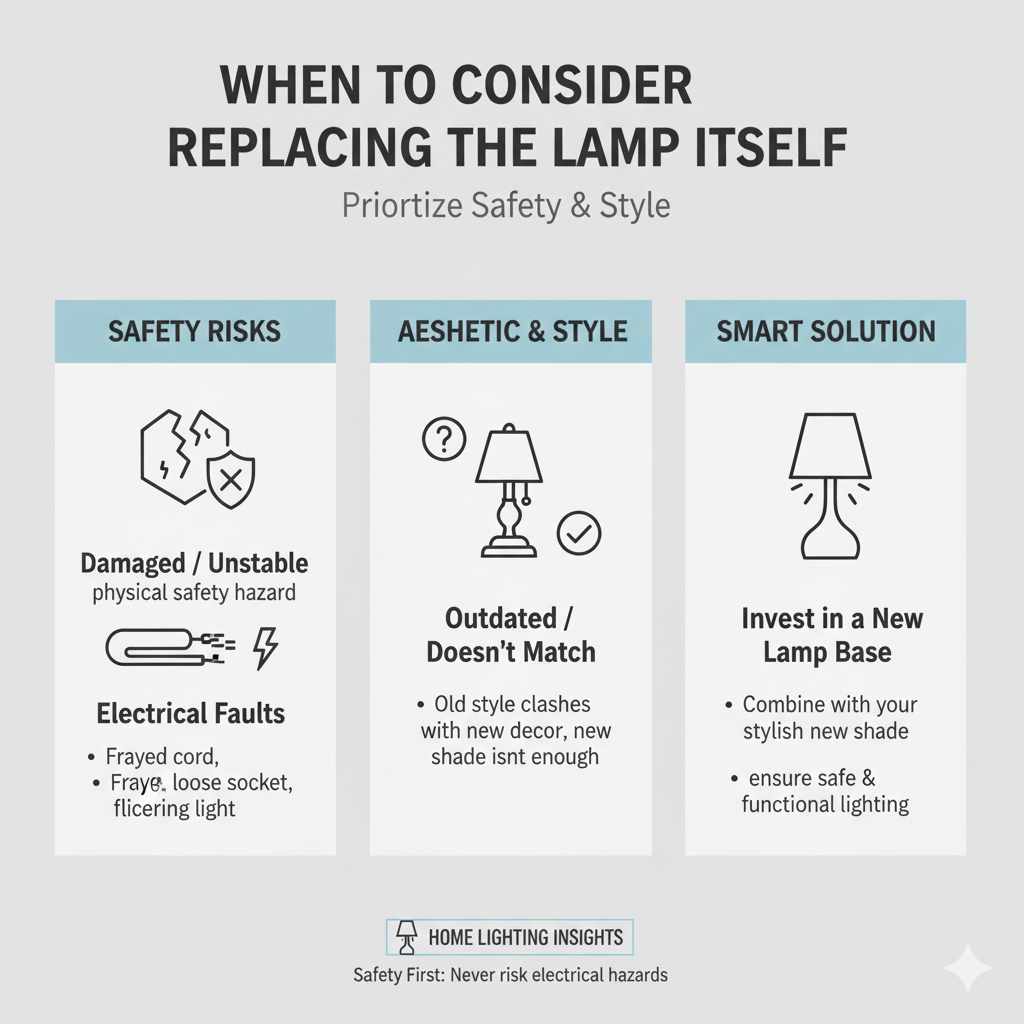
When to Consider Replacing the Lamp Itself
While replacing a lampshade is easy, there are times when the lamp base might be the real issue. If your lamp base is:
- Damaged or Unstable: If the base is cracked, wobbly, or poses a safety risk, it’s time to consider a new lamp.
- Electrically Faulty: If the cord is frayed, the socket is loose, or the lamp flickers unexpectedly, don’t risk it. Replace the entire lamp for safety.
- Outdated or Doesn’t Match: Sometimes, a beautiful new shade can’t save an old lamp base that no longer fits your style.
In these cases, investing in a new lamp base and adding your stylish new shade will give you the best overall result and ensure your lighting is safe and functional.
FAQ: Your Lampshade Questions Answered
Q1: How do I measure my old lampshade to buy a new one?
A1: Measure the diameter of the top and bottom of the shade, and its height. For drum shades, top and bottom diameters are the same. For empire or bell shapes, measure both. Note the fitter type (spider, uno) as well.
Q2: Can I put any fabric shade on any lamp?
A2: Not always. You must ensure the new shade has the correct fitter type (spider, uno, etc.) to attach to your lamp’s harp or socket. Size and style proportion are also important for aesthetics and function.
Q3: My new shade seems too small for the harp. What’s wrong?
A3: This usually means the fitter inside the shade is not a standard spider fitter, or the harp itself is an unusual size. Confirm your new shade is designed for a harp and not an uno fitter. If it is a spider fitter, you might need a replacement harp.
Q4: Can I clean a styrene lampshade with a washing machine?
A4: Absolutely not. Washing machines are far too harsh and will likely destroy a styrene lampshade. Always clean styrene shades by hand with a damp cloth or mild soap and water, and avoid soaking.
Q5: What is the difference between a spider fitter and an uno fitter?
A5: A spider fitter has three arms that rest on top of a lamp’s harp, secured by a finial. An uno fitter is a ring integrated into the shade that slides directly over the light bulb socket, eliminating the need for a harp.
Q6: My lamp flickers after changing the shade. What should I do?
A6: This is unlikely related to the shade itself unless the new shade is causing the bulb to be too close to the socket or harp. Check that the bulb is screwed in tightly and that the wattage is appropriate. If flickering persists, the issue is likely with the lamp’s wiring or bulb, and you should have it inspected or replaced.
Conclusion
There you have it! Replacing a styrene lampshade is a wonderfully simple and rewarding DIY project. You’ve learned how to choose the right size and style, safely remove the old shade, and install your new one, all with minimal tools. It’s a fantastic way to refresh your decor, breathe new life into an old lamp, and add a personal touch to your living space. Don’t hesitate to try this yourself – you’ll be amazed at the difference a new shade can make. Happy decorating!