How to Replace Track Lighting
Hey there! Imagine we’re hanging out in your garage, chatting about car projects under the glow of your track lighting. It’s bright, sleek, and perfect for working on your ride, but what happens when a bulb burns out or the whole system feels outdated? That’s when I started wondering how to replace track lighting. As someone who’s tackled this for my own automotive blog and workshop, I’ve learned the ins and outs of swapping out track lighting. It’s easier than you might think, and I’m excited to walk you through it. Whether you’re upgrading your garage or sprucing up a showroom, this guide will light the way. Let’s dive in!
Why Replace Track Lighting?
Track lighting is awesome for automotive spaces. It’s flexible, adjustable, and shines light right where you need it—like on your car’s engine or a display model. But over time, bulbs die, fixtures age, or you just want a modern look. Maybe your old system uses outdated bulbs that guzzle energy. Or perhaps the track heads don’t aim right anymore.
Replacing track lighting can save energy, improve brightness, and make your space feel fresh. For me, upgrading to LED track lights in my garage made late-night wrenching sessions way easier on the eyes. Plus, it’s a DIY project that’s totally doable with some basic tools and know-how. Let’s break it down step by step.
Understanding Track Lighting Basics
Before we start, let’s talk about what track lighting is. It’s a system where light fixtures, called track heads, clip onto a metal track. The track carries electricity, so you can move or adjust the heads easily. Tracks come in straight lines, L-shapes, or even curves, depending on your setup.
There are three main types: H, J, and L tracks. Each has a slightly different design, so new track heads must match the track type. H-type is the most common in homes and garages. Knowing this is key because mismatched parts won’t work. I learned this the hard way when I bought the wrong track head for my J-type track—oops! Check your track type before shopping.
Tools and Materials You’ll Need
Replacing track lighting doesn’t require a ton of tools, which is great. Here’s what I gathered when I did mine:
- Screwdriver (flathead and Phillips)
- Wire stripper
- Voltage tester
- Ladder or step stool
- New track heads or track lighting kit
- Wire nuts (if rewiring)
- Electrical tape
- Safety glasses and gloves
You might also need a new track if you’re replacing the whole system. LED track heads are my go-to for energy savings and brightness. I spent about $50 on a set of four LED heads for my garage, and they were worth every penny. Make sure your new lights match your track type and voltage (usually 120V in the USA).
Safety First: Turn Off the Power
I can’t stress this enough—safety is number one. Before touching anything electrical, turn off the power at your breaker box. Flip the switch for the circuit that powers your track lighting. Then, use a voltage tester to double-check that the wires are dead. I always test twice because I’d rather be paranoid than shocked.
Wear safety glasses and gloves, especially if you’re dealing with old wiring. Old fixtures can have frayed wires or dust that irritates your eyes. When I replaced my track lights, I found a dusty mess inside the old heads. Gloves kept my hands clean, and I was glad I had them.
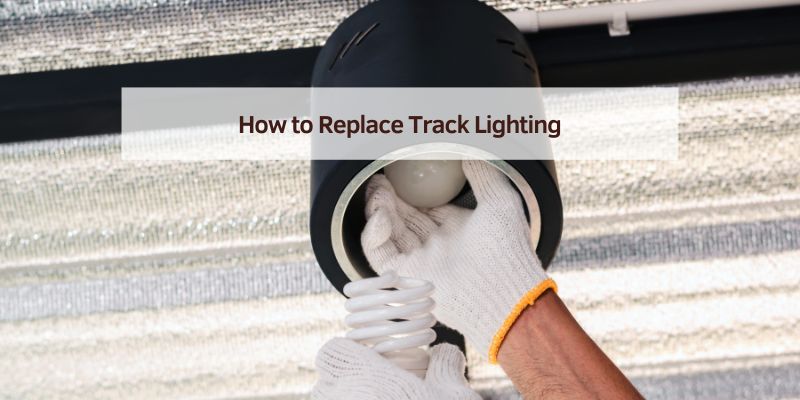
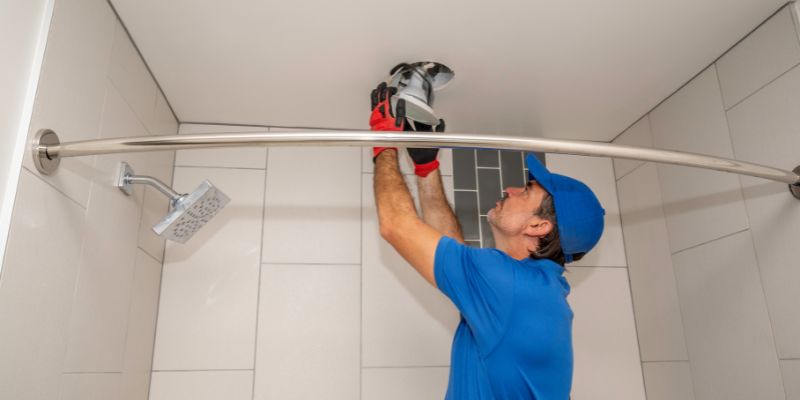
Removing the Old Track Lighting
Now, let’s get to the fun part—taking out the old stuff. Start by removing the track heads. Most just twist or snap off the track. Give them a gentle wiggle, and they should pop out. If they’re stuck, check for a small locking tab or screw. My old heads had tiny screws I almost missed, so look closely.
If you’re replacing the track itself, unscrew it from the ceiling. Tracks are usually held by mounting screws or clips. Have a buddy hold the track if it’s long—it’s awkward to balance alone. Once it’s down, disconnect the wires from the junction box. You’ll see a black (hot), white (neutral), and maybe a green or bare (ground) wire. Note how they’re connected for later.
Choosing the Right Replacement Track Lights
Picking new track lights is where you can have some fun. I wanted bright, energy-efficient lights for my garage, so I went with LEDs. They come in different styles—spotlights, floodlights, or pendants—and colors like warm white (2700K) or cool white (4000K). Cool white is great for automotive work because it’s crisp and clear.
Check the lumens, too. Lumens measure brightness. For a garage, 800-1,500 lumens per head works well. My new LEDs were 1,000 lumens each, and four heads lit up my whole workspace. Make sure the track heads match your track type (H, J, or L). If you’re replacing the track, you can choose any type, but H is easiest to find.
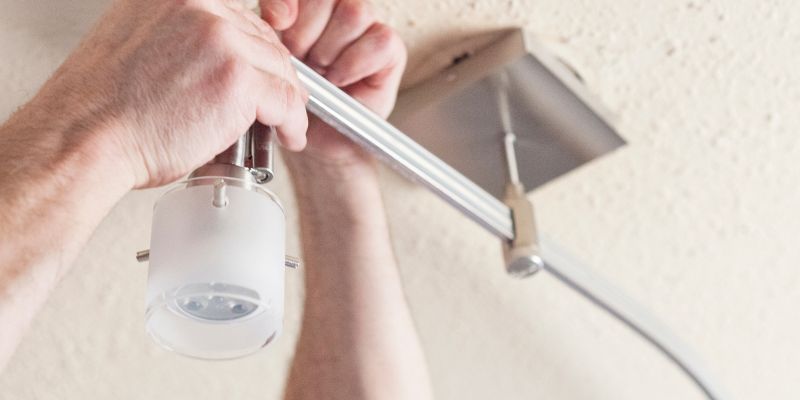
Installing New Track Lighting
Ready to install? If you’re keeping the old track, snap or twist the new track heads onto it. It’s usually as simple as clicking them in. Test each head by turning the power back on briefly to ensure it lights up. I did this one by one to make sure everything worked before moving on.
If you’re installing a new track, start by mounting it to the ceiling. Most kits come with screws and anchors. Mark where the track will go, drill pilot holes if needed, and secure it tightly. Feed the wires from the junction box through the track’s connector. Connect black to black, white to white, and ground to ground using wire nuts. Wrap the connections with electrical tape for extra safety.
Wiring the New System Safely
Wiring sounds scary, but it’s straightforward if you’re careful. If you’re just swapping track heads, you won’t need to touch the wires. But for a new track, you’ll connect it to the junction box. Here’s how I did it:
- Strip about half an inch of insulation from the track’s wires.
- Match the wires: black to black (hot), white to white (neutral), ground to ground.
- Twist the ends together with wire nuts.
- Tug gently to ensure they’re secure.
- Wrap each connection with electrical tape.
Double-check your work before turning the power back on. I messed up a connection once and had to redo it—annoying but a good lesson. If you’re not comfy with wiring, call an electrician. Better safe than sorry.
Adjusting and Testing Your New Lights
Once everything’s installed, it’s time to play with the lights. Track lighting is awesome because you can aim the heads wherever you want. I pointed mine at my workbench, car lift, and tool rack. Adjust them until the light hits the right spots.
Turn the power back on and flip the switch. If the lights don’t work, check your wiring or make sure the track heads are properly seated. My first try had one head that didn’t light up—it wasn’t clicked in all the way. A quick fix, and I was good to go.
Benefits of Upgrading to LED Track Lighting
I’m a huge fan of LED track lights, and here’s why. They use way less energy—sometimes 80% less than old incandescent or halogen bulbs. My old halogen heads were 50 watts each; my new LEDs are 10 watts but just as bright. That’s real savings on my electric bill.
LEDs also last longer, like 25,000-50,000 hours. That’s years of use without changing bulbs. Plus, they don’t get as hot, which is great in a garage where you’re already sweating. The light quality is better, too—crisp and clear for detailed work like polishing a car’s finish.
Common Mistakes to Avoid
I’ve made my share of goofs, so let me save you some trouble. First, don’t buy track heads that don’t match your track type. Check if it’s H, J, or L before shopping. Second, don’t skip the voltage tester. Assuming the power’s off is a recipe for a shock.
Another mistake is overloading the track. Each track has a wattage limit—usually 1,920 watts for a 120V system. Check the total watts of your new heads to avoid blowing a fuse. Finally, don’t rush the wiring. Double-check every connection to avoid flickering lights or worse.
How Track Lighting Enhances Automotive Spaces
As an automotive buff, I love how track lighting transforms a garage or showroom. It’s perfect for highlighting specific areas, like a car on display or a workbench. You can angle the lights to show off a paint job’s shine or illuminate a tricky repair. In my garage, I aimed one head at my vintage Mustang’s hood, and it looks like a museum piece.
Track lighting also adds a modern vibe. Sleek tracks and adjustable heads make your space feel professional, whether you’re a DIYer or running a shop. Plus, with LEDs, you get bright, even light that makes working on cars easier and safer.
Cost of Replacing Track Lighting
Let’s talk money. Replacing track lighting can be budget-friendly or a bit pricier, depending on what you do. A single LED track head costs $10-$50. A set of four might run $40-$200. If you’re replacing the track, expect $20-$100 for a 4- to 8-foot section. A full kit with track and heads can cost $100-$300.
I spent about $150 on a new LED kit for my garage, including four heads and a 6-foot track. Installation took me a Saturday afternoon, so I saved on labor costs. Hiring an electrician might add $100-$300, depending on your area and the job’s complexity. It’s a worthwhile investment for better lighting.
Maintaining Your New Track Lighting
Once your new lights are up, maintenance is easy. Dust the track and heads every few months to keep them bright. I use a microfiber cloth to avoid scratching. Check the connections yearly to ensure they’re tight. LEDs don’t burn out often, but if one dims, it might be time for a new head.
If you notice flickering, check that the heads are secure on the track. Loose connections are usually the culprit. In my garage, I had a flicker issue once—it was just a head that needed a firm push to lock in.
Troubleshooting Common Issues
Even with careful installation, things can go wrong. If your lights don’t turn on, check the breaker first. Then, use your voltage tester to confirm power is reaching the track. A loose wire in the junction box is often the issue.
If one head doesn’t work, make sure it’s compatible with your track. I had a head that wouldn’t light up because it was slightly off-spec for my H-type track. Swapping it fixed the problem. If the lights flicker, tighten all connections and ensure the total wattage isn’t too high.
Why This Project Is Worth It
Replacing track lighting is one of those projects that feels so rewarding. When I finished mine, my garage went from dim and dated to bright and modern. It’s not just about looks—better lighting makes working on cars safer and more fun. I can see every bolt and scratch clearly now, which saves time and frustration.
This project also boosts your confidence. Tackling electrical work (safely!) makes you feel like a pro. Plus, it’s a practical upgrade that adds value to your space, whether you’re a car enthusiast or just want a better-lit garage.
Here’s a quick table to summarize the process:
| Step | Tools Needed | Tips |
|---|---|---|
| Turn Off Power | Voltage tester | Test twice to be safe |
| Remove Old Heads | Screwdriver | Check for locking tabs |
| Install New Track | Drill, screws, wire nuts | Match wires correctly |
| Attach New Heads | None | Ensure they click into place |
| Test and Adjust | Ladder | Aim the lights for the best coverage |
Conclusion
Wow, what a journey! We’ve gone from wondering how to replace track lighting to mastering the process step by step. From picking the right track heads to wiring safely, you now know how to transform your garage or showroom with bright, modern lighting. Whether you’re swapping out a single head or installing a whole new system, this DIY project is totally doable and so worth it.
I hope you’re as excited as I was when I flipped the switch and saw my garage glow. Better lighting doesn’t just make your space look good—it makes working on cars easier, safer, and more fun. So grab your tools, pick some sleek LED track heads, and light up your automotive world. You’ve got this, and I can’t wait for you to see the results!
FAQs
What tools do I need to replace track lighting?
You’ll need a screwdriver, wire stripper, voltage tester, ladder, and maybe wire nuts and electrical tape. Safety glasses and gloves are smart, too. Most of these are common household tools.
Can I replace track lighting myself?
Yes, it’s a DIY-friendly project if you follow safety steps. Turn off the power, use a voltage tester, and match new track heads to your track type. If you’re unsure about wiring, hire an electrician.
How do I know if my new track heads are compatible?
Check your track type—H, J, or L. The track head’s packaging or manual will say which type it fits. Mismatched heads won’t connect properly, so double-check before buying.
How much does it cost to replace track lighting?
A single-track head costs $10-$50. A full kit with track and heads runs $100-$300. If you hire an electrician, add $100-$300 for labor, depending on the job.
Why should I switch to LED track lighting?
LEDs save energy, using 80% less power than halogen bulbs. They last 25,000-50,000 hours, produce bright, clear light, and stay cool, making them perfect for garages or showrooms.