How to Reverse Ceiling Fan Direction: Genius Guide
Quick Summary:
Reversing your ceiling fan direction is simple! Most fans have a small switch on the motor housing. For remote-controlled fans, the direction change is usually an option within the remote’s buttons. This guide shows you exactly how to adjust your fan for cozy winter warmth or cool summer breezes, making your home more comfortable year-round.
Hey there, DIY friends! Md Meraj here. Ever notice how your ceiling fan seems to be working against you? In the summer, you want it to push cool air down, right? But when winter rolls around, a fan blowing cold air straight down can actually make your room feel much chillier. It’s a common puzzle, but thankfully, it has a super simple solution that you can handle yourself. We’re going to learn how to reverse your ceiling fan’s direction so it works perfectly for every season.
Think of it this way: your ceiling fan is like a versatile tool. Just like you’d adjust a saw blade for different cuts, you can adjust your fan’s spin to suit the weather. This little change can make a big difference in how comfortable your home feels and even help you save a bit on your heating and cooling bills. Ready to get your fan working smarter, not harder? Let’s dive in!
Why Reverse Your Ceiling Fan Direction? The Seasonal Advantage
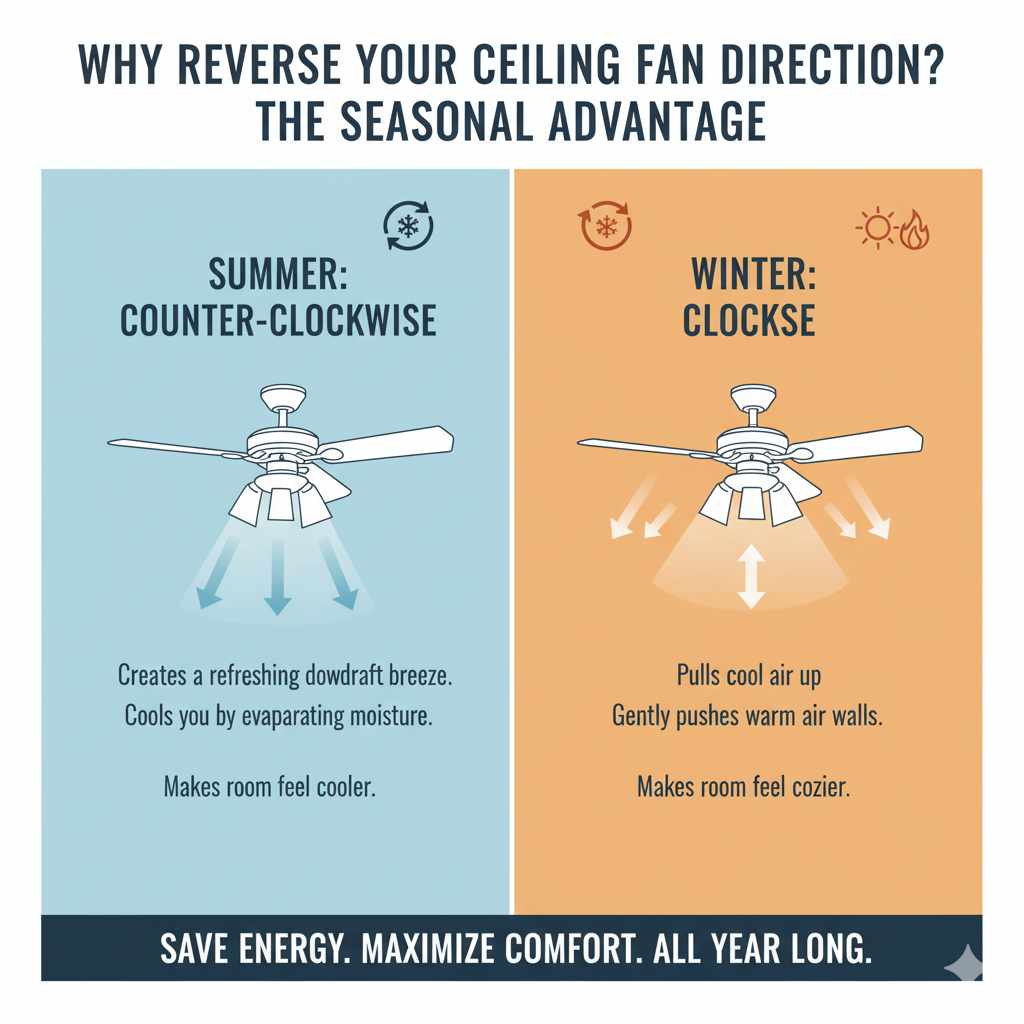
Ceiling fans are fantastic for moving air, but their direction matters a lot. Most of us are familiar with the summer setting, where the fan spins counter-clockwise. This creates a downdraft, a refreshing breeze that cools you down by evaporating moisture on your skin. It’s like having a personal air conditioner!
But in the colder months, that same downdraft can feel pretty uncomfortable. When you reverse the direction, the fan spins clockwise. This pulls cooler air up towards the ceiling and gently pushes the warmer air that naturally rises along the walls and ceiling down into your living space. It’s a subtle but effective way to circulate heat without creating a draft, making your room feel cozier and potentially reducing the need to crank up your thermostat. This simple adjustment is a key part of smart home energy management.
Understanding this seasonal difference is the first step to maximizing your fan’s comfort and efficiency. Let’s explore how to make that change.
Two Main Ways to Reverse Your Ceiling Fan Direction
There are generally two types of ceiling fans when it comes to changing direction: those with a manual switch and those controlled by a remote. Each method is straightforward, but they involve slightly different steps. We’ll cover both so you can confidently tackle your specific fan.
Method 1: The Manual Switch (Most Common)
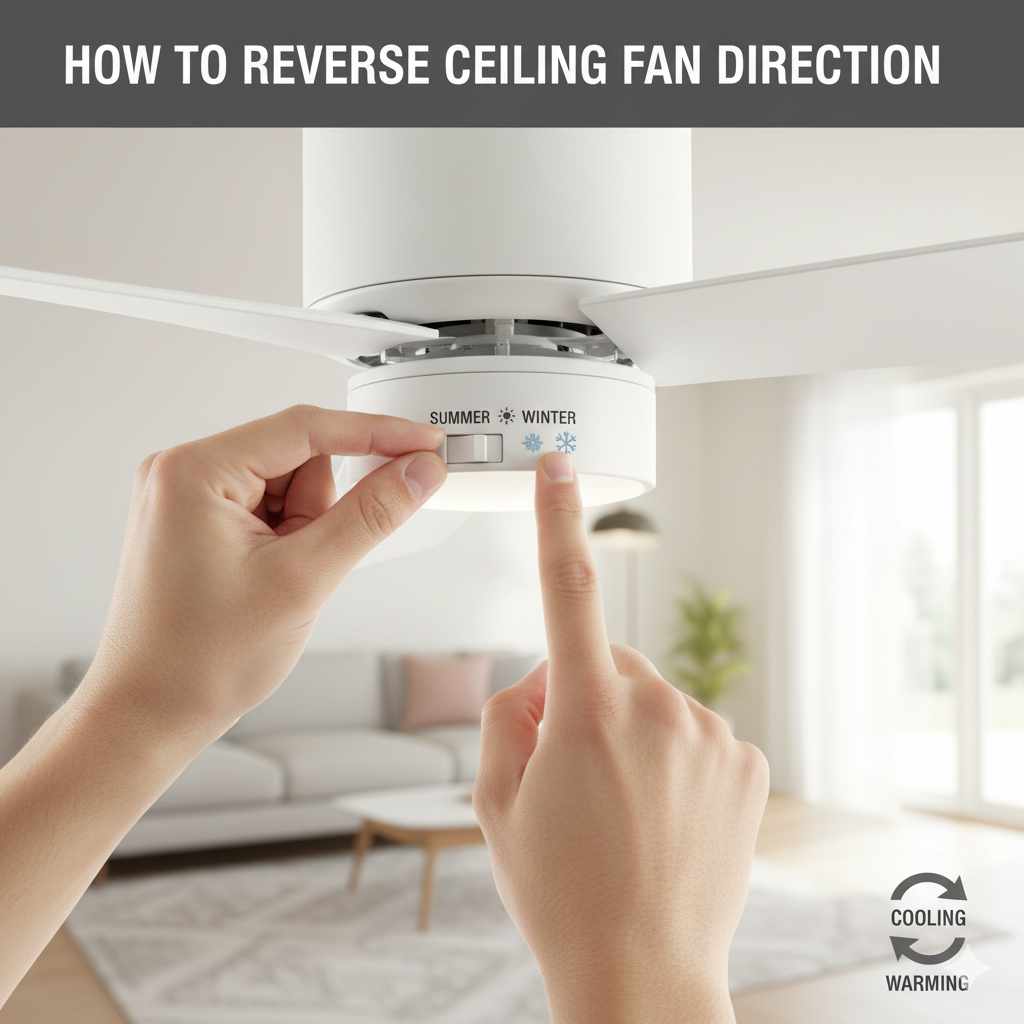
Many ceiling fans, especially older models or those without fancy remote controls, have a small physical switch located directly on the motor housing. This is usually a tiny slide switch or a toggle. It’s often hidden slightly under the fan canopy or near where the blades attach.
Step-by-Step Guide: Manual Switch
- Safety First: Turn Off the Power! This is the most crucial step. Go to your circuit breaker box and flip the breaker that controls the ceiling fan. If you’re unsure which breaker it is, turn off the main breaker for the room or even the whole house to be safe. You can also just turn the fan off using its pull chain or wall switch, but cutting power at the breaker is the safest practice.
- Locate the Direction Switch: With the power off, carefully stand on a stable ladder or step stool. Look at the central motor housing of the fan. You might need to gently remove a decorative cover or look closely around the base of the blades. The switch is usually small and might be labeled with “F” (Forward) and “R” (Reverse) or arrows indicating direction.
- Flip the Switch: Once you’ve found it, use a small screwdriver or even your finger (if it’s easy to grip) to slide the switch to the opposite position. If it was in the “F” position, move it to “R,” and vice-versa.
- Reassemble (If Necessary): If you removed any covers, gently put them back in place.
- Restore Power and Test: Go back to your circuit breaker box and turn the power back on. Turn on your ceiling fan using its pull chain or wall switch. Listen for any unusual noises and observe the direction the blades are spinning. For cooler months, you want them to spin clockwise.
It’s that simple! The key is to be methodical and always prioritize safety by turning off the power before you touch anything on the fan motor.
Method 2: Reversing Direction with a Remote Control
If your ceiling fan came with a remote, changing the direction is usually much simpler and doesn’t even require you to get on a ladder! Modern fans with remotes often have this feature built into the control panel. This is a fantastic convenience, especially if you have high ceilings.
Step-by-Step Guide: Remote Control Fan
- Ensure Fan is On: Turn on your ceiling fan using the remote control.
-
Locate the Direction Button: Examine your remote control carefully. Look for a button that is specifically designed to change the fan’s direction. It might be labeled with:
An icon showing a fan with arrows indicating rotation.
“Direction,” “Reverse,” or “Winter/Summer.”
Sometimes, it’s a secondary function of the speed buttons, requiring you to press and hold one for a few seconds.
Tip: If you can’t find a dedicated button, consult your fan’s user manual. You can usually find a digital copy on the manufacturer’s website by searching for your fan’s model number. - Press the Button: Once you’ve identified the correct button, press it. You might hear a small click from the fan motor, or the fan might briefly change speed before settling into its new direction.
- Confirm the Direction: Observe the fan blades. For winter, you want them to spin clockwise, gently pushing warm air down.
Important Note for Remote-Controlled Fans: Some remote-controlled fans might require a specific sequence of button presses or a short power interruption to reset and accept the new direction command. If pressing the button doesn’t immediately work, try turning the fan off and then pressing the direction button again before turning the fan back on. Again, the user manual is your best friend here!
When to Reverse Your Fan Direction
Knowing how to change your fan’s direction is great, but knowing when makes all the difference. Here’s a simple guide to seasonal fan use:
Summer (Cooling Mode)
- Fan Direction: Counter-clockwise (spinning towards you).
- Effect: Creates a cooling downdraft.
- When to Use: When the room feels warm and you want a direct cooling breeze. This is the most common setting for warm weather.
Winter (Warming Mode)
- Fan Direction: Clockwise (spinning away from you, towards the ceiling).
- Effect: Pulls cooler air up and gently pushes warmer air (which rises) down the walls.
- When to Use: When the room feels cool, especially if you have a heating system running. This helps distribute heat more evenly without creating a draft.
It’s a good practice to switch the direction twice a year. Think of it as part of your spring cleaning and fall home preparation routine. This simple act ensures your fan is always contributing to your comfort and energy efficiency.
Tools You Might Need (And Some You Won’t!)
The beauty of reversing your ceiling fan direction is that it requires very few tools, making it a perfect DIY project for beginners. Here’s what you might need, and what you definitely don’t:
Tools You Might Need:
- Stable Ladder or Step Stool: Essential for safely reaching the fan motor. Ensure it’s sturdy and placed on a level surface.
- Screwdriver (Phillips or Flathead): You might need this if your fan has a decorative cover that needs to be unscrewed to access the direction switch.
- User Manual: For remote-controlled fans, this is your most valuable tool! It will have specific instructions for your model.
Tools You Definitely Won’t Need:
- Power Tools: Absolutely no drills, saws, or sanders are required for this task.
- Specialized Electrical Tools: You won’t need wire strippers or multimeters.
- Paint or Glue: Unless you’re also planning a fan makeover, these aren’t necessary!
The simplicity of the tool requirement is what makes this such an accessible DIY task for anyone looking to improve their home comfort.
Troubleshooting Common Issues
While reversing a ceiling fan is usually straightforward, sometimes you might run into a snag. Here are a few common issues and how to solve them:
Issue: I can’t find the direction switch.
Solution:
- Check the Motor Housing Thoroughly: Look on all sides, under any covers, and near where the blades attach. Sometimes it’s tucked away.
- Consult the Manual: If you have a remote, the manual is crucial. It will show you exactly where the switch is located or confirm if it’s operated solely by the remote.
- Manufacturer’s Website: Search for your fan’s model number online. Most manufacturers provide PDF versions of their manuals.
- Consider the Fan Type: If it’s a very old fan or a basic model, it’s highly likely to have a manual switch. Newer, feature-rich fans might be remote-only.
Issue: The switch is stuck or hard to move.
Solution:
- Ensure Power is Off: Never force a stuck switch while the fan is powered.
- Gentle Wiggling: Try gently wiggling the switch back and forth. Sometimes dust or grime can make it stiff.
- Use a Tool Carefully: If your finger can’t get enough leverage, use the tip of a flathead screwdriver to gently pry or push the switch. Be careful not to break it.
- Lubrication (Use Sparingly): In rare cases, a tiny drop of WD-40 or a similar lubricant on the switch mechanism itself (not the motor) might help, but use with extreme caution and ensure it doesn’t drip into the motor.
Issue: The fan doesn’t change direction, or it makes weird noises after flipping the switch.
Solution:
- Double-Check Power: Make sure the circuit breaker is fully on.
- Verify Switch Position: Ensure the switch is fully in the new position. Sometimes they can feel like they’re in place but aren’t quite there.
- Remote Control Issues: If it’s a remote fan, try replacing the batteries in the remote. If the fan still doesn’t respond, there might be an issue with the receiver in the fan unit or the remote itself.
- Safety Shut-off: If the fan makes strange noises, turn off the power immediately at the breaker. There might be a mechanical issue with the motor or blades. In this case, it’s best to contact a qualified electrician or the manufacturer for assistance. For more on electrical safety, the Electrical Safety Foundation International (ESFI) offers excellent resources.
Issue: I changed the direction, but it doesn’t feel different.
Solution:
- Fan Speed: Ensure the fan is on a speed that actually moves air. A very low speed might not be noticeable.
- Room Size and Ceiling Height: In very large rooms or rooms with very high ceilings, the effect of the reversed fan might be less pronounced.
- Airflow Obstructions: Make sure nothing is blocking the air from circulating (e.g., large furniture directly under the fan).
- Confirm Blade Direction: Stand directly under the fan and watch the blades. In winter (clockwise), you should see the blades moving away from you and pushing air towards the ceiling. In summer (counter-clockwise), you should see them moving towards you and pushing air down.
Understanding Your Ceiling Fan’s Motor Housing Switch
The motor housing switch is the most common way to reverse a ceiling fan’s direction. It’s a simple, mechanical component that directly controls the flow of electricity to the motor in one direction or the other. Think of it as a gatekeeper for the fan’s rotation.
This switch typically has two positions, often labeled with letters or symbols:
| Label | Meaning | Seasonal Use | Blade Rotation |
|---|---|---|---|
| F (or Arrow pointing down) | Forward / Summer Mode | Summer | Counter-clockwise |
| R (or Arrow pointing up) | Reverse / Winter Mode | Winter | Clockwise |
It’s important to note that the “F” and “R” labels can sometimes be confusing because they refer to the direction of the motor’s primary function, not necessarily the direction of airflow you want. The key is to remember that for summer cooling, you want the blades spinning counter-clockwise (pulling air down), and for winter warming, you want them spinning clockwise (pushing air up the walls). Always verify by watching the blade direction after you’ve made the change.
If you ever need to understand more about electrical components in your home, resources like the U.S. Department of Energy’s Energy Saver page on ceiling fans can provide valuable context on how they contribute to home efficiency.
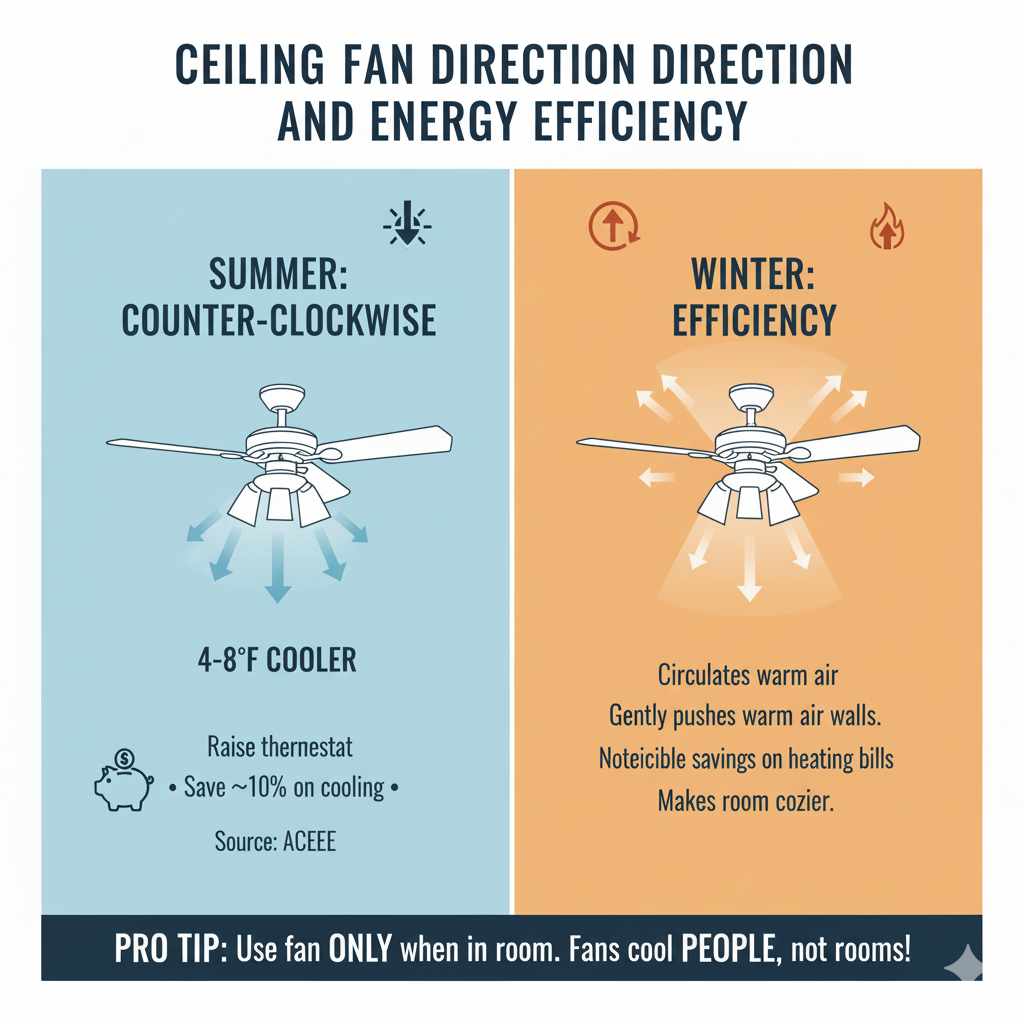
Ceiling Fan Direction and Energy Efficiency
Reversing your ceiling fan direction isn’t just about comfort; it’s also a smart energy-saving move. By using your fan to supplement your heating and cooling systems, you can reduce your reliance on them, leading to lower energy bills.
In the summer, a fan can make a room feel 4-8 degrees cooler, allowing you to raise your thermostat setting by a few degrees without sacrificing comfort. This can save you around 10% on your cooling costs, according to the American Council for an Energy-Efficient Economy (ACEEE), which advocates for energy-saving practices in homes.
In the winter, the clockwise setting helps to gently circulate warm air without creating a draft. This can make your heating system more efficient by ensuring warm air reaches all parts of the room, reducing the need for the heater to run as long or as intensely. While the exact savings can vary, many homeowners report a noticeable difference in their heating bills when utilizing their fan’s winter setting effectively.
The key is to use the fan only when you are in the room. Fans cool people, not rooms, so turn them off when you leave to avoid wasting energy.
Frequently Asked Questions (FAQ)
Q1: How often should I change my ceiling fan direction?
A1: It’s a good idea to change the direction of your ceiling fan twice a year. Switch to the counter-clockwise (summer) setting in the spring and to the clockwise (winter) setting in the fall. This ensures you’re getting the most comfort and efficiency from your fan year-round.
Q2: Can I reverse the direction while the fan is on?
A2: For fans with a manual switch, it is crucial to turn off the power at the circuit breaker before attempting to change the direction. For remote-controlled fans, you can usually change the direction using the remote while the fan is on, but always refer to your fan’s manual for specific instructions.
A3: Some very basic or older models of ceiling fans might not have a reverse function. If you’ve thoroughly checked the motor housing for a switch and examined your remote (if applicable) without finding an option, your fan may not be designed to reverse its direction. In such cases, you might consider upgrading to a newer model that offers this feature.
Q4: Does reversing the fan direction affect the light kit?
A4: No, reversing the fan direction only affects the rotation of the blades. It does not impact the operation or direction of any attached light kit.
Q5: My fan is making a clicking noise after I changed the direction. What should I do?
A5: If you hear clicking or any unusual noises after changing the direction, turn off the fan immediately at the circuit breaker. This could indicate a loose component, an unbalanced blade, or a problem with the motor. It’s best to have it inspected by a qualified electrician or consult the manufacturer.
Q6: Can I use the reverse function on my fan if I have vaulted ceilings?
A6: Yes, you can use the reverse function on fans with vaulted ceilings. However, the effectiveness might vary. For summer cooling, the downdraft is usually noticeable. For winter warming, the clockwise setting will still help to gently push warm air down, but it might take longer to circulate effectively in a very large or high-ceilinged room.
Q7: What is the difference between summer and winter settings for a ceiling fan?
A7: The summer setting (counter-clockwise rotation) creates a cooling downdraft. The winter setting (clockwise rotation) pulls cooler air up and gently pushes warmer air that has risen along the walls back down into the living space without creating a draft, helping to circulate heat.
Conclusion
There you have it! You’ve learned the simple steps to reverse your ceiling fan’s direction, whether it has a manual switch or is controlled by a remote. This seemingly small adjustment is a powerful tool for enhancing your home’s comfort throughout the year and can even contribute to energy savings.
Remember, safety is always paramount. Always ensure the power is off at the breaker before touching any part of the fan motor. For remote-controlled fans, consult your manual for the most accurate instructions. By taking a few minutes to adjust your fan seasonally, you’re not just improving comfort; you’re making your home more efficient and embracing smart, hands-on home improvement.
Don’t be afraid to tackle this project. With these clear steps, you can confidently make this change yourself. Enjoy a more comfortable home, no matter the season!