How to Secure Plywood For Hurricane Protection
Many people worry about protecting their homes when storms approach. One common task is figuring out how to secure plywood for hurricane protection. For beginners, this can seem a bit tricky because there are different ways to do it, and you want to make sure it’s strong enough.
Don’t worry, though! We’ll walk you through everything step by step. You’ll learn exactly what you need and how to get it done easily and correctly.
We’ll cover all the important bits to give you peace of mind.
Understanding Hurricane Protection With Plywood
This section covers the basics of why plywood is a good choice for hurricane protection and what makes it effective. We will explore the materials needed and the importance of proper preparation before you start the actual work. Understanding these foundational elements is key to ensuring your plywood barriers can withstand severe weather conditions.
We aim to simplify the process so anyone can feel confident in their home’s safety.
Why Plywood for Hurricane Protection
Plywood is a popular material for storm shutters because it is strong, relatively inexpensive, and easy to work with. It acts as a shield, preventing high winds and flying debris from breaking windows and doors. When a hurricane is coming, strong winds can push objects at very high speeds.
A broken window can let wind and rain inside, which can quickly damage your home. Plywood covers these openings, creating a solid barrier. It’s a practical choice for many homeowners.
-
Strength and Durability
Plywood is made by layering thin sheets of wood veneer glued together. This cross-graining makes it very strong and resistant to splitting. For hurricane protection, you’ll want to use thicker plywood, like 1/2 inch or 5/8 inch.
This thickness adds extra strength. It can handle impacts from branches or other things blown by the wind. It’s also resistant to warping and cracking, which is important in changing weather conditions.
This makes it a reliable material for keeping your home safe.
-
Cost-Effectiveness
Compared to other materials like metal shutters or custom-made storm panels, plywood is generally more affordable. This makes it a good option for people on a budget. You can buy large sheets of plywood at most hardware stores.
It’s also easy to cut and shape to fit your specific windows and doors. The initial cost is lower, and the materials are widely available, making it a practical choice for many homeowners looking to protect their property without breaking the bank.
-
Ease of Use
Plywood is simple to cut with basic tools like a saw. You can measure your windows and doors and then cut the plywood to fit perfectly. It’s also easy to attach.
You can use screws or bolts to fasten it securely. This ease of use means that even if you’re not a professional builder, you can likely install plywood storm shutters yourself. This saves money on labor and allows you to act quickly when a storm warning is issued.
Materials You Will Need
To effectively secure plywood for hurricane protection, you’ll need a few key items. First, you’ll need good quality exterior-grade plywood. It’s best to use a thickness of at least 1/2 inch.
You’ll also need fasteners, which can include lag screws, bolts, and washers. For securing the plywood, sturdy metal braces or mounting brackets are often recommended. Don’t forget a measuring tape, a pencil for marking, a drill with appropriate drill bits, and a saw for cutting the plywood to size.
Safety glasses are a must for eye protection.
-
Exterior-Grade Plywood
This type of plywood is designed to withstand moisture and outdoor conditions. It uses waterproof glue, which prevents the layers from separating when exposed to rain or humidity. For hurricane shutters, thicker is better.
Look for 1/2 inch or 5/8 inch plywood. The thicker the plywood, the more impact it can resist. It should be rated for exterior use to ensure it doesn’t degrade quickly when exposed to the elements.
-
Fasteners (Lag Screws and Bolts)
These are crucial for attaching the plywood securely. Lag screws are heavy-duty screws with a hexagonal head, good for screwing directly into wood framing. Bolts, with nuts and washers, offer even more strength, especially when you can go through the framing and secure them on both sides.
For hurricane protection, you want fasteners that are long enough to go through the plywood and well into the studs or frame of your house. Stainless steel or galvanized fasteners are best because they resist rust.
-
Drill and Drill Bits
A good power drill is essential for pre-drilling holes. Pre-drilling makes it much easier to drive screws or bolts without splitting the wood. It also ensures the fasteners go in straight.
You’ll need drill bits that match the diameter of your screws or bolts. Having a variety of sizes is helpful. A cordless drill offers convenience for working around your home.
-
Measuring Tape and Pencil
Accurate measurements are vital for cutting your plywood to the correct size. You need to measure your windows and doors precisely. A sturdy measuring tape is indispensable.
A pencil is used to mark your cut lines on the plywood. It’s good practice to measure twice and cut once to avoid wasting materials.
-
Saw (Circular or Handsaw)
You’ll need a saw to cut the plywood sheets to the exact dimensions of your windows and doors. A circular saw is fast and efficient for straight cuts. A handsaw can also be used if you don’t have power tools, but it will take more effort.
Make sure you have a sharp blade for clean cuts. Always follow safety guidelines when using any saw.
-
Safety Gear
Safety first is always important. Wear safety glasses to protect your eyes from sawdust and flying debris. Work gloves can protect your hands.
If you’re working with loud power tools, ear protection is also a good idea. Ensure you have a stable ladder if you’re working on upper-story windows.
How to Measure and Cut Plywood for Windows and Doors
This section focuses on the practical steps of getting your plywood ready. We’ll guide you through accurately measuring your window and door openings. Then, we’ll explain how to cut the plywood to ensure a snug fit, which is critical for maximum protection.
Proper sizing means less chance for wind to get under the edges. This part is about precision to make sure your shields work their best.
Precise Measurement Techniques
Getting the measurements right is the first and most important step in preparing your plywood storm shutters. You need to measure each window and door opening very carefully. Don’t just measure the glass part; measure the entire frame.
Measure the width at the top, middle, and bottom of the opening. Do the same for the height. It’s a good idea to take at least three measurements for both width and height.
-
Measuring Window Openings
For windows, measure the outside dimensions of the frame itself. Start at one edge of the frame and measure across to the opposite edge. Do this for both the width and the height.
It’s crucial to account for any slight irregularities in the frame. You want your plywood to cover the entire opening and overlap the frame slightly for a secure seal. Measure to the very outside edge of the window frame.
-
Measuring Door Openings
Similar to windows, measure the outside dimensions of your door frame. Measure the width from one side of the frame to the other. Then measure the height from the top of the frame to the bottom.
If your doors have glass panels that need covering, you might need to measure those separately or cut plywood to cover the entire door surface. For maximum security, covering the whole door is often recommended.
-
Adding Overlap
Once you have your measurements, add a little extra to each dimension. A common recommendation is to add about 2 to 4 inches to both the width and height. This extra bit of plywood will overlap the frame of the window or door.
This overlap creates a stronger seal and makes it harder for wind and water to get behind the plywood. For example, if a window is 30 inches wide by 40 inches high, cut your plywood to 34 inches by 44 inches.
Cutting Plywood Accurately
After you have your measurements, it’s time to cut the plywood. Use your measuring tape and pencil to mark the cut lines on the plywood sheet. Ensure your lines are straight and clear.
If you added overlap to your measurements, mark those new, larger dimensions. Double-check your marks before you start cutting.
-
Using a Saw Safely
If you’re using a circular saw, place the plywood on a stable surface like sawhorses. Make sure the blade is set to the correct depth to cut through the plywood without damaging the surface underneath. Always wear safety glasses.
Guide the saw steadily along your marked lines. If you’re using a handsaw, take your time for cleaner cuts.
-
Cutting for a Snug Fit
The goal is to cut the plywood so it fits snugly against the window or door frame. The overlap you added should extend past the frame. This ensures that when you install it, there are no large gaps.
A snug fit is key to preventing wind from getting under the plywood and creating pressure that could cause it to fail. If a cut isn’t quite right, you might need to trim a little more, so it’s better to start slightly larger.
-
Labeling Your Panels
Once you’ve cut your plywood pieces, it’s a good idea to label each one. You can write the room or window number on the back of the plywood. This will make installation much faster and easier when a storm is approaching.
For example, label a piece “Living Room Window Left” or “Back Door.” This organization saves time and reduces stress during an emergency.
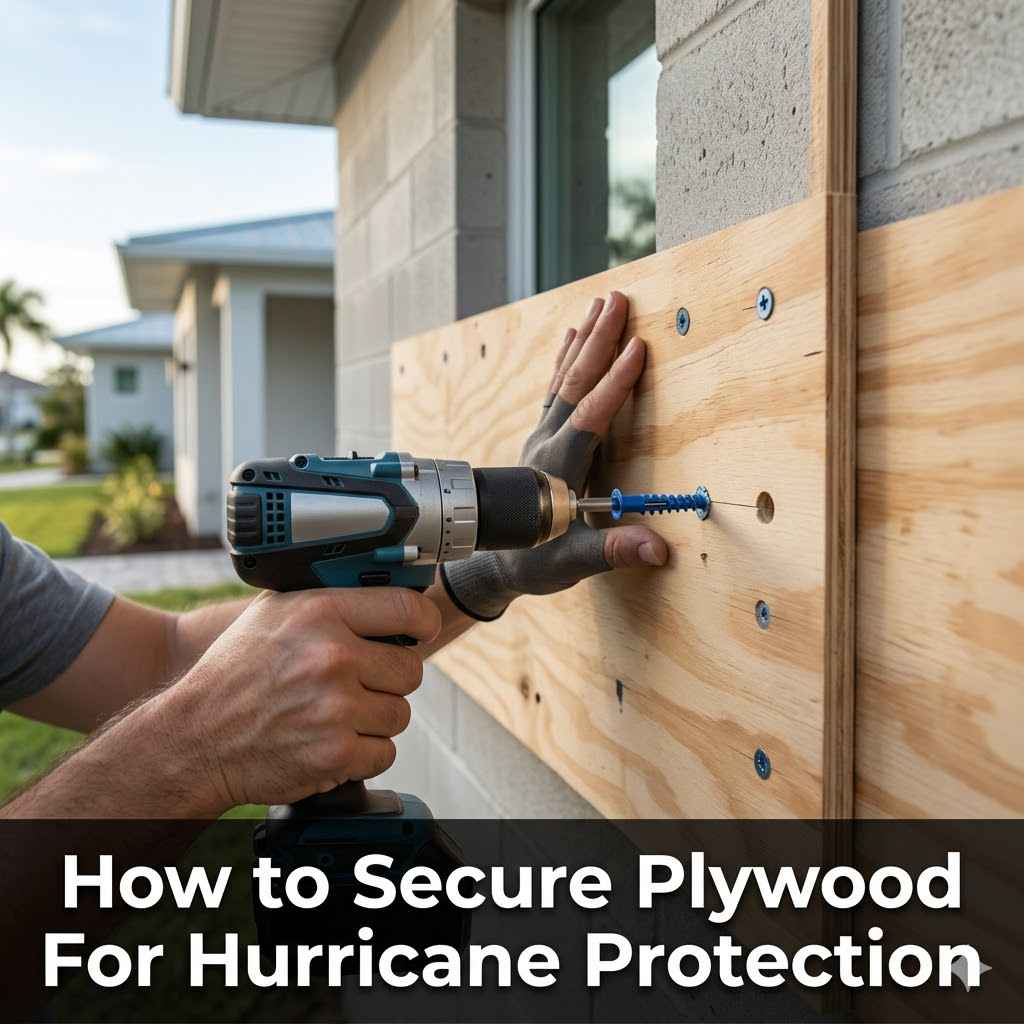
How to Secure Plywood for Hurricane Protection
This section is the core of our guide. Here, we will detail the most effective methods for attaching your pre-cut plywood panels to your home’s structure. We will discuss using lag screws and bolts, and the importance of attaching them directly to the wall studs or strong framing.
Proper anchoring is vital to ensure the plywood stays in place during extreme wind and rain.
Attaching Plywood to Wall Studs
The strongest way to attach your plywood storm shutters is by fastening them directly into the wall studs. Wall studs are the vertical beams inside your walls that provide structural support. They are typically spaced 16 or 24 inches apart.
Locating these studs is crucial for a secure installation. You can find studs using a stud finder or by tapping on the wall until you hear a solid sound.
-
Locating Studs
A stud finder is the easiest tool to use. You run it along the wall where the window or door frame is, and it will indicate the location of the studs. If you don’t have a stud finder, you can try tapping the wall.
Studs create a solid sound, while the spaces between them sound hollow. You can also look for nail or screw lines in the drywall, which often indicate stud locations. The goal is to anchor the plywood directly into these solid supports.
-
Pre-drilling Holes
Before you install the plywood, pre-drill holes through the plywood and into the studs. The size of the drill bit should be slightly smaller than the diameter of your lag screws or bolts. This makes it much easier to drive the fasteners and prevents the wood from splitting.
For each point where you will place a fastener, pre-drill a hole. This step ensures the screws go in straight and deep.
-
Using Lag Screws
Lag screws are a common choice for attaching plywood. They are strong and easy to install. Place the pre-cut plywood panel over the window or door opening, ensuring it covers the frame and extends to your marked stud locations.
Drive the lag screws through the plywood and into the pre-drilled holes in the studs. Space your lag screws about 6 to 10 inches apart. Use washers under the heads of the lag screws to distribute the pressure and prevent the screw head from pulling through the plywood.
Using Bolts for Maximum Security
For the highest level of protection, using bolts with nuts and washers is often recommended. This method involves drilling completely through the wall structure. It provides an exceptionally strong connection.
This is particularly beneficial in areas prone to severe hurricanes.
-
Drilling Through the Wall
After positioning the plywood, drill holes completely through the plywood, the wall sheathing, and the stud. Make sure the drill bit is long enough to pass through all these layers. You will then insert a bolt through this hole.
This creates a strong anchor point. It’s important to do this for multiple locations across the plywood panel.
-
Using Washers and Nuts
On the inside of your home, place a washer and then a nut onto the bolt. Tighten the nut securely. This creates a strong clamping force, holding the plywood firmly in place.
Use large washers on both the outside (under the bolt head) and the inside (under the nut). This distributes the force over a wider area, preventing the bolt from tearing through the materials. This through-bolt method offers superior resistance to wind pressure.
Alternative Mounting Methods
While directly attaching to studs is ideal, there are situations or preferences that call for alternative methods. These might involve using mounting brackets or pre-installed anchor points.
-
Metal Mounting Brackets
Some homeowners prefer to install permanent metal mounting brackets around their windows and doors. These brackets have pre-drilled holes. You then cut your plywood to fit these openings.
When a storm is expected, you simply screw the plywood into the brackets. This can be faster during an emergency. The brackets should be made of sturdy, corrosion-resistant metal, like aluminum or galvanized steel.
Ensure they are securely attached to the wall framing.
-
Pre-Installed Anchors
Another approach is to pre-install threaded anchor points into the wall framing around windows and doors. These anchors have a threaded post sticking out. You then drill corresponding holes in your plywood panels.
When needed, you align the plywood and screw it onto these anchor posts. This method also speeds up installation during a storm. The anchors must be deeply embedded into the studs for optimal strength.
Spacing and Number of Fasteners
The number and spacing of your fasteners are critical to the effectiveness of your plywood storm shutters. Overlooking this can lead to failure. Building codes in hurricane-prone areas often specify minimum fastener spacing.
-
Recommended Spacing
A common recommendation for lag screws or bolts is to space them no more than 6 to 10 inches apart along all edges of the plywood panel. This ensures that the plywood is uniformly supported. If you have a larger window or door, you might need additional fasteners in the middle of the panel, especially if the plywood is flexing.
-
Minimum Fastener Count
For standard-sized windows, a minimum of four to six fasteners per side is often a good starting point. For larger openings or doors, you will need more. Always consult local building codes for the most accurate and up-to-date requirements in your area.
Proper fastener density is a key factor in preventing the plywood from being blown off during high winds.
Consider a scenario where a homeowner used only two lag screws on the top and two on the bottom of a large window. During a moderate storm, the wind pressure exerted enough force to rip the plywood from the wall, causing significant damage. This highlights the importance of sufficient fasteners spaced correctly.
When and How to Install Your Plywood Shutters
Knowing when to put up your shutters is as important as knowing how to install them. This section will guide you on timing and the actual installation process when a storm warning is issued. We’ll cover pre-storm checks to ensure everything is ready to go.
This helps to reduce panic and ensure safety for your home and family.
Timing Is Crucial
The decision to install storm shutters should be made as soon as a hurricane watch or warning is issued for your area. It’s always better to prepare early than to rush when the weather is already deteriorating.
-
Hurricane Watch vs. Warning
A hurricane watch means hurricane conditions are possible in your area. This is the time to start gathering your tools and plywood. A hurricane warning means hurricane conditions are expected.
This is when you should begin installing your shutters. Don’t wait until the storm is right on top of you.
-
Preparing in Advance
It’s wise to have your plywood cut and labeled well before hurricane season begins. Store the plywood panels in a dry place, like a garage or shed. This way, when the time comes, you only need to focus on the installation.
Having everything ready to go can significantly reduce stress during an emergency.
The Installation Process During a Storm Warning
When the official warnings are issued, and it’s safe to do so, begin installing your plywood shutters. Work systematically, starting with the most vulnerable openings.
-
Systematic Installation
Begin with the windows and doors on the side of your house facing the prevailing winds, if you know them. However, often it’s best to cover all openings to ensure maximum protection. If you have multiple people helping, divide the tasks.
One person can align the plywood, while another starts driving fasteners.
-
Ensuring a Tight Fit
As you install each panel, double-check that it is sitting flush against the frame and that your fasteners are tight. If you are using bolts, make sure the nuts are securely tightened from the inside. A loose shutter is worse than no shutter at all.
-
Securing Doors
For doors, especially entry doors, you may want to cover the entire door with plywood. This prevents wind and water from forcing their way in, even if the door itself doesn’t break. Use plenty of fasteners, going into the door frame and surrounding studs.
Post-Storm Removal
Once the hurricane has passed and it is declared safe by authorities to go outside, you can remove the plywood shutters.
-
Waiting for Safety
Do not remove shutters until all danger has passed and local authorities have given the all-clear. There can still be lingering dangers like downed power lines or unstable structures.
-
Careful Removal
Remove fasteners carefully. If you used bolts, unscrew the nuts. If you used lag screws, unscrew them.
Be aware that screws can be tight and may require some effort. Store your plywood shutters back in a safe, dry place for future use. Inspect them for any damage before storing.
Maintaining Your Plywood Shutters
Proper care ensures your plywood shutters last for many hurricane seasons. This section covers how to store and maintain them. Keeping them in good condition means they will be ready and effective when you need them most.
Good maintenance saves you money and provides better protection.
Storage Guidelines
How you store your plywood shutters when they are not in use can greatly affect their lifespan and effectiveness.
-
Dry Storage is Key
Always store your plywood shutters in a dry, protected area, such as a garage, shed, or basement. Moisture can cause the plywood to warp, rot, or delaminate over time. This weakens the material and makes it less effective for storm protection.
Keep them off the ground to prevent moisture absorption from concrete floors.
-
Protection from Elements
Protect the stored plywood from direct sunlight and extreme temperatures. While exterior-grade plywood is durable, prolonged exposure can still cause damage. If storing them flat, stack them evenly to prevent warping.
If storing them vertically, ensure they are leaning against a stable support to avoid falling.
Inspection and Refurbishment
Before each hurricane season, and after each use, it’s important to inspect your plywood shutters for any signs of damage or wear.
-
Checking for Damage
Look for any signs of rot, delamination (layers separating), cracks, or significant dents. Check the edges for splintering. If you notice any serious damage, it might be time to replace that particular panel.
Minor superficial damage might be repairable.
-
Repairing Minor Damage
Small cracks or chips can often be repaired using wood filler designed for exterior use. Sand down any rough spots. If the edges are splintered, you can carefully trim them or use a strong exterior adhesive to seal them.
Re-drilling fastener holes might be necessary if they have become enlarged.
-
Repainting or Sealing
Consider repainting or resealing your plywood shutters every few years, especially if they have been exposed to the elements. Use a good quality exterior paint or sealant. This provides an extra layer of protection against moisture and UV rays.
This simple step can significantly extend the life of your shutters.
Frequently Asked Questions
Question: How thick should plywood be for hurricane protection
Answer: For hurricane protection, it is recommended to use exterior-grade plywood that is at least 1/2 inch thick, with 5/8 inch being even better for added strength and impact resistance.
Question: Can I use regular plywood for storm shutters
Answer: It’s best to use exterior-grade plywood because it’s made with waterproof glue and is designed to withstand moisture, which is crucial for storm protection. Regular interior plywood can delaminate when wet.
Question: How far apart should screws be when attaching plywood
Answer: When attaching plywood for hurricane protection, fasteners like lag screws or bolts should generally be spaced no more than 6 to 10 inches apart along all edges to ensure a secure hold.
Question: Do I need to cover my whole door with plywood
Answer: Yes, it is highly recommended to cover the entire door with plywood, not just the glass panels, to provide the strongest protection against wind and water intrusion.
Question: Where do I install the fasteners for plywood shutters
Answer: Fasteners should be installed directly into the wall studs, which are the solid vertical framing members inside your walls, to provide the most secure attachment.
Wrap Up
Securing plywood for hurricane protection is an important step for safeguarding your home. By carefully measuring, cutting, and properly fastening your plywood panels directly into wall studs, you create a strong barrier against high winds and flying debris. Always remember to use exterior-grade materials and adequate fasteners spaced correctly.
Store your shutters safely and inspect them regularly to ensure they are ready for the next storm.