How To Set DMM With Current Clamps Correctly
Many people find using a digital multimeter (DMM) with current clamps a bit tricky at first. You might wonder where to plug in the wires or which setting to choose on your meter. Don’t worry, it’s a common learning curve.
This guide will show you exactly How to Set a DMM When Using Current Clamps in simple steps. We’ll cover everything you need to know so you can start measuring current with confidence.
Setting Up Your DMM For Current Clamp Use
Getting your DMM ready for current clamp measurements is a fundamental skill for anyone working with electrical circuits. This section explains the initial setup steps, ensuring you connect your equipment correctly and select the appropriate settings on your digital multimeter. Proper setup prevents damage to your meter and ensures accurate readings.
We will cover the basic connections and dial settings you need to get started.
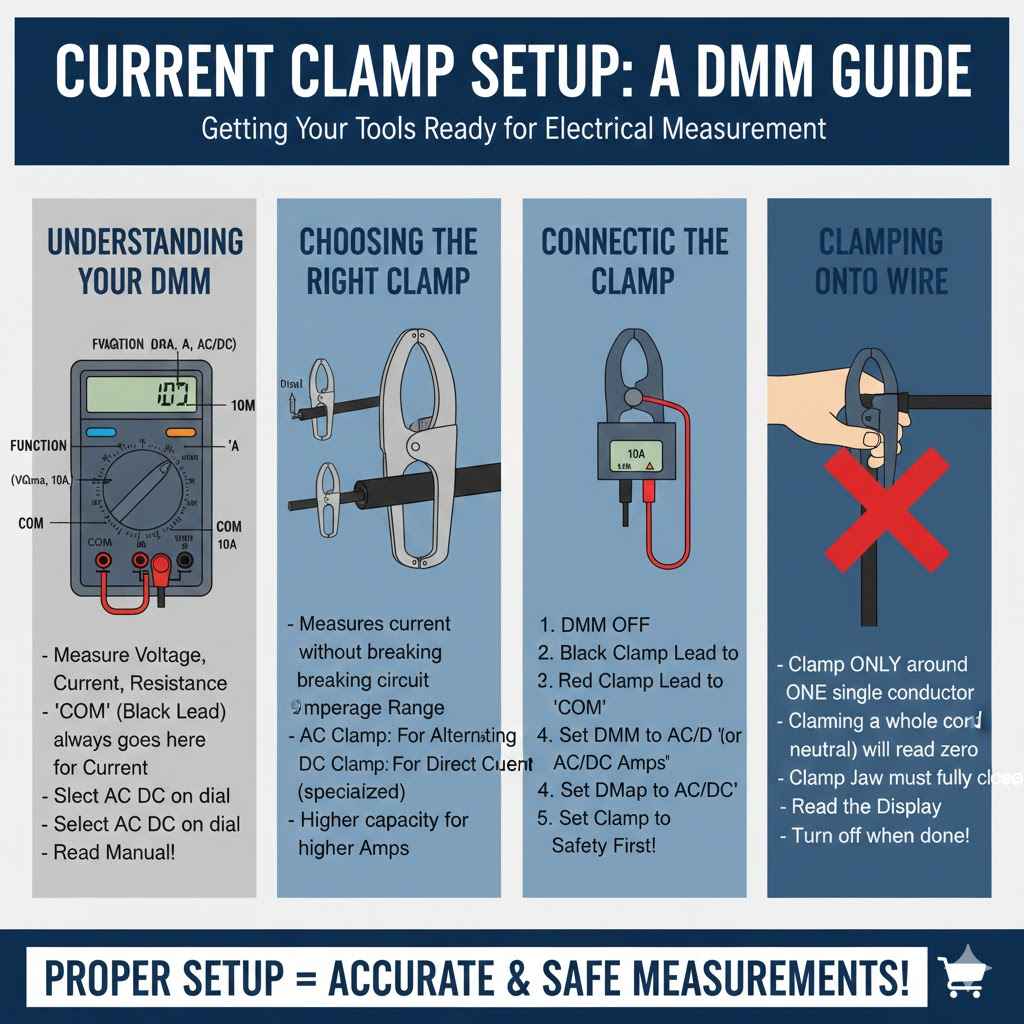
Understanding Your Digital Multimeter
A digital multimeter, often called a DMM, is a versatile tool for measuring voltage, current, and resistance. When using current clamps, understanding the DMM’s functions is key. Most DMMs have a dial that allows you to select different measurement modes and ranges.
For current measurements, there are typically dedicated settings, often marked with symbols representing amperes (A) or milliamps (mA).
The “COM” (common) port is where the black test lead always goes. For voltage and resistance, the red test lead goes into the “VΩmA” port. However, for current measurements above a few hundred milliamps, you’ll use a different port, often labeled “A” or “10A,” which is designed to handle higher electrical flow.
Always check your DMM’s manual, as port labels can vary between brands and models.
The main dial on your DMM has many positions. You will see symbols for AC (alternating current) and DC (direct current). Current clamps are often used for AC current, like the power flowing through household outlets.
Make sure you select the correct AC or DC setting based on what you are measuring. Choosing the wrong type can lead to inaccurate readings or damage.
Choosing the Right Current Clamp
Current clamps, also known as inductive ammeters or clamp meters, are devices that measure electrical current without needing to break the circuit or disconnect wires. They work by sensing the magnetic field created by the flow of current. Different clamps are designed for different current ranges and types of current (AC or DC).
When selecting a current clamp, consider the maximum current you expect to measure. Clamps come in various sizes and capacities, from a few amps to hundreds or even thousands of amps. If you try to measure a current that is too high for your clamp, you could damage the clamp or get an inaccurate reading.
Always choose a clamp that can handle the expected current with some headroom.
Another factor is whether you need to measure AC current, DC current, or both. Many clamp meters are designed for AC current only, as AC current produces a fluctuating magnetic field that is easier to detect. However, specialized clamp meters can measure DC current, which has a steady magnetic field.
Ensure your clamp meter is compatible with the type of current you need to measure.
Connecting the DMM and Current Clamp
To use a current clamp with your DMM, you first need to connect them properly. The current clamp usually has two output wires or a cable that plugs into your DMM. These outputs represent the measured current as a voltage signal that your DMM can read.
This signal is then interpreted by the DMM to display the actual current in amps.
First, ensure your DMM is turned OFF. Then, connect the black wire from the current clamp to the “COM” (common) port on your DMM. Next, connect the red wire from the current clamp to the port on your DMM that is designated for current measurement.
This is often labeled “A” or “10A” and is used for higher current measurements. Some smaller clamps might connect to a “mA” port for measuring lower currents.
It is vital to ensure the DMM is set to the correct function (AC or DC current) and range before you turn it on or connect the clamp to a live circuit. If your clamp has a separate selector for AC or DC, set that accordingly. This careful connection process is the first step to getting accurate and safe readings.
Mastering the DMM Settings for Current Measurement
Once your DMM and current clamp are physically connected, the next critical step is setting the DMM itself to correctly interpret the signal from the clamp and display the current. This involves selecting the right measurement mode and range. Incorrect settings are a common source of error and can lead to confusion or even damage.
This section will guide you through the DMM dial and selection process.
Understanding DMM Current Ranges
Digital multimeters have different ranges for measuring current. A range is the scale of values the meter can measure. For example, a DMM might have a 10A range and a 200mA range.
You must select a range that is appropriate for the current you are measuring. If you select a range that is too low, you might blow a fuse in your DMM or damage it.
If you are unsure of the current level, it is always best to start with the highest range available on your DMM. Once you have a reading, you can then decrease the range if necessary to get a more precise measurement. For example, if you are measuring the current drawn by a small electronic device, you would likely use a lower range like 200mA or 400mA.
For household appliances, you might need a higher range, like 10A.
The current clamp itself also has a specified operating range. This is the range of current it is designed to accurately measure. You need to ensure that both your DMM’s selected range and the clamp’s capacity are suitable for the current you are testing.
Matching these is key to getting reliable results.
Selecting AC vs. DC Current Measurement
Alternating current (AC) and direct current (DC) flow differently and require different measurement settings on your DMM. AC current periodically reverses direction, creating a changing magnetic field that clamp meters easily detect. DC current flows in one direction, producing a constant magnetic field.
On your DMM, you will typically see symbols for AC and DC current. The symbol for AC is often a wavy line (~), while the symbol for DC is a straight line with a dashed line below it (—/–). For most home and industrial power circuits, you will be measuring AC current.
Electronic devices often use DC current, which is usually supplied by batteries or power adapters.
When using a current clamp, you must select the correct setting on your DMM to match the type of current you are measuring. If you select AC current mode for a DC measurement, you will get an incorrect reading, likely zero or a fluctuating number. Similarly, selecting DC mode for an AC current can lead to inaccurate results or overload the meter.
Setting the DMM Dial and Function
With the test leads connected and the clamp in place, the next step is to adjust the DMM’s dial. Rotate the dial to the section that corresponds to current measurement. This section is usually labeled with the letter “A” for amperes.
Within this section, you will find sub-settings for AC and DC current.
Choose the setting that matches the type of current you are measuring (AC or DC). If you are using a clamp meter, ensure the clamp’s own setting also matches. For example, if your clamp is a dedicated AC clamp, you should only use it with the AC setting on your DMM.
After selecting the function (AC or DC current), choose the appropriate range. As mentioned earlier, start with the highest range and work your way down for better accuracy. Some modern DMMs have an “auto-ranging” feature, which automatically selects the best range for the measurement.
If your DMM has this, it simplifies the process significantly.
Practical Steps for Using Current Clamps
Now that you understand the basics of setting up your DMM and current clamp, let’s walk through the practical steps of actually taking a current measurement. This involves safely clamping the device around the conductor and reading the displayed value. These steps ensure you get an accurate reading and stay safe while working with electricity.
Safely Clamping Around the Conductor
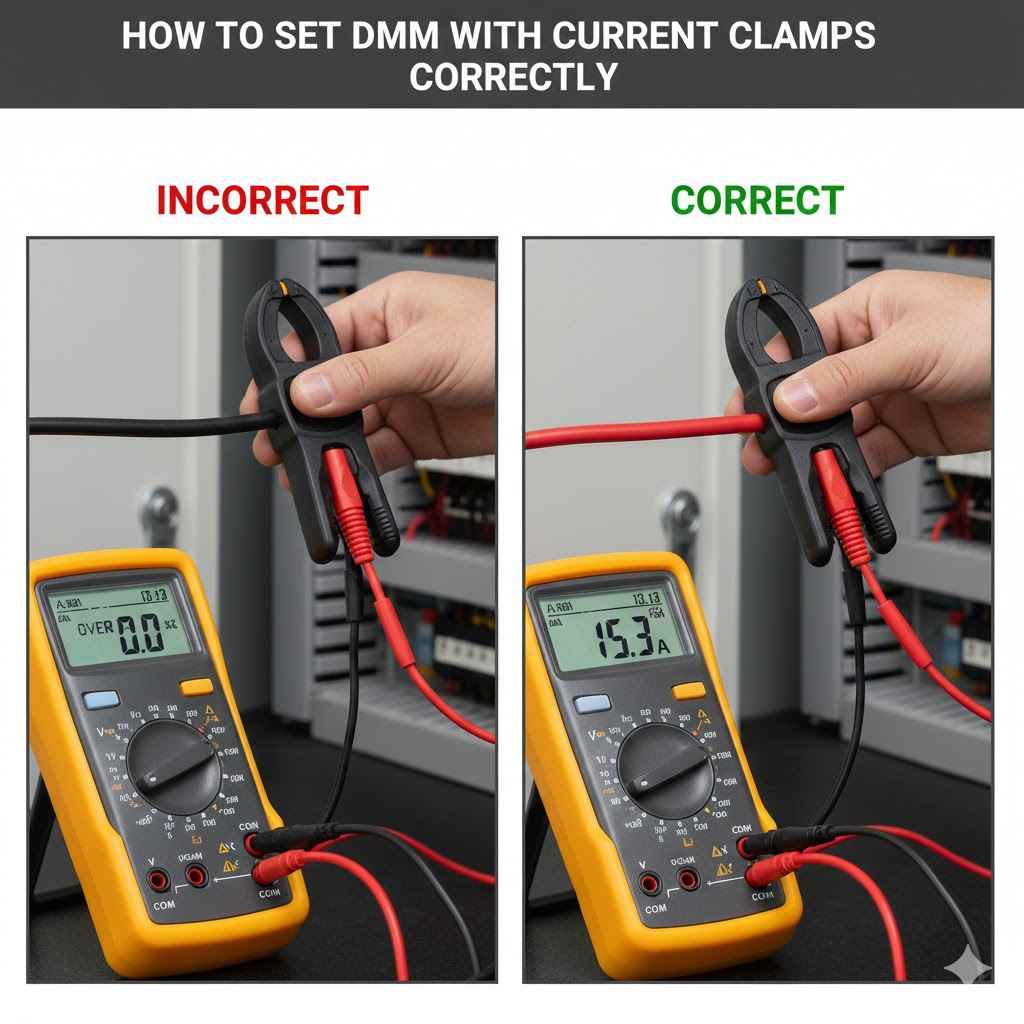
The key feature of a current clamp is its ability to measure current without interrupting the circuit. To do this, you open the jaws of the clamp and place them around a single conductor carrying the current you wish to measure. Ensure that only one wire is inside the clamp’s jaws.
If you clamp around multiple wires, you will get an inaccurate reading because the magnetic fields will cancel each other out, or you’ll be measuring the combined effect.
For example, when measuring the current drawn by a lamp plugged into an outlet, you would open the clamp and place it around the single power cord wire leading to the lamp. Never clamp around both the hot and neutral wires simultaneously, as this will result in a zero reading or a reading that reflects the difference between the two, which is not the current being used by the device.
Make sure the clamp is fully closed and latched. Many clamps have a mechanism that ensures they are securely shut for accurate readings. Also, ensure the conductor is properly seated within the jaws.
A good connection of the jaws is crucial for capturing the full magnetic field generated by the current.
Taking the Measurement and Reading the Display
Once the current clamp is securely around the conductor and your DMM is set up correctly, you can power on the circuit you are testing. The DMM display will show a numerical value. This value represents the amount of current flowing through the conductor in amperes (or milliamps, depending on the range you selected).
If you started with the highest range and the reading is very low or zero, you can now carefully adjust the DMM to a lower range for a more precise reading. For instance, if you measured 1.5A on the 10A range, you might switch to a 2A or 400mA range to see more decimal places if your meter supports it. However, always ensure the new range is still higher than the expected current.
If the display shows “OL” or “1”, it means the current is too high for the selected range, and you need to switch to a higher range immediately. If you are measuring AC current, the reading will likely be a stable number. If you are measuring DC current, it should also be stable, although small fluctuations can occur.
Interpreting Readings and Common Scenarios
Understanding what the numbers on your DMM mean in real-world scenarios is essential. For example, a small LED light might draw only 20mA (0.02A), while a toaster could draw 8A. Knowing these typical values helps you verify if your readings are reasonable.
Scenario 1: Checking a Battery-Powered Device
- Turn off the device you are testing.
- Connect your DMM to the current clamp, setting the DMM to DC current measurement on the highest available range (e.g., 10A).
- Open the clamp and place it around the positive wire coming from the battery pack to the device.
- Turn the device back on.
- Read the display. If it shows a low reading (e.g., 150mA), you can switch the DMM to a lower range (e.g., 400mA) for a more precise reading.
Scenario 2: Measuring Power Consumption of a Household Appliance
- Ensure the appliance is plugged in and turned on.
- Set your DMM to AC current measurement on its highest range (e.g., 10A), and connect it to your AC current clamp.
- Carefully open the clamp’s jaws and place them around the single power cord wire going to the appliance.
- Read the value on the DMM display. For a typical microwave, this might be around 5-7A.
The accuracy of your measurement depends on several factors, including the quality of your DMM and clamp, proper connection, and the correct selection of AC/DC and range. If you get a reading that seems illogical, double-check all your settings and connections.
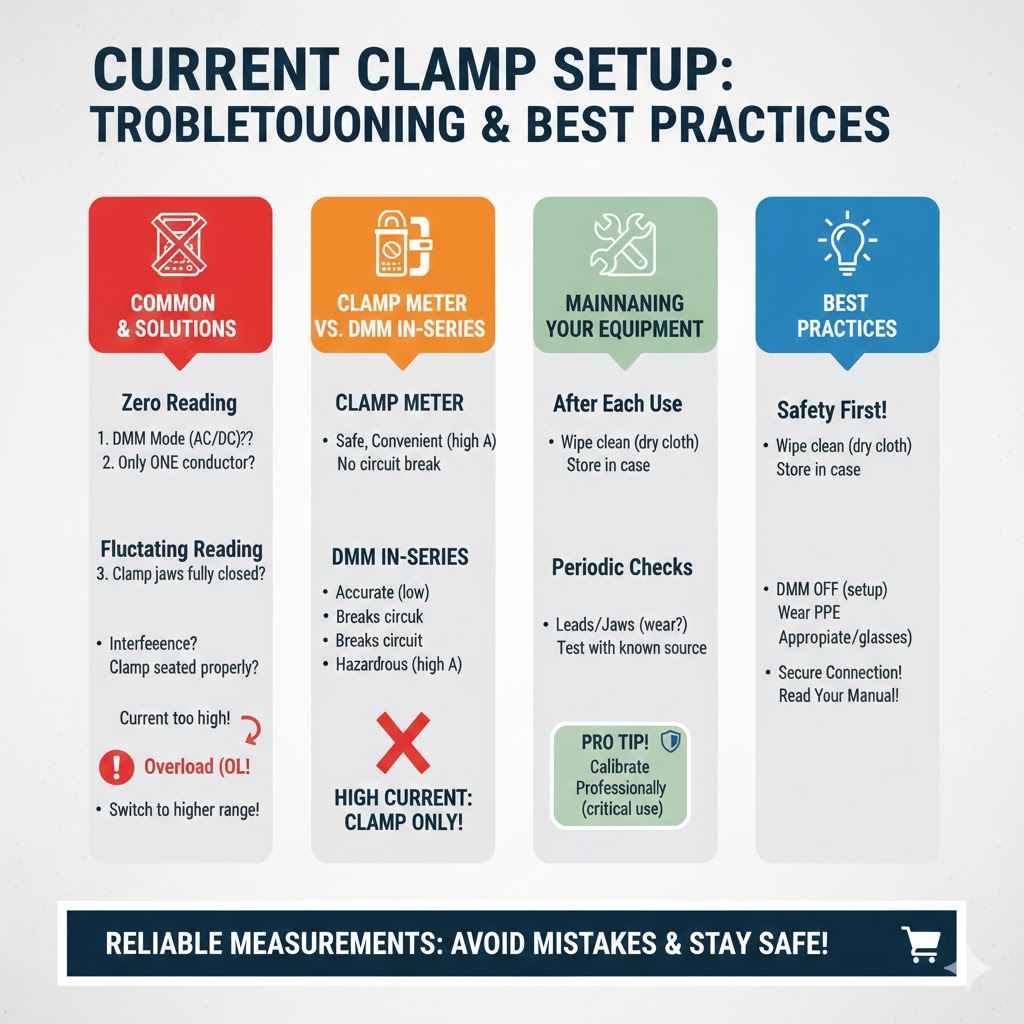
Troubleshooting and Best Practices
Even with careful setup, you might encounter issues. This section addresses common problems when using DMMs with current clamps and offers best practices to ensure accuracy and longevity of your equipment. Following these tips will help you avoid common mistakes and get reliable measurements every time.
Common Issues and Solutions
One frequent issue is getting a reading of zero when you expect to see current. This could be due to several reasons. First, check if the DMM is set to the correct mode (AC or DC) and range.
Ensure the clamp is placed around only one conductor. Sometimes, the clamp jaws may not be fully closed, or the conductor might not be centered within them, leading to a weak magnetic field detection.
Another problem is getting wildly fluctuating readings. This can happen if the clamp is not properly seated or if there is significant electromagnetic interference in the vicinity. Ensure the clamp is securely closed and try moving it away from other electrical devices if possible.
For DC measurements, ensure you are not experiencing any AC ripple on the DC line, as this can sometimes cause odd readings if the clamp is not designed for it.
If your DMM displays “OL” or a similar overload indication, it means the current is too high for the selected range. Immediately switch to a higher current range. If you are already on the highest range and still see “OL,” the current might exceed the maximum capacity of your DMM or clamp, and you will need a different, higher-rated instrument.
When to Use a Clamp Meter vs. Direct DMM Measurement
The primary advantage of a clamp meter is safety and convenience. You can measure high currents without breaking the circuit. For measuring currents above about 10A, using a clamp meter is usually the only practical and safe option.
Measuring high currents directly with a DMM requires placing the DMM in series with the circuit, which involves breaking the circuit and can be hazardous with high currents.
However, for very low currents, such as those in sensitive electronics (microamps or milliamps), a standard DMM used in series with the circuit is often more accurate. Clamp meters are typically less accurate at very low current levels. For example, measuring the current consumption of a microcontroller might require a DMM set to measure milliamps directly, rather than using a clamp meter.
Consider the specific application. If you are troubleshooting a motor, checking the load on a circuit breaker, or measuring the current draw of an appliance, a clamp meter is ideal. If you are diagnosing a low-power electronic board or measuring quiescent current in a device, a standard DMM measurement in series is preferred for precision.
Maintaining Your DMM and Current Clamp
Proper maintenance ensures your tools remain accurate and reliable. After each use, wipe down your DMM and current clamp with a dry, soft cloth. Store them in a protective case or their original packaging to prevent dust and damage.
Avoid exposing them to extreme temperatures or moisture.
Periodically check the test leads and the clamp’s jaws for any signs of wear or damage. Damaged leads can cause inaccurate readings or safety hazards. If the jaws of the clamp appear bent or misaligned, it can affect the magnetic field detection and lead to errors.
Some clamps have a calibration adjustment screw; consult your manual if you suspect an accuracy issue.
Regularly test your DMM on a known voltage source, like a fresh battery, to verify its basic functionality. For current clamps, if you have access to a known current source, you can perform periodic checks. Most professional DMMs and clamps come with a calibration certificate, and some users opt for professional recalibration every few years, especially if used in critical applications.
Frequently Asked Questions
Question: Do I need a special DMM for current clamps?
Answer: Not necessarily. Most standard digital multimeters (DMMs) with a current measurement function can be used with current clamps, as long as the clamp’s output is compatible with the DMM’s input ports and range.
Question: Can I measure DC current with a standard clamp meter?
Answer: Some clamp meters are designed for AC current only. If you need to measure DC current, you must use a clamp meter specifically designed for DC or AC/DC measurements.
Question: What happens if I set the DMM to the wrong range?
Answer: If you select a range that is too low for the current you are measuring, you risk blowing the fuse inside your DMM or damaging the meter. Always start with the highest range and work down.
Question: How do I know if my current clamp is accurate?
Answer: You can check accuracy by comparing readings with a known current source or another calibrated meter. If readings are consistently off, the clamp might need recalibration or replacement.
Question: Can I measure current without breaking the circuit with a DMM?
Answer: Yes, that’s the main benefit of a current clamp. It allows you to measure current by sensing the magnetic field around a conductor, so you don’t need to disconnect wires.
Conclusion
Setting up your DMM with current clamps is straightforward with these steps. You now know how to connect your equipment, select AC or DC modes, and choose the correct ranges. Safely clamping around a conductor and interpreting the readings are also covered.
This guide empowers you to measure current accurately and confidently in various applications.