How to Stop a Shed Door from Sagging
Keeping a shed door from sagging can be a common puzzle for many folks, especially those just starting out with home projects. It’s easy to overlook how much weight a door carries over time or how weather can affect the wood. Sometimes, a little bit of simple fix can make a big difference and save you from a lot of frustration.
Don’t worry if this sounds tricky; we’ll walk through it step-by-step with easy-to-follow instructions. This guide will show you exactly how to keep a shed door from sagging so your shed works perfectly.
Preventing Shed Door Sagging Issues
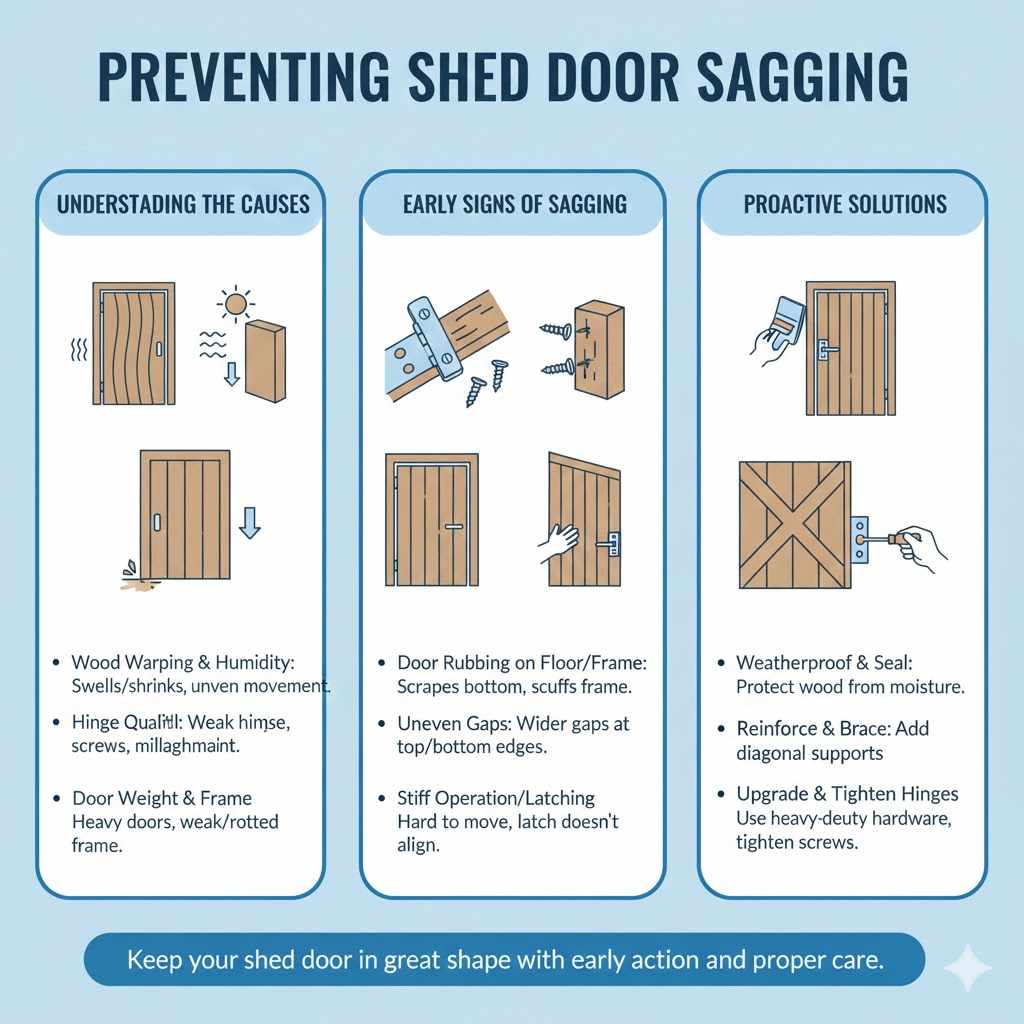
Addressing shed door sagging before it becomes a major problem is key to maintaining your shed’s functionality and appearance. This section will cover the common reasons why shed doors start to sag in the first place and what early signs to look for. Understanding these causes helps you take proactive steps.
We will explore how humidity, the weight of the door, and the quality of hinges can all play a part. Learning about these factors is the first step in keeping your shed door in great shape for years to come.
Understanding the Causes of Door Sag
Shed door sagging happens for several reasons, and knowing them helps you fix it right. The wood itself can warp, especially if it gets wet and then dries out repeatedly. This expansion and contraction puts stress on the door and its frame.
Hinges are another big culprit. If they are old, loose, or not strong enough for the door’s weight, they can start to pull away from the wood, causing the door to hang unevenly. Sometimes, the door is just too heavy for the hinges or the frame it’s attached to.
This is especially true for larger, solid wood doors.
The materials used in your shed door also matter. Cheaper wood might not hold up as well over time compared to more durable types. The way the door was built also plays a role.
Doors that are not properly braced or reinforced are more likely to sag. Even the way the door is used can contribute. Constantly slamming it or leaving it open in strong winds can put extra strain on the hinges and frame.
Wood Warping and Environmental Factors
Wood is a natural material that reacts to its surroundings. When wood absorbs moisture, it swells. When it dries out, it shrinks.
This constant cycle, especially common with outdoor structures like sheds, can cause the wood in your shed door to warp. This warping means the door isn’t flat anymore, and one side might start to hang lower than the other. Humidity levels in the air are a major influence.
In damp climates, wood absorbs more moisture, leading to swelling. In dry, hot weather, it releases moisture and shrinks.
Consider a shed door made of solid pine. If it’s constantly exposed to rain or high humidity, the wood will absorb water. This makes the door thicker and can cause it to bow.
Then, if a hot sun beats down on it, the wood dries out quickly, shrinking unevenly. This uneven movement is what leads to warping and can result in the door dragging on the ground or not closing properly. Even paint or sealants, while helpful, can sometimes trap moisture if not applied correctly, accelerating the problem.
Hinge Quality and Installation
The hinges are the workhorses that support your shed door. Their quality and how well they are installed are critical. Cheap, flimsy hinges might seem like a good way to save money, but they often can’t handle the stress.
Over time, they can bend, break, or pull away from the wood. This is especially true for heavier doors. Think of hinges like the shoulders of the door; if they’re weak, the whole door will droop.
When hinges are not installed correctly, problems can arise quickly. If the screws are not long enough, they won’t get a good grip in the wood. Stripped screw holes, where the wood is damaged and the screws can’t tighten, are another common issue.
Proper alignment is also important. If the hinges are not perfectly straight, they create uneven pressure on the door and frame, leading to sagging. It’s like trying to hang a picture with a crooked hook; it won’t hang straight.
Door Weight and Frame Integrity
The weight of your shed door is a direct factor in how much stress it puts on its supporting structure. A heavy door, perhaps made of thick, solid wood or with metal reinforcements, requires robust hinges and a strong frame. If the frame of your shed is weak or has started to rot, it won’t be able to hold the door upright and square.
The frame acts as the anchor, and if that anchor is loose, the door will inevitably sag.
Imagine a door made of solid oak. It can easily weigh 50 pounds or more. This weight, multiplied over years of opening and closing, puts a constant downward force on the hinges and the frame.
If the shed frame is made of thinner lumber or has been exposed to moisture and pests, it might start to lean or weaken. This compromised frame can no longer provide the sturdy support the heavy door needs, leading to that tell-tale sag. Regular checks of the frame’s condition are as important as checking the door itself.
Signs of a Sagging Shed Door
Spotting the early signs of a sagging shed door can save you a lot of hassle. The most obvious indicator is when the door doesn’t close quite right. You might notice it rubbing against the floor or the door frame at the bottom.
Sometimes, the top corner of the door might pull away from the frame, leaving a gap.
Another sign is difficulty opening or closing the door. If it feels like you have to lift or push the door harder than usual, it’s likely because it’s not hanging straight. You might also see uneven gaps along the edges of the door where it meets the frame.
If one side has a big gap and the other is snug, that’s a clear sign of sagging. Loose hinges are also a strong indicator; if you can see them move or wobble when you try to open the door, they’re probably part of the problem.
Door Rubbing on the Floor or Frame
This is usually the most noticeable sign that your shed door is starting to sag. When a door hangs too low, its bottom edge will make contact with the floor or the threshold. You might hear a scraping sound as you try to open or close it.
This constant friction can wear down the bottom of the door and the floor over time, making the problem worse.
Similarly, if the door sags unevenly, one side might rub against the door frame. This could be on the top or the side. You might see scuff marks on the frame or the door where they are making contact.
This makes it difficult to get a good seal when the door is closed, which can let in pests and weather. The more the door scrapes, the more damage it causes, creating a cycle that needs to be broken.
Uneven Gaps Around the Door
A well-fitting door should have consistent gaps along all its edges where it meets the frame. If you notice that one side of the door has a large gap between it and the frame, while the other side is snug or even touching, this is a classic sign of sagging. The gap might be wider at the top or the bottom, depending on which way the door is leaning.
For example, if the top hinge is failing, the top corner of the door on that side might pull away from the frame, creating a noticeable gap. Conversely, if the bottom of the door is dragging, the gap at the top might widen. These uneven gaps not only look bad but also compromise the security and weatherproofing of your shed.
They allow wind, rain, and even small animals to get inside more easily.
Stiff Operation or Difficulty Latching
When a door sags, it’s no longer aligning correctly with its intended path. This misalignment means that parts of the door might be pressing against the frame or the ground. This creates friction, making the door harder to move.
You might feel resistance when you try to push or pull it, and it might feel like you have to force it. This stiffness is a clear signal that something is out of alignment.
The latch mechanism is also affected by a sagging door. The latch bolt might not line up with the strike plate on the frame anymore. This means you might struggle to get the latch to engage, or it might not secure the door properly at all.
Sometimes, you might have to lift or push the door just right to get it to latch, which is inconvenient and a security risk. A door that’s hard to close and latch is often a door that’s starting to sag.
How to Keep a Shed Door from Sagging
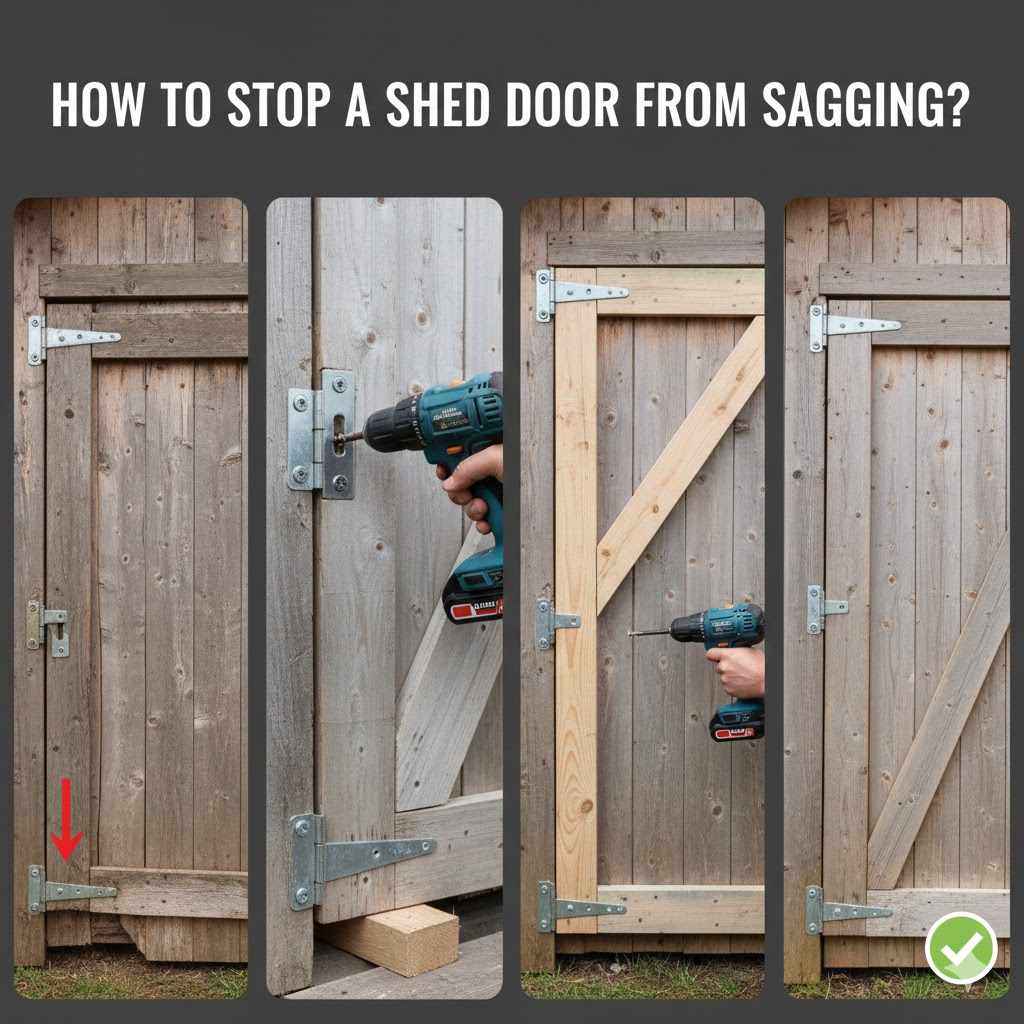
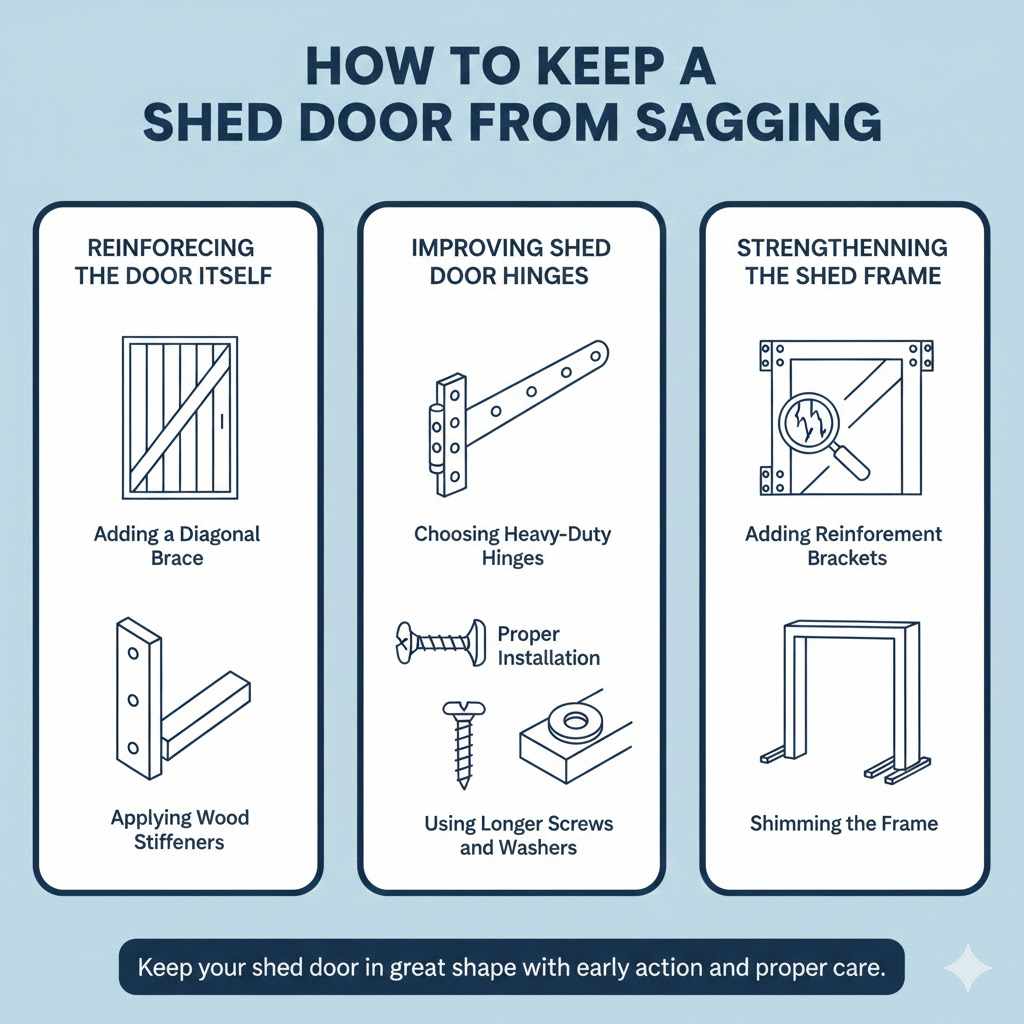
Now that we understand why shed doors sag, let’s get to the solutions. The good news is that most sagging issues can be fixed with a few basic tools and a little effort. We’ll cover reinforcing the door itself, improving the hinges, and strengthening the frame.
These methods are designed to be straightforward, even if you’re not a seasoned DIYer. Follow these steps, and you’ll soon have your shed door hanging straight and working smoothly again.
Reinforcing the Shed Door Itself
Sometimes, the door itself is the weak link. Wood doors can develop weaknesses over time, especially if they are exposed to the elements. Reinforcing the door’s structure can prevent future sagging and help correct existing issues.
This involves adding support to the door panel so it maintains its shape and rigidity.
Adding a Diagonal Brace
A diagonal brace is one of the most effective ways to prevent a shed door from sagging. This is a piece of wood that runs from one corner of the door to the opposite corner, forming a triangle. Triangles are incredibly strong shapes because they distribute weight and stress evenly, making the door much more rigid.
Even if the door is already starting to sag a bit, a diagonal brace can help pull it back into alignment.
To add a diagonal brace, you’ll first need to measure the inside dimensions of your door. Then, cut a piece of sturdy wood, like a 1×3 or 1×4 board, to fit diagonally across the back of the door. You’ll want to position it so it runs from the top hinge side to the bottom latch side, or vice versa, depending on where the sag is most prominent.
Attach the brace securely using long wood screws. Make sure the screws are long enough to go through the brace and firmly into the door’s frame. For extra strength, you can use wood glue along with the screws.
Using Corner Brackets
For a simpler approach, or to add extra support to a diagonal brace, corner brackets can be very useful. These are L-shaped metal pieces that screw into the corners of the door. They add rigidity and help prevent the door from twisting or warping.
You can install them on the back of the door where the frame meets the panel.
Purchase strong metal corner brackets from a hardware store. For a typical shed door, two or three per corner might be sufficient. Position them so they connect two pieces of the door’s frame at a 90-degree angle.
Use short wood screws to attach them firmly to the wood. Ensure the brackets are not so large that they will interfere with the door’s operation or be visible from the front. These brackets act like extra support beams at critical stress points.
Applying Wood Stiffeners
Sometimes, the internal structure of a hollow-core shed door might have weakened. In such cases, you can add wood stiffeners. These are typically thin strips of wood that are glued and screwed into place to reinforce weak spots.
They can be added along the edges or across the internal bracing of the door to make it more solid.
If your door has internal framing, you can add additional wood pieces to these frames. Cut pieces of 1×2 or 1×3 lumber to fit along the existing internal supports. Apply a generous amount of wood glue to both surfaces and then screw them into place.
This essentially creates a stronger, more solid door panel that is less likely to flex and sag. This method is particularly helpful for older doors that might have started to delaminate or weaken internally.
Improving Shed Door Hinges
The hinges are often the first point of failure when a door starts to sag. Upgrading or properly reinstalling your hinges can make a world of difference. This involves choosing the right type of hinge and ensuring they are firmly attached.
Choosing Heavy-Duty Hinges
Standard hinges might not be strong enough for the weight and constant use of a shed door. Opting for heavy-duty strap hinges or T-hinges is often a good idea. Strap hinges are long and run down the length of the door, distributing the weight over a larger area.
T-hinges are shaped like a T and are also good for heavier doors, with the strap part attaching to the door and the other part to the frame.
When selecting hinges, consider the size and weight of your shed door. For a standard wooden shed door, 6-inch or 8-inch heavy-duty hinges are usually appropriate. Make sure they are made of strong material like steel and have a rust-resistant coating, as they will be exposed to the elements.
These hinges provide more surface area for attachment, which means more screws into the wood, leading to a much stronger hold and better support for the door.
Proper Hinge Installation Techniques
Even the best hinges will fail if they are not installed correctly. When installing new hinges or reattaching existing ones, make sure the screw holes are clean and free of debris. If the old screw holes are stripped, you’ll need to repair them.
One common method is to fill the hole with wood filler or a golf tee and wood glue, then let it dry before re-drilling a pilot hole. For very stripped holes, you might need to use larger screws or even wood dowels.
Position the hinges precisely. Use a level to ensure the door is hanging straight before you fully tighten the screws. The top hinge should be placed about 6-10 inches from the top of the door, and the bottom hinge about 6-10 inches from the bottom.
If you have a third hinge, space it evenly in the middle. Ensuring the hinges are perfectly aligned with the door and frame is crucial for proper support and to prevent future sagging.
Using Longer Screws and Washers
Often, the screws that come with hinges are not long enough to get a secure grip in the wood. For shed doors, it’s beneficial to use longer, heavier-gauge screws. These screws will reach deeper into the door frame or the door itself, providing a much stronger connection.
This is especially important for the hinges attached to the door frame, as this is where most of the door’s weight is supported.
Washers can also be a valuable addition. Placing a washer between the hinge and the screw head helps to distribute the pressure evenly. This prevents the screw head from digging into the wood, which can weaken the attachment over time.
It also helps to ensure a snug fit. When you use longer screws, pre-drilling pilot holes is a good idea to prevent the wood from splitting, especially near edges.
Strengthening the Shed Frame
If the door is sagging, the frame it hangs on might be part of the problem. A weak or damaged frame cannot adequately support the door’s weight, leading to the door hanging improperly. Strengthening the frame ensures it can hold the door straight.
Checking Frame Integrity
Before making any adjustments to the door, inspect the shed’s frame around the doorway. Look for signs of rot, decay, or structural weakness. Push on the frame to see if it feels solid or if it flexes.
Pay close attention to the areas where the hinges are attached, as these are under the most stress. If the frame itself is compromised, you’ll need to reinforce or repair it before tackling the door.
Rotting wood can often be identified by a soft, crumbly texture and a musty smell. Pests like termites or carpenter ants can also weaken the wood over time. If you find any damaged sections, they will need to be repaired or
Adding Reinforcement Brackets to the Frame
Similar to reinforcing the door, you can add metal brackets to the shed frame for extra support. L-shaped brackets can be screwed into the corners of the door frame where it meets the shed walls. If the door frame is made of multiple pieces, these brackets can tie them together more securely.
This makes the entire opening more stable and better able to bear the door’s weight.
Ensure you use screws that are long enough to go deep into the studs of your shed. Pre-drilling pilot holes is important to avoid splitting the wood, especially if the frame is older. These brackets provide additional strength by reinforcing the connection points and preventing racking or twisting of the frame, which is a common cause of door sag.
They act as internal splints for the doorway structure.
Shimming the Frame if Necessary
Sometimes, the shed itself might have settled, or the frame might not have been installed perfectly square. If the frame is slightly out of plumb, it can cause the door to sag. In such cases, you might need to use shims – thin pieces of wood or plastic – to adjust the position of the frame or the hinges.
This is a more advanced fix, but it can correct persistent sagging issues caused by an unlevel frame.
This involves carefully loosening the screws holding the frame or hinges. Then, you insert shims behind the frame or hinge plate until the door hangs straight and closes properly. You can use a level to ensure everything is plumb and square.
Once the door is hanging correctly, you can re-tighten the screws, and if needed, trim the excess shim material. This method requires patience and a bit of trial and error to get the alignment just right.
Real-Life Examples and Scenarios
Seeing how these solutions work in practice can be very helpful. Let’s look at a couple of situations where these methods were used.
- Sarah had a wooden shed with a single, heavy door. Over a few years, the door started to sag, making it hard to close. She noticed the bottom of the door was scraping the concrete pad.
- First, she examined the hinges and found they were a bit loose and the wood around the screw holes was slightly damaged. She decided to
- John’s shed door was made of thinner plywood and had started to warp and sag in the middle. It wasn’t touching the floor, but there was a noticeable gap at the top. He decided to reinforce the door panel itself.
- He bought a 1×3 piece of lumber and cut it to fit diagonally across the back of the door, from the top corner on the hinge side to the bottom corner on the latch side. He secured it with wood glue and several 2-inch screws. He also added two small metal corner brackets to the other two corners for extra stability.
- After the glue dried, the door was much more rigid. He then reattached the existing hinges, ensuring they were aligned with the reinforced door. The warping was significantly reduced, and the door now closed much better, looking almost new.
These examples show that with a few simple steps, you can effectively fix a sagging shed door.
Frequently Asked Questions
Question: How often should I check my shed door hinges?
Answer: It’s a good idea to check your shed door hinges at least once a year, perhaps in the spring and fall. Look for any signs of rust, looseness, or damage. This regular check can help you spot problems before they cause the door to sag.
Question: Can a sagging door cause damage to the shed frame?
Answer: Yes, a sagging door can put extra stress on the shed frame over time. If the door is constantly rubbing against the frame or the floor, it can cause wear and tear on those components, potentially leading to damage or rot if left unaddressed.
Question: What is the best type of wood for a shed door to prevent sagging?
Answer: For shed doors, woods like cedar or redwood are naturally resistant to moisture and insects, which helps prevent warping and sagging. Pressure-treated pine is also a good, more affordable option because it’s treated to withstand rot and decay.
Question: How do I know if I need to replace my hinges instead of just tightening them?
Answer: If your hinges are bent, rusted through, or if the screw holes in the wood are completely stripped and won’t hold screws anymore, it’s usually best to replace them. Also, if you have basic hinges on a heavy door, upgrading to heavy-duty ones is recommended.
Question: Can I fix a sagging door with just a shim?
Answer: A shim can help if the sag is caused by a slightly unlevel frame or door opening. However, if the door itself is warped or the hinges are failing, a shim alone might not be enough. It’s often best used in combination with reinforcing the door or improving the hinges for a lasting fix.
Summary
Keeping a shed door from sagging involves understanding common causes like wood warping and weak hinges. By reinforcing the door with braces, choosing heavy-duty hinges, and ensuring the frame is solid, you can maintain your shed’s functionality. Simple steps like using longer screws and checking for rot make a big difference.
With a little effort, your shed door will hang straight and work smoothly again.