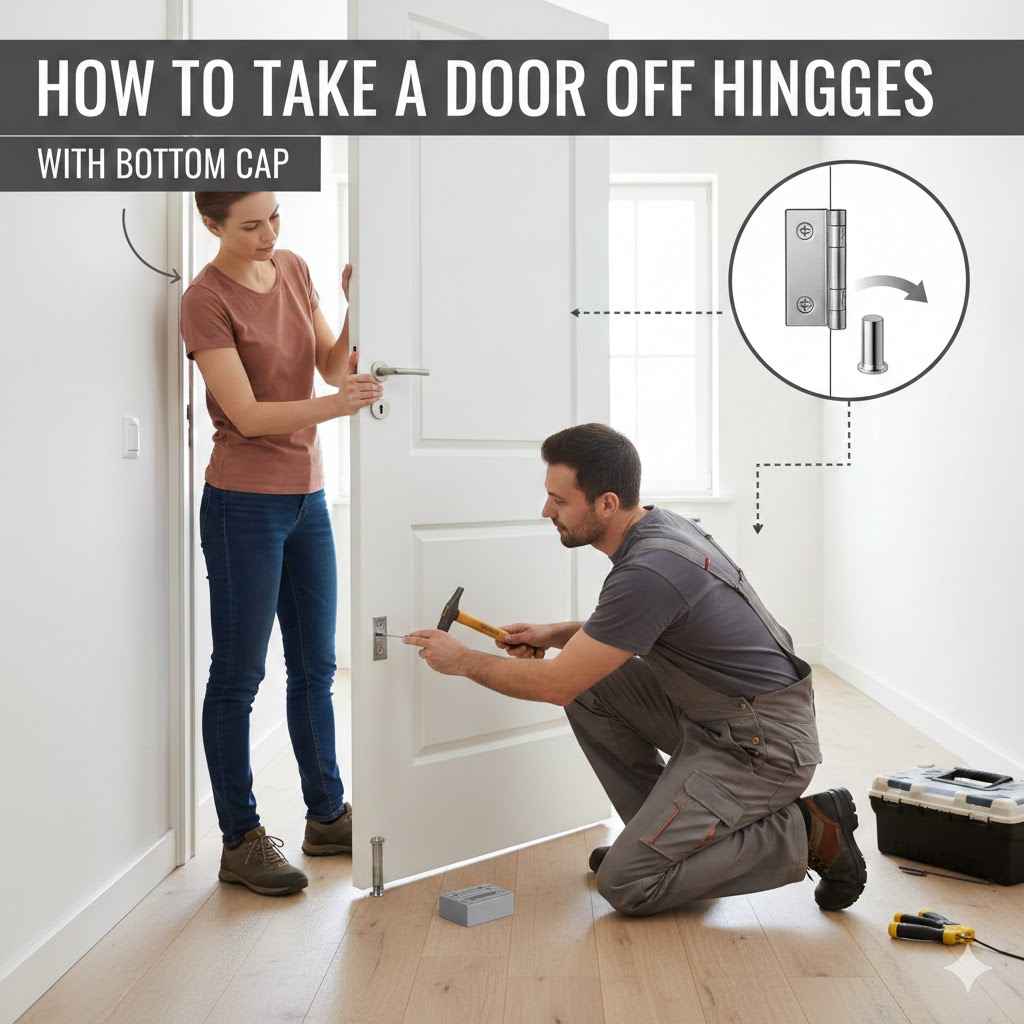
How to Take a Door Off Hinges With Bottom Cap
Sometimes you need to move a door, maybe to get it out of the way for painting or to
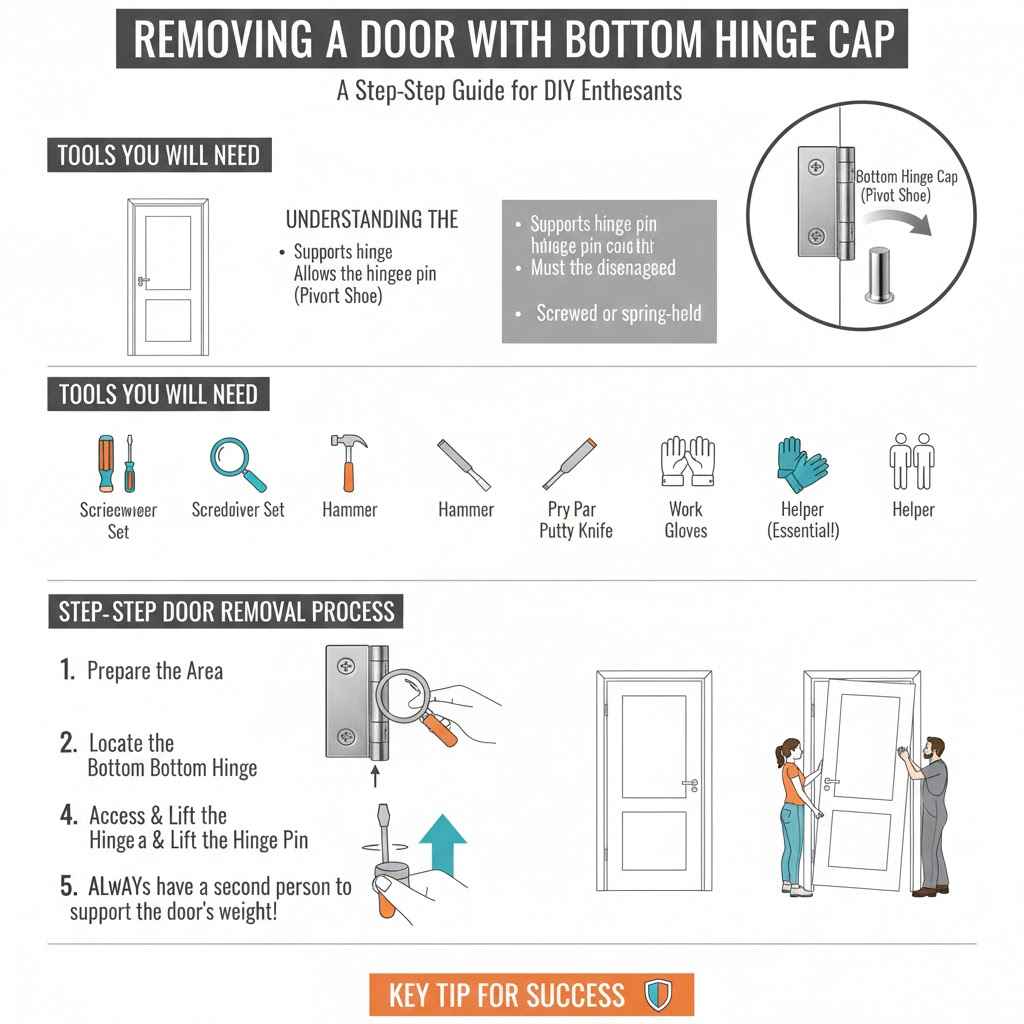
Removing a Door With Bottom Hinge Cap
This section covers the main task of getting a door off its hinges when the bottom hinge has a cap. This is a common situation for interior doors, especially in older homes or for certain types of door hardware. Understanding the purpose of the bottom hinge cap and how to deal with it is key to a smooth removal process.
We will explore the tools you might need and the basic steps involved.
Understanding the Bottom Hinge Cap
The bottom hinge cap, often called a pivot shoe or base plate, is an important part of the hinge system, especially for doors that swing both ways or are designed to be removed easily. This cap typically houses the bottom part of the hinge pin, which is crucial for the door’s stability and operation. It’s designed to allow the hinge pin to be lifted out from the bottom, thereby releasing the door from the frame.
Not all hinges have this type of cap, but when they do, knowing how to address it is essential for safe and proper door removal. This cap can sometimes be screwed in place or held by a spring mechanism, which we will discuss further.
For example, in some commercial settings or in specific residential door designs, the bottom hinge might have a decorative or functional cap that needs to be removed first. This cap protects the hinge pin’s base and can add a finished look. However, it also means you can’t just lift the pin straight up as you might with a standard hinge.
You must disengage or remove the cap to gain access to the pin’s lower end. This detail is what often causes confusion for DIYers, leading to frustration if they don’t know this specific step.
Tools You Will Need
Having the right tools makes any job easier and safer. For removing a door with a bottom hinge cap, you’ll generally need a few common household items. This isn’t a job that requires specialized professional equipment, which is good news for beginners.
- Screwdriver Set A good set with various Phillips and flathead bits is essential. You might need different sizes depending on the screws holding the hinge cap or other parts of the door assembly. A magnetic tip can be helpful to prevent dropping small screws.
- Hammer A small hammer is useful for gently tapping things into place or helping to loosen stubborn parts. It’s not for forceful striking but for controlled persuasion.
- Pry Bar A small pry bar or a putty knife can be used to carefully lever components apart if they are stuck or to help lift the hinge pin. Use with caution to avoid damaging the door or frame.
- Gloves Work gloves can protect your hands from splinters, sharp edges, or pinching. Doors can be surprisingly heavy and awkward to handle.
- Helper A second person is highly recommended. Doors are heavy and can be difficult to manage alone. Having someone to help support the door as it’s being detached makes the process much safer and easier for everyone involved.
Step-by-Step Door Removal Process
Now that you have your tools and a basic understanding, let’s get to the actual process. We will break down the steps so you can follow along easily.
Prepare the Area Make sure the space around the door is clear. Remove any rugs or furniture that could get in the way. This also prevents tripping hazards as you maneuver the door.
Locate the Bottom Hinge This is the key hinge to focus on. You’ll see the hinge pin extending from the bottom of the door and into the frame or the floor plate.
Address the Bottom Cap This is where the “bottom cap” comes into play. Depending on the hinge design, you might need to unscrew the cap from the frame, or there might be a small slot or opening at the bottom of the cap.
Access the Hinge Pin Once the cap is dealt with, you’ll see the end of the hinge pin. You might need to insert a screwdriver or a similar thin tool into a notch or hole at the bottom of the pin to help push it upward.
Lift the Hinge Pin With your helper ready to support the door, gently tap the hinge pin upwards using the screwdriver and hammer. Work from the bottom of the pin upwards. As the pin lifts out of the hinge, the door will start to separate from the frame.
Remove the Door Once all hinge pins are sufficiently lifted or removed, carefully lift the door straight up and off the remaining hinges. Your helper should be supporting the weight of the door.
Dealing With Different Bottom Hinge Cap Styles
Not all bottom hinge caps are the same. They come in various designs, and how you interact with them will depend on the specific type you are working with. Understanding these differences will help you avoid common mistakes and ensure a smoother removal.
We will explore some of the most common styles and how to approach each one.
Screw-On Caps
Some bottom hinge caps are directly attached to the frame or the hinge base using screws. These are generally the most straightforward to deal with. You will see visible screw heads on the cap or around its base.
- Identify Screws Locate all screws holding the cap in place. These are typically Phillips head screws.
- Unscrew the Cap Use your screwdriver to carefully remove these screws. Keep them in a safe place, like a small container or magnetic tray, so they don’t get lost.
- Remove the Cap Once all screws are out, the cap should lift away easily. If it feels stuck, a gentle tap with a rubber mallet or the handle of your screwdriver might help. Avoid using excessive force, which could damage the cap or the surrounding door frame.
Case study: A homeowner was trying to repaint their interior doors. They encountered a bottom hinge cap that seemed stuck. Upon closer inspection, they realized there were four small screws holding it to the floor plate.
Once they removed these screws, the cap came off easily, allowing them to lift the door. This saved them the hassle of trying to work around the cap.
Spring-Loaded or Clip-On Caps
Other hinge caps are designed to be held in place by a spring mechanism or clips. These might not have visible screws, making their removal less obvious at first glance. The idea is that they can be quickly disengaged.
- Look for Release Points These caps often have a small slot, notch, or a slightly raised edge. This is where you’ll need to apply pressure or use a tool to release the spring.
- Use a Thin Tool Insert a flathead screwdriver, a strong putty knife, or even a specialized hinge pin removal tool into the designated slot or near the edge.
- Apply Gentle Pressure Gently pry or push the tool to disengage the spring or clip. You might hear a click or feel the cap loosen. Sometimes, you need to push upwards while prying downwards, or vice versa, depending on the design.
- Test for Movement Once you’ve applied pressure, try to see if the cap can be lifted or wiggled. If it moves, you can usually then pull it off by hand. If not, you may need to adjust the angle or pressure of your tool.
Sample scenario: Imagine a door that needs to be temporarily removed for moving large furniture. The bottom hinge has a cap that doesn’t have screws. You notice a small circular indent at the very bottom.
Using a nail and a gentle tap from a hammer, you push the nail into this indent. This action releases an internal spring, allowing the cap to be pulled away.
Integrated Hinge Systems
Some modern door systems use integrated hinges where the bottom cap is part of a larger hinge assembly that might be recessed into the door or frame. These can be more complex and may require specific tools or knowledge.
- Consult Documentation If you are dealing with a newer or custom door, check if there are any manufacturer instructions or diagrams available. These can be invaluable for understanding the specific mechanism.
- Look for Set Screws Sometimes, instead of a cap, there’s a small set screw located on the side of the hinge base that holds the pin in place. Loosening this set screw can allow the pin to be raised.
- Professional Help If you are unsure or if the hinge system seems unusually complex, it’s often best to consult a professional. Forcing these types of hinges can lead to costly damage.
Safety Precautions and Tips
Safety should always be the top priority when working on any home improvement project, including removing doors. Doors can be heavy and awkward, and improper handling can lead to injuries or damage to your property. Here are some essential safety tips to keep in mind.
Handling the Door Safely
Doors are heavier than they look, and their weight distribution can be tricky. A single interior door can weigh anywhere from 20 to 50 pounds or more, depending on its material and construction. Exterior doors are significantly heavier.
- Always Have a Helper Working alone can be dangerous. A second person is crucial for supporting the door’s weight as it is detached from the hinges and for carrying it safely afterwards. This prevents dropping the door, which could cause injury or damage to floors.
- Maintain a Secure Grip Ensure you and your helper have a firm and steady grip on the door. Use gloves for better traction and to prevent splinters. Position yourselves so you can comfortably lift and carry the door.
- Clear Pathways Before you start, make sure the path where you’ll be carrying the door is completely clear of obstacles. This includes furniture, rugs, and any other items that could cause a trip or fall.
- Support the Door Properly As you lift the hinge pins, one person should be ready to support the door’s weight. Once detached, move the door slowly and deliberately, communicating with your helper at all times about direction and stops.
Statistics show that falls are a leading cause of non-fatal injuries in homes. Properly managing the weight and movement of a door significantly reduces the risk of such incidents.
Protecting Your Property
Beyond personal safety, it’s important to protect your doors, frames, and surrounding areas from damage. A little care goes a long way in preventing costly repairs.
- Use Protective Materials Place drop cloths or old blankets on the floor where the door will rest if you need to set it down temporarily. This protects your flooring from scratches. You can also place them against walls you might accidentally bump against.
- Gentle Tool Usage When using tools like screwdrivers or pry bars, apply force gradually and carefully. Avoid sharp, jerky movements. This minimizes the risk of gouging wood, scratching paint, or damaging the hinge mechanism itself.
- Mind the Door Frame The door frame is often made of softer wood than the door itself and can be easily dented or scratched. Be mindful of where the door edges are as you lift and maneuver it. Keep the door slightly away from the frame when possible until it’s fully clear.
- Keep Parts Organized When you remove screws or any other small parts from the hinge cap or mechanism, put them in a labeled bag or container immediately. This prevents them from getting lost and ensures you have everything needed to reattach the door later.
According to home repair surveys, property damage from DIY projects often stems from rushing or not using the right techniques. Being patient and careful with tools and materials helps avoid these common pitfalls.
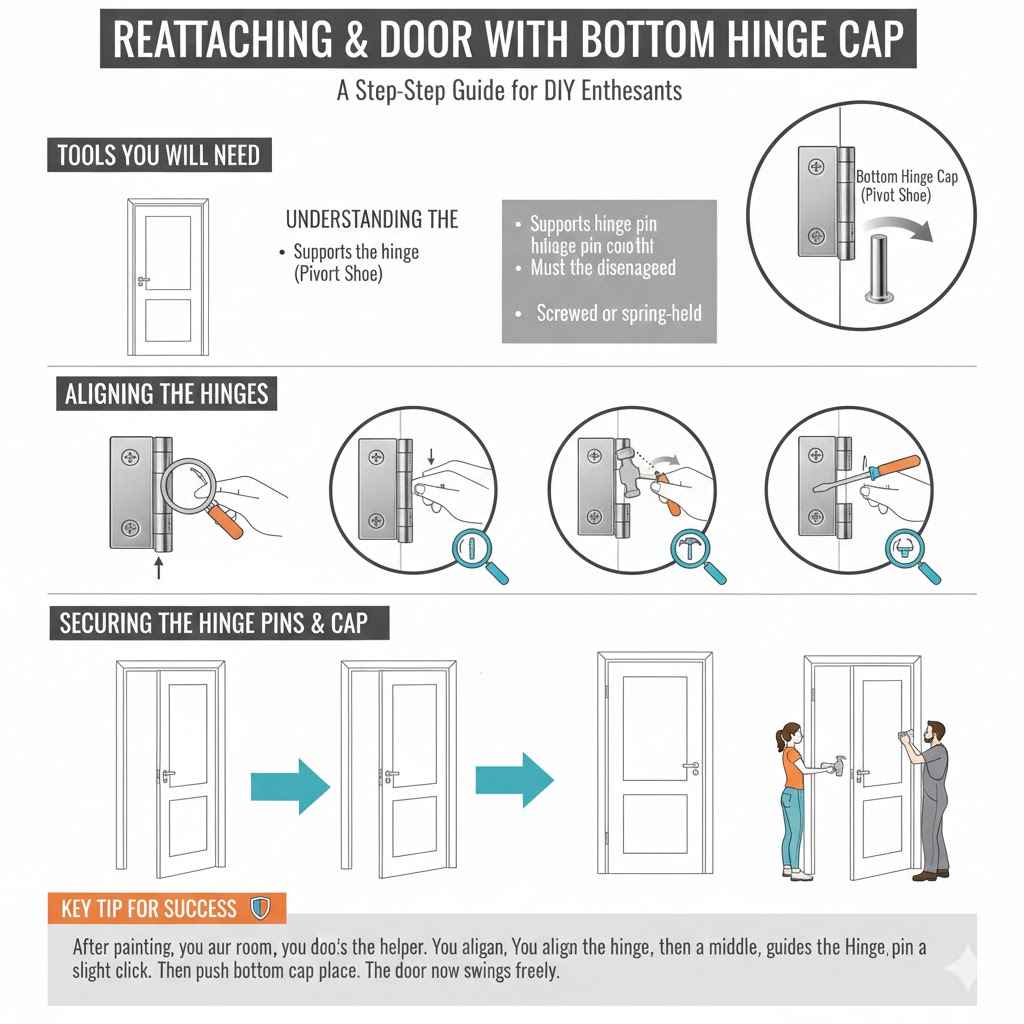
Reattaching the Door
Putting the door back on is the reverse of taking it off, but it’s important to do it carefully to ensure everything aligns properly and the door functions smoothly.
Aligning the Hinges
Proper alignment is key to a good fit. You’ll want to make sure the hinge knuckles on the door align with those on the frame.
- Position the Door Place the door back into the door frame. With your helper, carefully lift the door so that the hinge knuckles on the door line up with the corresponding knuckles on the frame.
- Guide the Hinge Pins As you align the knuckles, you should be able to see where the hinge pins need to go back into place. This might require some slight wiggling or adjustment of the door’s position.
- Lower the Door Gently With the hinges aligned, slowly lower the door so that the hinge pins begin to slide back into their respective knuckles.
Securing the Hinge Pins and Cap
Once the door is hanging on the hinges, you need to secure the pins and reattach the bottom cap.
- Insert Hinge Pins If you fully removed the pins, you’ll need to slide them back into the aligned hinge knuckles. This may require a gentle tap with a hammer, but ensure they go in smoothly.
- Reinstall the Bottom Cap Now, place the bottom hinge cap back into its original position. For screw-on caps, reinsert and tighten the screws. For spring-loaded or clip-on caps, ensure they snap or click securely back into place. Test its connection to ensure it won’t dislodge easily.
- Test the Door Once everything is reattached, open and close the door a few times. Check for smooth operation, listen for any squeaks or binding, and ensure the door closes and latches properly.
Sample scenario: After painting a room, you need to put the door back. You and your helper lift the door. You align the top hinge, then the middle, and then the bottom.
As you lower it, your helper guides the hinge pin into the bottom hinge. You hear a slight click as it seats. Then you push the bottom cap back into place, and it snaps shut.
The door now swings freely.
Frequently Asked Questions
Question: Do all doors have a bottom hinge cap
Answer: No, not all doors have a bottom hinge cap. Many standard interior doors use simple hinges where the pin goes straight into the top hinge knuckle and rests in the bottom hinge knuckle without a separate cap. Bottom hinge caps are more common on doors that swing both ways or have specific pivot mechanisms.
Question: Can I remove a door without a helper
Answer: It is strongly recommended not to remove a door without a helper. Doors can be surprisingly heavy and unwieldy, and trying to manage them alone significantly increases the risk of injury and damage to the door or your home.
Question: What if the hinge pin is stuck
Answer: If a hinge pin is stuck, try applying a penetrating lubricant like WD-40 and let it sit for a few minutes. Then, try tapping the pin gently from the bottom with a hammer and screwdriver. Ensure you are working on the correct hinge and that any bottom cap has been fully removed or disengaged.
Question: How do I know which type of bottom hinge cap I have
Answer: Examine the bottom hinge closely. If you see screws, it’s likely a screw-on type. If there are no screws but there’s a visible slot, notch, or smooth surface where you might apply pressure, it’s likely a spring-loaded or clip-on type.
Integrated systems may look like part of the hinge body itself.
Question: Can I remove a door that swings both ways
Answer: Yes, you can remove a door that swings both ways, but these often have specialized pivot hinges at the top and bottom. The bottom hinge usually has a cap or mechanism that needs to be dealt with first, similar to what we’ve discussed for standard doors, but may require a specific tool to disengage the pivot.
Final Thoughts
Taking a door off hinges with a bottom cap is a manageable task. You learned about different cap styles and the simple steps to remove them. With the right tools and a helper, you can safely detach and reattach your doors.
Follow these instructions carefully for a successful DIY project.