
How to Test a Fluorescent Bulb: Quick and Easy Methods
To test a fluorescent bulb, simply turn off the light fixture, remove the bulb, and visually inspect it for any signs of damage or discoloration. Fluorescent bulbs can also be tested with a digital multimeter to check for continuity and proper voltage.
Additionally, using a non-contact voltage detector can confirm if there is any electrical current flowing through the bulb. It is important to test fluorescent bulbs regularly to ensure they are functioning correctly and to avoid potential hazards such as flickering, dimming, or complete failure.
Whether in a home or office setting, a properly functioning fluorescent bulb is crucial for providing efficient and reliable lighting.
Visual Inspection
To test a fluorescent bulb, perform a visual inspection first. Look for any signs of damage, discoloration, or flickering.
Checking For Physical Damage
When testing a fluorescent bulb, the first step is to visually inspect it for any signs of physical damage. A damaged bulb can compromise its efficiency and pose safety risks. To do this:
- Make sure the power is turned off before handling the bulb. Safety first!
- Look for any cracks, chips, or dents on the bulb’s surface. These imperfections can indicate internal damage.
- Inspect the ends of the bulb, where the pins are located, for any bent or broken pins. Damaged pins may prevent proper functioning and cause flickering or humming.
Inspecting For Discoloration
Discoloration in a fluorescent bulb can be a sign of aging or malfunction. By examining the bulb for discoloration, you can determine its overall condition. Here’s how:
- Observe the color of the bulb. A healthy fluorescent bulb should have a consistent and even color throughout.
- Check for dark spots or blackening along the surface of the bulb. This discoloration can indicate burnout or internal defects.
- Pay attention to the presence of yellowing or browning. These discolorations may signal deterioration or the accumulation of contaminants on the bulb.
Examining For Flickering Or Humming
A fluorescent bulb that flickers or emits a humming sound can be bothersome and indicate underlying problems. To analyze the performance of the bulb, conduct the following examination:
- Switch on the bulb and observe its behavior. A healthy fluorescent bulb should start up quickly without any flickering or delays.
- Listen for any unusual humming noises coming from the bulb. Excessive humming can indicate a faulty ballast or other electrical issues.
- Take note of any flickering or inconsistent light output. This can be a sign of imminent failure or a problem with the bulb’s components.
By performing a thorough visual inspection, you can gather valuable information about the condition of a fluorescent bulb. Identifying physical damage, discoloration, and irregularities in performance can help you determine whether a bulb needs to be replaced or requires further troubleshooting.
Continuity Test
One of the essential tests to determine the functionality of a fluorescent bulb is the continuity test. This test helps in verifying if there is a complete and uninterrupted flow of electricity through the bulb. By conducting a continuity test, you can assess the condition of the filament inside the bulb, ensuring that it is not open or broken. In this section, we will discuss how to perform a continuity test on a fluorescent bulb using a multimeter.
Gathering The Necessary Tools
Before starting the continuity test, it is important to gather the necessary tools. Here’s what you’ll need:
- A multimeter (also known as a digital multimeter or DMM)
- A screwdriver (if required to remove the bulb)
Removing The Fluorescent Bulb
Step 1:
Ensure that the power to the fluorescent fixture is turned off. This is crucial for your safety.
Step 2:
Use a screwdriver, if necessary, to remove the fluorescent bulb from its socket. Gently twist the bulb counterclockwise until it loosens, and then carefully pull it out. Take caution while handling the bulb to avoid breakage or injury.
Using A Multimeter To Test Continuity
Step 1:
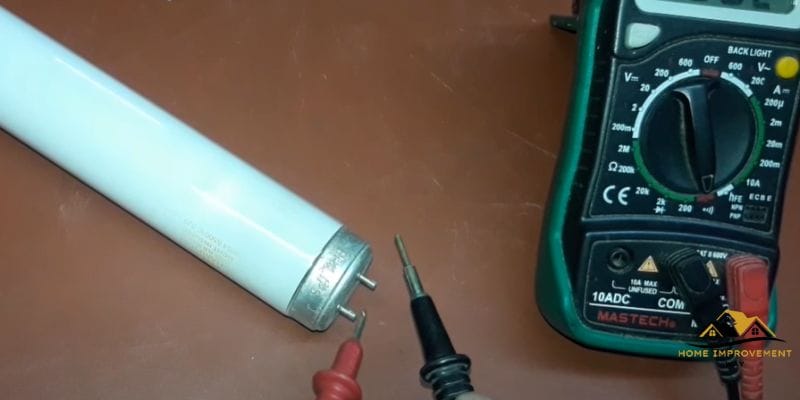
Set the multimeter to the continuity test mode. This is usually indicated by a symbol resembling sound waves or a diode.
Step 2:
Hold the probes (the metal tips of the multimeter) against the two metal pins at each end of the fluorescent bulb.
Step 3:
Observe the multimeter display. If the continuity test is successful, the multimeter will emit a beep sound or display a reading close to zero ohms (Ω). This indicates that there is a complete path for electrical current to flow through the bulb’s filament. If there is no continuity, meaning the bulb’s filament is open or broken, the multimeter will not emit a beep sound or display a reading.
Step 4:
Repeat the test on any other fluorescent bulbs, if necessary, to ensure an accurate assessment of their continuity.
Now that you know how to perform a continuity test on a fluorescent bulb using a multimeter, you can easily determine if your bulb is functional and in good working condition. Remember to always prioritize safety by disconnecting the power supply before removing or testing any electrical components.
Power Test
Testing a fluorescent bulb is essential to determine if it is functioning properly. One of the key steps in this process is the power test. By following a few simple steps, you can easily test your fluorescent bulb to ensure it is getting the required power supply. Let’s dive into the details of performing a power test.
Turning Off The Power Supply
The first step in testing a fluorescent bulb for power is to turn off the power supply. This crucial step helps avoid any accidents or electric shocks. Locate the circuit breaker or fuse box and switch off the power to the area where the bulb is installed. By doing this, you create a safe environment for testing the bulb without any potential electrical hazards.
Removing The Fluorescent Bulb
Once you have turned off the power supply, the next step is to remove the fluorescent bulb from its fixture. Take caution and wear protective gloves to avoid any injuries or breakages during the removal process. Carefully unscrew the bulb counterclockwise until it is completely free from the fixture. Be gentle and ensure you have a firm grip on the bulb to prevent it from slipping or falling.
Testing For Voltage Using A Non-contact Voltage Tester
Now that you have removed the fluorescent bulb, it is time to test for voltage using a non-contact voltage tester. This handy tool allows you to check if there is any electrical current present in the fixture. Simply place the non-contact voltage tester near the wires or terminals where the bulb was connected. The tester will indicate if there is any voltage present without the need for direct contact.
Make sure the tester emits a visual or auditory signal when it detects voltage. This indicates that the fixture is getting the necessary power supply. If you do not receive any indication, it may indicate a wiring issue or a problem with the power source. In such cases, it is recommended to consult a professional electrician for further assistance.
Remember, testing the power supply of a fluorescent bulb is a crucial step in troubleshooting any issues with its functionality. By following these steps and using a non-contact voltage tester, you can ensure that your bulb is receiving the necessary power. Once you have completed the power test, you can move on to the next steps in determining the cause of any lighting problems you may be experiencing.
Replacement Test
One of the easiest ways to test a fluorescent bulb is the Replacement Test. This test involves using a known working fluorescent bulb to determine if a questionable bulb is faulty or simply needs replacing. By following a few simple steps, you can quickly assess the health of your fluorescent bulb and determine if it needs to be replaced.
Obtaining A Known Working Fluorescent Bulb:
To conduct the Replacement Test, you will first need to find a known working fluorescent bulb that is compatible with the fixtures in question. Obtain this bulb from a source such as a functioning lamp or another known working fluorescent light. It is crucial that this bulb is confirmed to be in good working condition.
Inserting The Known Working Bulb:
Once you have obtained the known working fluorescent bulb, it’s time to proceed to the next step: inserting the bulb. Begin by turning off the power to the fixture and ensuring the bulb is cool to touch. Carefully remove the questionable bulb from its socket, taking note of any signs of damage or discoloration. Next, insert the known working bulb into the same socket, making sure it is securely in place.
Observing If The New Bulb Turns On:
With the known working bulb now inserted, it’s time to observe whether the new bulb turns on. Turn the power back on and wait a few moments to see if the bulb illuminates. Pay close attention to any flickering or inconsistent lighting, as this may indicate a problem with the fixture itself rather than the bulb. If the replacement bulb fails to turn on at all, it is likely that the fixture has a larger issue.
By conducting the Replacement Test, you can quickly determine if a questionable fluorescent bulb needs to be replaced or if the issue lies elsewhere. Remember to exercise caution and follow safety procedures when handling fluorescent bulbs to avoid any accidents.

Final Thoughts
Testing a fluorescent bulb is an important step in ensuring its functionality. By following specific procedures, you can easily assess if the bulb is working or needs replacement.
When To Seek Professional Help
While testing a fluorescent bulb can be a simple task, there are situations when it is best to seek professional help. If you are unsure about the testing process or if you lack the necessary tools and knowledge, it is recommended to call a professional electrician or technician. They have the expertise to handle electrical tasks safely and efficiently.
Importance Of Regular Maintenance
Regular maintenance plays a crucial role in ensuring the longevity and optimal performance of fluorescent bulbs. By conducting routine inspections and tests, you can identify any faulty bulbs or potential issues before they become major problems. This proactive approach helps to minimize the risk of sudden breakdowns and costly repairs.
Safety Precautions During Testing
Testing a fluorescent bulb involves working with electricity, which can be hazardous if not done correctly. It is imperative to take proper safety precautions to protect yourself and prevent accidents. Here are some important safety measures to follow:
- Make sure the power is turned off before starting any inspection or testing.
- Wear insulated gloves and safety glasses to protect against electric shocks and debris.
- Use a non-contact voltage tester to confirm that the circuit is de-energized before touching any wires or components.
- Avoid touching exposed metal parts, as they may still be energized.
- Avoid using damaged or frayed cords and wires.
- Dispose of old and broken fluorescent bulbs properly as they contain hazardous materials.
Following these safety precautions will ensure a safe testing process and reduce the risk of accidents or injuries.
Conclusion
To conclude, testing a fluorescent bulb is a simple process that can save you time and money. By following the steps outlined in this blog post, you can determine whether your bulb is functioning properly or needs to be replaced.
Remember to exercise caution and follow safety guidelines when working with electricity. By regularly testing and maintaining your fluorescent bulbs, you can ensure optimal lighting and efficiency in your home or workplace.