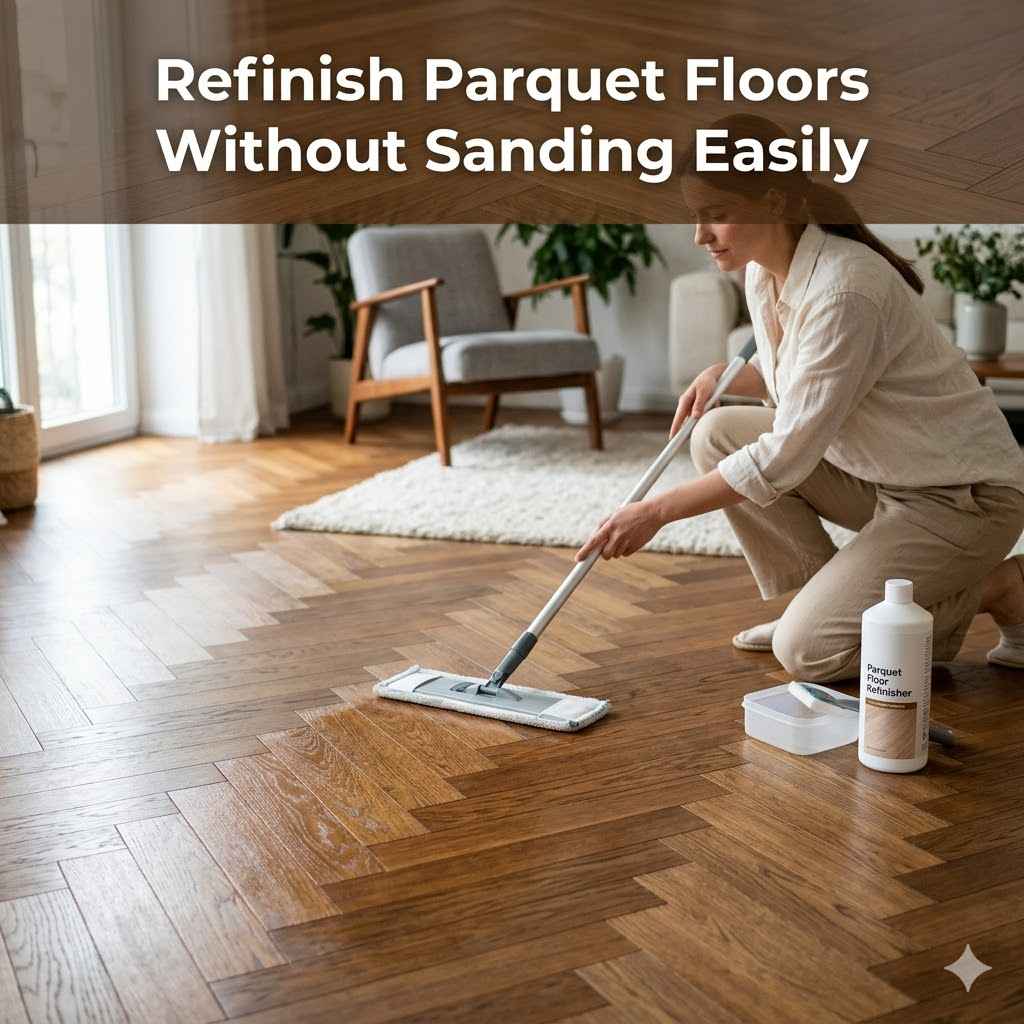
Refinish Parquet Floors Without Sanding Easily
Want to make your old parquet floors look new again without the big mess of sanding? Many people think refinishing floors means lots of dust and hard work, especially with the unique pattern of parquet. But you don’t have to be a pro to get a beautiful finish.
This guide will show you simple steps to Refinish Parquet Floors Without Sanding Easily. We’ll go through everything you need to know to get great results without the sandpaper.
Prepare Your Parquet Floors
Getting your parquet floors ready is a super important step before you do anything else. It helps make sure the new finish sticks well and looks its best. This part might seem simple, but doing it right makes a huge difference later on.
We’ll cover how to clean deeply and make sure your floors are perfect for the next steps.
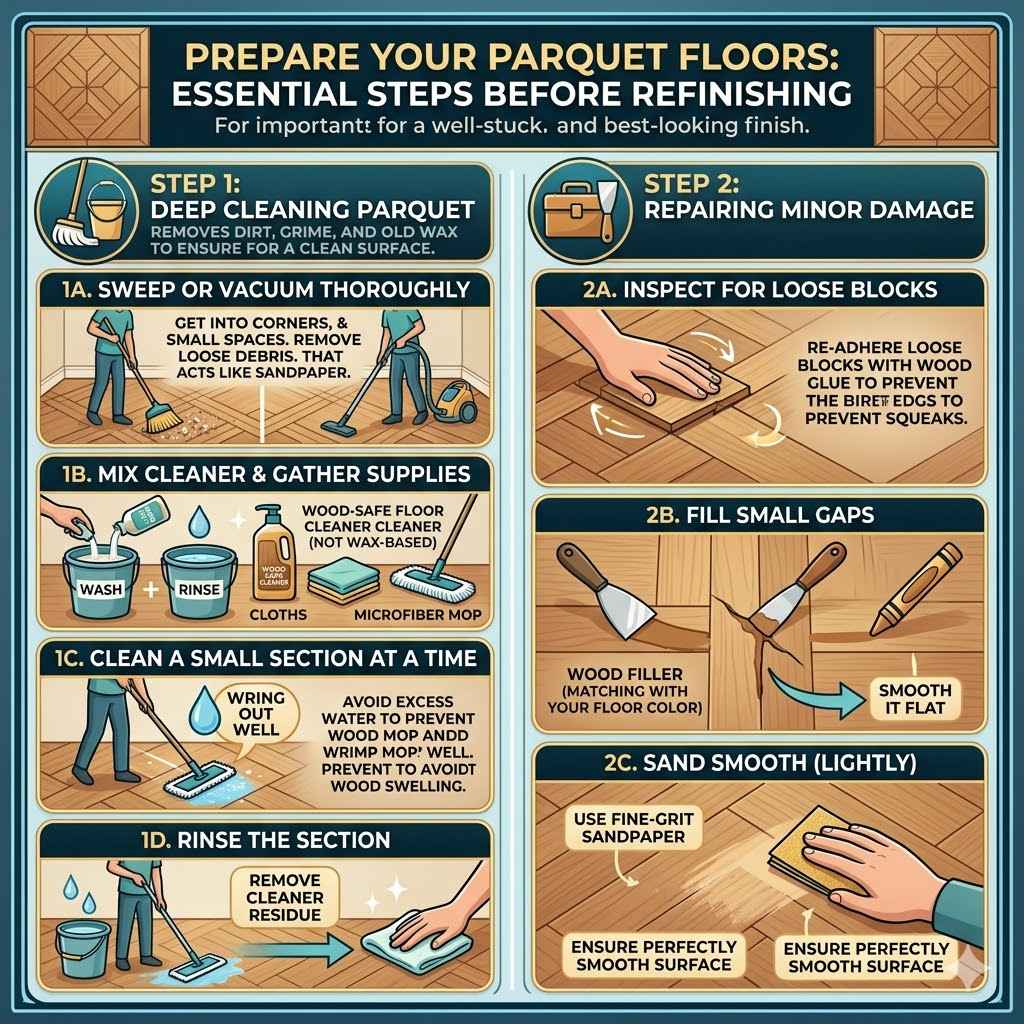
Deep Cleaning Parquet
The first thing to do is give your floors a really good clean. You want to remove all the dirt, grime, and old wax. This is key so the new finish has a clean surface to stick to.
A dirty floor can lead to a patchy or dull new coat.
Gather your cleaning supplies. You will need a good floor cleaner that is safe for wood, two buckets, clean cloths or microfiber mops, and a broom or vacuum cleaner. Make sure the cleaner you pick is not a wax-based one, as this can stop the new finish from adhering properly.
Using the right cleaner is vital. Some cleaners leave behind a residue that can prevent the new finish from bonding. Always check the product label to ensure it’s suitable for finished wood floors and doesn’t contain any waxes or oils that could interfere with refinishing.
Sweep or vacuum thoroughly. Get into all the small spaces between the parquet blocks. This removes loose debris that could scratch the floor when you clean it with liquid.
Loose dirt and grit can act like sandpaper under your mop. Taking the time to get rid of as much as possible before wet cleaning prevents these particles from being spread around and causing damage. Pay special attention to corners and edges where dust tends to gather.
Mix your cleaner. Follow the directions on the cleaner bottle. Usually, you mix a small amount with water in one bucket.
Diluting the cleaner correctly is important. Too much cleaner can leave a sticky residue, while too little might not be effective at removing tough grime. Always measure carefully for the best results.
Clean a small section at a time. Dip your mop or cloth into the cleaning solution, wring it out really well so it’s just damp, not dripping wet. Wipe the floor section.
Using a damp mop, not a soaking wet one, is critical for wood floors. Excess water can seep into the wood, causing swelling and damage, especially to the glue holding the parquet blocks together. Wringing out the mop thoroughly ensures you’re cleaning without saturating the wood.
Rinse the section. Use your second bucket with clean water and a clean mop or cloth. This removes any cleaner residue. Wring it out well.
Rinsing is just as important as cleaning. The cleaner itself can leave a film on the floor. This film can prevent the new finish from sticking properly.
Using a separate bucket for rinsing keeps your rinse water clean.
Dry the floor. Use a clean, dry cloth or mop to dry the area you just cleaned and rinsed. Then move to the next section and repeat.
Wood needs to be dry after cleaning. Letting it air dry can take too long and still leave moisture behind. Actively drying the floor ensures that no water is left to harm the wood or the new finish.
This helps prevent issues like cupping or warping of the wood.
Repairing Minor Damage
Before you apply any new finish, it’s smart to fix any small issues. This includes filling small gaps or dents. These small fixes make your floor look much better when it’s all done.
Inspect for loose blocks. Gently press down on each parquet block. If any feel loose, you can try to re-adhere them with wood glue.
Loose blocks can cause squeaks and look uneven. A little wood glue applied carefully underneath the block and a weight placed on top until it dries can often fix this. This prevents the problem from getting worse and makes the floor feel solid again.
Fill small gaps. Use wood filler that matches your floor color. You can buy it in a paste or crayon form.
Wood filler can hide small cracks and gaps between blocks. It makes the surface look smooth and uniform before you add the new finish. Choose a filler that can be stained or painted, as this gives you more options for matching your floor color.
Apply filler with a putty knife. Push it into the gap or dent and then smooth it flat with the surface. Let it dry completely.
Using a putty knife helps to pack the filler into the damaged area. Smoothing it flush with the floor prevents bumps that could be noticeable after refinishing. Following the drying time on the product is crucial for a strong repair.
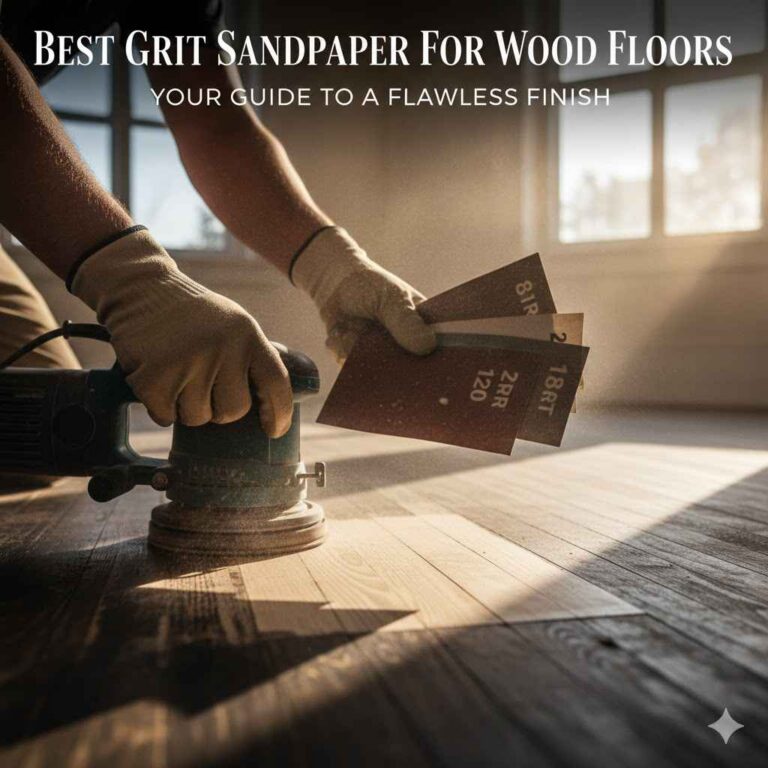
Sand smooth (lightly). Once the filler is dry, gently sand the filled areas so they are level with the rest of the floor.
Even though we are avoiding full sanding, a light touch-up sand on the filler spots is needed. This ensures the filled areas are perfectly smooth and blended. Use fine-grit sandpaper for this so you don’t scratch the surrounding wood.
Choosing the Right Refinishing Products
When you decide not to sand, picking the right products is key. There are special finishes made for this. They work differently than traditional floor finishes and are easier to use.
We’ll look at what types of products work best and what to look for.
Types of No-Sand Finishes
Several types of floor finishes can be applied without sanding. These are designed to bond directly to your existing finish. This saves a lot of time and effort.
Water-based polyurethane. This is a popular choice for DIYers. It dries quickly, has low odor, and is easy to clean up.
Water-based polyurethanes are great because they don’t have the strong chemical smell of oil-based ones. This means you can often do the work in a day without making your home unlivable. Cleanup is also easy with soap and water.
Re-coaters or refreshers. These products are specifically made to add a new layer of protection over existing finishes. They are often very thin and easy to apply.
Re-coaters are like a revitalizing top coat for your floors. They can bring back shine and cover up minor scratches. They work by chemically bonding with the old finish, essentially becoming one with it.
Restorative finishes. Some products are marketed as floor restorers. They aim to bring back the shine and color of worn-out floors.
These restorers often contain polymers that fill in micro-scratches and create a new, smooth surface. They are a good option if your floor is dull but not heavily damaged. They can also add a layer of protection against future wear.
Understanding Product Labels
Always read the product label carefully. It will tell you if the product is meant for use over existing finishes and if it requires sanding beforehand.
Look for phrases like “no-sand formula” or “refinishes over existing finishes.” This tells you it’s designed for your method.
These phrases are your signal that the product is suitable for a no-sand refinish. Manufacturers include them to make it clear that their product is intended for a specific application without requiring heavy preparation like sanding.
Check for compatibility. Some products might say they work over polyurethane but not wax. Make sure your floor is free of incompatible finishes.
Compatibility is key for any finish to adhere properly. If you have wax on your floors, even a no-sand finish won’t stick well. This is why the deep cleaning step is so important for removing any old wax or sealers.
Consider the sheen. Finishes come in different sheens like matte, satin, semi-gloss, and gloss. Choose one that fits your preference.
The sheen affects how the floor looks and how much light it reflects. A satin finish is popular because it hides minor imperfections better than a high-gloss finish. Matte finishes offer a very natural look.
Applying the Refinishing Product
This is where you start to see the transformation! Applying the new finish is straightforward if you follow the steps carefully. We will walk you through how to get an even coat and a great look for your parquet floors.
Application Tools
Having the right tools makes the job much easier and the results much better. You don’t need anything too fancy.
High-quality applicator pad or brush. For water-based finishes, a foam applicator pad designed for floor finishes or a good synthetic brush works well.
These tools are designed to spread the finish thinly and evenly. A cheap brush might leave bristles behind, and a regular roller might apply the finish too thick. A good applicator ensures a smooth, consistent layer.
Extension pole. This helps you reach areas without bending over constantly, making the job less tiring.
An extension pole attaches to your applicator pad or brush. It allows you to stand up straight while working, which is much more comfortable for long jobs. This makes the whole process more manageable.
Paint tray or bucket with roller grid. This helps you load the applicator evenly.
A paint tray or a bucket with a grid prevents you from overloading your applicator. You can roll the pad on the grid to remove excess finish, ensuring a thin, even coat. This is important for avoiding drips and runs.
Application Steps
Apply the finish in thin, even coats. This is better than one thick coat.
Stir the finish gently. Do not shake the can, as this can create air bubbles.
Shaking a can of finish can introduce tiny air bubbles that will show up on your floor. Gently stirring it ensures the product is mixed without adding unwanted air. This leads to a smoother final appearance.
Load your applicator. Dip it into the finish or use the tray, then remove excess product.
You want just enough finish on the applicator to spread smoothly. Too much will lead to pooling and drips. Too little will make it hard to cover the area evenly.
Apply in long, even strokes. Work with the grain of the wood. For parquet, this means following the direction of the wood blocks in each section.
Working with the grain helps the finish blend in and look natural. For parquet, this can be tricky as the grain changes direction. Apply in small sections, moving from one end of the room to the other.
Overlap your strokes slightly. This ensures no areas are missed and creates a seamless finish.
Slightly overlapping each stroke helps to avoid creating lines where one stroke ends and the next begins. This creates a uniform surface that looks consistent across the entire floor.
Apply second and third coats as needed. Let each coat dry completely according to the product instructions. Lightly buff between coats if the product directions say so.
Multiple thin coats are always better than one thick coat. Each layer builds protection and depth. Allowing adequate drying time between coats is crucial for the finish to cure properly.
Maintaining Your Refinished Parquet Floors
Keeping your parquet floors looking good after refinishing is easy. Simple, regular care makes a big difference. We’ll cover the best ways to clean and protect your floors so they stay beautiful for a long time.
Daily and Weekly Care
Regular cleaning stops dirt from building up and scratching the new finish.
- Sweep or vacuum daily. Use a soft brush attachment on your vacuum.Daily sweeping removes dust and grit that can scratch the finish over time. A vacuum with a soft brush head is ideal as it won’t damage the wood. This simple step prevents wear and tear.
- Spot clean spills immediately. Use a soft, damp cloth.Liquids left on the floor can cause staining or damage to the finish. Wiping up spills right away with a damp cloth prevents them from soaking into the wood or the finish.
- Damp mop weekly or as needed. Use a wood floor cleaner and a well-wrung-out mop.A weekly damp mop keeps the floors clean and shiny. Remember to wring out the mop very well to avoid excess water. This helps maintain the finish and keeps it looking fresh.
Protecting Your Floors
Simple protective measures stop your floors from getting damaged from everyday use.
Use rugs and mats. Place mats at entryways and rugs in high-traffic areas.
Entry mats catch dirt and moisture before it gets tracked onto your floors. Rugs in busy spots like living rooms or hallways absorb impact and prevent wear patterns from forming. This is a simple way to protect the finish.
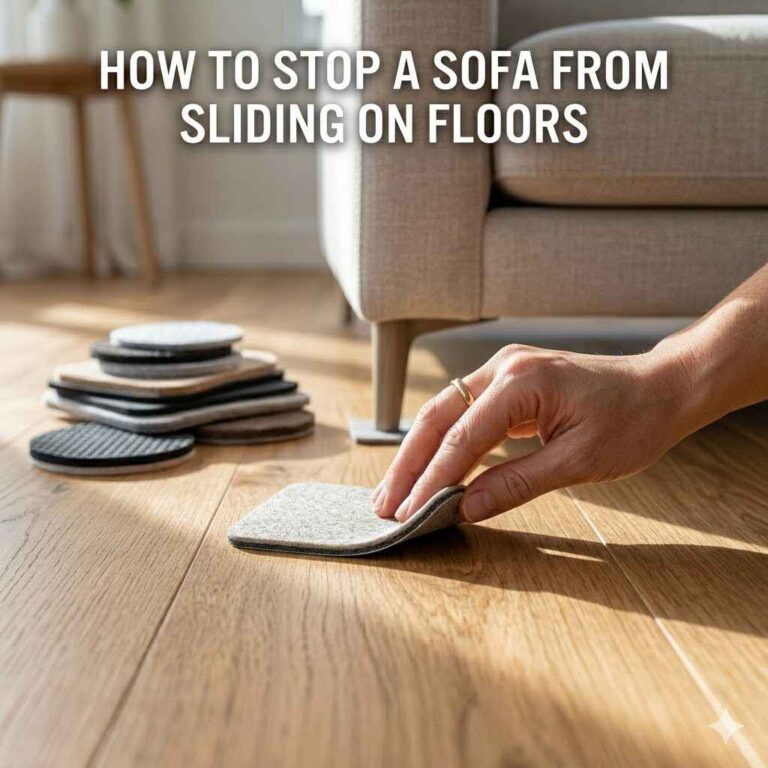
Use furniture pads. Put felt pads on the legs of all furniture.
Felt pads on furniture legs slide smoothly across the floor instead of scratching it. This is especially important for chairs and tables that are moved often. Replace them when they become worn.
Avoid high heels and pet claws. These can cause dents and scratches.
Sharp objects like high heels or pet claws can easily damage the wood finish. Wearing soft shoes indoors and keeping pet nails trimmed can help prevent this type of damage.
Control humidity. Maintain a steady humidity level in your home.
Extreme changes in humidity can cause wood to expand or contract, potentially leading to gaps or warping. Using a humidifier or dehumidifier can help keep the wood stable and protect the finish.
Troubleshooting Common Issues
Even with the best efforts, sometimes little problems pop up. Knowing how to fix them can save your project. We’ll look at common issues and how to solve them easily.
Uneven Finish
If your finish looks streaky or uneven, it’s usually due to application.
Cause: Applying the finish too thick or too thin in spots. Not overlapping strokes enough.
When the finish isn’t applied evenly, some areas will look different from others. This can happen if you don’t use the right amount of product on your applicator or if you don’t overlap your strokes properly.
Solution: Lightly scuff sand the uneven areas with fine-grit sandpaper (220 grit or higher). Then, apply another thin, even coat of finish, ensuring you overlap strokes.
A light sanding can smooth out the imperfections. The key is to be gentle so you don’t damage the existing finish. Applying another thin coat will help blend everything together for a uniform look.
Bubbles or Lumps
Air bubbles or small lumps can ruin the smooth look of your floor.
Cause: Shaking the product can, not stirring gently. Applying finish too quickly. Dust in the air.
These issues often stem from how the product was handled or applied. Shaking the can introduces air, and applying too fast can trap air or dust.
Solution: If it’s minor, let the finish dry completely, then gently sand out the imperfections and reapply a thin coat. For larger issues, you might need to use a specialized filler or consult product instructions.
Sometimes, a gentle sanding can fix small bubbles. For more noticeable problems, you might need to treat the area more directly. Always try to work in a clean environment to avoid dust.
Dull Spots
If certain areas don’t have the same shine as others, it can be frustrating.
Cause: Incomplete coverage, not enough coats, or uneven application.
Dull spots often mean that the finish didn’t cover the entire surface properly. This could be because you didn’t apply enough product or missed a spot during application.
Solution: Reapply a thin coat of finish to the affected areas. If the whole floor is dull, a full second coat might be needed.
Adding another thin layer of finish can revive dull spots. Make sure to feather the edges of your application to blend it seamlessly with the surrounding area.
Refinish Parquet Floors Without Sanding Easily Benefits
Choosing to refinish your parquet floors without sanding offers many advantages. It’s a more accessible way for homeowners to refresh their space. This method is less physically demanding and can be completed much faster than traditional sanding.
It also means less mess and disruption in your home, making it a practical choice for busy households. The cost can also be lower, as you’re not paying for expensive sanding equipment or professional sanding services.
Saves Time and Effort. Traditional floor refinishing requires extensive preparation and a lot of physical labor to sand down the old finish. A no-sand method skips this demanding stage, allowing you to complete the project in a fraction of the time. You can often finish a room in a weekend.
This efficiency is a major draw for many homeowners. Instead of dedicating days or weeks to sanding, you can focus on applying the new finish, which is a much quicker process. This means your floors are back in use sooner, and your daily life is less interrupted.
Reduced Mess and Dust. Sanding creates a significant amount of fine dust that can spread throughout your home, requiring extensive cleaning. No-sand refinishing produces minimal dust, usually just from minor repairs, making the process much cleaner and healthier.
The dust from sanding is a notorious problem. It gets into ventilation systems, coats furniture, and can take weeks to fully clean. A no-sand approach greatly reduces this airborne nuisance, making your home a more pleasant place to be during the renovation.
Lower Cost. You avoid the expense of renting or buying heavy-duty sanding equipment. Plus, if you’re doing it yourself, you save on labor costs. The products themselves are often reasonably priced for the value they provide.
When you factor in the cost of sanders, sandpaper, and potentially hiring a professional sander, the traditional method can add up. The no-sand alternative cuts down on these expenses, making it a more budget-friendly option for homeowners looking to update their floors without breaking the bank.
Suitable for All Skill Levels. The application process for no-sand refinishers is typically much simpler than sanding. This makes it an excellent DIY project for beginners who may find traditional methods too intimidating.
This method democratizes floor refinishing. You don’t need to be an expert woodworker to achieve good results. The ease of application means that anyone can tackle this project and feel confident about the outcome.
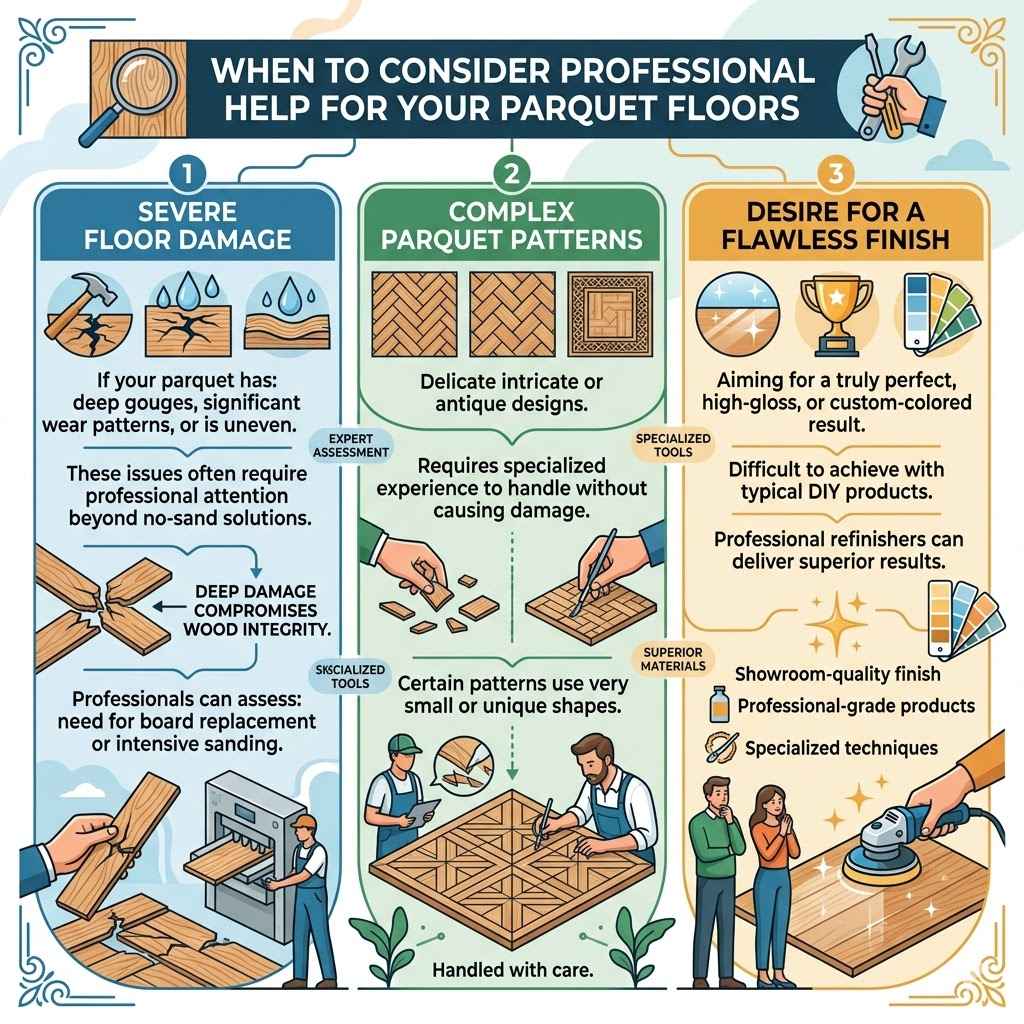
When To Consider Professional Help
While refinishing parquet floors without sanding is a great DIY option, there are times when professional help is a good idea. If your floors have deep scratches, significant water damage, or warped boards, a professional can assess the situation and offer the best solution. They have specialized tools and expertise to handle more severe issues that might be beyond a DIY project.
Professionals can also ensure a perfect, factory-like finish for those who want the absolute best result.
Severe Floor Damage. If your parquet flooring has deep gouges, significant wear patterns, or is uneven, it may require professional attention. These issues often go beyond what a simple no-sand refinisher can fix.
Deep damage compromises the integrity of the wood. Professionals can assess if the boards need replacing or if a more intensive sanding process is necessary to achieve a smooth, durable surface.
Complex Parquet Patterns. While this guide covers general parquet, some intricate or antique parquet designs might be delicate. Professionals have the experience to handle these without causing damage.
Certain parquet patterns are made of very small or uniquely shaped pieces. A professional can work with these delicate designs, ensuring each piece is treated with care during the refinishing process.
Desire for a Flawless Finish. If you aim for a truly perfect, high-gloss, or custom-colored finish that’s difficult to achieve with DIY products, a professional refinisher can deliver superior results.
Achieving a showroom-quality finish often requires specific techniques and professional-grade products. If your goal is the highest possible aesthetic standard, hiring an expert is the best route.
Frequently Asked Questions
Question: Can I really refinish parquet floors without any sanding at all
Answer: Yes, you can refinish many parquet floors without sanding using special no-sand refinishing products. These products are designed to bond to your existing finish, giving your floors a fresh look without the mess and labor of traditional sanding.
Question: What kind of cleaner should I use before refinishing
Answer: Use a pH-neutral wood floor cleaner that is specifically designed for finished wood floors. Avoid anything with wax, oil, or ammonia, as these can interfere with the new finish bonding to the floor.
Question: How many coats of finish should I apply
Answer: Most no-sand refinishing projects recommend applying two to three thin, even coats. Always follow the specific product instructions, as drying times between coats are crucial.
Question: How long will my refinished floors last
Answer: With proper care and maintenance, a no-sand refinish can last for several years, often 3-5 years or more. Regular cleaning and protection will extend the life of the finish.
Question: Can I change the color of my parquet floors with a no-sand product
Answer: Most no-sand refinishers are designed to refresh or add a clear protective coat, not to change the color significantly. Some products might slightly darken the wood or add a tint, but for a color change, sanding is usually required.
Summary
You can indeed Refinish Parquet Floors Without Sanding Easily by following simple steps. Prepare floors by cleaning and fixing small damages. Choose the right no-sand products, apply them carefully with proper tools, and maintain them with regular cleaning and protection.
This method saves time, effort, and money, making it a great DIY project for a beautiful floor refresh.