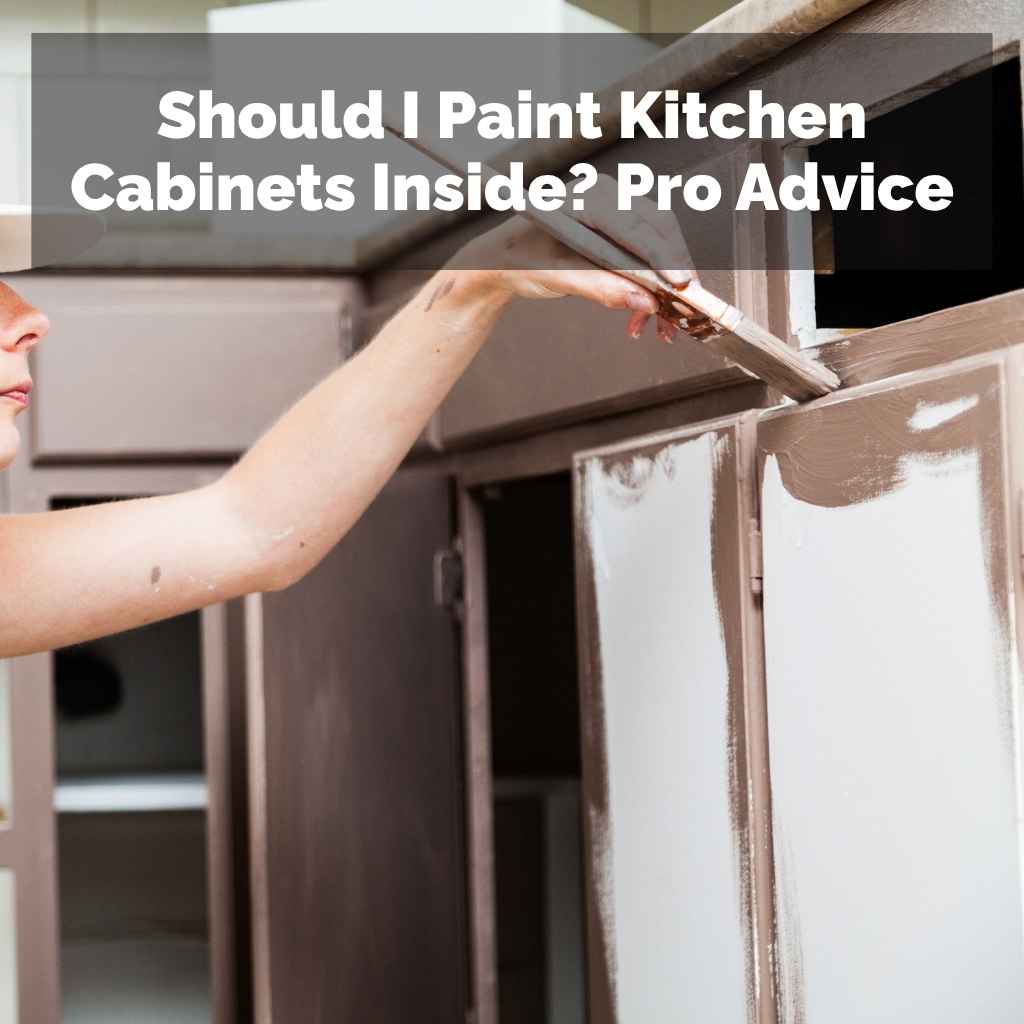
Should I Paint Kitchen Cabinets Inside? Pro Advice
Many folks wonder, Should I Paint the Inside of Kitchen Cabinets? Pro Advice is a common question for anyone looking to refresh their kitchen. It might seem like a simple DIY job, but getting it right can be tricky for beginners.
You want your cabinets to look great inside and out, without any hassle. This guide will walk you through everything you need to know, step by step, so you can make the best decision for your kitchen. We’ll cover all the important details to help you achieve a beautiful finish.
Should I Paint the Inside of Kitchen Cabinets? The Big Question
Deciding whether to paint the inside of your kitchen cabinets is a big step for many homeowners. It’s a project that can dramatically change the look and feel of your kitchen, but it also requires careful thought and preparation. Beginners often hesitate because they’re unsure of the best approach, the right materials, or if it’s even worth the effort.
This section explores the core considerations and helps you weigh the pros and cons.
Why Consider Painting Cabinet Interiors
Painting the inside of your kitchen cabinets can bring a fresh, updated look to your cooking space. It’s a way to add a pop of color or a clean, modern finish that complements your kitchen’s overall style. If your current cabinets are old, stained, or just not your taste, this can be a more budget-friendly alternative to full replacement.
It also offers a chance to personalize your kitchen. You might choose a bold color for a statement or a soft, neutral tone for a subtle update. This project can make your kitchen feel brand new without a huge expense, giving you a refreshed space that feels more like home.
-
Aesthetic Appeal: Fresh paint can make old cabinets look new again. It allows you to match the interior to your decor. You can choose a color that pops or one that blends in seamlessly.
This visual update can make your kitchen feel more inviting and stylish.
-
Customization: You have complete control over the color and finish. This is your chance to get creative and make your kitchen truly unique. Whether you want a bright accent or a subtle enhancement, painting lets you achieve it.
-
Cost-Effectiveness: Compared to replacing cabinets, painting is much cheaper. You can achieve a significant transformation for the cost of paint and supplies. This makes it an attractive option for those on a tighter budget.
Potential Downsides to Painting Interiors
While painting cabinet interiors has benefits, there are also challenges to consider. The process takes time and effort, and if not done correctly, the results might not be what you expect. It’s important to be realistic about the work involved and the potential outcomes.
Improper preparation can lead to peeling paint or an uneven finish. Also, the smell of paint can linger for a while, which might be bothersome. You’ll need good ventilation.
Think about how much you use your cabinets and how sensitive you are to these issues before you start.
-
Labor Intensive: Painting cabinets, inside and out, requires a lot of prep work. This includes cleaning, sanding, and priming. It can be time-consuming and physically demanding, especially for large kitchens.
Rushing the process often leads to poor results.
-
Durability Concerns: The inside of cabinets sees a lot of use. Items are frequently moved in and out, which can cause wear and tear on the paint. You need a durable paint and a good finish to withstand this.
Scratches and chips can appear over time.
-
Potential for Mess: Dust from sanding, paint drips, and fumes can make your kitchen a mess during the project. You’ll need to cover countertops and floors. Good ventilation is key to managing paint odors and ensuring a safe working environment.
Preparing Your Kitchen Cabinets for Painting
Proper preparation is the most critical step for any painting project, especially for kitchen cabinets. This is where many DIYers run into trouble. If you skip or rush this part, your paint job won’t last or look its best.
We’ll walk through each step to ensure a smooth and lasting finish for your cabinet interiors.
Cleaning and Degreasing
Kitchen cabinets are often covered in grease and grime from cooking. You need to remove all of this before you can paint. A clean surface is essential for the paint to stick properly.
This step ensures the paint adheres well and prevents future peeling or bubbling.
Start by removing everything from the cabinets. Use a good degreaser, like a solution of dish soap and warm water, or a specialized kitchen degreaser. Wipe down all interior surfaces, paying close attention to corners and edges.
Rinse with clean water and let them dry completely. This will make a big difference in the final outcome.
-
Gather Supplies: You’ll need rubber gloves, sponges or soft cloths, a bucket, warm water, and a good degreasing cleaner. For tough grease, a stronger cleaner might be necessary. Ensure you have plenty of rags for wiping and rinsing.
-
Wipe Down Thoroughly: Use your degreasing solution to clean every inch of the cabinet interiors. Pay extra attention to areas near the stove and sink where grease buildup is common. Don’t forget the shelves, drawer insides, and any other surfaces you plan to paint.
-
Rinse and Dry: After degreasing, wipe down all surfaces with a clean cloth dampened with plain water. This removes any residue from the cleaner. Let the cabinets air dry completely, or use a fan to speed up the process.
Any moisture left behind can affect paint adhesion.
Sanding for Adhesion
Sanding creates a slightly rough surface that the new paint can grip onto. Even if your cabinets are already painted or finished, sanding is usually necessary. This step is vital for ensuring the paint adheres well and doesn’t chip or peel later.
Use fine-grit sandpaper, around 150-220 grit. You don’t need to remove the existing finish, just scuff it up lightly. Sand all surfaces you plan to paint.
After sanding, wipe away all the dust with a tack cloth or a damp cloth. This dust is the enemy of a smooth paint job, so be thorough.
-
Choose the Right Grit: Fine-grit sandpaper (150-220) is best for this task. It’s enough to create a surface for paint to adhere to without damaging the cabinet material. Avoid coarse sandpaper, which can leave deep scratches.
-
Sand Smoothly: Sand all areas that will be painted. Move the sandpaper in the direction of the wood grain if applicable. The goal is to create a dull, uniform surface, not to strip the original finish.
-
Dust Removal is Key: After sanding, use a vacuum with a brush attachment to remove most of the dust. Then, use a tack cloth or a slightly damp microfiber cloth to pick up any remaining fine particles. This ensures a clean surface for priming.
Priming for a Better Finish
Primer is like a base coat that helps your paint stick better and makes the final color more vibrant. It also covers any stains or imperfections that might show through the paint. Using a good primer is a game-changer for cabinet painting.
Apply one or two coats of a high-quality primer specifically designed for cabinets or interior woodwork. Let each coat dry completely according to the product instructions. This step is essential for achieving a smooth, even, and long-lasting paint job.
It seals the surface and provides a uniform base.
-
Select the Right Primer: Use a good adhesion-promoting primer. For kitchens, a stain-blocking primer is also a good idea to cover any dark wood tones or old stains. Look for water-based or oil-based options that suit your paint type.
-
Apply Even Coats: Apply the primer in thin, even coats using a brush or roller. Avoid applying it too thick, which can lead to drips and an uneven texture. Ensure you cover all the areas you sanded and prepped.
-
Allow Drying Time: Let the primer dry completely between coats and before applying paint. Check the primer can for recommended drying times. Rushing this step can compromise the paint’s adhesion and the overall finish.
Choosing the Right Paint for Cabinet Interiors
The type of paint you use for the inside of your cabinets makes a big difference in how they look and how well they hold up. You want something durable and easy to clean. Let’s explore the best options for this high-traffic area.
Paint Types for Durability
For cabinet interiors, you need a paint that can withstand frequent use, spills, and cleaning. Latex or acrylic paints are popular choices because they are water-based, easy to clean up, and come in many finishes. However, for the most durable finish, consider specialized cabinet paints or enamels.
Oil-based paints used to be the go-to for durability, but modern water-based alkyd paints offer similar toughness with easier cleanup and lower VOCs. These paints create a hard, protective finish that resists scratches and moisture, which is perfect for kitchen environments.
-
Water-Based Alkyd Enamels: These are a great compromise, offering the durability of oil-based paints with the convenience of water cleanup. They provide a hard, smooth finish that is resistant to scuffs and stains. Many brands offer these specifically for cabinets.
-
Acrylic Lacquers: These offer a very hard, durable finish that is often used in factory-finished cabinets. They dry very quickly, which can speed up the painting process. However, they can be more challenging to work with for beginners and often require a spray application.
-
Urethane-Modified Acrylics: These paints combine the flexibility of acrylics with the toughness of urethanes. They are known for their excellent chip and scratch resistance, making them ideal for high-wear areas like cabinet interiors.
Choosing the Right Sheen
The sheen of your paint affects its durability and how easy it is to clean. For cabinet interiors, it’s best to choose a sheen that offers good protection and can be wiped down easily.
Satin or semi-gloss sheens are generally recommended for cabinet interiors. Satin offers a bit of sheen and is quite durable, while semi-gloss provides a more reflective surface that is very easy to clean and highly resistant to moisture and stains. Avoid matte or flat finishes, as they are more porous and harder to keep clean.
-
Satin Finish: Offers a soft sheen, providing good durability and washability. It’s a popular choice because it hides minor imperfections better than higher gloss finishes. This sheen strikes a good balance between appearance and practicality for cabinet interiors.
-
Semi-Gloss Finish: This finish is highly reflective and very durable. It’s excellent for high-moisture areas like kitchens because it resists stains and is easy to wipe clean. It can, however, highlight surface imperfections more than satin.
-
High-Gloss Finish: While extremely durable and easy to clean, a high-gloss finish can show every little flaw on the surface. It might be too shiny for some people’s tastes inside cabinets, but it offers the ultimate in washability.
Color Considerations for Cabinet Interiors
The color you choose for the inside of your cabinets can impact the overall feel of your kitchen. While it’s a less visible area, a thoughtful color choice can add a nice surprise or enhance your kitchen’s style.
You can go with a classic white for a clean look, or a pop of color for personality. Consider how the interior color will look when the doors are open, especially if it contrasts with your cabinet exteriors. Light colors can make the space feel brighter and larger, while darker colors can add a touch of sophistication.
-
Light and Bright Colors: Whites, creams, and light pastels can make the inside of your cabinets feel more open and airy. They reflect light, making it easier to see what’s inside and giving a clean, fresh appearance. This is a safe and popular choice.
-
Bold Accent Colors: If you’re feeling adventurous, a vibrant color like teal, yellow, or even a deep navy can add a fun and unexpected element. This works well if your exterior cabinets are neutral or if you want to create a unique focal point.
-
Natural Wood Tones: If you’re painting the exterior of your cabinets, you might consider leaving the interior in its natural wood finish for a contrasting look. This can add warmth and texture. However, ensure the natural wood is clean and well-maintained.
The Painting Process for Cabinet Interiors
Now that you’re prepared and have your materials, it’s time for the actual painting. This part requires patience and a steady hand to achieve a professional-looking result. Follow these steps carefully for the best outcome.
Applying the Paint
Use a high-quality brush for cutting in edges and corners and a small foam roller for the larger surfaces. Apply paint in thin, even coats. Avoid overloading your brush or roller, as this will lead to drips and an uneven finish.
Allow each coat to dry thoroughly according to the paint manufacturer’s instructions before applying the next.
Work in a well-ventilated area. Good lighting is also important to ensure you don’t miss any spots. Take your time; rushing this process is the quickest way to get less-than-ideal results.
The goal is a smooth, consistent finish that looks great for years to come.
-
Brush Technique: For tight spaces and edges, use an angled brush. Load the brush with just enough paint and apply it in smooth, even strokes. Feather the edges to blend them with the rolled areas.
Consistent pressure is key to avoiding brush marks.
-
Roller Technique: Use a small, high-density foam roller for smooth finishes on cabinet interiors. Apply paint evenly, overlapping each stroke slightly. Roll in one direction to maintain consistency.
If using a solvent-based paint, ensure your roller is compatible.
-
Multiple Thin Coats: It’s always better to apply two or three thin coats than one thick coat. Thin coats dry faster, adhere better, and result in a smoother finish. They also reduce the risk of drips and runs.
Drying and Curing Times
Paint needs time to dry and then to cure fully. Drying time is when the paint feels dry to the touch. Curing time is when the paint reaches its maximum hardness and durability.
This is crucial for preventing damage.
Always check the paint can for specific drying and curing instructions. While paint might feel dry in a few hours, it can take weeks for it to fully cure. During the curing period, be extra gentle with the painted surfaces to avoid scratching or chipping.
Avoid placing heavy items inside the cabinets until they are fully cured.
-
Touch Dry vs. Cure: Paint is considered “dry to touch” when it’s no longer tacky. However, it takes much longer to “cure,” meaning it hardens to its full durability.
This can take up to 30 days for some paints.
-
Handle with Care: During the curing process, avoid sliding heavy items across the painted surfaces. Use gentle movements when placing or removing items from the cabinets. This helps prevent premature wear and tear.
-
Patience Pays Off: Resist the urge to load up your cabinets immediately. Allowing adequate curing time ensures your paint job will be more durable and long-lasting. The extra wait is worth the prolonged beauty of your cabinets.
Reassembling and Storing Items
Once the paint is fully dry and preferably close to fully cured, you can start putting things back into your cabinets. Be mindful of how you place items to protect the new finish.
Consider using shelf liners made of silicone or a similar material. These can provide an extra layer of protection against scratches and spills. They also make cleaning easier in the future.
If you’re storing heavy items, place them carefully and consider using placemats or trays to distribute the weight.
-
Gentle Placement: When putting items back, avoid scraping the bottoms of jars or cans across the painted surface. Lift items in and out rather than sliding them. This simple habit can significantly extend the life of your paint job.
-
Use Shelf Liners: Consider using non-adhesive shelf liners made of rubber, silicone, or cork. These add a protective cushion, absorb minor impacts, and make cleaning up spills much simpler. They also add a decorative touch if you choose a patterned liner.
-
Organize Wisely: Distribute the weight of items evenly across shelves. Avoid placing very heavy objects directly on one spot for extended periods, especially during the curing phase. Think about the order in which you put things back to maintain the pristine look.
Real-Life Examples and Scenarios
Seeing how others have approached painting cabinet interiors can offer valuable insights. Let’s look at a couple of scenarios to help you visualize the process and potential results.
Scenario 1: The Young Family Kitchen
A family with young children wanted to brighten their dark, dated kitchen without a major renovation. They decided to paint the inside of their cabinets a cheerful sky blue. They carefully prepped the cabinets, using a degreaser and light sanding.
They applied two coats of primer and two coats of a durable, semi-gloss latex paint in the chosen blue. They also added clear silicone liners to the shelves. The result was a fun, vibrant kitchen that felt much more welcoming.
The liners protected the paint from crayon marks and sticky fingers, making cleanup much easier.
Scenario 2: The Minimalist Apartment Kitchen
A single professional living in a small apartment wanted a clean, modern look. They chose to paint the inside of their standard white cabinets a very light, almost off-white, satin finish. The goal was to make the space feel larger and cleaner.
They followed a similar prep process. The subtle change made a big difference, giving the cabinets a fresh, updated feel without being overwhelming. The satin finish was easy to wipe down and maintained the minimalist aesthetic.
Tips for Different Cabinet Materials
The material of your cabinets can affect how you paint them. While the basic steps are similar, some materials might require slight adjustments.
-
MDF Cabinets: Medium-density fiberboard (MDF) is very porous. It requires extra coats of primer to ensure an even surface and to prevent the paint from being absorbed unevenly. Ensure the primer is specifically recommended for MDF.
-
Laminate Cabinets: Painting laminate can be challenging as it’s very smooth. You’ll need a specialized bonding primer designed for laminate or plastic surfaces to ensure the paint adheres properly. Sanding laminate is often less effective; a good bonding primer is key.
-
Solid Wood Cabinets: These are generally the easiest to paint. However, some wood types, like pine or oak, can have tannins that bleed through paint. Use a stain-blocking primer to prevent this.
Sanding and prepping are straightforward for solid wood.
Frequently Asked Questions
Question: Is it worth painting the inside of kitchen cabinets?
Answer: Yes, it can be very worth it if you want to refresh your kitchen’s look, add personality, or make the space feel brighter. It’s a cost-effective way to update your kitchen, but requires careful preparation and the right materials for a durable finish.
Question: What is the best paint finish for inside cabinets?
Answer: Satin or semi-gloss finishes are best. They offer durability, are easy to clean, and resist moisture and stains, which is important for a kitchen environment. Matte finishes are harder to keep clean.
Question: How long does it take to paint the inside of kitchen cabinets?
Answer: It varies depending on the size of your kitchen and your preparation speed. Including cleaning, sanding, priming, and multiple paint coats, it can take anywhere from a weekend to several days, plus drying and curing time.
Question: Do I need to remove my cabinet doors and drawers?
Answer: For the best and most thorough results, yes, it’s highly recommended to remove cabinet doors and drawer fronts. This allows you to access all interior surfaces properly and avoid paint drips on exterior finishes.
Question: Can I paint over existing varnish inside my cabinets?
Answer: Yes, you can paint over varnish, but proper preparation is key. You must clean thoroughly, sand to create a dull surface for adhesion, and apply a good quality primer designed to stick to glossy surfaces.
Wrap Up
Deciding Should I Paint the Inside of Kitchen Cabinets? Pro Advice shows it’s a rewarding project. Proper prep, the right paint, and patience lead to beautiful results.
You can transform your kitchen’s look and feel. Enjoy your refreshed space!