What Are The Dimensions Of A Standard Sheet Of Plywood: Essential Guide
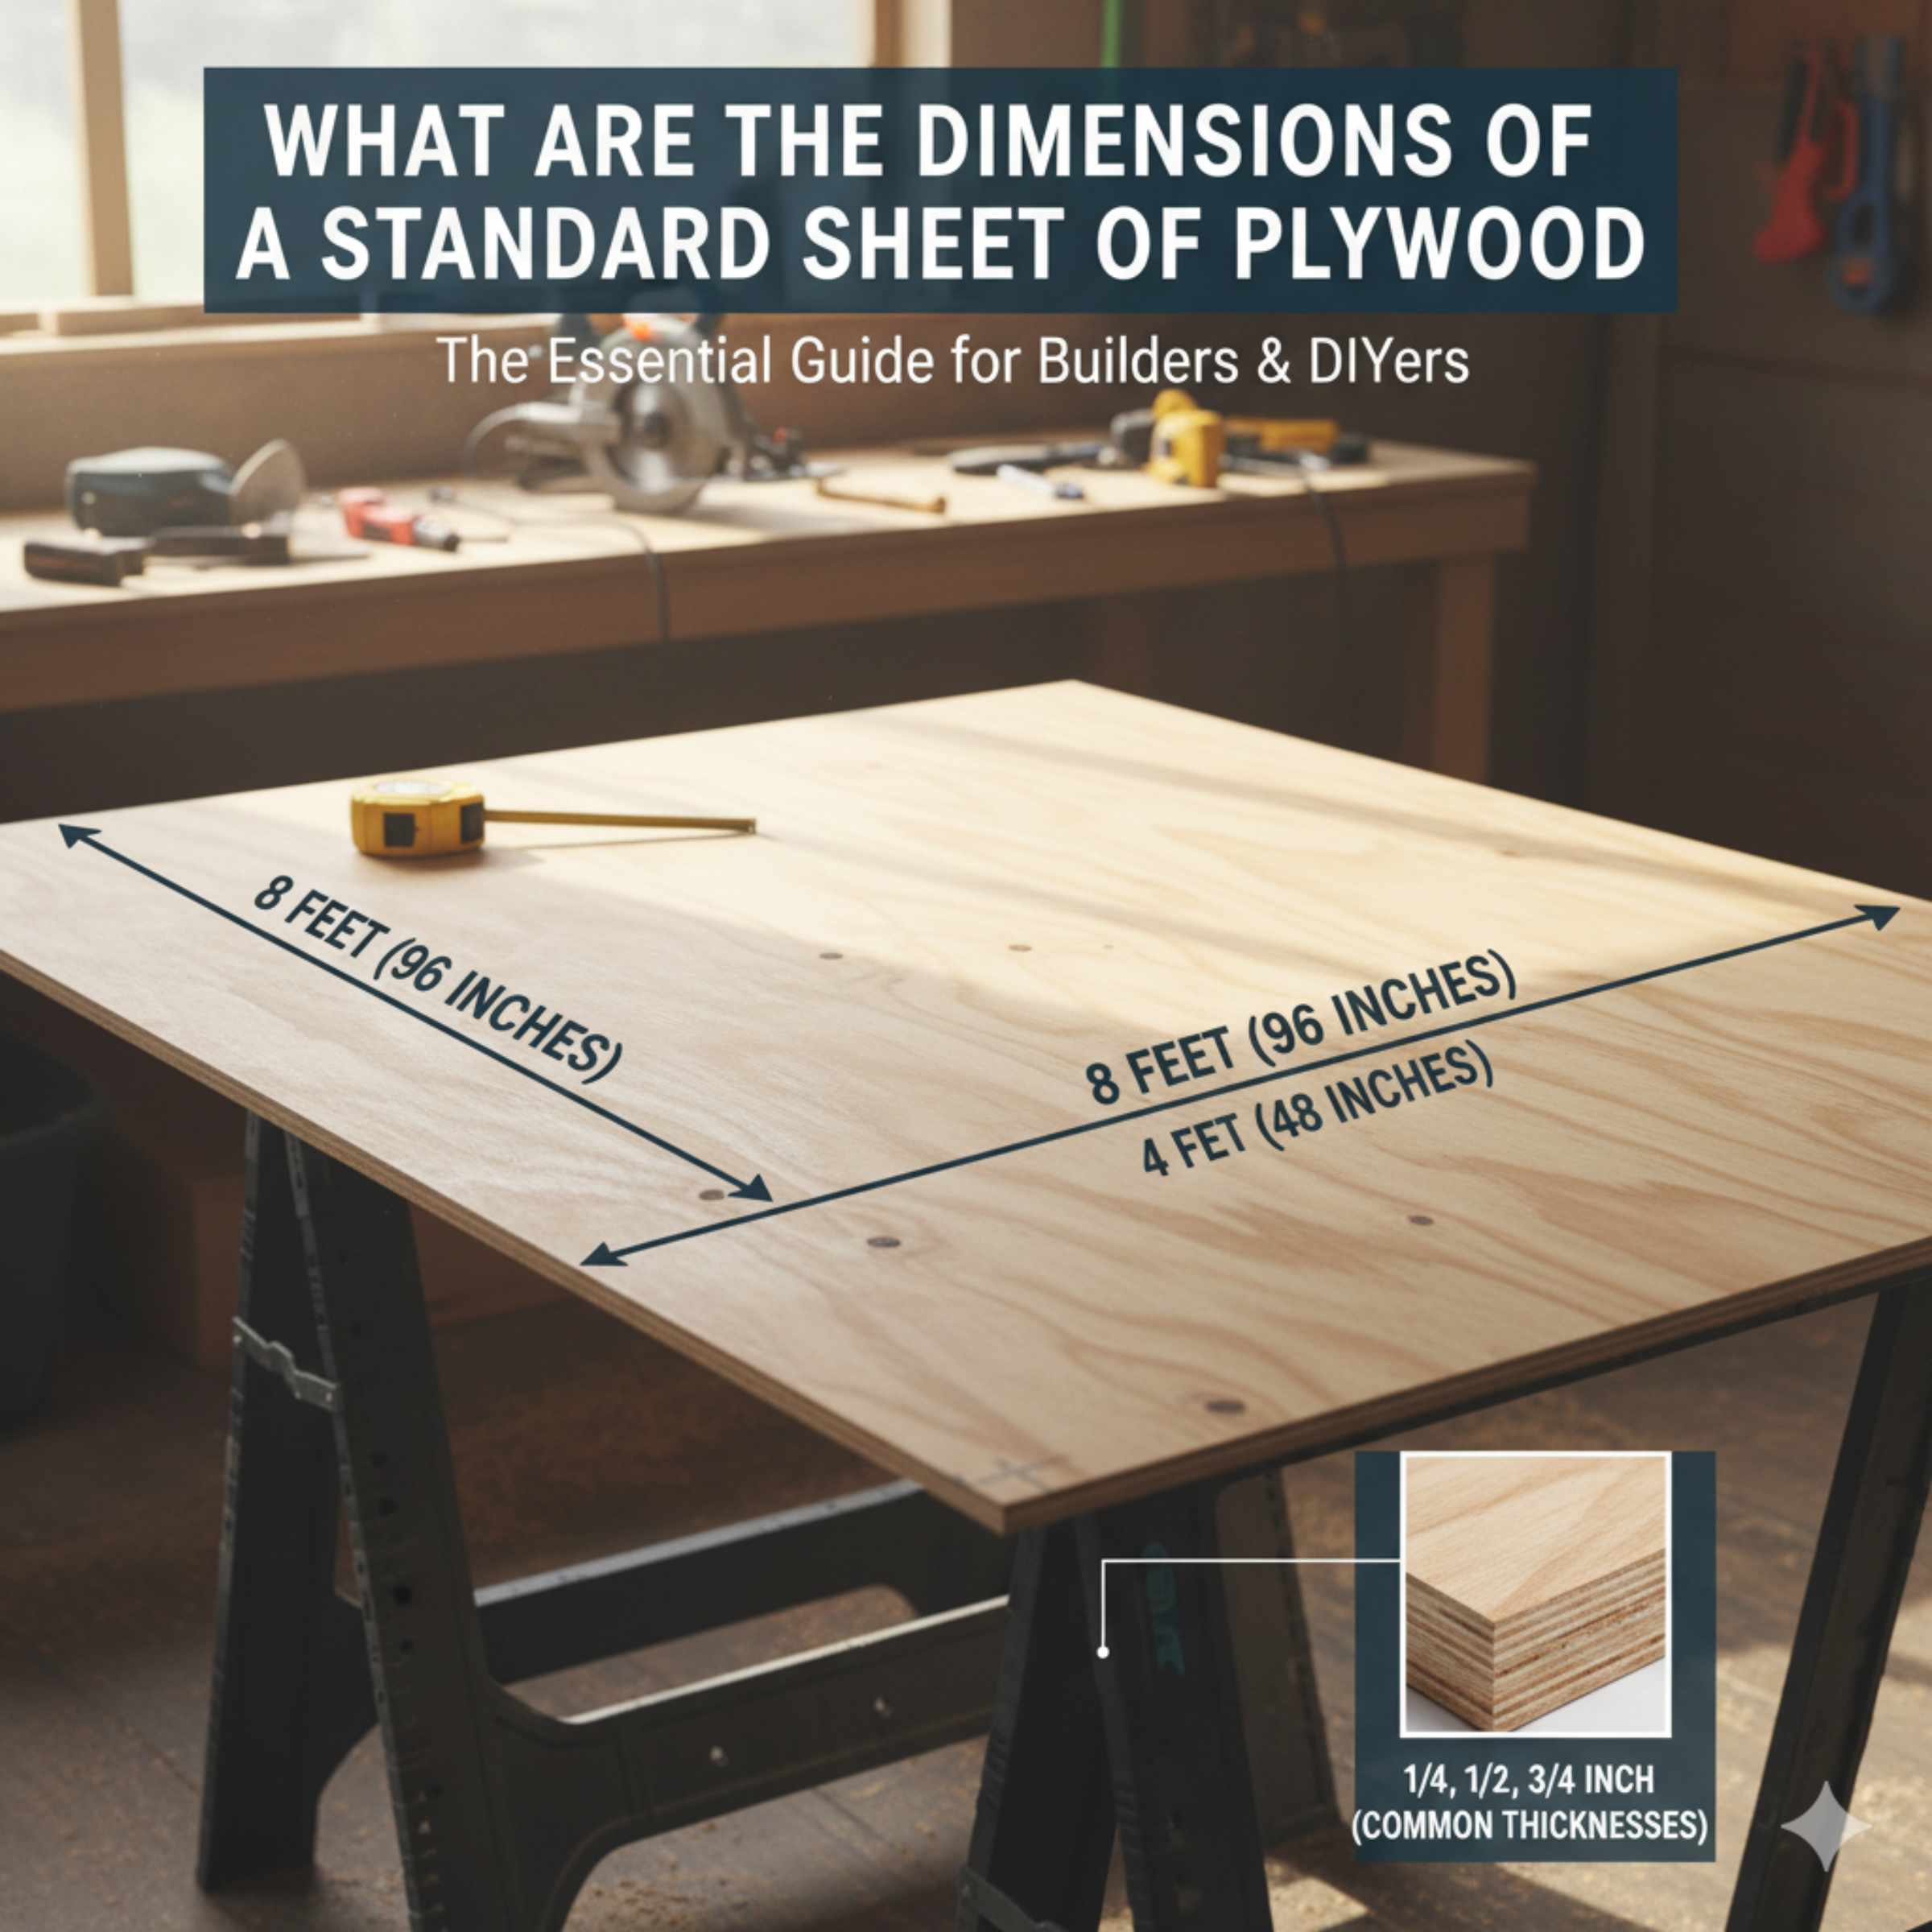
The standard sheet of plywood you will find at almost any home center measures 4 feet wide by 8 feet long (4′ x 8′). This size is the industry benchmark for thickness variations, but the surface area remains constant, making it easy to plan any building, shelving, or DIY project with predictable material supply.
Hey there, DIY friends! I’m Md Meraj, and if you’ve ever stood in the lumber aisle staring at those huge, flat panels of wood, you know the feeling. It’s exciting to buy plywood for a new shelf or project, but knowing exactly what you are getting is key to avoiding frustrating trips back to the store. Plywood is the backbone of so many home projects, from building sturdy cabinets to making quick repairs. The big question is always: what size is that thing, really?
Don’t worry; it’s simpler than it looks! We are going to break down the exact dimensions of standard plywood, discuss how thickness plays a role, and give you the confidence to buy exactly what you need for your next build. Grab your tape measure (or just remember these numbers!), and let’s make sure your projects start right.
The Magic Numbers: Standard Plywood Dimensions
When anyone in the construction or DIY world talks about a “standard sheet” of plywood, they are referring to one set of surface dimensions. This size is the result of decades of standardized manufacturing. Knowing this number is your first step to successful material planning.
Length and Width: The Constant Surface Area
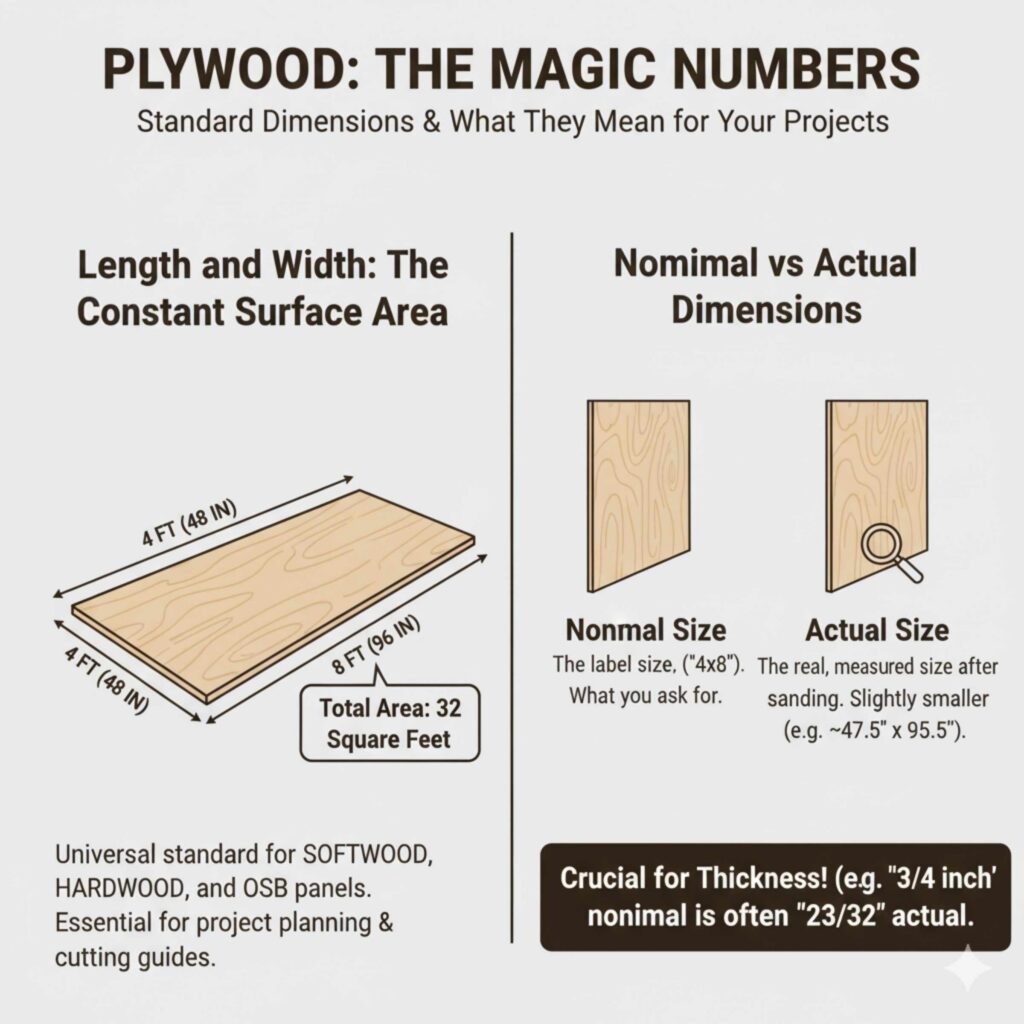
For nearly all common applications—whether you are buying softwood plywood, hardwood veneer, or even OSB (Oriented Strand Board, which is often sold alongside plywood)—the surface dimensions are the same:
- Width: 4 feet (or 48 inches)
- Length: 8 feet (or 96 inches)
This gives you a total surface area of 32 square feet per sheet (4 ft x 8 ft = 32 sq. ft.). This standardization is fantastic because it means that any cutting plan you find online or in a book will assume you are starting with this 4×8 footprint. This uniformity is what makes buying, cutting, and stacking materials so much easier for everyone, from the seasoned contractor to the weekend warrior.
Understanding “Nominal” vs “Actual” Dimensions
Here is where a lot of beginners get tripped up. In the world of lumber, you will constantly hear the terms “nominal” and “actual” size. This is crucial for plywood, especially when it comes to thickness, but it slightly affects the stated dimensions too, though less dramatically than with dimensional lumber (like 2x4s).
Nominal Size: This is the name or label the board is sold under (e.g., a “4×8” sheet). It’s the size manufacturers agree upon for marketing and labeling.
Actual Size: This is the real, measured size after the material has been manufactured, dried, sanded, and finished. Because plywood is sanded smooth for a nice finish, the actual dimensions are usually slightly smaller than the nominal label.
While the 48” x 96” measurement is universally understood as the standard, it’s wise to always double-check the thickness, as that’s where the actual measurements vary the most.
Plywood Thickness: Measuring Down (The Critical Variation)
While the 4’ x 8’ footprint is standard, the thickness is where plywood truly earns its designation for specific uses. Thickness is typically measured in fractions of an inch, or sometimes by a numbering system specific to construction grades.
It is essential to know that plywood is almost always sold slightly thinner than its nominal rating because of the sanding process. A 3/4-inch sheet, for example, might actually measure closer to 19/32 of an inch.
Common Plywood Thicknesses and Their Uses
To help you plan, here is a look at the most common thicknesses you will encounter in standard 4’ x 8’ sheets, along with what we usually use them for in home projects. Remember, these are the nominal (labeled) sizes.
| Nominal Thickness | Approximate Actual Thickness | Best For (Beginner Projects) |
|---|---|---|
| 1/4 inch (1/4″) | 0.238″ | Cabinet backs, paneling, craft projects, drawer bottoms. |
| 3/8 inch (3/8″) | 0.363″ | Light-duty shelving, curved surfaces, covering subfloors temporarily. |
| 1/2 inch (1/2″) | 0.475″ | Standard shelving, light framing, utility storage boxes. |
| 5/8 inch (5/8″) | 0.600″ | High-load shelving, utility workbenches, utility shed siding. |
| 3/4 inch (3/4″) | 0.725″ | Cabinet carcass construction, sturdy workbenches, quality furniture. |
Pro Tip from Meraj: If you are building a cabinet where the side panels meet a face frame, always check your actual thickness! If your plans call for 3/4″ material and you use 5/8″ material because it was on sale, your joints might end up slightly offset, leading to a wobble you don’t want. Precision matters when joining edges!
Decoding Plywood Grade Stamps: Beyond Dimensions
While dimensions tell you how big the sheet is, the grade stamp tells you how strong and good-looking the sheet is. As a beginner, focusing on two main types will cover 95% of your needs: Construction Grade and Appearance Grade.
1. Construction Grade Plywood (CDX)
CDX is the workhorse of the lumberyard. It’s designed for function, not beauty. The “C” and “D” refer to the veneer quality on the face and back, which often have knots, repairs, or splits. The “X” stands for Exterior glue, meaning it resists weather, making it great for outdoor utility projects.
- Where to Use It: Shed framing, temporary flooring protection, subflooring, fence repairs.
- Why It’s Good for Beginners: It’s cheaper, and if you are painting it or covering it up, its appearance doesn’t matter one bit.
2. Appearance Grade Plywood (Cabinet Grade – ACX/BCX)
If you are building shelving that you plan to stain or leave visible, you need Appearance Grade plywood, often called “Cabinet Grade.” The A-grade veneer is smooth and nearly flawless on the surface.
- ACX: “A” face veneer, “C” back veneer. Great if only one side will be visible.
- ABC/ABX: Both sides are relatively smooth. Ideal for projects where the top and bottom (like a tabletop) need to look nice.
For interior projects where moisture isn’t a concern (like bookshelves), you might see labels like “AC” or “BC” without the ‘X.’ These use standard interior glue.
Specialty Plywood Sizes and Sheets
While 4×8 is the standard, you will occasionally see sheets pre-cut to smaller, more manageable sizes, especially if you are only working on a very small project. These are usually the same material types, just already broken down.
Common Smaller Cuts
Home centers often stock “project panels” or “utility sheets” that are much easier to fit in a small car trunk or maneuver in a tight garage:
- 2’ x 4’ sheets: Great for small risers or small speaker boxes.
- 4’ x 4’ sheets: Perfect for smaller closets or built-in cabinet bases.
- Sheets pre-cut to 24” or 12” widths: Often found in the hardwood plywood section for cabinetmaking, saving you the first rip cut.
If you buy a smaller piece, always confirm the thickness! A 2’x4’ sheet of 3/4” plywood is still 3/4” thick, but it’s much easier to carry home.
Calculating How Much Plywood You Need: The DIY Math
The biggest confidence booster in DIY is accurate material estimation. Since we know the standard sheet is 4’x8’ (32 square feet), planning your cuts around this size saves you money and trips. We use a concept called “nesting” cuts.
Step-by-Step Cutting Strategy
When designing your project, always try to design components that fit within the 4-foot width. This minimizes waste because you avoid “rip cuts” (cuts made along the 8-foot length).
- Measure Twice, Draw Once: Measure the total area you need to cover. For example, you need three shelves, each 18 inches deep and 40 inches wide.
- Convert Everything to Inches: It’s easier to visualize cuts this way. 48” (width) x 96” (length). Your shelves are 18” deep and 40” wide.
-
Layout on the Sheet:
- Can you fit two 40-inch wide shelves across the 48-inch width? No (40 + 40 = 80 inches needed).
- Can you fit two 18-inch deep pieces side-by-side across the 48-inch width? Yes! (18 + 18 = 36 inches used). You have 12 inches leftover width.
- Maximize the Length: Since you can fit two 18-inch deep pieces side-by-side across the width, how many 40-inch long pieces can you get from the 96-inch length? 96 / 40 = 2.4. You can get two full 40-inch long pieces.
- Calculate Total Pieces: By cutting the sheet in half across the width (creating two 24″ x 96″ strips), and then cutting those strips down, you can usually get your three pieces out of one sheet with minimal waste.
If you are unsure about your layout, many high-end lumber suppliers or big box stores offer computer-aided sheet optimization tools. However, for simple projects, drawing the layout directly onto the 4×8 sheet sketch is often the most reliable method for beginners.
Tools You Need to Handle and Cut 4×8 Sheets
Handling a full 4×8 sheet, especially the heavier 3/4-inch plywood, requires the right support and cutting tools. Safety first, always!
Essential Support Equipment
You cannot safely or accurately cut a 32-square-foot piece of wood on sawhorses that are too short or too flimsy. The sheet must be fully supported along the cut line.
- Sturdy Sawhorses: Invest in at least two pairs of heavy-duty sawhorses rated for several hundred pounds each.
- Table or Work Surface: Ideally, you should break the sheet down on a dedicated assembly table, but if space is tight, good sawhorses spaced appropriately will work. For long, straight cuts, you often need a helper to support the off-cut end so it doesn’t bind the blade.
- Skates or Dolly: Moving a 70-pound sheet of 3/4-inch plywood around the shop or out of your truck is easier (and safer for your back) with a sturdy utility dolly or panel cart.
Cutting Tools for Precision
When cutting plywood, the goal is to prevent “tear-out”—where the veneer splinters off as the blade exits the material. This is critical on the visible side.
1. Circular Saw with a Guide
This is the most common tool for breaking down large sheets.
- Blade Choice: Use a fine-tooth, high tooth count (60 teeth or more) blade designed for plywood or laminate. This smooth cut greatly reduces tear-out.
- The Essential Guide: Never freehand a straight cut on plywood. You must use a clamped straight edge (like a level or a factory-made guide rail) to ensure your cut is perfectly straight. For excellent DIY results, check out resources from organizations like the Family Handyman on creating a simple cross-cut sled for accuracy.
2. Table Saw (For smaller, final cuts)
If you have access to a table saw, it is excellent for making the final, accurate rips (cutting along the 8-foot length) once the sheet is manageable. Always remember that a full 4×8 sheet is too long and unwieldy for most home table saws, so break it down into 2×8 or 4×4 pieces first.
Plywood for Outdoors vs Indoors: Moisture Matters
The dimensions of the sheet might be the same, but the glue holding those layers (plies) together drastically changes where you can use the material. This is governed by standards set by organizations like the APA – The Engineered Wood Association of The Americas.
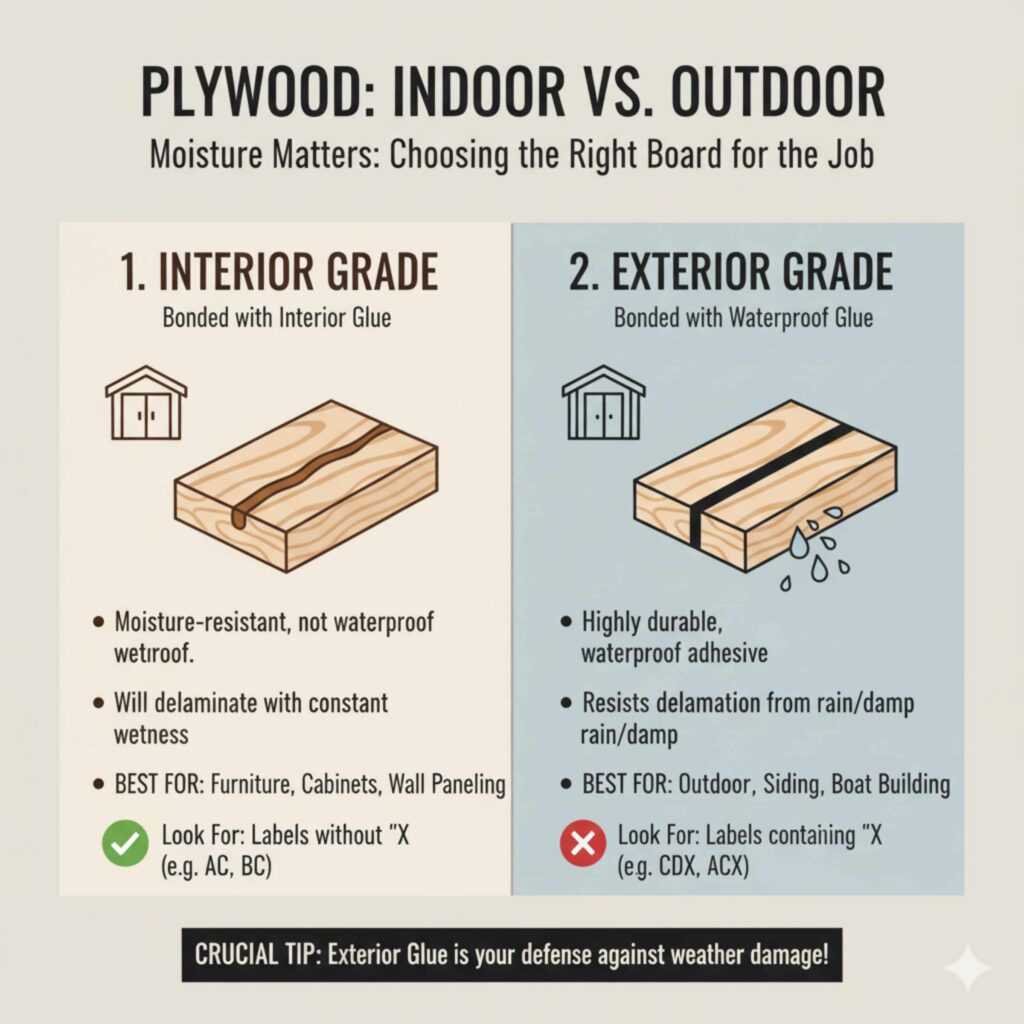
Interior Grade Plywood (Bonded with Interior Glue)
This plywood uses moisture-resistant glue, which is strong enough for normal indoor humidity but will break down if exposed to constant dampness or rain.
- Best For: Indoor furniture, cabinets, bookshelves, interior wall paneling.
- Look For: Labels that do not have an ‘X’ (e.g., AC or BC).
Exterior Grade Plywood (Bonded with Waterproof Glue)
Exterior plywood uses highly durable, waterproof adhesive that resists delamination (when the layers separate due to moisture). Even if the face veneer gets wet, the core stays bonded.
- Best For: Outdoor sheds, boat building, underlayment for tile floors that might get wet, exterior siding.
- Look For: Labels containing an ‘X’ (e.g., CDX, ACX).
When building something that lives outside, always choose Exterior Grade, even if you plan to paint it heavily. The glue is the crucial defense against weather damage.
Frequently Asked Questions (FAQ) About Plywood Dimensions
Q1: If I buy a 3/4-inch sheet of plywood, will it actually measure 0.75 inches?
A: Not usually. Due to sanding, a nominal 3/4″ sheet is often closer to 19/32″ or about 0.725 inches. Always measure your sheet before starting a project, especially if you are joining it flush with solid wood.
Q2: What is the standard weight of a 4×8 sheet of 3/4-inch plywood?
A: This varies based on the wood species (e.g., birch is heavier than pine), but a standard 4×8 sheet of 3/4″ plywood typically weighs between 65 and 80 pounds. Be prepared for the weight when loading and unloading!
Q3: Can I order custom-sized plywood sheets?
A: Yes, but it costs more. Lumberyards and specialty suppliers can often cut your 4×8 sheets down to size before you pick them up. For DIY projects, it’s often cheaper to buy the 4×8 sheet and cut it yourself.
Q4: Why is plywood almost always sold in 4×8 sheets?
A: The 4×8 size became the industry standard because it balances manufacturing efficiency, transportation, and construction needs. It fits well on trucks, aligns with common framing layouts (like 16″ or 24″ stud spacing), and minimizes waste in both residential and commercial construction. This standardization also keeps costs lower for consumers.
Q5: Is OSB the same size as plywood?
A: Yes. OSB (Oriented Strand Board) is manufactured to the same standard dimensions as plywood—typically 4 feet by 8 feet—so it can be used interchangeably in many structural applications. However, while the size is the same, plywood generally offers better moisture resistance and surface finish for furniture and cabinetry projects.
Conclusion: Master Plywood Sizes and Build with Confidence
Knowing the standard size of plywood—4 feet by 8 feet—gives you a powerful advantage in planning any DIY or construction project. That single sheet provides a predictable 32 square feet of coverage, making material estimation, cutting layouts, and budgeting far easier. While the surface dimensions remain consistent, understanding nominal versus actual thickness is critical for achieving precise joints and professional-looking results.
By learning how thickness, grade, glue type, and intended use all work together, you avoid common beginner mistakes like misaligned cabinets, weak shelving, or moisture damage. Whether you’re building furniture, installing shelving, or tackling outdoor projects, choosing the right plywood sheet starts with understanding its true dimensions.
With this knowledge in hand, you can walk into any lumberyard with confidence, select the right material the first time, and start your project knowing it’s built on a solid foundation—literally. Measure smart, cut accurately, and let every project begin the right way!