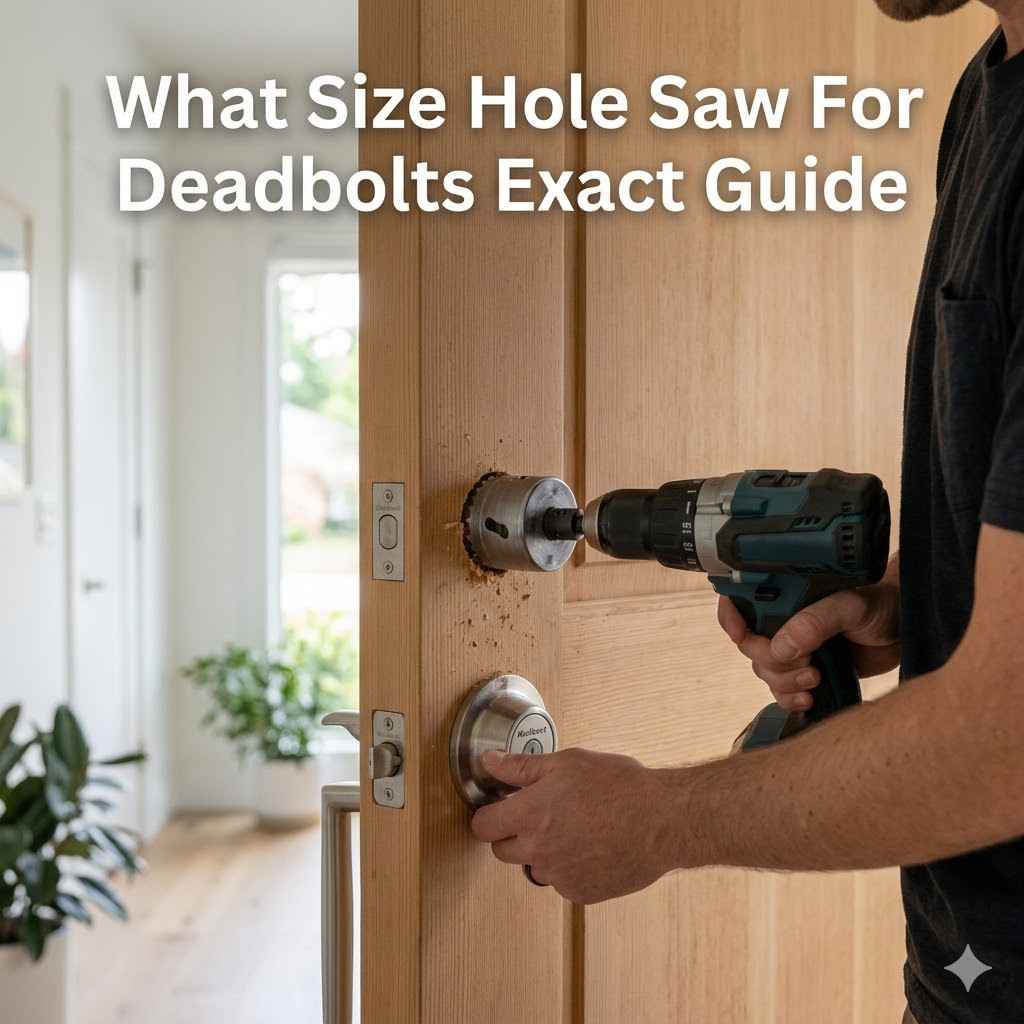
What Size Hole Saw For Deadbolts? Exact Guide
Figuring out the right size hole saw for your deadbolt can feel tricky. Many folks wonder, What Size Hole Saw for Deadbolt? Exact Guide.
Doors and deadbolts come in different sizes, and getting it wrong means a loose lock or a difficult installation. Don’t worry, though! This guide makes it super simple.
We’ll walk you through each step so you can drill the perfect hole the first time.
Choosing the Right Hole Saw Size
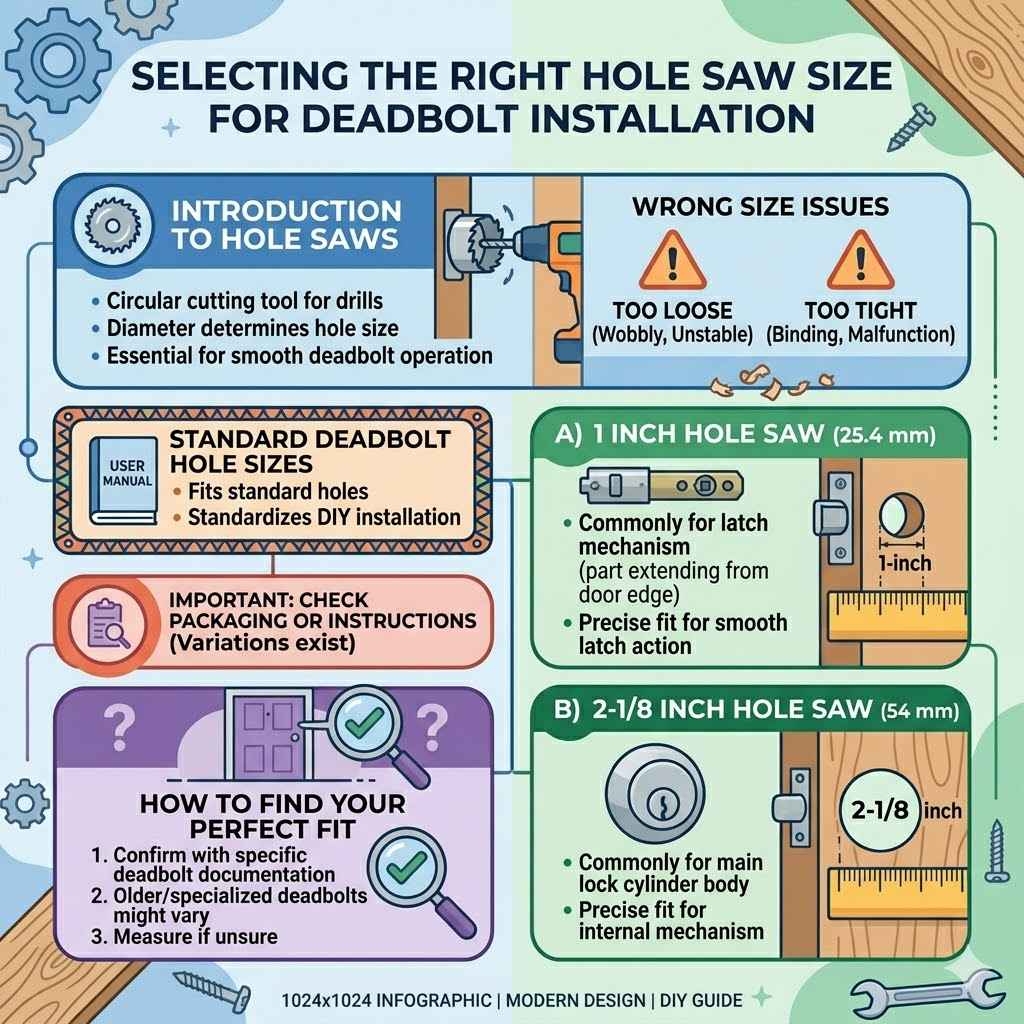
Selecting the correct hole saw is the most important step when installing a deadbolt. The hole saw is a circular cutting tool that attaches to a drill. Its diameter determines the size of the hole you will make in your door.
Using the wrong size can lead to a deadbolt that is either too loose and wobbly, or too tight, causing it to bind and not function correctly. This section will break down exactly how to find the perfect fit.
Standard Deadbolt Hole Sizes
Most deadbolts are designed to fit into standard-sized holes. This standardization makes installation much easier for DIYers. However, there can be slight variations depending on the manufacturer and the specific deadbolt model.
It is always best to check the packaging or instructions that come with your deadbolt.
- 1 Inch Hole Saw: This size is commonly used for the deadbolt’s latch mechanism. The latch is the part that extends from the edge of the door into the door frame to secure it. This hole needs to be precise so the latch can slide smoothly in and out.
- 2 1/8 Inch Hole Saw: This is the most common size for the main body of the deadbolt. This is where the entire lock cylinder and mechanism are housed. A hole this size ensures the deadbolt fits snugly and securely within the door.
These two sizes cover the vast majority of deadbolt installations. However, it is wise to always confirm with your specific deadbolt’s documentation. Some older or specialized deadbolts might have slightly different requirements.
Having the correct hole saw diameter ready before you start drilling saves time and frustration.
How to Measure for Your Deadbolt
Even with standard sizes, it’s smart to measure your specific deadbolt. This ensures you buy the exact hole saw needed. You can usually find this information in the deadbolt’s manual or on the product packaging.
If you’ve lost these, you can often find specifications online by searching for your deadbolt’s model number.
Sometimes, you might have an older door or a less common deadbolt. In these cases, you might need to do a quick measurement yourself. Carefully measure the diameter of the part of the deadbolt that will sit inside the larger hole.
Also, measure the diameter of the latch assembly. These measurements will give you the exact sizes you need.
Knowing these measurements beforehand prevents you from having to make a trip back to the hardware store. It also ensures a professional-looking installation. A properly sized hole makes the deadbolt function smoothly and securely.
Tools and Preparation for Drilling
Before you pick up a drill, gather everything you need. Proper preparation makes the job much safer and easier. You’ll need your chosen hole saw and a drill.
Safety glasses are a must to protect your eyes from sawdust and flying debris. A tape measure is also essential for marking where to drill.
Make sure your drill is powerful enough for the task. Larger hole saws require more torque. It’s a good idea to use a drill with a variable speed setting.
This allows you to start slowly and increase speed as needed. A sharp hole saw will cut more cleanly and with less effort.
Essential Tools Checklist
Having the right tools makes any DIY project go smoother. For installing a deadbolt, focus on precision and safety. Here’s what you should have ready:
- Drill A corded drill is often preferred for power, but a strong cordless drill will work too. Ensure it has enough torque.
- Hole Saw Set Ideally, you’ll have both the 2 1/8 inch and 1 inch hole saws, as these are most common.
- Pilot Bit Most hole saws come with a pilot bit that helps center the saw and guides it.
- Tape Measure For accurate placement of the holes.
- Pencil To mark your drilling spots.
- Safety Glasses Non-negotiable for eye protection.
- Work Gloves To protect your hands.
- Chisel and Hammer For creating the mortise for the latch plate if needed.
- Screwdriver For installing the deadbolt hardware.
Having all these items readily available means you can proceed with the installation without interruption. It prevents delays and ensures you have what you need when you need it.
Marking Your Door Accurately
Accuracy in marking is key to a successful deadbolt installation. Measure twice, drill once is a good motto here. Start by identifying the proper height for your deadbolt.
Most deadbolts are installed at a comfortable height for hand operation, typically around 60-66 inches from the floor.
Use your tape measure to find the center of the door’s edge where the latch will go. Then, transfer this measurement to the face of the door. This is where the main body of the deadbolt will sit.
Many deadbolt kits come with a template that makes marking easier. If yours doesn’t, use your tape measure and pencil to mark the exact center point for both the large hole and the smaller latch hole.
For the large hole, you’ll be marking the center point. For the smaller latch hole, you’ll mark the center on the edge of the door and then transfer that point to the face of the door. This ensures the latch mechanism will align perfectly when installed.
Double-check your measurements before you start drilling to avoid costly mistakes.
Drilling the Holes for the Deadbolt
Now for the actual drilling. This is where having the right tools and accurate marks really pays off. It’s best to drill the larger hole first.
This provides a stable entry point for the deadbolt mechanism. Remember to drill from both sides of the door to prevent the wood from splintering badly.
When drilling the latch hole, you’ll usually drill from the edge of the door into the face. Again, drill halfway through from one side and then finish from the other. This technique ensures a clean cut on both surfaces.
Take your time and let the drill do the work; forcing it can lead to damage.
Step-by-Step Drilling Process
Follow these steps carefully to drill clean, accurate holes for your deadbolt. This process works for both the large and small holes, with slight adjustments for placement.
- Secure the Door: Make sure the door is stable. If it’s still on its hinges, wedge it securely so it doesn’t move while you drill. If the door is off the hinges, place it on a workbench or saw horses.
- Attach the Hole Saw: Securely attach the appropriate sized hole saw (usually 2 1/8 inch for the main body) to your drill. Ensure the pilot bit is centered.
- Position the Drill: Place the pilot bit exactly on your marked center point on the face of the door. Hold the drill perpendicular to the door surface.
- Start Drilling: Begin drilling at a slow speed. As the hole saw bites into the wood, you can gradually increase the speed. Apply steady, even pressure.
- Drill Halfway: Continue drilling until the pilot bit emerges from the other side of the door. Mark this point on your drill bit if needed to gauge depth.
- Switch Sides: Once you’ve drilled halfway, stop the drill. Go to the other side of the door and align the pilot bit with the hole you just created. This ensures the holes will meet precisely in the middle.
- Finish Drilling: Continue drilling from the second side until you break through to the first hole. This method helps prevent splintering on both sides of the door.
-
For the Latch Hole: For the 1-inch hole, you’ll repeat a similar process. Mark the center point on the edge of the door where the latch will extend. Attach the 1-inch hole saw.
Drill from the edge into the door, again drilling halfway from one side and finishing from the other if possible (though often this hole is drilled straight through from the edge).
- Clean Up: Once both holes are drilled, use a chisel or sandpaper to clean up any rough edges or splinters.
Taking your time during this process is crucial. Rushing can lead to damaged wood or misaligned holes, making deadbolt installation difficult. A clean, precisely drilled hole ensures the deadbolt will function smoothly and securely.
Tips for a Clean Cut
Getting a clean cut with a hole saw is not always straightforward, especially in wood. Wood can splinter, chip, or blow out on the exit side if not drilled carefully. The technique of drilling halfway from each side is the primary way to avoid this.
This is because the pilot bit on the hole saw is designed to center the cut. When you reach the halfway point and switch sides, the pilot bit from the other side helps guide the saw perfectly, so the two drilled holes meet cleanly.
Another tip is to use a steady, consistent speed. Starting slow helps the pilot bit grip the wood and prevents the drill from wandering. Once the hole saw is engaged, increasing speed slightly can make the cut smoother.
However, avoid high speeds on very hard woods, as this can cause the wood to burn or the saw to overheat.
Using a sharp hole saw is also critical. A dull saw will require more force, which increases the chance of splintering and makes the drilling process much harder. If your hole saw seems to be struggling or producing rough cuts, it might be time to sharpen it or replace it.
Consider using a sacrificial piece of wood clamped to the exit side of the door for practice or to reduce tear-out.
Installing the Deadbolt Hardware
Once the holes are drilled, the next step is to install the deadbolt itself. This involves fitting the main body of the deadbolt into the larger hole and the latch into the smaller, edge hole. You’ll then install the strike plate on the door frame to align with the latch.
Carefully insert the deadbolt assembly through the larger hole in the door. Ensure it sits flush. You might need to chisel out a small recess for the latch plate to sit flush with the door’s edge.
Once the deadbolt is in place, secure it with the provided screws. This usually involves two long screws that pass through the exterior and interior lock cylinders and screw into the deadbolt mechanism.
Fitting the Latch and Strike Plate
The latch assembly slides into the hole drilled on the edge of the door. Ensure the bevel on the latch faces the direction the door closes. Some latches require a mortise (a small rectangular cut-out) to sit flush with the door’s edge.
If your latch plate isn’t flush, use a sharp chisel to carefully remove wood until it is. This provides a clean, professional finish.
Once the latch is in place, use screws to secure it to the door. Now, with the door closed, mark the position of the latch on the door frame. You will need to create a corresponding mortise for the strike plate.
The strike plate is the metal piece that the latch engages with to keep the door locked. Use the strike plate as a template to mark where you need to chisel. Carefully chisel out the wood to create a recess for the strike plate.
It should sit flush with the door frame. Secure the strike plate with screws.
Test the deadbolt several times. Open and close the door, lock and unlock the deadbolt. The latch should slide smoothly in and out, and the strike plate should align perfectly with the latch.
If there is any sticking or misalignment, you may need to adjust the mortises or the strike plate position slightly.
Securing the Deadbolt Assembly
The final step in securing the deadbolt is to attach the interior and exterior components. The main deadbolt body will have holes that align with mounting posts. The exterior component typically has a keyed cylinder.
The interior component is usually a thumb turn. Long screws are used to connect these two pieces through the door, securing the entire deadbolt mechanism.
Insert the exterior cylinder and connecting rod through the large hole. Then, align the interior thumb turn mechanism and its mounting posts with the corresponding holes on the exterior piece. Insert the long screws through the interior piece and into the exterior piece.
Tighten these screws securely, but do not overtighten, as this can strip the threads or damage the lock.
Ensure the deadbolt operates smoothly after tightening. The thumb turn should rotate easily, and the deadbolt should extend and retract fully. If it feels stiff, check that the screws aren’t too tight or that the holes are properly aligned.
A correctly installed deadbolt provides security and peace of mind.
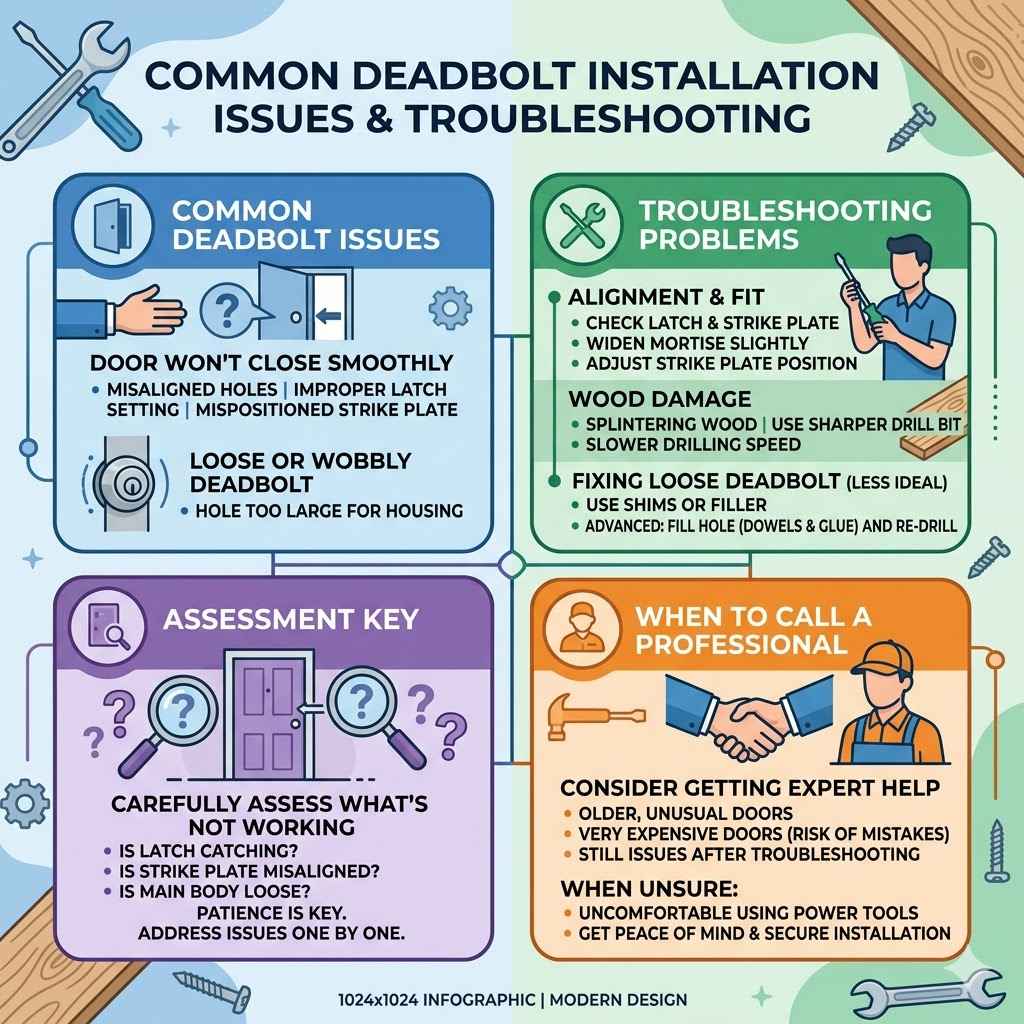
Common Deadbolt Installation Issues
Even with the best guide, sometimes things don’t go perfectly. Common issues range from drilling the wrong size hole to the deadbolt not aligning correctly. Knowing these potential problems can help you troubleshoot if they arise.
One frequent problem is a door that doesn’t close smoothly after the deadbolt is installed. This could be due to misaligned holes, an improperly set latch plate, or an incorrectly positioned strike plate. Another issue is a deadbolt that feels loose or wobbly.
This often means the hole drilled was too large for the deadbolt’s housing.
Troubleshooting Common Problems
If your deadbolt isn’t working right, don’t panic. Most issues have simple fixes. If the deadbolt is stiff or doesn’t fully retract, check the alignment of the latch with the strike plate.
You might need to widen the mortise for the strike plate or adjust its position slightly. If the hole for the deadbolt housing is too large, you might be able to use shims or a filler to make it a tighter fit, but this is a less ideal solution.
For splintering wood during drilling, it’s often a sign of a dull drill bit or drilling too fast. Next time, try a sharper bit and start at a slower speed. If the deadbolt feels loose, it likely means the hole was drilled slightly larger than the deadbolt.
In some cases, you can use wood glue and dowels to fill the hole slightly and re-drill, but this is a more advanced repair. Often, a slightly loose deadbolt is still functional but doesn’t look as professional.
The key is patience. Carefully assess what isn’t working correctly. Is the latch catching?
Is the strike plate misaligned? Is the main body of the deadbolt loose? Address these specific points one by one.
When to Call a Professional
While installing a deadbolt is a common DIY project, there are times when it’s best to call a professional locksmith or handyman. If you have an older, unusually shaped door, or a very expensive door, you might not want to risk making a mistake. Also, if you’ve tried troubleshooting and are still having issues, a professional has the experience and specialized tools to fix it.
If you’re uncomfortable using power tools or feel unsure about any step of the process, it’s always safer to get expert help. A professional can ensure the deadbolt is installed correctly and functions securely, giving you peace of mind and proper protection for your home. They can also advise on the best type of deadbolt for your needs.
Frequently Asked Questions
Question: What is the most common size hole saw for a deadbolt?
Answer: The most common sizes are 2 1/8 inches for the main body of the deadbolt and 1 inch for the latch mechanism.
Question: Do I need to drill from both sides of the door?
Answer: Yes, drilling halfway from each side helps prevent wood splintering and ensures the holes meet cleanly.
Question: My deadbolt feels loose. What should I do?
Answer: This usually means the hole was drilled too large. You might try using shims or filling the hole slightly, but ideally, you would want the hole to be the correct size for a secure fit.
Question: Can I use a standard drill bit instead of a hole saw?
Answer: No, a hole saw is specifically designed to create large, clean, circular holes needed for deadbolts. Standard drill bits are not suitable.
Question: What if the latch doesn’t sit flush with the door edge?
Answer: You will need to use a sharp chisel to carefully cut a small mortise (recess) into the edge of the door so the latch plate sits flush.
Summary
Finding the right size hole saw for your deadbolt is key to a secure and smooth installation. The standard sizes are 2 1/8 inches for the lock body and 1 inch for the latch. Proper measurement, preparation, and careful drilling from both sides prevent common issues.
Always check your deadbolt’s instructions. If you encounter problems, troubleshooting is usually straightforward. For complex situations or if you’re unsure, a professional is a great option.
You can now confidently install your deadbolt.