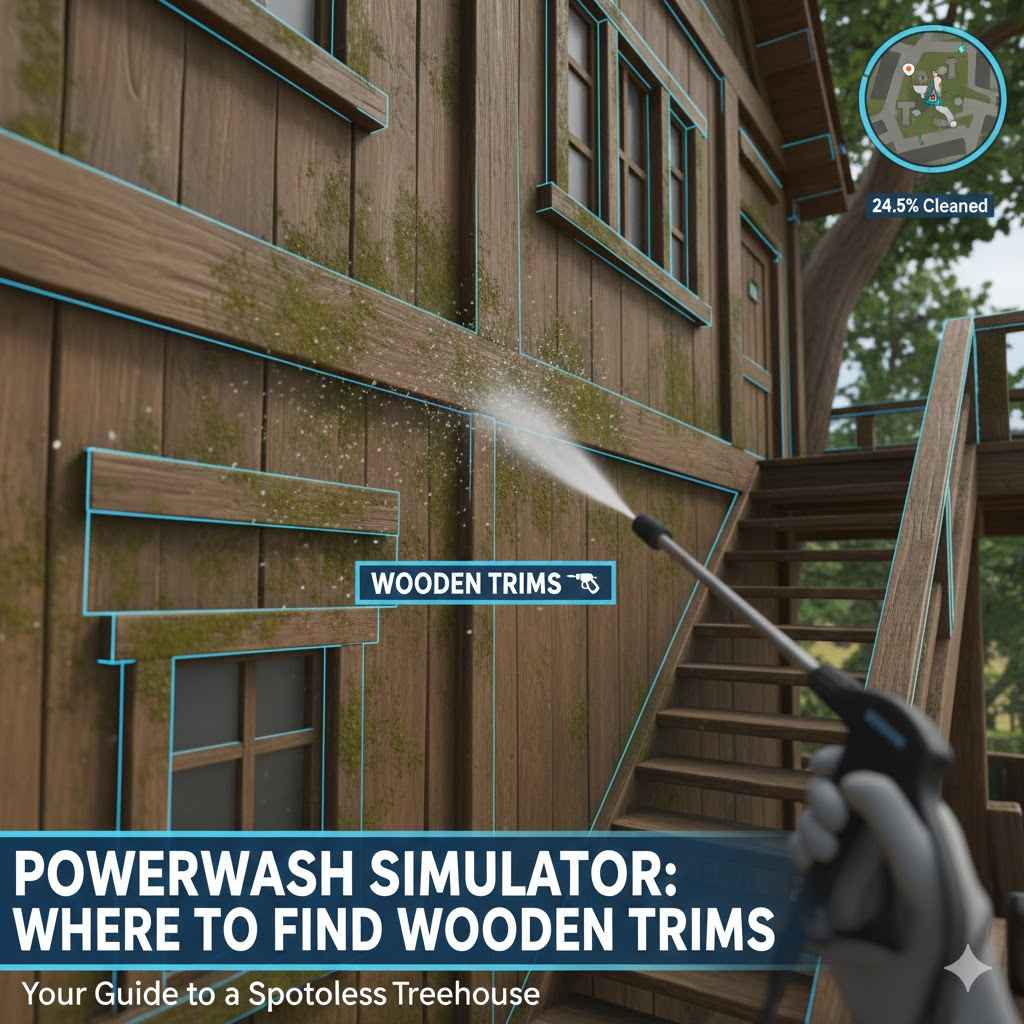
Where to Locate Wooden Trims in PowerWash Simulator
If you’re starting out in PowerWash Simulator, you might find yourself wondering, Where Are the Wooden Trims in PowerWash Simulator? It’s a common question! Finding these trims can sometimes feel tricky, especially when you’re just getting used to the game. Don’t worry, though; this guide is here to help you out. We’ll explore where you’re likely to find these wooden surfaces, making it easier to clean everything up. Let’s get started, shall we?
Finding the Hidden Wood Surfaces
Locating wooden trims can be tricky in the beginning. These surfaces are often less obvious than larger, more prominent features. The game’s environment often features a wide variety of materials, and the wooden trims are usually integrated into the building’s overall aesthetic design, such as window frames or fence posts. Because these trims can blend in with the surrounding architecture, players need to train their eyes to notice details. Successfully finding these elements will enable players to clean everything thoroughly, improving their game’s progress. As you progress, you’ll begin to notice them more easily. This guide will provide information to recognize them quickly.
Types of Wood Trims You Will Encounter
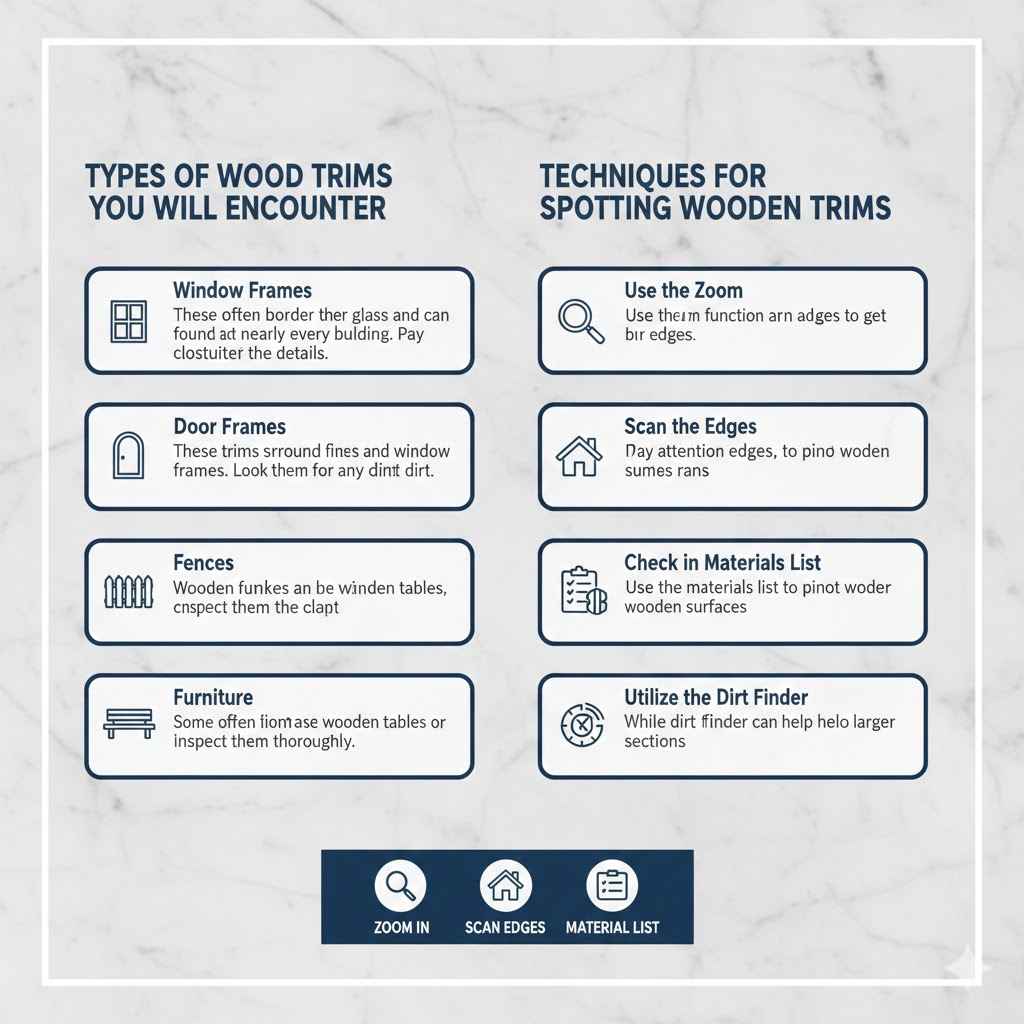
In PowerWash Simulator, you’ll encounter various types of wooden trims. Recognizing these different types will help you identify where to focus your cleaning efforts. Common types include window frames, door frames, fences, wooden furniture, and decorative elements like shutters or beams. Each type of wooden trim has a unique appearance and may be positioned in a way that makes it more susceptible to dirt and grime accumulation.
Window Frames: These often border the glass and can be found on nearly every building. Pay close attention to the edges.
Window frames are some of the most common wooden trims. They are usually easy to spot because they frame the glass of the windows. Look closely at the edges, where dirt is most likely to build up. These are often the first wooden trims players encounter in the game. These trims can vary in size and material depending on the building style.
Door Frames: These trims surround doors and are similar to window frames.
Similar to window frames, door frames are essential wooden trims to locate. Inspect them for any signs of dirt. Door frames often accumulate dirt from general foot traffic or environmental factors such as rain and wind. Cleaning the door frames is critical to achieving a complete cleaning score for each level. Inspect the area around the doors.
Fences: Wooden fences are frequently seen in the game. Look for the individual planks.
Wooden fences are often more exposed to the elements, making them a prime target for grime and dirt. They may look slightly different depending on their style, but are usually easy to identify. Be thorough, because you will often miss dirt because of the cracks and small spaces between the planks. Wooden fences can vary widely in design. Consider the construction and angles.
Furniture: Some levels might have wooden tables or chairs outside. Inspect them thoroughly.
Wooden furniture will likely be a part of the outdoor scenery in some levels. You can identify this wooden furniture easily by its traditional look. They frequently accumulate dirt from regular use and exposure to outdoor elements. These surfaces can include benches, tables, or even decorative items. Look for any exposed wood surfaces. Think about how the item is placed and the angles that the dirt would likely affect.
Techniques for Spotting Wooden Trims
Learning how to effectively spot wooden trims is a skill that will improve your PowerWash Simulator experience. You’ll learn the techniques used for spotting these hard-to-find areas. This will include tips for scanning environments, paying attention to the details of the level, and making use of the game’s tools to help with the cleaning process. Practice will make perfect. You will learn to recognize wooden trims in the blink of an eye.
Use the Zoom: Use the zoom function on your power washer to get a closer look at the details.
The zoom function is a great tool for inspecting areas closely. Use it to examine the edges of windows, doors, and other areas where wooden trims are usually found. The zoom function will allow you to see more detail, which will help distinguish wooden trims from other materials. This close-up view will reveal dirt that’s not as easily seen from a distance. The zoom will allow you to see details that are easily overlooked. This will improve your effectiveness and your score.
Scan the Edges: Pay attention to the edges of structures, where wooden trims often run.
Focusing on the edges of buildings and objects is a very effective strategy. Wooden trims are often placed along the edges, such as around windows, doors, and roofs. By visually tracing the outline of objects, you are more likely to see the trims. This helps you identify these areas, making sure you don’t miss cleaning any part. Scanning edges helps you find the most common places for wooden trims. It is a quick and efficient way to locate and clean the trims.
Check the Materials List: Use the materials list in the game to pinpoint wooden surfaces.
The materials list is a handy tool, as it can highlight all the wooden surfaces in a level. Using this tool will help you find the wooden trims and then locate them and clean them more efficiently. You can use the game’s interface to highlight wooden trims, revealing their locations, which saves time. This is especially helpful in large environments with many structures. The materials list ensures you don’t miss any wooden elements. This leads to a higher cleaning score and helps you get through the game faster.
Utilize the Dirt Finder: While not always pinpoint, the dirt finder can help with larger sections.
The dirt finder is one of the essential tools in the game. Though it doesn’t specify the material, it often highlights the dirt that has built up, which might be on the wooden trims. The dirt finder will reveal where to begin your cleaning, and where to look for wooden trims. It will save you time and help you to focus on the areas that need the most attention. Even if not pinpoint, it gives you a direction to get started, especially when cleaning larger structures.
Cleaning Techniques for Wooden Trims
When it comes to cleaning the wooden trims in PowerWash Simulator, there are specific techniques that can make the process more effective. Knowing the right approach will not only improve your cleaning efficiency but also help preserve the wooden trims’ appearance, avoiding damage that can happen by using the wrong tools or settings. The focus should be on the proper power washer settings, cleaning agents, and the order of operations for the best results.
Recommended Power Washer Settings
The settings on your power washer can significantly affect your ability to clean wooden trims effectively. Understanding and correctly adjusting these settings is vital to achieving a perfect score while keeping the wood from being damaged. The main factors to consider are pressure, nozzle type, and the use of cleaning agents. Using the correct combination will help the cleaning process.
Adjust the Pressure: Start with lower pressure settings to prevent damage.
Lower pressure settings are recommended. Begin with a lower setting when cleaning the wooden trims. Wood is more sensitive than other surfaces, and high pressure could damage or chip the wood. Gradually increase the pressure if needed. This reduces the risk of damaging the wood’s surface and helps control the water flow. Start low and only increase if necessary. This will make sure you don’t make mistakes with higher pressure.
Choose the Right Nozzle: Use a wide-angle nozzle for delicate surfaces.
Using the correct nozzle type is crucial for efficient cleaning. Wide-angle nozzles spread the water flow, which helps to cover more surface area without concentrating the pressure. This is very good for wooden trims. These nozzles can clean efficiently and reduce the chance of damaging the wooden surfaces. Select the appropriate nozzle to protect the wood. You’ll ensure a more uniform cleaning. The wide-angle will provide better results.
Use Cleaning Agents Carefully: Some cleaners can damage wood; choose mild ones.
Using the proper cleaning agents can improve the cleaning results and prevent damage to the wooden trims. Some detergents are made to clean tough dirt and grime but might be too strong for the wood. Always select the mild ones. Review the cleaning agent’s details before use, and apply sparingly. Consider the specific type of wood you’re cleaning. Use cleaners specifically designed for wood surfaces. Test the cleaner in an unseen area. This will avoid damaging the wooden surfaces.
Efficient Cleaning Strategies
To improve your efficiency and get the best results, it is a good idea to create a cleaning strategy. A good strategy will consider the order in which you clean, how to avoid streaking or water spots, and ways to handle difficult areas. Good cleaning will improve the final results. This approach will maximize your cleaning time and make sure that you remove all dirt effectively.
Clean Top to Bottom: Start at the top of the trim and work your way down.
Starting at the top and working down with each trim allows the water to carry the dirt and grime away, reducing the chances of streaking. Gravity will assist in the cleaning process. This will avoid spreading dirt to already cleaned areas. When you start at the top, you avoid re-soiling the cleaned parts. This means you will not have to clean them twice. Follow this approach and you will have excellent results.
Overlap Your Passes: Slightly overlap each pass of the power washer.
Overlapping your passes makes sure you get every spot. It ensures a thorough and even cleaning. This will prevent any areas from being missed and will avoid uneven cleaning. When you use the overlap technique, you’ll reduce any risk of gaps in cleaning. This will increase the cleaning efficiency and make sure that you achieve a thorough cleaning result. It’s the best way to get a complete clean.
Address Stubborn Stains: Use a higher pressure or closer range carefully.
For tougher stains, you might want to increase the pressure. However, be careful not to damage the surface. You can also adjust your position or use a specialized cleaning agent. Testing in a small area is a good idea. Always take extra care when removing tough dirt. This will help you restore the wood’s original finish. Always watch out for any signs of damage. This will give you the best outcomes.
Rinse Thoroughly: Make sure you rinse the trim completely after cleaning.
Make sure you remove all soap and any loose dirt to prevent water spots. This ensures a clean look. Cleaning with water prevents any residue from the cleaning agent, improving the appearance of the wooden trim. Rinsing your areas will give you a superior finish and is the final step to a perfect clean. After the wash, rinsing is an important final step. Ensure all surfaces are fully cleaned for a perfect finish.
Dealing With Challenging Areas
Some wooden trims can be tricky to clean due to their design or location. These are the areas that need a little more effort and a different approach. Learning how to manage these difficult areas is essential for completing the job. Using the correct tools and approaches will improve efficiency and help you to get every area thoroughly clean.
Difficult Angles: Use the adjustable nozzle to reach tight spaces.
Adjustable nozzles make it easy to clean in difficult spaces. Angling the nozzle will provide you with better access. You can clean hard-to-reach areas like corners, edges, and crevices. This adaptability is helpful for areas like door frames. The adjustable nozzle is a great tool for maximizing your cleaning capability. You can efficiently clean those harder parts.
Old or Damaged Wood: Be very careful with delicate wood. Use low pressure.
Old or damaged wood requires special care and careful consideration. It may be weaker and more susceptible to damage. You should use a lower pressure and apply gentle techniques. This reduces the risk of erosion. It’s also good to choose the correct nozzle type. This is important to ensure the best care of the wood. Make sure you avoid causing further harm to these surfaces. Always apply a gentle approach to make sure the cleaning process goes smoothly.
Multiple Layers: Work carefully when multiple layers of trim are present.
Some wooden trims have multiple layers, which means you have to use a strategic approach to clean them. You will need to make sure that each layer is thoroughly cleaned without missing any spots. When cleaning multiple layers, it is important to pay attention to the edges. This will require some patience and careful execution. This detailed approach is important to ensure an overall clean appearance. With all the layers clean, the final result will be a complete and uniform cleaning outcome.
Use the Extension Wand: For high trims, the extension wand will help.
The extension wand is a valuable tool for cleaning areas that are hard to reach, like high window frames or other elevated wooden trims. This tool will help you access those difficult areas, eliminating the need to move ladders. This improves the cleaning process and ensures that all areas are completely cleaned. Always extend the wand to the correct length for the best use and to get the best results. It’s especially useful for cleaning the higher wooden trims.
Finding the Wooden Trims in PowerWash Simulator: Real-World Examples
To help illustrate the methods discussed, we can explore some practical examples of common scenarios you’ll encounter in PowerWash Simulator. These real-world instances will show you how to apply the techniques and strategies. These will ensure you’re well-equipped to manage even the most challenging cleaning tasks. Each example also provides an insight into common issues that players face when cleaning.
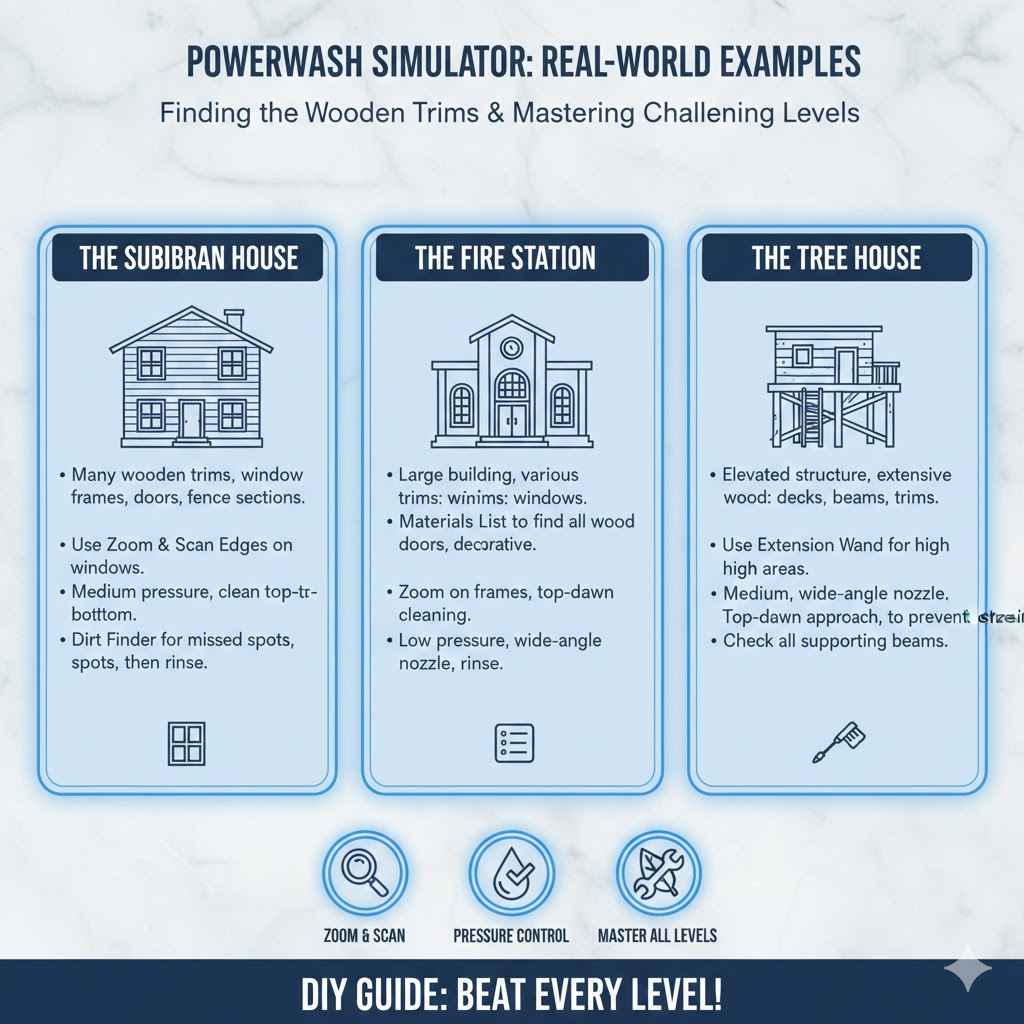
The Suburban House: Many players face the challenge of cleaning the wooden trims on the suburban house. This level requires you to clean a two-story home, including all windows, doors, fences, and various other wooden elements. The wooden trims are located in several difficult areas, like the window frames.
In this example, the wooden trims are mostly around the windows. To start, use the zoom function to check the edges of each window and door. Adjust the nozzle and power washer settings to medium pressure. Clean the frames from top to bottom. If any dirt is still present, use the dirt finder to make sure you didn’t miss anything. Then, rinse them thoroughly. This approach is effective for getting the best results.
The Fire Station: The fire station level will present you with the challenge of cleaning a large building with several different types of wooden trims, including window frames, wooden doors, and exterior decorative elements. These elements are located in various areas.
Begin by using the materials list to identify every wooden surface. Then, focus on the window frames and door frames. Use the zoom to find these trims. Start at the top and work your way down. Apply lower pressure, using a wide-angle nozzle. This will ensure that all areas are clean. If needed, you can use the dirt finder to look for any spots you have missed. Remember to rinse them completely. This will ensure they’re spotless.
The Tree House: This level will have you clean an elevated structure with an extensive amount of wooden surfaces, including trims, decks, and supporting beams. This setting requires you to pay extra attention to the details. The wooden components are in locations that are difficult to reach.
You can use the extension wand. Start with the higher surfaces, such as the roof edges and window frames, to make sure you get everything. Pay close attention to the details. Using a medium pressure is best to avoid any damage. Then, choose the wide-angle nozzle for a uniform clean. Always clean the top areas first, rinsing them to eliminate streaking. By following this method, you can effectively clean the elevated sections of the treehouse. Be sure to check all of the supporting beams.
Frequently Asked Questions
Question: Where are wooden trims in PowerWash Simulator?
Answer: Wooden trims in the game are usually located around windows, doors, fences, and some furniture. Use the zoom and dirt finder tools to help.
Question: What’s the best nozzle for wooden trims?
Answer: A wide-angle nozzle is generally recommended because it spreads the water flow, preventing damage to the wood.
Question: How do I clean stubborn dirt off the trims?
Answer: Increase the pressure slightly, use a specialized cleaning agent for wood, or gently scrub with the appropriate tools. Test it in a hidden area first.
Question: How can I tell which parts are made of wood?
Answer: The in-game materials list can highlight all wooden surfaces in the current level. This is a very helpful tool.
Question: Should I always start from the top?
Answer: Yes, always begin cleaning wooden trims from the top and move downwards. This helps with the flow of dirt and water. This prevents streaking.
Final Thoughts
So, you’ve learned the methods for identifying and cleaning wooden trims in PowerWash Simulator. From recognizing different wood types to employing effective cleaning strategies, you’re now better prepared to deal with these areas. The main focus is on recognizing the trims and using the appropriate cleaning techniques. Remember to focus on the details, use the tools, and clean each part methodically. If you use this information, you can improve your cleaning. Keep practicing! Soon, you’ll be efficiently cleaning all the wooden trims. Happy washing!