Which Direction To Lay Wood Flooring In A Square Room: Proven Essential
For a perfectly square room, the best direction to lay wood flooring is usually parallel to the longest wall or parallel to the main light source (like a window) to hide seams and create the most pleasing visual flow. This approach maximizes perceived room size and minimizes tricky cuts at the edges.
Welcome, DIY friend! Choosing which way to run your new wood floor planks in a square room can feel like a big decision. You want it to look professional, spacious, and perfect. Will running them across the width make the room look wider, or will running them lengthwise make it look longer? It’s easy to get stuck here, worrying about mistakes before you even make your first cut.
Don’t sweat it! Every great floor starts with this exact question. I’m here to walk you through the simple rules and the expert tricks that professional installers use, even in rooms that look perfectly square on the surface. We will keep things easy, safe, and focused on getting you beautiful, lasting results with confidence.
By the end of this guide, you’ll know exactly which direction suits your specific space best, and you’ll be ready to tackle that first board with a steady hand.
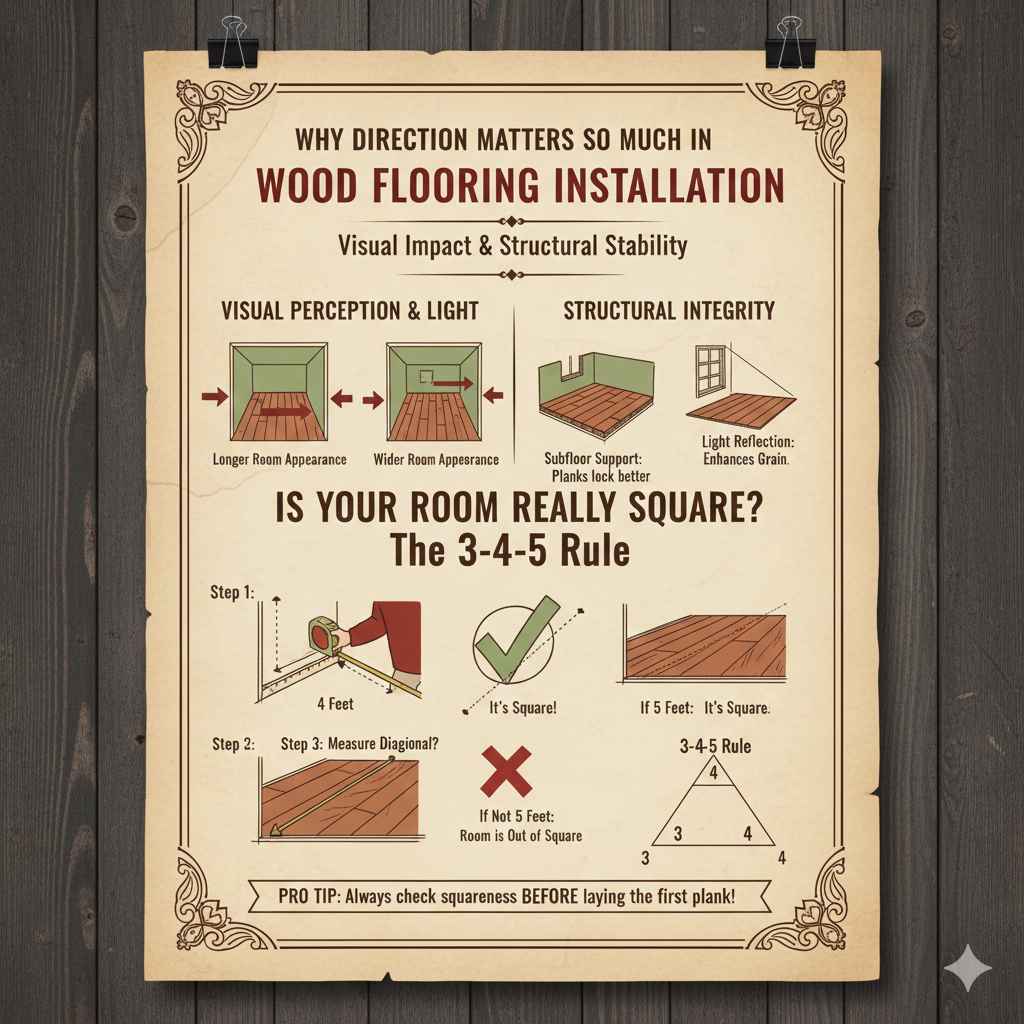
Why Direction Matters So Much in Wood Flooring Installation
When laying down hardwood or laminate flooring, direction isn’t just an aesthetic choice; it impacts the structural integrity, how light plays across the surface, and how easy the installation process will be. Think of it as drawing a line that guides the eye.
In any room, especially a square one, the direction you choose dictates three main things:
- Visual Perception: The direction of the planks can make a room appear longer, wider, or shorter.
- Light Reflection: How light hits the grain dramatically changes the floor’s color and texture perception.
- Subfloor and Stability: Proper direction helps the planks lock together better and deals with minor imperfections in the subfloor.
Is Your Room Really Square? The Essential First Check
Before you commit to a direction, you must confirm your room is as square as it looks. Many homeowners skip this step, leading to frustrating, uneven gaps down the road. A room that looks square might actually have slightly longer opposing walls. This small difference matters greatly for long runs of flooring.
You need a reliable tape measure and perhaps a large framing square for a quick check, but the best method is called triangulation.
How to Confirm Squareness Using Triangulation (The 3-4-5 Rule)
The 3-4-5 rule is a classic construction technique used to verify a perfect 90-degree corner. If you measure 3 feet down one wall from the corner and 4 feet down the adjacent wall, the diagonal distance between those two points must measure exactly 5 feet if the corner is a perfect square (90 degrees).
- Measure Wall A: Measure exactly 3 feet out from the corner along the first wall. Make a small pencil mark.
- Measure Wall B: Measure exactly 4 feet out from the same corner along the second wall. Make a small pencil mark.
- Measure the Diagonal: Measure the distance between the two pencil marks you just made.
- Check the Result: If the measurement is exactly 5 feet, your corner is square. If it’s more or less than 5 feet, the room is slightly out of square, and you need to adjust your starting point accordingly (we’ll discuss this in the next section).
Repeat this check for at least two corners. If all corners are close to 5 feet, you can confidently treat the room as square for laying your wood floor.
The Two Primary Rules for Laying Wood Flooring in a Square Room
When a room is genuinely square, you have two main, highly respected options. Both lead to excellent results, but one often slightly outperforms the other based on subtle visual cues.
Option 1: Run Parallel to the Primary Light Source (The Visual Champion)
This is often considered the “gold standard” for flooring installation, regardless of the room’s shape, but it works beautifully in square spaces.
The goal here is to have the direction of the planks run toward the main window or source of natural light. Why? When light skims across the floor surface parallel to the joints (seams) between the planks, shadows are minimized. This makes the seams almost invisible.
If you run the boards perpendicular (against) the light source, the light hits the slightly raised edges of each plank, highlighting every tiny gap or imperfection. You don’t want that!
When to choose this: If your square room has one dominant, large window or sliding door, run the planks toward that opening.
Option 2: Run Parallel to the Longest Wall (The Length Maximizer)
Even in a square room, one wall might measure a tiny fraction longer than the other (maybe by 1/4 inch). Following the longest dimension generally helps the eye perceive the room as being slightly longer or grander.
If you have two windows of equal size on opposite walls, running the boards down the longer of the two wall spans is the traditional, conservative choice.
Pro Tip for Square Rooms: If the room has no dominant light source (say, small windows on three walls), choose the longest wall and run the boards parallel to it. This creates a continuous, clean sightline through the room.
Tools You Need Before You Start Cutting
Before we get into the final layout, let’s make sure your toolbox is ready. Having the right tools makes cutting and fitting much safer and faster. These are essential for any plank flooring installation.
| Tool Name | Why You Need It | Beginner Tip |
|---|---|---|
| Chalk Line or Laser Level | To ensure your very first row is perfectly straight across the room. | A laser level is worth the investment for perfect straightness. |
| Miter Saw (or Table Saw) | For accurate, square cuts on the ends of planks. | Always wear safety glasses and never force the wood through the blade. |
| Jigsaw | For making tricky relief cuts around door jambs or oddly shaped corners. | Use a blade designed for wood/laminate to reduce chipping. |
| Tapping Block and Mallet | To gently tap planks together without damaging the tongue and groove edges. | Always place the tapping block on the edge, never directly on the plank face. |
| Spacers (or Wedges) | To maintain the necessary expansion gap (usually 1/4” to 3/8”) around all walls. | Keep these handy for every single row, even if the wall looks straight. |
Step-by-Step Layout Guide for Your Square Room
Once you’ve chosen your direction (parallel to light or parallel to the longest wall), the actual layout process is straightforward. We will focus on the starting point, as that determines the success of the entire floor.
Step 1: Determine the Layout Width
Even in a square room, you need to ensure that the last row of planks is not too narrow. A final strip that is less than two inches wide looks weak and is hard to install.
Measure the distance from your starting wall (Wall A) to the opposite wall (Wall B). This is your total width.
Divide this total width by the width of a single flooring plank. If the result gives you a final piece that is too narrow, you must adjust your starting point.
Example: If the room is 12 feet wide (144 inches), and your planks are 5.5 inches wide, 144 / 5.5 = 26.18 planks. This means you’ll have 26 full planks and a final piece that is 0.18 of a plank wide. This is fine! If you got 26.98 planks, that last piece would be too narrow (almost a full board width), so you’d rip your first board narrower to balance the look.
Step 2: Establish the Layout Line
Your very first row must be perfectly straight. If it’s crooked, every single subsequent row will look progressively worse.
Using your measuring tape and chalk line (or laser level), measure the required expansion gap (e.g., 3/8 inch) in from your starting wall (Wall A) along the entire length of that wall. Snap a clean, straight line on the subfloor.
This line is where the tongue edge of your first row of planks will sit.
Step 3: Prepare the First Row (The Ripping Cut)
For the first row running along your starting wall, you almost always need to remove the locking tongue from the side facing the wall. This is called “ripping” the board.
Use your table saw or circular saw to carefully cut off the tongue along the entire length of every board you plan to use in that first row.
Safety Check: When ripping, ensure the board is firmly supported and the factory edge (the part you are keeping) is running flush against the saw guide fence. Always use push sticks!
Step 4: Install the First Row and Spacers
Lay the first board down along your chalk line, ensuring the cut (flat) edge rests against the wall. Insert spacers between the board and the wall to maintain your expansion gap.
Continue installing the first row, tapping pieces together gently using your tapping block. Make sure the ends meet perfectly square.
Step 5: Staggering the Seams (The Visual Glue)
This is key to a professional look. You do not want the end joints of consecutive rows to line up—this creates weak spots and very obvious lines.
The general rule of thumb is that the end joint of one row should be at least 6 inches away from the end joint of the adjacent rows. In a square room, this usually means staggering your seams randomly, or, for a more formal look, staggering them by exactly half the board length.
Start your second row (Row 2) with the off-cut piece from the end of the first row (provided that off-cut is longer than 6 inches). If not, cut a new plank to a random length that achieves the 6-inch offset.
Step 6: Finishing the Room
Continue laying planks row by row, locking them in place and tapping gently. Always check your straightness against your initial layout line for the first few rows.
When you reach the last row, you will likely need to rip it lengthwise to fit the remaining gap, using the same calculation you performed in Step 1.
Advanced Considerations: Dealing with Imperfections
While we assumed a square room, real-world rooms often have walls that aren’t perfectly parallel or plumb (perfectly vertical). If your chosen direction (say, toward the main window) runs parallel to walls that bow slightly inward or outward, the gaps can become noticeable.
Handling Wall Bows
If a wall bows outward, your planks will naturally try to bend toward it, causing the locking mechanism to strain. If the wall bows inward, you’ll have a visible gap opening up near the middle of the row.
The Fix: Do not force the wood. If you hit a stubborn bow, cut a small arc or relief cut into the end of the board that touches the wall, allowing it to fit the curve slightly better, while still allowing for the required expansion gap maintained by the spacers.
For more detailed guidance on handling subfloor leveling before installation, which heavily affects plank seating, you can refer to resources like the National Wood Flooring Association (NWFA) standards, which offer detailed professional guidelines on substrate flatness.
Directional Impact Comparison in Square Rooms
To give you a final perspective, here is how the two primary choices visually affect a square space:
| Direction Chosen | Visual Effect in Square Room | Best For |
|---|---|---|
| Parallel to Light Source | Makes the floor look smoother; hides minor installation flaws and seams effectively. | Hiding imperfections; maximizing perceived quality of finish. |
| Parallel to Longest Wall | Creates a clear, dominant line that draws the eye along the longest axis. | Rooms with two clear, strong sightlines or pathways into the room. |
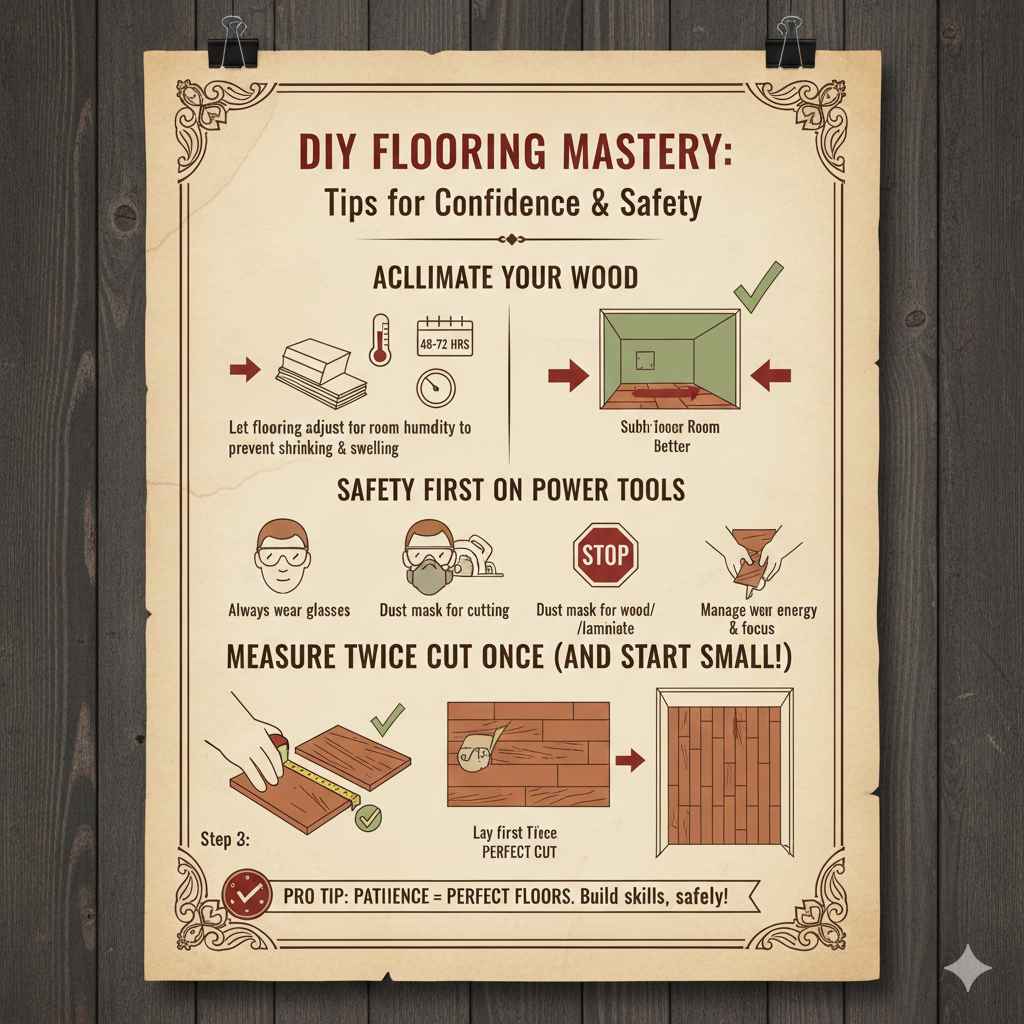
Tips for Confidence and Safety During Installation
DIY projects are about building skills safely. Since laying flooring is very repetitive, take care to manage your energy and focus.
- Acclimate Your Wood: Always let your flooring sit in the room where it will be installed for at least 48 to 72 hours before opening the boxes. This allows the wood to adjust to the humidity, preventing major shrinking or swelling later on.
- Safety First on Power Tools: Always wear safety glasses when cutting. Dust masks are recommended, especially when cutting engineered wood or laminate cores.
- Measure Twice, Cut Once (Really!): This saying is gospel in woodworking. Measure your required length, then measure it again on the plank before committing to the cut.
- Start Small: Lay your first two rows perfectly. If those are good, you can usually trust your momentum for the rest of the room.
Frequently Asked Questions (FAQ) for Beginner Flooring Installers
Q1: If my square room has two windows of equal size on opposite walls, which direction should I choose?
A: In this tie situation, revert to the measurement. Choose the wall that is technically the longest, even if only by a tiny margin, and run the planks parallel to that wall. This maintains a consistent, long visual line.
Q2: How much space should I leave between the planks and the wall?
A: For solid hardwood, aim for 1/4 inch to 3/8 inch. For floating floors (like laminate or engineered click-lock), always follow the manufacturer’s specifications, which are often slightly larger (up to 1/2 inch) to allow for expansion. Spacers are essential for this.
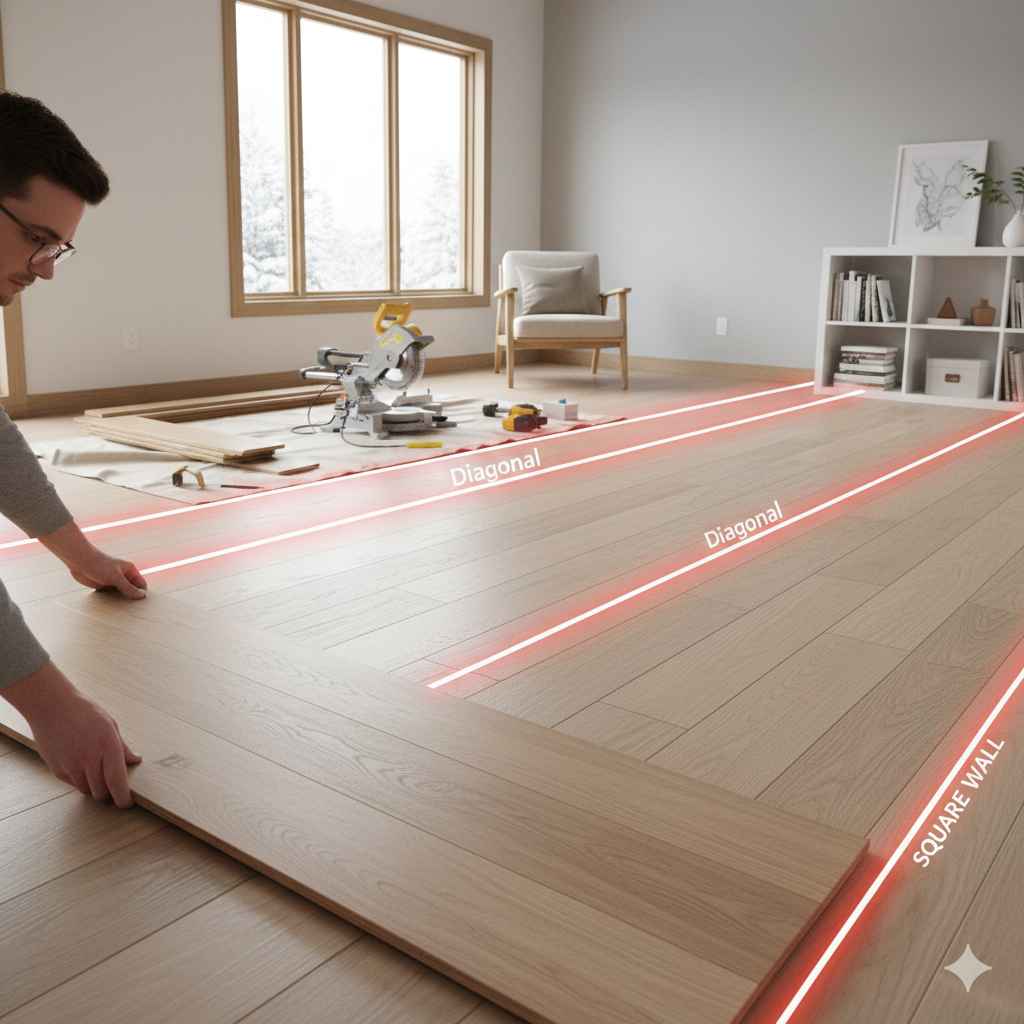
Q3: Can I lay planks diagonally in a square room?
A: Yes, you absolutely can, and it looks fantastic! However, diagonally installed floors require significantly more planning, more complex cuts, and waste much more material (up to 15-20% waste). For a beginner, sticking to parallel installation is far safer and more budget-friendly.
Q4: What if the light hits the floor at an angle, and the seams still show?
A: If the seams are still visible even when running parallel to the light, this usually means there is a slight height difference between the locking mechanisms of two adjoining planks. Gently use your tapping block to reseat them. If that doesn’t work, inspect the subfloor flatness underneath that area—you might need to address a small dip or hump in the subfloor.
Q5: Do I need an expansion gap if I’m gluing the wood down?
A: Yes, absolutely! Even glued-down engineered wood or solid wood requires an expansion gap around the perimeter. Wood naturally absorbs and releases moisture, causing it to expand and contract across its width. Without an adequate gap, the floor will buckle in the center, a problem called “crowning.”
Q6: Is it okay if my first row is slightly curved because the wall is uneven?
A: No, it is not okay. Your first row sets the standard for the entire installation. If the first row is curved, every other row after it will mirror that curve. Always snap a straight layout line and use spacers to maintain the gap, even if the wall itself is wavy.
Conclusion: Trust Your Sightline
You’ve done the essential homework: you checked the squareness, you know the two best directional rules, and you have your tools ready. Remember, in a square room, the choice boils down to prioritizing light reflection or establishing a primary visual pathway.
If the room is used constantly and has one main entry point, prioritize running parallel to the light source shining in that direction. If the room feels balanced and you want to emphasize its size, run it parallel to the longest measurement.
Take a deep breath. You are the boss of this floor. By following these tested principles, you are setting yourself up not just for an installation, but for a beautiful, durable floor that you installed with your own capable hands. Happy laying!