
A String Tied to Book: Proven Science
Quick Summary: When a string is tied to a book and pulled lightly, the book will move towards you due to friction. The force you apply overcomes the static friction between the book and the surface, causing motion. This simple demonstration illustrates basic physics principles like force, friction, and motion.
Ever wondered what happens when you tie a string to a book and give it a gentle tug? It might seem like a simple action, but there’s some fascinating science at play! Many of us have done this as kids, or perhaps you’re thinking about it for a science project or just out of curiosity. It’s a common, everyday action that can sometimes feel a little puzzling if you don’t know the “why” behind it. Don’t worry if it’s not immediately obvious; understanding the forces involved is key. We’re going to break down the science behind this simple experiment in a way that’s easy to grasp. Get ready to see how a little tug on a string can reveal big physics concepts!
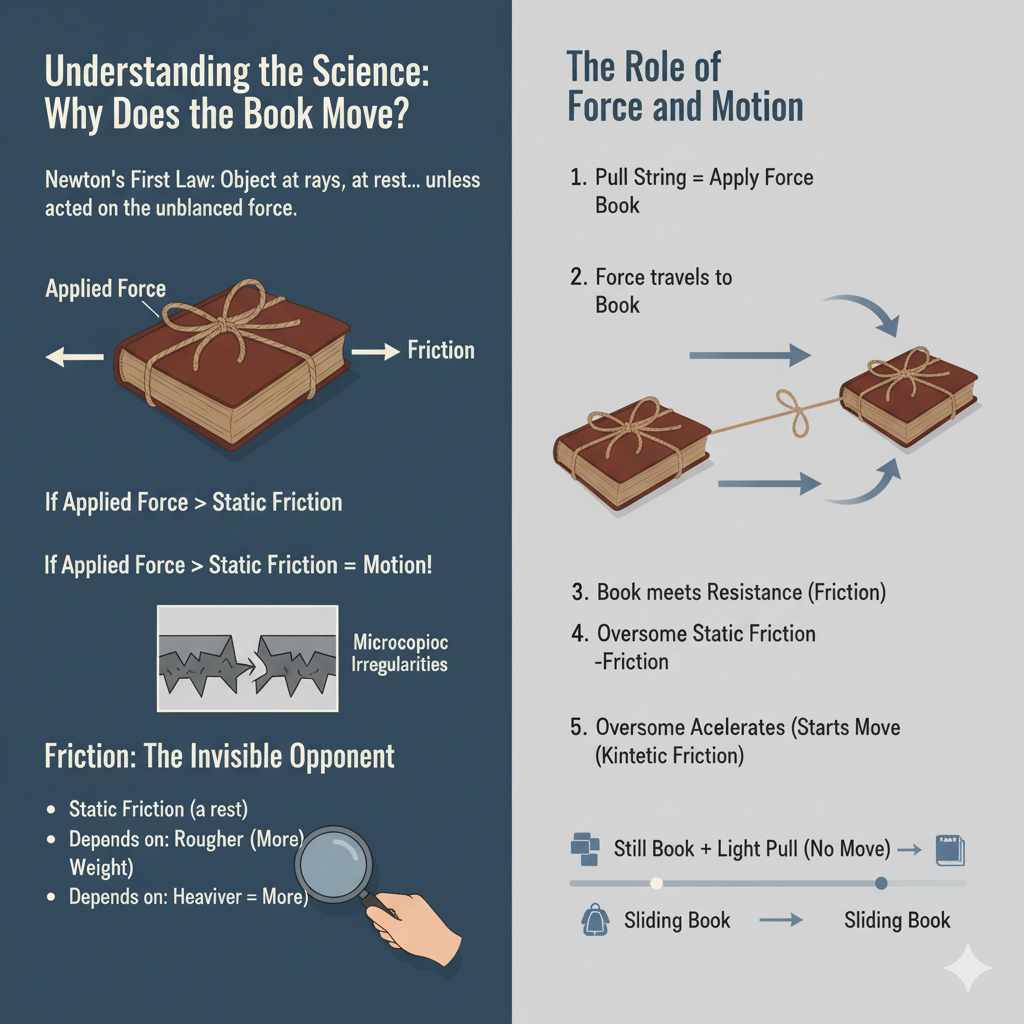
Understanding the Science: Why Does the Book Move?
When you tie a string to a book and pull it, you’re essentially applying a force. This force travels through the string and acts on the book. But the book doesn’t just slide away instantly, does it? That’s where the concept of friction comes in. Friction is a force that opposes motion between two surfaces that are in contact. Think of it as a silent, invisible resistance.
There are different types of friction. When the book is sitting still, there’s static friction holding it in place. This is the force you need to overcome to get the book moving. Once the book starts to slide, you’re dealing with kinetic friction, which is usually a bit less than static friction. The science behind “a string tied to a book and pulled lightly” is all about these forces interacting.
The Role of Force and Motion
Newton’s Laws of Motion are fundamental to understanding this. Specifically, Newton’s First Law, often called the Law of Inertia, states that an object at rest stays at rest, and an object in motion stays in motion with the same speed and in the same direction unless acted upon by an unbalanced force. In our case, the book is at rest. When you pull the string, you apply a force. If this applied force is greater than the static friction between the book and the surface it’s on, you create an unbalanced force. This unbalanced force causes the book to accelerate and move.
Think about it this way: you’re trying to “unbalance” the forces that are keeping the book still. The string is your tool to apply that force, and the movement of the book is the result of overcoming the resistance (friction).
Friction: The Invisible Opponent
Friction is a crucial part of this experiment. It’s what makes it possible for us to walk, for cars to drive, and for many everyday objects to stay put. In the case of our book, friction arises from the microscopic irregularities on the surface of the book’s cover and the surface it’s resting on. Even seemingly smooth surfaces have tiny bumps and dips that interlock when pressed together.
When you pull the string, you’re trying to slide the book. The friction between the book and the surface resists this sliding motion. The amount of friction depends on a few factors:
- The surfaces in contact: Rougher surfaces generally have more friction than smoother ones. A book on a carpet will have more friction than a book on a polished table.
- The force pressing the surfaces together: The heavier the book, the more force is pressing it down onto the surface, and thus, the more friction there will be.
- The area of contact (to some extent): While often simplified, the area of contact can play a role, though the coefficient of friction is more dominant.
For “a string tied to a book and pulled lightly,” the “lightly” part is important. If you pull too lightly, the static friction will be stronger than your pull, and the book won’t move. If you pull just right, you overcome static friction, and the book begins to slide, encountering kinetic friction.
Setting Up Your Experiment: Simple Steps
This is one of those experiments that requires minimal setup. You likely have everything you need right at home! Here’s how to do it:
Materials You’ll Need:
- A book (any kind will do, but a hardcover might be easier to tie a string to)
- A piece of string or twine (about 1-2 feet long)
- A flat, smooth surface (like a table, desk, or hard floor)
- Optional: A small piece of tape (to secure the string if needed)
Step-by-Step Guide:
- Prepare the Book: Take your book and the string. You need to attach the string securely to the book. The easiest way is to tie it around the middle of the book, ensuring it’s snug but won’t damage the cover. If your book has a dust jacket, be careful not to tear it. Alternatively, you can tie the string around the pages if the book is closed, or use a small piece of tape to secure one end of the string to the cover.
- Choose Your Surface: Find a flat, stable surface. A smooth table or a polished wooden floor works well because the friction is relatively low and predictable. Avoid surfaces that are too rough or uneven, as this can make the results harder to observe.
- Position the Book: Place the book on the chosen surface. Make sure the string is lying flat on the surface, extending away from the book.
- Apply Gentle Force: Now, hold the free end of the string. Apply a gentle, steady pull. Start with a very light pull and gradually increase the force. Pay attention to what happens to the book.
- Observe the Motion: Notice when the book starts to move. Does it move immediately? Does it require a certain amount of effort? Observe how it slides across the surface.
- Experiment with Variations (Optional): Once you’ve observed the basic principle, you can try varying things. Try different surfaces (e.g., a rough placemat, a piece of sandpaper, a cloth), different books (heavier vs. lighter), or different types of string. What changes do you notice?
This simple setup allows you to directly experience the concepts of force and friction in action. It’s a hands-on way to see how applying a force can overcome resistance and cause movement.
Factors Affecting the Book’s Movement
While the basic principle of overcoming friction is simple, several factors can influence exactly how the book moves when you pull the string. Understanding these can deepen your appreciation for the physics involved.
Surface Characteristics
The nature of the surface the book rests on is a primary factor. A smoother surface, like a glass table, will have less friction than a rougher surface, like a concrete floor. This means you’ll need less force to get the book moving on a smoother surface.
To illustrate, consider these surface types and their typical friction levels:
| Surface Type | Typical Friction Level | Notes |
|---|---|---|
| Polished Wood/Glass | Low | Requires minimal force to initiate movement. |
| Laminate Flooring | Medium-Low | Slightly more resistance than polished surfaces. |
| Concrete | Medium | Noticeable resistance, especially if unpolished. |
| Carpet/Fabric | High | Significant resistance, requires much more force. |
| Sandpaper | Very High | Designed to create high friction. |
The table above shows a general trend. For precise measurements, you’d look at the coefficient of friction, which is a dimensionless number that represents the ratio of the frictional force to the normal force pressing the surfaces together. For instance, the coefficient of kinetic friction ($mu_k$) for rubber on dry concrete is around 0.6 to 0.85, while for ice on ice, it can be as low as 0.02.
Weight of the Book
The heavier the book, the greater the normal force pressing it against the surface. Since friction is directly proportional to the normal force (Friction = $mu$ * Normal Force), a heavier book will have more friction. This means you’ll need to apply a stronger pull on the string to overcome this increased resistance and get the book moving.
Imagine trying to slide a feather compared to trying to slide a stack of encyclopedias. The encyclopedias, being much heavier, will have significantly more static and kinetic friction.
The String and How You Pull
The way you pull the string also matters. If you pull the string horizontally, you’re applying force directly against the friction. If you pull the string upwards at an angle, some of your force is used to lift the book slightly, reducing the normal force and thus reducing friction. However, for a beginner-friendly demonstration of “a string tied to a book and pulled lightly,” pulling horizontally is usually the clearest way to demonstrate the basic concept.
Also, the material and thickness of the string can affect how the force is transmitted. A thinner, stronger string might allow for a more direct application of force. If the string stretches significantly, some of your effort will go into stretching the string rather than pulling the book.
Angle of Pull
Let’s elaborate on the angle of pull. When you pull a string attached to an object, the direction of your pull matters. If you pull perfectly horizontally, all of your applied force is available to overcome friction. However, if you pull upwards at an angle ($theta$), the applied force ($F_{applied}$) can be resolved into two components:
- Horizontal Component: $F_{horizontal} = F_{applied} times cos(theta)$. This component directly opposes friction.
- Vertical Component: $F_{vertical} = F_{applied} times sin(theta)$. This component acts upwards, reducing the normal force ($F_N$) pressing the book down. The new normal force becomes $F_N’ = F_N – F_{vertical}$.
Since friction is proportional to the normal force, reducing the normal force by pulling upwards at an angle will decrease the friction. This means it might be easier to start the book moving when pulling at a slight upward angle, even though your total applied force might be the same. For a simple demonstration, a horizontal pull is often preferred to isolate the friction concept, but understanding the effect of an angled pull adds another layer to the science.
The Science of Static vs. Kinetic Friction
When you first start pulling the string, you’re working against static friction. This is the force that keeps the book stationary. Static friction is not a fixed value; it can vary from zero up to a maximum value. The maximum static friction is the force you need to overcome to initiate motion.
Once the book begins to slide, the friction acting on it changes to kinetic friction (also called sliding friction). Kinetic friction is generally less than the maximum static friction. This is why, once you get an object moving, it often feels a bit easier to keep it moving than it was to get it started.
Here’s a breakdown:
-
Static Friction ($f_s$):
- Keeps an object at rest.
- Variable: $0 le f_s le f_{s,max}$
- $f_{s,max} = mu_s times F_N$, where $mu_s$ is the coefficient of static friction and $F_N$ is the normal force.
- You need to apply a force greater than $f_{s,max}$ to start motion.
-
Kinetic Friction ($f_k$):
- Acts on a moving object.
- Generally constant (for a given pair of surfaces and normal force).
- $f_k = mu_k times F_N$, where $mu_k$ is the coefficient of kinetic friction.
- Typically, $mu_k < mu_s$.
When you pull the string, you’re increasing your applied force. Initially, the static friction force matches your applied force, keeping the book still. As you increase your pull, static friction also increases, up to its maximum value. The moment your applied force exceeds this maximum static friction, the book starts to slide, and the friction immediately drops to the lower value of kinetic friction.
Real-World Applications of Friction
Understanding friction, as demonstrated by pulling a book with a string, has countless applications in our daily lives and in engineering. Friction isn’t always an enemy; it’s often a necessary force.
Everyday Examples:
- Walking: We push backward on the ground, and the static friction between our shoes and the ground pushes us forward. Without friction, we’d just slip!
- Driving: Tires grip the road due to friction, allowing cars to accelerate, brake, and turn.
- Braking Systems: Brakes in vehicles work by increasing friction between brake pads and the rotor or drum, slowing the vehicle down.
- Tools: Screwdrivers grip screws, hammers grip nails, and saws grip wood, all thanks to friction.
- Holding Objects: The friction between your hand and an object allows you to hold it without it slipping.
Engineering and Design:
Engineers carefully consider friction when designing everything from machinery to clothing. Sometimes they want to reduce friction (e.g., using lubricants in engines or ball bearings in moving parts) and sometimes they want to increase it (e.g., designing tire treads or using specialized materials for grip).
The science behind “a string tied to a book and pulled lightly” is a fundamental principle that underpins many of these applications. For a deeper dive into the physics of friction, you can explore resources from institutions like the University of Toronto’s Physics Department, which offers explanations and models related to friction.
Common Mistakes and How to Avoid Them
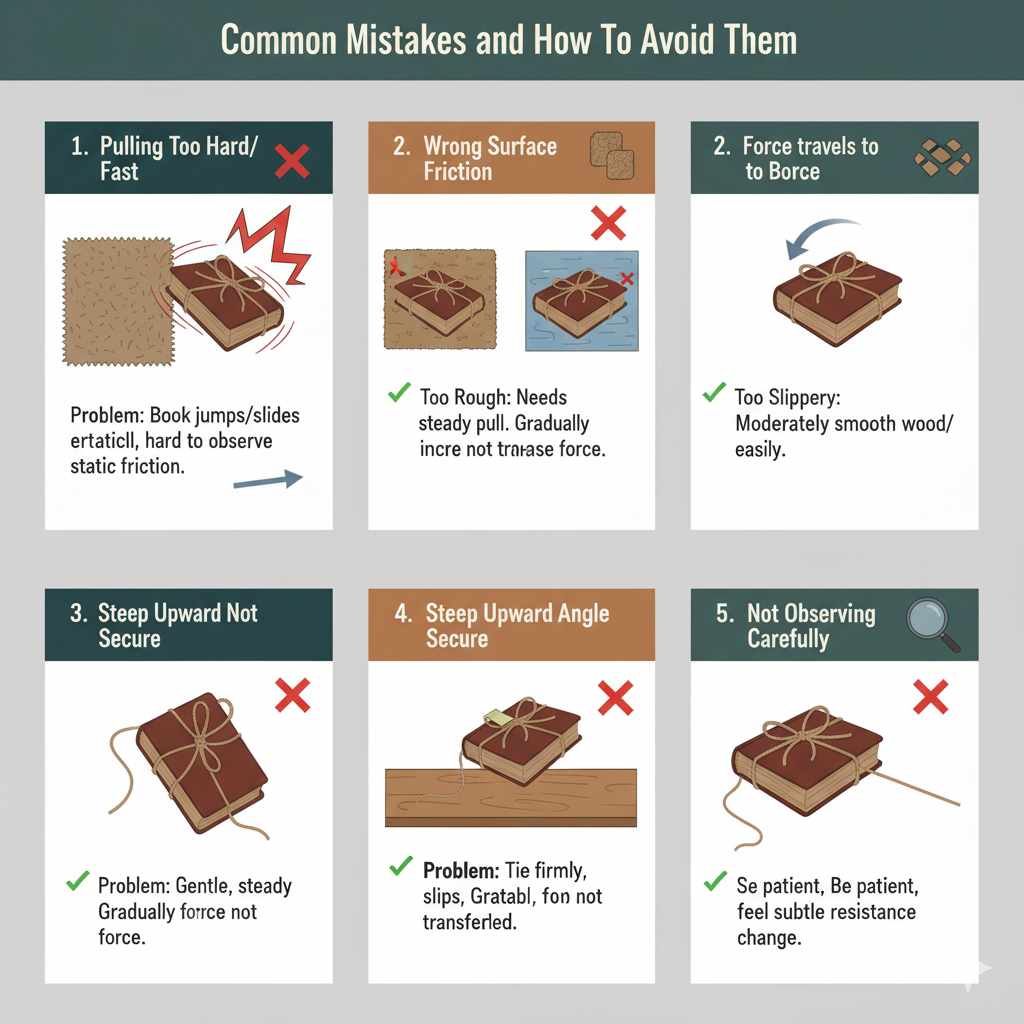
Even with a simple experiment, it’s easy to run into minor issues. Here are a few common mistakes when demonstrating or observing the science of pulling a book with a string, and how to avoid them:
Mistake 1: Pulling too hard or too fast initially.
Problem: If you yank the string with a lot of force right away, the book might jump or slide erratically, making it harder to observe the transition from static to kinetic friction. You might also underestimate the initial force needed.
Solution: Start with a very gentle, steady pull. Gradually increase the force. This allows you to feel the point where the static friction is overcome and the book begins to move. This makes the demonstration of static vs. kinetic friction much clearer.
Mistake 2: Using a surface with too much or too little friction.
Problem: If the surface is extremely rough (like thick carpet), you might need a very large force, making it difficult to demonstrate the “pulled lightly” aspect. If the surface is too slippery (like wet glass), the book might slide too easily, and it’s hard to feel the resistance.
Solution: Choose a moderately smooth and consistent surface like a wooden table, a desk, or a hard floor. If you want to experiment with different friction levels, have a variety of surfaces ready, but start with a standard one.
Mistake 3: Not tying the string securely.
Problem: If the string slips or comes untied, you won’t be applying force effectively to the book. The string might also stretch or deform significantly, absorbing some of the applied force.
Solution: Ensure the string is tied firmly to the book. If needed, use a small piece of strong tape to secure the knot or the end of the string to the book’s cover. This ensures a direct transfer of force.
Mistake 4: Pulling at a very steep upward angle.
Problem: While pulling at an angle can reduce friction, pulling too steeply might cause the book to lift off the surface or become unstable, which deviates from the primary goal of demonstrating horizontal sliding friction.
Solution: For the basic demonstration, aim for a horizontal pull. If you want to explore the effect of angled pulls, do so as a secondary experiment after you’ve clearly demonstrated the horizontal case.
Mistake 5: Not observing carefully.
Problem: Rushing through the experiment without paying attention to the subtle changes in resistance as you pull.
Solution: Be patient. Feel the resistance in the string. Notice the moment the resistance changes or the book starts moving. This careful observation is key to understanding the science.
Frequently Asked Questions (FAQ)
Q1: What is the main scientific principle behind a string tied to a book and pulled lightly?
A1: The main principle is friction. When you pull the string, you apply a force. This force must overcome the static friction between the book and the surface to make the book move. Once moving, it’s kinetic friction that opposes the motion.
Q2: Why doesn’t the book move if I pull the string very lightly?
A2: If you pull too lightly, your applied force is less than the maximum static friction. Static friction is a force that prevents an object from moving, and it adjusts its strength to match your pull up to a certain limit. If your pull doesn’t reach that limit, the book stays put.
Q3: Is it harder to push the book or pull it with a string?
A3: Generally, pulling with a string at a horizontal or slightly upward angle is often easier than pushing. When you push, the force you apply can have a component that presses the object down, increasing friction. Pulling horizontally directly opposes friction, and pulling slightly upwards can even reduce friction by lifting the object slightly.
Q4: What is the difference between static and kinetic friction?
A4: Static friction is the friction that keeps an object at rest. Kinetic friction is the friction that opposes the motion of an object that is already moving. Typically, the maximum static friction is greater than the kinetic friction.
Q5: Does the type of string matter?
A5: Yes, the type of string can matter. A stretchy string will absorb some of your pulling force, meaning less force is directly applied to the book. A strong, inelastic string will transfer the force more efficiently. The thickness and material can also affect how easily it slides on surfaces.
Q6: How can I make the book slide more easily?
A6: You can make the book slide more easily by reducing friction. This can be done by placing it on a smoother surface, reducing its weight (if possible, though not practical for a book experiment), or by pulling at a slight upward angle to reduce the normal force.
Q7: Where can I learn more about the physics of friction?
A7: You can find reliable information from educational websites, physics textbooks, and university physics department pages. For example, resources from reputable institutions like MIT or the NASA often provide clear explanations of physics concepts.
Conclusion
So, the next time you tie a string to a book and give it a gentle tug, you’ll know it’s not just magic! You’re witnessing a fundamental demonstration of physics in action. The simple act of pulling a book reveals the interplay between applied force and the ever-present force of friction. You’ve learned how static friction holds the book in place, and how a sufficient pull overcomes it to introduce kinetic friction, setting the book in motion.
We’ve explored how factors like the surface you’re pulling on, the weight of the book, and even the angle of your pull can influence the outcome. Understanding these elements helps demystify why some objects move more easily than others and highlights the importance of friction in everything from walking to driving. This hands-on experiment is a fantastic way to build confidence in understanding basic scientific principles and encourages you to look for the science in everyday actions. Keep experimenting, keep asking questions, and keep building your knowledge – that’s the spirit of DIY and discovery!