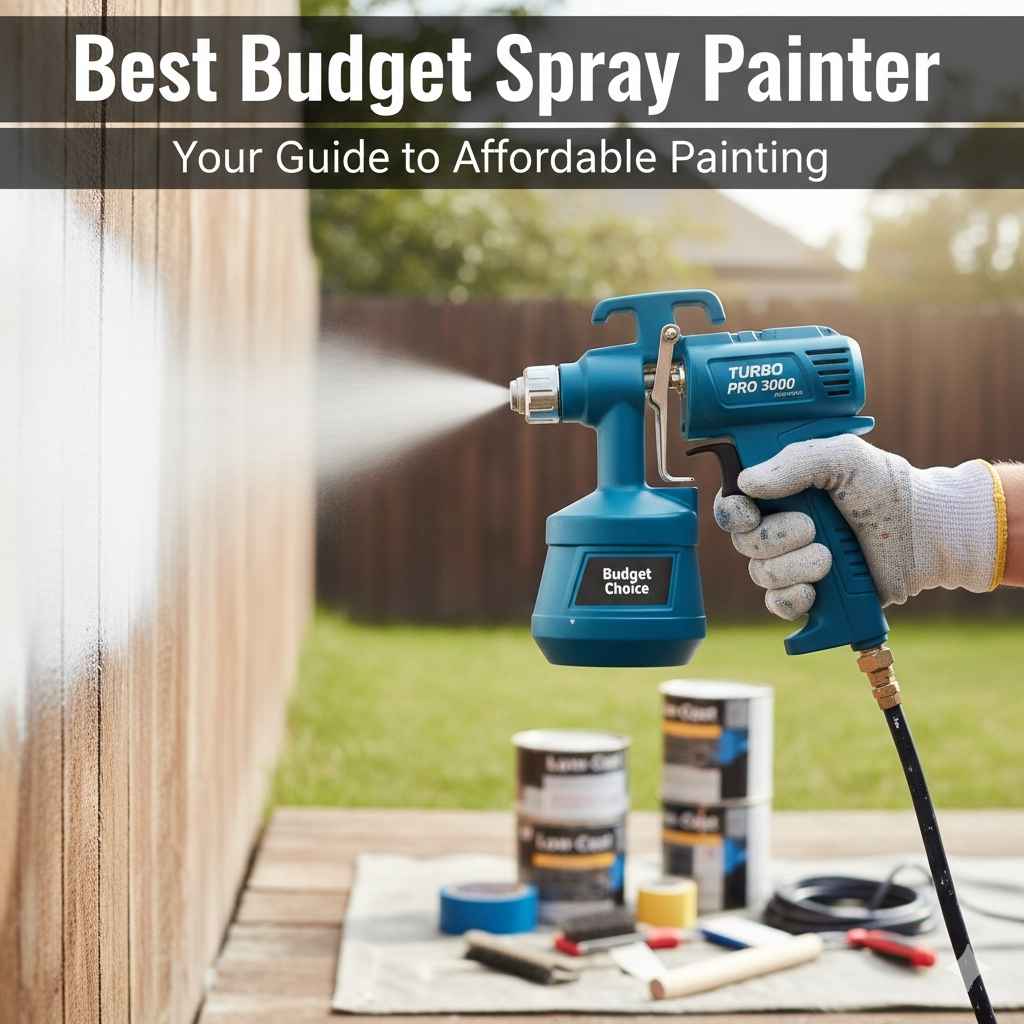
Best Budget Spray Painter: Your Guide to Affordable Painting
Choosing the Best Budget Spray Painter: Cheap Picks That Work can seem tricky at first. It’s common to feel unsure about all the options and how they fit your painting needs. Don’t worry! This guide breaks down everything simply, from what to look for to which spray painters offer the best value. We’ll explore the budget-friendly options that perform well, so you can start painting like a pro without breaking the bank. Let’s get started and find the perfect spray painter for you!
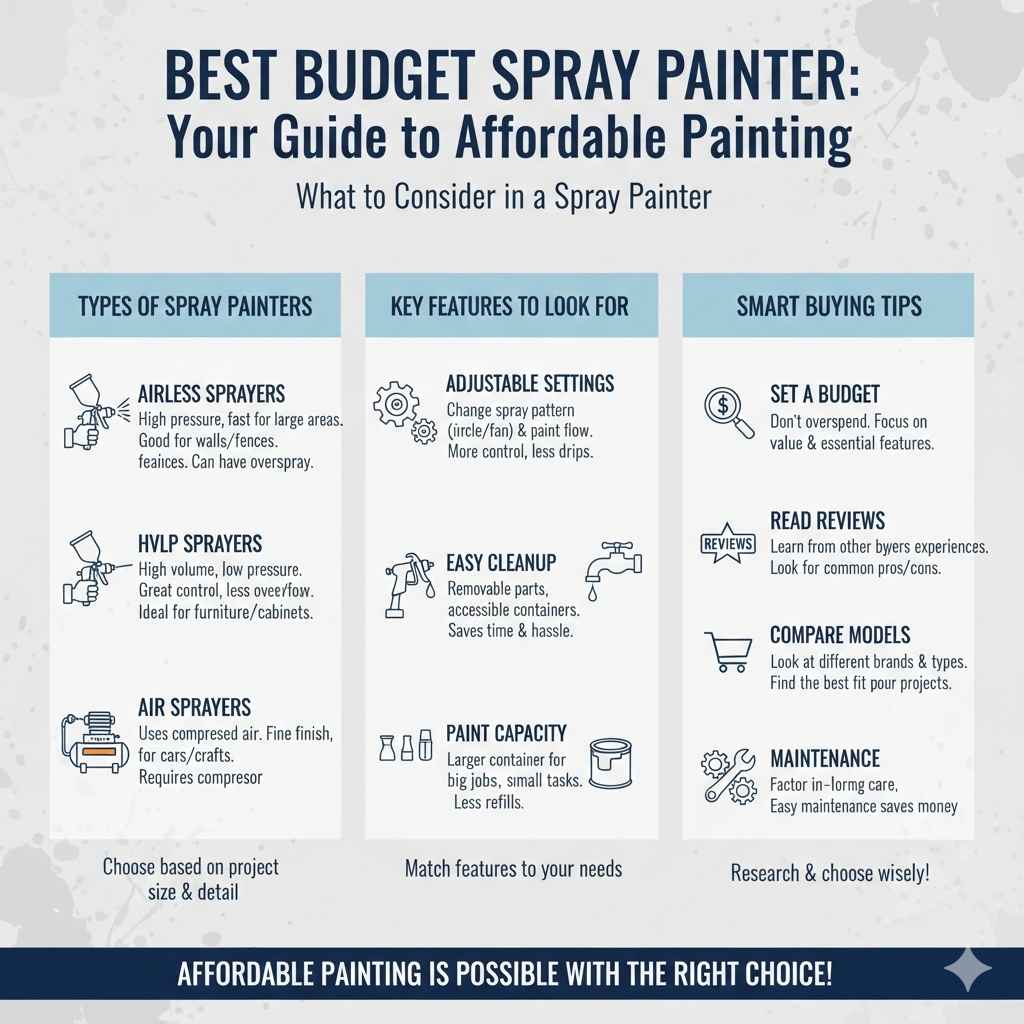
What to Consider in a Spray Painter
Before you buy, it’s important to know what makes a spray painter “good” for you. This means thinking about what you’ll be painting and how often you’ll be using the sprayer. You also need to think about your budget. The features and quality vary a lot among spray painters. Some might be great for small jobs and others might work for bigger projects. Learning the differences will help you make a smart choice and get the best value for your money. That way, you won’t overspend on a sprayer that’s more than you need, or get one that doesn’t do the job.
Types of Spray Painters
Spray painters come in a few main types, each using a different way to spray paint. Knowing these can help you pick the right one. The most common types are airless, HVLP, and air sprayers. Each works well for different painting jobs. Airless sprayers are good for larger areas, while HVLP sprayers give you great control for detailed work. Air sprayers are often used for DIY projects. Choosing the type that matches your project is important for getting a good finish. For the Best Budget Spray Painter: Cheap Picks That Work, you’ll often find HVLP or air sprayers offer the best value.
Airless Sprayers: These use a pump to push paint at high pressure through a small nozzle, which atomizes the paint.
Airless sprayers are powerful and great for large areas like walls and fences. They provide a fast and even finish, but they can use a lot of paint and can be trickier to control. You might get more overspray with this type. The high pressure can also make cleaning a bit more involved. While generally more expensive, some budget airless options exist.
HVLP (High Volume Low Pressure) Sprayers: HVLP sprayers use a lot of air at low pressure to atomize the paint.
HVLP sprayers give you more control and create less overspray. They are ideal for detailed work like furniture or cabinets. Because of the lower pressure, you can get a smoother finish with less paint waste. They are often a good choice for beginners due to their ease of use. If you want detail and better control, an HVLP sprayer is a smart choice for the Best Budget Spray Painter: Cheap Picks That Work.
Air Sprayers: Air sprayers use compressed air to atomize the paint, usually from a compressor.
Air sprayers can give a very fine finish, which is great for things like car painting or detailed craft projects. They require a compressor, which can increase the cost. They are usually more complex to set up. But, they are a good choice if you already have a compressor and are looking for professional results. Air sprayers generally offer excellent control.
Key Features to Look For
When selecting a budget spray painter, you should explore specific features. These features will impact how well the sprayer works and how easy it is to use. Some features improve accuracy, while others make cleanup easier. These features are all about making your painting project go smoothly. Consider how these features match up with what you are painting and how much experience you have.
Adjustable Settings: Look for spray painters that let you change the spray pattern and the amount of paint.
Being able to adjust the spray pattern (like from a circle to a fan) helps you match the spray to the surface you are painting. For instance, a fan pattern is good for walls, while a circle is better for smaller items. You also want to adjust the paint flow so that you are not wasting paint or creating drips. This gives you more control and helps you get a better finish, especially important for the Best Budget Spray Painter: Cheap Picks That Work.
Easy Cleanup: Consider how easy it is to clean the spray painter.
Cleaning a spray painter can be a messy job. Models that are easy to take apart and clean will save you time and hassle. Look for features like removable nozzles and paint containers that are easy to access. Some spray painters even have self-cleaning functions, which can be a real time-saver. Choosing one with good cleaning features will make the entire painting process more enjoyable.
Nozzle Size: The nozzle size matters because it affects the spray pattern and the type of paint you can use.
Different nozzles are made for different paints and tasks. Smaller nozzles are good for fine details and thin paints, while larger nozzles are better for thicker paints and bigger areas. Knowing what nozzle sizes your sprayer takes will give you the most flexibility. Look for a sprayer that comes with multiple nozzle sizes or allows you to buy different ones. This will allow you to handle different paint types. This is a must-have for the Best Budget Spray Painter: Cheap Picks That Work because versatility is key.
Paint Capacity: The paint container’s capacity has an effect on how often you have to refill it.
Larger paint containers allow you to paint for longer without stopping to refill. This is helpful for big projects. Smaller containers are fine for small tasks and can also be easier to handle. Consider the size of your project when choosing. If you are painting a whole room, a bigger container is better. For small items, a smaller one is fine.
Top Affordable Spray Painters and Their Features
Now, let’s look at some specific spray painters that are good choices for the Best Budget Spray Painter: Cheap Picks That Work. We will look at what makes them special. Knowing about these options will help you decide which one is right for your painting needs.
HVLP Spray Painters
HVLP spray painters offer a great balance of performance and affordability. They provide excellent control. This is the top choice if you are doing detailed painting. HVLP sprayers are efficient and produce less overspray. This helps you save paint. These features make them a good pick for beginners. They usually are easier to clean and maintain than other types of spray painters.
Wagner Spraytech Control Spray Max HVLP Sprayer: This sprayer is known for its ability to handle different paints and its user-friendly design.
The Wagner Spraytech Control Spray Max HVLP Sprayer is an excellent choice for a wide variety of projects, from furniture to walls. It has adjustable settings for different spray patterns, making it flexible for various tasks. It is also designed to be easy to clean, which saves time. This sprayer is a great all-around choice. Its affordability and performance make it a top pick for many DIY painters.
Graco Magnum Project Painter Plus Paint Sprayer: This sprayer is for DIY projects. It offers good performance and is easy to use.
The Graco Magnum Project Painter Plus Paint Sprayer is a good choice if you are doing home improvement projects. It’s an airless sprayer, which means it sprays paint quickly. It’s ideal for larger surfaces like walls or fences. This sprayer is also designed for ease of use, making it suitable for both beginners and experienced users. It is a good choice for anyone tackling bigger projects.
HomeRight Finish Max Fine Finish HVLP Sprayer: This sprayer excels at detail work and is user-friendly.
The HomeRight Finish Max Fine Finish HVLP Sprayer is ideal for detailed painting tasks, like furniture or cabinets. It’s known for producing a smooth finish with minimal overspray. It is lightweight and easy to handle, which makes it good for smaller projects. It is a smart pick if you need a spray painter for detailed work and a smooth finish.
Airless Paint Sprayers
Airless paint sprayers are powerful and fast. This makes them ideal for large surfaces. They’re excellent for painting walls, fences, and exteriors. They often cost more. But there are still choices that fit a budget. They do need more paint. They may require a bit more skill to operate. But, they are the go-to choice for getting a lot of painting done fast.
Critter Spray Products 22032 Spray Gun: This spray gun is often favored for its simplicity and the good finish it can deliver.
The Critter Spray Products 22032 Spray Gun is a popular pick for its ease of use. It works with many different paints. It is a good option for small to medium-sized projects. It delivers a good finish. If you need a versatile and straightforward spray gun, this is worth exploring. It’s particularly useful for those who want to avoid the complexities of larger sprayers.
FLEXiO 2000 Paint Sprayer: This versatile sprayer works well with various paints and offers good control.
The FLEXiO 2000 Paint Sprayer is a solid pick for both interior and exterior painting. Its adjustability lets you customize the spray for different surfaces. It is flexible for a variety of tasks. The FLEXiO 2000 makes painting projects more manageable. It is suitable for beginners to pros. This is a practical and versatile choice for many home projects.
Wagner Control Pro 130 Power Painter: It’s built for bigger projects. It is a great option for those looking to cover large areas.
The Wagner Control Pro 130 Power Painter is designed for larger tasks. It is an airless sprayer that can handle big surfaces quickly. If you are doing a lot of painting, like walls or fences, this sprayer is worth exploring. It allows you to get the job done faster. It is good for people who want to paint large areas efficiently. It may be slightly higher priced, but the speed will save time.
Choosing the Right Paint and Preparation
Having the right paint is just as important as the spray painter. Preparing your surface and choosing the correct paint type makes a big difference in the final result. Understanding the different paint options and surface prep steps will help you get a great finish. You will not get the best results if you skip these steps. Getting the right paint and doing the prep work are keys to a successful paint job.
Selecting the Right Paint
The paint you choose should depend on the surface you’re painting. Different paints are made for different materials and different uses. You’ll want to use oil-based or latex paint. Also, think about the finish you want, like matte, satin, or gloss. Each provides a different look and level of durability. Knowing the paint types and finishes is key to getting a good outcome.
Latex Paint: Latex paint is water-based. It’s a favorite for its low odor and easy cleanup with soap and water.
Latex paint is a good pick for interior walls and ceilings. It dries quickly and is less likely to crack than oil-based paints. It is a smart choice for DIY projects. It’s also available in various finishes, from flat to glossy. Latex is user-friendly and good for beginners.
Oil-Based Paint: Oil-based paint is durable and provides a smooth, hard finish.
Oil-based paint works well on wood and metal surfaces, like trim and doors. It lasts a long time and is resistant to stains. It often has a strong odor and needs solvents for cleanup. Because it takes longer to dry, it’s a good choice if durability is a priority. It is good for areas that experience heavy wear.
Primer: Primer is a base coat that helps the paint stick to the surface and provides a uniform finish.
Using primer is a crucial step for getting a good paint job. It creates a better surface for the paint to stick to, especially on surfaces like wood or metal. It also helps to cover up stains and inconsistencies. Using primer improves the final look of your paint and helps it last longer. It’s an extra step. It’s a worthwhile step to get the best results.
Surface Preparation
Prepping the surface is extremely important. It makes paint stick well and gives you a good result. Preparation includes cleaning, sanding, and filling any holes or imperfections. The aim is to get a smooth, clean surface so that the paint goes on evenly. This step may take time, but it will make a big difference in the way your finished work looks.
Cleaning: Clean the surface to remove dirt, dust, and grease.
Cleaning removes anything that could stop the paint from sticking to the surface. Use soap and water or a cleaning solution to wipe down the surface. Let it dry completely before you start painting. This important step helps to ensure that your paint will adhere well and last. Cleaning makes the painting easier and results in a better finish.
Sanding: Sanding provides a smooth surface. It also helps the paint to stick better.
Sanding is especially important for wood or previously painted surfaces. Sanding smooths out imperfections and creates a surface that the paint can grip onto. Use sandpaper with the right grit for your project. Always dust off the surface after sanding. This will remove any loose particles that could interfere with paint adhesion. Sanding is essential for a professional finish.
Filling Imperfections: Fill holes, cracks, and other imperfections before painting.
Filling these imperfections ensures a smooth and even surface. Use a spackle or filler. Make sure the filler dries completely before sanding it smooth. This step gives you the best finish, especially on older surfaces. It’s a crucial part of the prep work. It is key to a professional looking result.
Mastering Spray Painting Techniques
Practicing your spray painting techniques ensures a professional result. The way you hold the spray painter, move, and overlap your strokes has a big effect on your outcome. Using the right techniques will help you prevent issues like drips, runs, and uneven coverage. Practicing these techniques will help you achieve a smooth, professional finish. Remember that practice is key.
Proper Spraying Techniques
When you start painting, it’s important to spray the paint right. This means keeping the spray painter at the right distance. It also involves using the correct movements. Doing this well keeps the paint even. You want to make smooth, consistent passes over the surface. Getting it right ensures that the paint goes on smoothly and looks great.
Holding the Sprayer: Hold the spray painter at the correct distance and angle.
Keep the spray painter a consistent distance from the surface. Usually this is about 6 to 12 inches away. Make sure the spray painter is perpendicular to the surface. This helps you get an even coat. Maintaining the right distance and angle prevents drips and uneven coverage. It’s an essential part of getting a good finish. If you’re unsure, test on a piece of cardboard first.
Moving the Sprayer: Move the spray painter in smooth, even strokes.
Moving the spray painter smoothly and evenly is key to preventing runs or drips. Overlap each stroke slightly. This will ensure full coverage. Try to keep your movements consistent and at a steady speed. Don’t stop in the middle of a stroke. This will help you get a uniform coat and professional-looking results. Practice on scrap wood. This way you’ll perfect your technique.
Overlapping Strokes: Overlap each stroke by about 50% to ensure even coverage.
Overlapping strokes helps avoid gaps in coverage. It ensures a uniform finish. Overlapping means that each stroke partially covers the previous one. This will avoid thin spots and guarantee a smooth look. Practice is helpful for getting the amount of overlap right. The perfect amount of overlap helps in achieving a professional result.
Troubleshooting Common Issues
Even with practice, you might run into problems when spray painting. Knowing how to deal with common problems helps you fix them quickly. Problems like drips, runs, and uneven coverage are normal. Getting good at troubleshooting these issues will help you learn from mistakes. That is important for improving your technique. This makes the whole process easier and improves your skill.
Drips and Runs: Drips and runs happen when too much paint is applied.
Drips and runs often mean you’re applying too much paint. This is often caused by moving too slowly or holding the spray painter too close to the surface. To fix it, you can lightly sand the area when it’s dry and then reapply a thinner coat of paint. Also, check your spray technique and make sure you’re moving evenly. Correcting these errors will help you achieve a better-looking finish. This is a common issue. You will solve it with practice.
Uneven Coverage: Uneven coverage happens when the paint isn’t applied uniformly.
Uneven coverage occurs when you haven’t overlapped strokes enough. It can also be caused by holding the spray painter at different distances. To fix this, adjust your spraying technique. Make sure you are using overlapping strokes and maintaining a constant distance. This will help you get a smooth and even coat. Sometimes, a second coat will solve the issue, especially with thinner paints.
Overspray: Overspray is when paint gets outside the area you are painting.
Overspray can happen when the pressure is too high, or you aren’t holding the sprayer correctly. To prevent this, make sure the pressure setting is right for your paint. Use masking tape and drop cloths to protect the areas you are not painting. Practice your technique to control the spray. This helps keep the paint where you want it and makes cleanup easier. Overspray means less wasted paint.
Spray Painter Maintenance and Cleaning
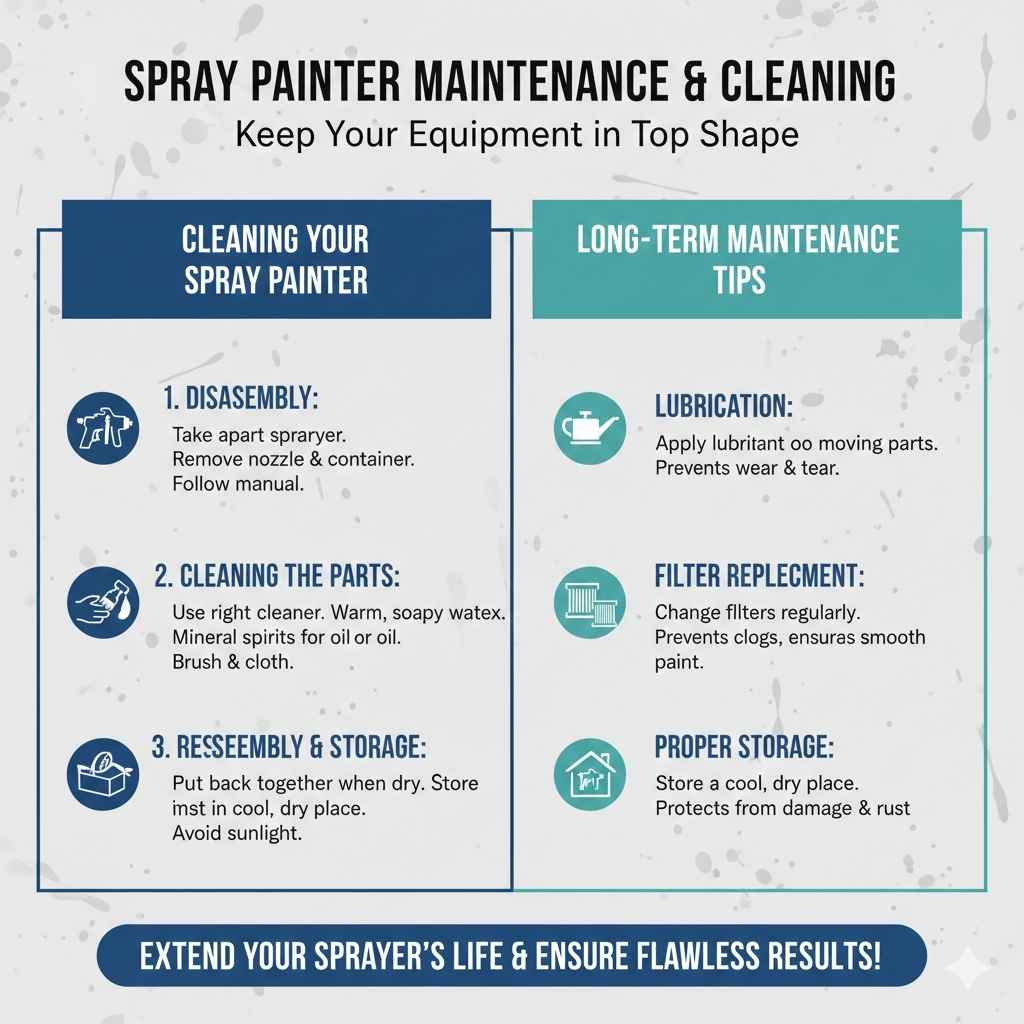
After you finish painting, cleaning and maintaining your spray painter are important. Proper maintenance will help your equipment last longer. It also makes sure it works well for your next project. Knowing how to clean and store your spray painter will make it easier to use. This will also keep it in good condition. Keeping things clean prevents problems.
Cleaning Your Spray Painter
Cleaning your spray painter right after each use is extremely important. Clean paint sprayers work better, and it helps them last longer. Remove all the paint from the paint container. Then clean the nozzle and the spray gun. Taking the time to clean your sprayer makes a big difference. It will keep it working for years to come. Clean paint sprayers mean easier, cleaner results.
Disassembly: Take the spray painter apart.
Remove the nozzle, the paint container, and any other parts that can come off. Follow your user’s instructions. Getting the sprayer apart is the first step in cleaning. When the sprayer is apart, it’s easier to remove paint. When parts are separate, it’s easier to clean them properly. Always follow safety directions. If your sprayer has a self-cleaning feature, this step will be easier.
Cleaning the Parts: Clean each part thoroughly.
Use the right cleaner for your paint type. For latex paint, use warm, soapy water. For oil-based paints, use mineral spirits. You can use a brush or cloth to remove paint from the nozzle. Cleaning each part carefully removes all paint and stops the sprayer from clogging. Make sure you do this well for each part. This will extend the life of your sprayer.
Reassembly and Storage: Put the spray painter back together and store it correctly.
Once everything is clean and dry, put your spray painter back together. Store it in a dry place. This protects it from damage. Make sure the storage area is away from direct sunlight. Storing your sprayer correctly will keep it ready for your next project. This helps ensure it’s ready to go when you need it. Storing it the right way makes it last.
Long-Term Maintenance Tips
Regular maintenance keeps your spray painter working at its best. Taking good care of your spray painter will extend its life. This helps you get great results every time. These tips help you keep your sprayer in top shape, saving you time and money.
Lubrication: Lubricate moving parts.
Many spray painters have parts that need lubrication. Use the lubricant recommended in the user guide. Lubricating moving parts helps them move smoothly. It prevents friction. This will help prevent wear and tear. This helps keep your spray painter running efficiently. It will also help your spray painter last longer.
Filter Replacement: Change filters regularly.
Filters keep paint debris from getting into the nozzle. Clogged filters can affect the spray pattern and damage the sprayer. Change your filter often. This protects the spray painter from clogs. Checking your filters regularly and replacing them will keep your paint looking smooth. It will extend the life of your sprayer.
Storage: Store your spray painter in a cool, dry place.
Good storage protects your spray painter from damage and rust. Keep it away from extreme temperatures and direct sunlight. Protect your sprayer when it is not in use. Store it correctly to get the most life out of it. This will keep your sprayer ready to use. This will keep your sprayer ready for your next project.
Frequently Asked Questions
Question: What is the best type of spray painter for beginners?
Answer: For beginners, an HVLP (High Volume Low Pressure) spray painter is often the best choice. They are easier to control, produce less overspray, and offer a smooth finish, which makes them ideal for learning the basics.
Question: Can I use any type of paint with a spray painter?
Answer: Not all paints work with every spray painter. Check your spray painter’s manual to find out what paint types it is compatible with. Most spray painters work well with latex and oil-based paints, but you may need to thin the paint.
Question: How do I prevent drips and runs when spray painting?
Answer: To prevent drips and runs, move the spray painter at a constant speed, maintain the correct distance from the surface, and apply thin, even coats of paint. Avoid applying too much paint at once.
Question: How often should I clean my spray painter?
Answer: Clean your spray painter immediately after each use. This helps prevent paint from drying and clogging the nozzle. It will also extend the lifespan of your sprayer.
Question: What safety precautions should I take when using a spray painter?
Answer: Wear a respirator or face mask to avoid breathing in paint fumes. Work in a well-ventilated area, and wear eye protection and gloves. Avoid open flames or sparks when using flammable paints.
Final Thoughts
The Best Budget Spray Painter: Cheap Picks That Work are available to transform your painting projects. From understanding the different types of spray painters to mastering the techniques, you now have the tools needed to start painting with confidence. Remember to consider what you’re painting. Pick a sprayer that fits your budget. Properly prepare the surface and select the correct paint type. It is all about getting ready for your project. Practice is crucial. Remember to keep your spray painter clean and well-maintained. Armed with this knowledge, you are ready to explore the exciting world of spray painting. With the right approach, anyone can achieve professional-looking results. Go ahead, give it a shot!