Can You Paint Over Existing Auto Paint Without Primer? Essential
Can You Paint Over Existing Auto Paint Without Primer?
While technically possible for minor touch-ups on sound factory paint, painting over existing auto paint without primer is generally not recommended for lasting results. Primer ensures adhesion, blocks stains, and creates a uniform base. Skipping it risks poor adhesion, chipping, and an uneven finish, especially over repairs or weathered surfaces.**
Hello there, friend! If you’re looking to refresh your car’s look or fix a small scratch, you’ve probably wondered if you can skip that messy primer step. We’ve all been there—we want the job done quickly and efficiently! Painting is fun, but primer seems like an extra hassle. Can you skip it and still get a finish that lasts? That’s a common question, and the answer depends on a few key factors about your current paint job. Don’t worry; we are going to walk through this step-by-step. We will make sure you get a beautiful, lasting finish, whether you decide to prime or not. Let’s look closely at what happens when you try to paint directly over old paint.
The Big Question: Why Do We Even Use Primer?
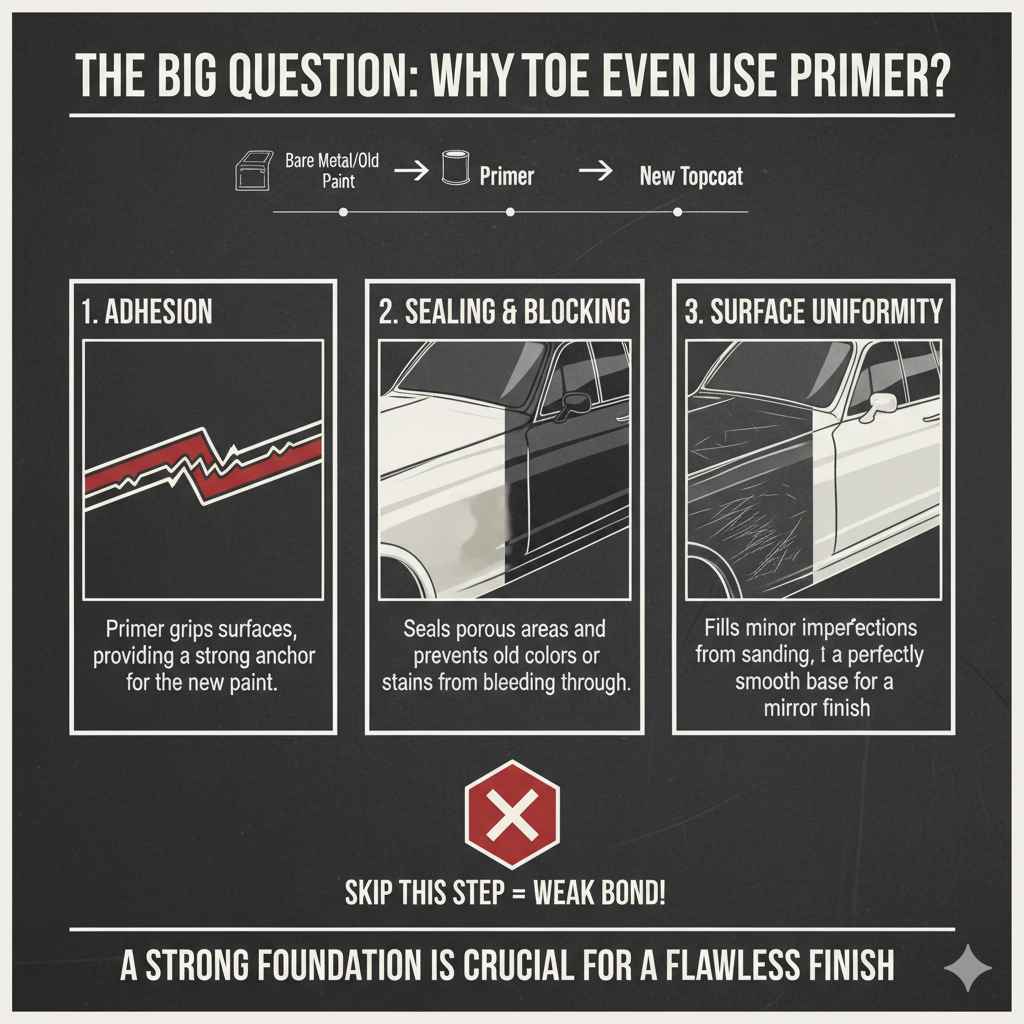
Before diving into whether you can skip primer, let’s quickly understand why pros always insist on it. Think of primer as the essential handshake between the bare metal (or old paint) and your shiny new topcoat. It does three very important jobs:
- Adhesion: Primer grips the old surface much better than paint alone can. It gives the topcoat something strong to stick to.
- Sealing and Blocking: It seals porous surfaces and blocks old stains or colors from bleeding through your new paint color.
- Surface Uniformity: It fills in very tiny scratches and imperfections left from sanding, giving you a perfectly smooth base for that mirror-like shine.
If you skip this step, you are relying entirely on the chemical bond between the new paint and the old clear coat—a bond that might be weak, especially if the old surface isn’t perfect.
Scenario 1: Painting Over Factory Original Paint (The Best-Case Scenario)
If your car has its original factory paint job, and it’s in decent shape (meaning no major rust, deep chips, or peeling), you might be able to get away without primer for certain jobs.
When It Might Be Okay (Minor Updates Only)
If you are just doing a light scuffing and repainting a small area with the exact same type of paint (like adding a racing stripe or painting trim pieces that are currently dull), you are working with a well-adhered base.
However, even in this case, proper surface prep is non-negotiable. The surface must be microscopically rough for the new paint to bite onto.
The Necessary Prep Work (If You Skip Primer)
If you absolutely must skip primer, your preparation needs to be incredibly thorough. Think of this prep work as doing the primer’s job manually:
- Clean Deeply: Wash the area thoroughly with car soap, then use a wax and grease remover. Any wax or silicone left behind will cause “fish-eyes” (tiny craters) in your new paint.
- Light Sanding: You need to scuff the surface. For factory clear coat, use a fine grit sandpaper, usually between 600 and 800 grit, used wet. This creates the necessary “tooth” for the new paint to grab onto.
- Wipe Down Again: Clean the dust off using a tack cloth or solvent cleaner before you even think about spraying.
Scenario 2: Painting Over Repaired Areas, Rust, or Scratches (Where Primer is Essential)
This is where skipping primer moves from being a risky choice to a guaranteed failure. If you have repaired rust, sanded down to the bare metal, or applied body filler, you MUST use primer.
Why Primer is Mandatory for Bare Metal and Repairs
When you sand down to bare metal or expose body filler, you create an entirely new, challenging surface for paint.
Bare Metal Concerns
Bare metal needs protection immediately. If you spray color coat directly onto bare metal, you leave no barrier against moisture. This leads directly to flash rusting, sometimes within hours. Automotive primers contain corrosion inhibitors that protect the steel underneath.
Body Filler Concerns
Body filler (Bondo, for example) is porous. If you paint directly onto it, the filler will suck the solvents out of your base coat, leading to dull spots, poor adhesion, and eventual cracking as the filler absorbs moisture. A high-build primer seals this surface perfectly.
To learn more about how surface preparation affects the longevity of automotive finishes, you can review general surface treatment guidelines from material science resources, like those sometimes shared by paint manufacturing associations.
Comparing the Risks: Primer vs. No Primer
For any job beyond a simple color refresh, skipping primer introduces risks that aren’t worth the time saved. Here is a quick comparison table to help you decide:
| Factor | Painting With Primer | Painting Without Primer |
|---|---|---|
| Adhesion Strength | Excellent; chemically bonds to the surface. | Fair to Poor; relies only on surface texture. |
| Longevity/Durability | Long-lasting; resists chipping and peeling. | Prone to chipping, peeling, and flaking quickly. |
| Surface Uniformity | Excellent; fills minor scratches for a smooth base. | Poor; tiny scratches from sanding show through. |
| Rust Protection | Excellent (if using epoxy/etching primer). | None; bare metal will rust quickly. |
| Time Added | Adds 1-2 extra steps (application and drying). | Saves a few hours initially. |
The Step-by-Step Guide: How to Paint Over Old Paint (The Safe Way)
If you’ve assessed your situation and decided your existing paint is sound enough for a direct color coat (Scenario 1), follow these steps. If you have bare metal or repairs, treat Step 2 as the mandatory priming step!
Step 1: Assess and Clean the Surface
This is the most important part, whether you prime or not. If the surface isn’t perfectly clean, nothing will stick.
- Inspect: Run your hand over the area. Is it smooth? Are there chips, rust spots, or areas where the paint feels chalky or soft? If so, you must sand these down to solid material and prime the exposed areas.
- Wash: Use a quality car wash soap and water to remove all surface dirt.
- Decontaminate: Use a wax and grease remover (solvent) on a clean microfiber towel. Wipe the entire area down, letting it flash off (evaporate). This removes hidden oils and silicone.
Step 2: Scuff Sanding (Creating the Tooth)
We need to create microscopic scratches so the new paint has something to grab onto. We are not trying to remove all the old paint—just dull it.
- Gather your materials: 600 to 800 grit wet/dry sandpaper, a sanding block (or flexible foam pad), and plenty of water.
- Keep the area wet while sanding (wet sanding). This keeps the sandpaper from clogging and reduces dust.
- Use light, even pressure with your sanding block. You are looking to remove the glossy shine entirely, leaving a dull, uniform haze over the old paint.
- Sand in gentle cross-hatch patterns (up and down, then side to side) to ensure you hit every angle.
- If you are painting a large panel, focus on keeping the edges of the repair area feathered and smooth so you don’t create a visible ridge later.
Step 3: Final Cleaning Before Color
If you skip primer, this cleaning step is the moment of truth for adhesion.
- Rinse the area thoroughly with clean water to remove all sanding residue.
- Wipe the area dry with clean microfiber towels.
- Use your wax and grease remover one final time. Wipe the area, let it dry completely, and inspect for any shiny spots—if you see any shine, you missed a spot and need to go back to Step 2 lightly.
- Use a tack cloth just before spraying. A tack cloth is slightly sticky and picks up any remaining microscopic dust particles that water or solvent might miss.
Step 4: Applying the Color Coat
Now you can apply your chosen automotive paint (base coat).
- Ensure you are working in a clean, dust-free environment with good ventilation. Wear an appropriate respirator! (Safety first, my friend!)
- Follow the paint manufacturer’s recommended flash times between coats. This is usually very short for modern paints, often just 5 to 15 minutes.
- Apply several thin, even coats rather than one thick coat. Thin coats dry better and minimize runs and sags.
Step 5: Applying Clear Coat (Essential!)
Even if you skip primer, you absolutely must apply a clear coat over your base color. The base coat provides the color, but the clear coat provides the UV protection, gloss, and durability.
- Wait for the base coat to flash according to the manufacturer’s instructions (usually until it looks completely flat and dry).
- Apply the clear coat, again using several thin, wet coats for the best shine.
- Allow the clear coat to cure fully according to the specifications before polishing or handling the car heavily.
Choosing the Right Paint System When Skipping Primer
When you skip primer, you put enormous pressure on the compatibility between the old paint and the new paint.
Compatibility Check
Most modern factory finishes are either two-stage (base coat/clear coat) or single-stage (color and gloss mixed together).
Base Coat/Clear Coat Systems: These are generally the safest to paint over each other after proper scuffing, provided the base coats are compatible (e.g., using the same brand’s products).
Single-Stage to Base/Clear: If you are painting a newer base/clear system over an older single-stage enamel, adhesion can be trickier, and primer is strongly recommended to act as a bridge.
A Note on Enamels and Urethanes
Older enamel paints often require specific preparation when switching to modern, harder urethane paints. Urethanes need a very sound surface. If you are painting a hard urethane over a softer enamel, the solvent in the urethane can sometimes react poorly with the enamel underneath, causing it to wrinkle or lift. A dedicated sealer or primer is the best insurance against this chemical incompatibility.
Safety First: Protecting Yourself During the Process
Whether you are priming or skipping it, automotive painting involves strong chemicals. Your health is much more important than saving an hour of prep time.
When spraying any paint or solvent, you must protect your lungs, skin, and eyes.
| Safety Item | Why It’s Needed |
|---|---|
| Respirator (NIOSH-approved) | Protects lungs from isocyanates (in clear coats/urethanes) and paint solvents. |
| Gloves (Nitrile) | Prevents skin contact with harsh chemicals and paint removers. |
| Eye Protection | Keeps paint mist and sanding debris out of your eyes. |
| Ventilation | Crucial for allowing solvents to evaporate safely and preventing fume buildup. |
If you plan to sand down to bare metal, ensure you look up the Safety Data Sheets (SDS) for the specific primer you plan to use, even if you only use it on the bare spots. You can often find these on the manufacturer’s website.
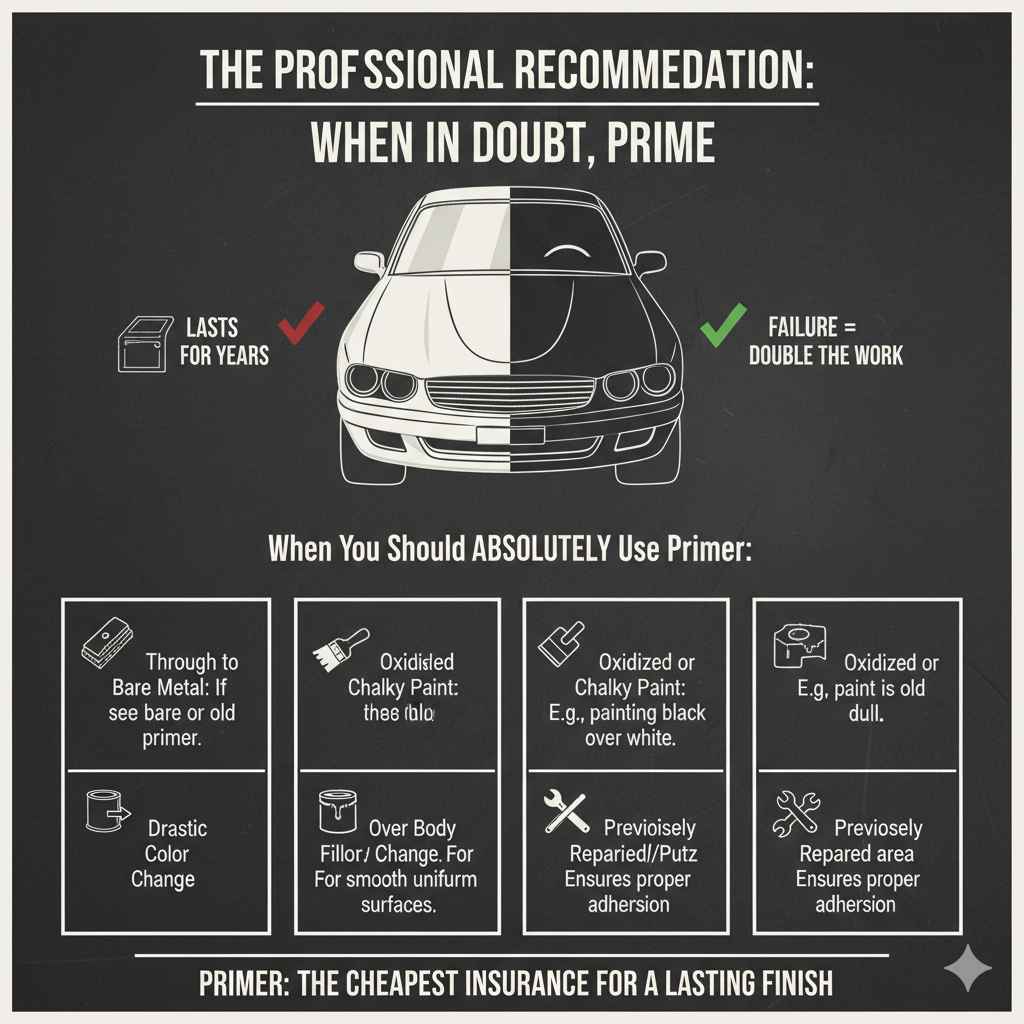
The Professional Recommendation: When in Doubt, Prime
As your guide, I need to give you the most reliable advice for a DIY job that lasts. If you are painting a visible area that you want to look good for years, skipping primer is a gamble.
Think about the cost of paint versus the cost of labor (your time). If your paint job fails in six months, you have to strip everything down and start over—doubling your time and material costs. A can of high-quality automotive primer costs very little compared to the frustration of failure.
When You Should Absolutely Use Primer:
- If you have sanded through the existing color and see gray primer, white primer, or bare metal.
- If the existing paint is old, oxidized, or chalky.
- If you are changing the color drastically (e.g., painting black over white).
- If you are painting over body filler or putty.
- If the area has been previously repaired.
Frequently Asked Questions (FAQ)
Q1: If my old paint is factory paint, can I skip primer entirely?
For very small touch-ups or adding a minor detail coat on sound factory paint, you can skip primer if you scuff the surface properly (using 600-800 grit wet sanding) and clean it aggressively. However, for painting entire panels, primer is strongly advised for long-term durability.
Q2: Will the new paint look dull if I don’t use primer?
Yes, often it will. Primer creates a flat, uniform surface. If you skip it, any sanding scratches you left in the old clear coat will show through the new color coat, making the final finish look uneven or dull, especially under bright sunlight.
Q3: What is the minimum grit sandpaper I should use on the old paint?
The minimum recommended grit for scuffing factory clear coat when skipping primer is usually 600 grit, used wet. If the old paint is very hard or oxidized, moving up to 800 grit is safer to ensure the new paint grabs without creating deep scratches.
Q4: How long do I have to wait after sanding before I can apply new paint if I skip primer?
Once you have thoroughly cleaned the sanded area with wax and grease remover and used a tack cloth, you should apply the base coat relatively soon—ideally within a few hours, and certainly within the same day. This ensures no new contaminants settle on the prepared surface.
Q5: Can I use regular home improvement primer instead of automotive primer?
Absolutely not. Home improvement primers are not formulated to withstand automotive temperatures, UV exposure, flexing of the body panels, or gasoline exposure. Automotive primers are chemically designed to work with urethane and enamel paints for flexibility and chemical resistance.
Q6: If I have one small rust spot, can I just prime that spot and then paint over the old good paint?
Yes, this is the correct approach! You must grind the rust out completely down to clean, solid metal. Treat that bare metal area with a specialty self-etching primer or a direct-to-metal (DTM) product. Then, you can scuff sand the surrounding good paint and apply your color coat over both the old paint and the newly primed spot. This blends the repair seamlessly.
Wrapping Up Your Painting Project
So, can you paint over existing auto paint without primer? The short, honest answer for a long-lasting, professional-looking finish is: generally, no, you shouldn’t, especially if any bare metal or previous repairs are exposed.
While skipping primer might save you an hour of work now, it dramatically increases your risk of chipping, peeling, and a lackluster finish down the road. Primer is your insurance policy against premature failure.
For those small jobs where the factory paint is perfect, thorough scuffing and intense cleaning might allow you to skip it. But remember, you are trading time now for potential failure later. My best advice, drawn from years of getting paint to stick right the first time, is this: take the extra step. Use the right automotive primer over any bare spots, and give your vehicle the durable foundation it deserves