Can You Paint Over Stained Wood With Acrylic Paint? The Best Way
Yes, you can absolutely paint over stained wood with acrylic paint, but the secret to a lasting, professional finish is in the preparation. You must properly clean, sand, and prime the surface with a stain-blocking primer before painting. Skipping these steps will cause the stain to bleed through and the paint to peel off.
Have you ever looked at a piece of dark, dated stained furniture and wished you could give it a bright, modern makeover? Maybe it’s an old coffee table, a set of kitchen cabinets, or some wood trim that just doesn’t fit your style anymore. You might wonder if you can just grab a can of acrylic paint and get to work. It’s a common question, and I’m here to tell you the answer is a big YES!
Painting over stain can feel intimidating, but it’s one of the most rewarding DIY projects you can tackle. It completely transforms a piece without the high cost of buying something new. In this guide, I’ll walk you through the best way to do it, step-by-step. We’ll cover everything from cleaning to the final coat, ensuring your project looks amazing and lasts for years. Let’s get started!
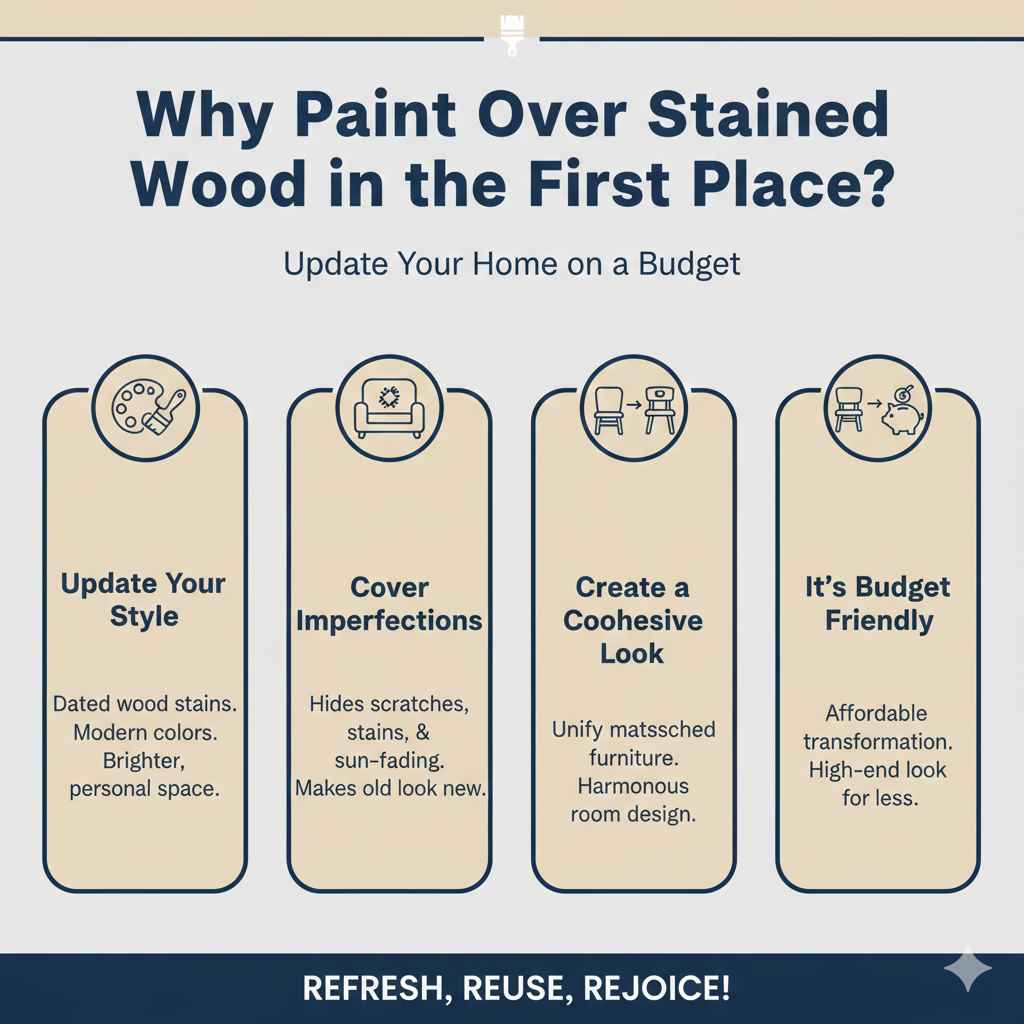
Why Paint Over Stained Wood in the First Place?
Giving stained wood a painted finish is a fantastic way to breathe new life into your home. It’s a popular choice for many homeowners and DIY enthusiasts for a few great reasons.
- Update Your Style: Wood stains, especially dark or orange-toned ones, can make a room feel dated. A fresh coat of paint in a modern color like white, gray, or even a bold blue can instantly update your decor and make your space feel brighter and more personal.
- Cover Imperfections: Over time, wood furniture and trim can get scratched, stained, or sun-faded. Paint provides a solid, opaque finish that hides these flaws beautifully, making an old piece look brand new again.
- Create a Cohesive Look: If you have mismatched wooden furniture from different eras or styles, painting them the same color is a brilliant way to create a unified and harmonious look throughout a room.
- It’s Budget-Friendly: Refinishing furniture with paint is far more affordable than buying new pieces. With just a few supplies, you can achieve a high-end look for a fraction of the cost.
The Challenge: Why You Can’t Just Paint Directly on Stain
So, why can’t you just brush your acrylic paint right over the stained wood? The problem lies with what’s already on the surface. Stained wood usually has two layers you need to deal with: the stain itself and a protective topcoat.
Most wood stains are oil-based. These oils can seep, or “bleed,” through water-based paints like acrylics. If you paint directly over them, you’ll likely see yellowish or brownish patches appear in your new paint job as it dries. It’s a frustrating problem that can ruin your hard work.
On top of the stain, there’s usually a clear protective finish like polyurethane, varnish, or lacquer. These topcoats are designed to be smooth and non-porous to resist dirt and moisture. Unfortunately, that same quality makes it very difficult for new paint to stick. Without proper prep, your paint will easily scratch, chip, or peel right off.
This is why proper preparation—cleaning, sanding, and priming—is the most important part of the entire project. It creates the perfect canvas for your paint to adhere to beautifully.
Is Acrylic Paint the Right Choice for This Project?
Acrylic paint is a fantastic choice for painting over stained wood, especially for beginners. It’s a water-based paint, which makes it easy to work with and clean up. However, like any product, it has its pros and cons.
Pros of Using Acrylic Paint
- Easy Cleanup: All you need is soap and water to clean your brushes, rollers, and any spills. No harsh chemicals required!
- Low Odor: Acrylic paints have very low levels of volatile organic compounds (VOCs), meaning they don’t have the strong, lingering smell of oil-based paints. This makes them much more pleasant to use indoors.
- Fast Drying Time: Acrylics dry quickly to the touch, often within an hour. This allows you to apply multiple coats in a single day, speeding up your project.
- Great Color Variety: You can find acrylic paint in virtually any color imaginable, and it’s easy to have custom shades mixed at the hardware store.
Cons of Using Acrylic Paint
- Less Durable Than Oil-Based Paint: While modern acrylic enamel paints are quite tough, they are generally not as resistant to heavy wear and tear as traditional oil-based paints. For high-traffic surfaces like tabletops or kitchen cabinets, adding a protective topcoat is essential.
- Requires a Specific Primer: Because acrylics are water-based, they cannot block oil stains on their own. You absolutely must use a high-quality stain-blocking primer to prevent bleed-through.
Here’s a simple table comparing acrylic paint with its main alternative, oil-based paint, for this type of project:
| Feature | Acrylic (Water-Based) Paint | Oil-Based Paint |
|---|---|---|
| Durability | Good, but may need a topcoat for high-traffic areas. | Excellent, creates a very hard and durable finish. |
| Cleanup | Easy (soap and water). | Difficult (requires mineral spirits or paint thinner). |
| Drying Time | Fast (1-2 hours between coats). | Slow (8-24 hours between coats). |
| Odor/VOCs | Low odor and low VOCs. | Strong odor and high VOCs. |
| Leveling | May show some brush strokes. | Excellent self-leveling for a smooth, brushless look. |
For most DIYers, the ease of use and low odor of acrylic paint make it the winning choice. As long as you prepare the surface correctly and use a good topcoat, you’ll get a beautiful, durable finish.
Your Toolkit: Essential Supplies for the Job
Before you start, gathering all your tools and materials will make the process smooth and stress-free. There’s nothing worse than having to stop mid-project for a trip to the store! Here’s what you’ll need:
Cleaning & Prep Supplies:
- Cleaner/Degreaser (TSP substitute is a great choice)
- Clean rags or sponges
- Bucket of warm water
- Sanding sponge or sandpaper (120- to 150-grit)
- Tack cloth or microfiber cloth
- Painter’s tape
- Drop cloths or plastic sheeting to protect your workspace
Safety Gear:
- Dust mask or respirator
- Safety glasses
- Gloves
Painting Supplies:
- Stain-Blocking Primer: This is crucial! Look for a shellac-based primer like Zinsser B-I-N or an oil-based one like Kilz Original.
- Acrylic Paint: A high-quality acrylic enamel or trim paint will give you the most durable finish.
- Protective Topcoat (Recommended): A water-based polyurethane like Minwax Polycrylic is perfect for protecting your acrylic paint finish.
- High-quality paintbrush (angled sash brush for details, flat brush for larger areas)
- Small foam roller for a smooth finish on flat surfaces
- Paint tray
The Best Way to Paint Over Stained Wood: A Step-by-Step Guide
Ready to transform your piece? Follow these steps carefully, and you’ll be amazed at the professional-looking results. Remember, patience and proper prep are your best friends here!
Step 1: Clean the Surface Thoroughly
Don’t skip this step! Over the years, furniture and trim collect dirt, grease, and grime that can prevent paint from sticking. Mix your TSP substitute or degreaser with warm water according to the package directions. Wearing gloves, use a sponge or rag to scrub down the entire surface you plan to paint. Pay extra attention to high-touch areas like cabinet doors or chair arms. After cleaning, wipe the surface down again with a clean rag and plain water to remove any cleaner residue. Let it dry completely.
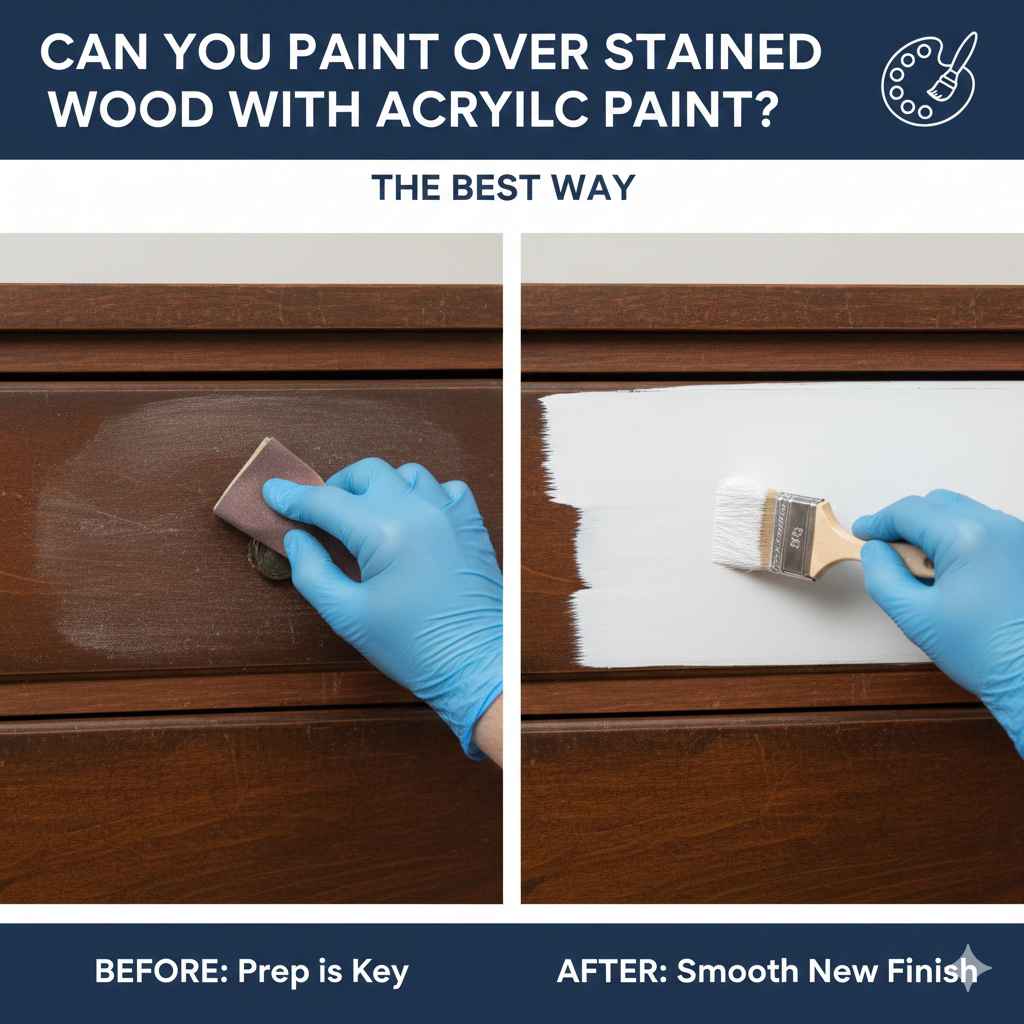
Step 2: Scuff Sand the Wood
The goal here is not to remove the old stain or finish completely. Instead, you just want to “scuff up” the glossy topcoat to give the primer something to grip onto. This is called creating a “tooth” for the paint. Using your 120- or 150-grit sandpaper or a sanding sponge, lightly sand the entire surface. Move in the direction of the wood grain. You’ll know you’re done when the shiny finish looks dull and slightly scratched. Be sure to wear a dust mask during this step!
A quick note on older homes: If your house was built before 1978, the wood might have been treated with a finish containing lead. The U.S. Environmental Protection Agency (EPA) provides important guidelines on how to test for lead and work safely. It’s always better to be safe!
Step 3: Wipe Away All the Dust
Sanding creates a lot of fine dust. If you paint over it, you’ll end up with a gritty, bumpy finish. First, use the brush attachment on your vacuum to remove most of the dust. Then, go over the entire piece with a tack cloth or a slightly damp microfiber cloth. A tack cloth is a sticky cheesecloth that is amazing at picking up every last bit of dust. Make sure the surface is perfectly clean and dust-free before moving on.
Step 4: Apply a Stain-Blocking Primer
This is the most critical step for success. A good stain-blocking primer does two things: it stops the old stain from bleeding through your new paint, and it provides an excellent surface for your acrylic paint to bond to. For stained wood, a shellac-based or oil-based primer is your best bet.
- Shellac-Based Primer (like Zinsser B-I-N): This is the ultimate stain blocker. It seals in everything, from wood tannins to oily stains, and it dries very quickly. The cleanup requires denatured alcohol, but its performance is unmatched.
- Oil-Based Primer (like Kilz Original): Another fantastic choice for blocking tough stains. It adheres well to glossy surfaces and creates a durable base. Cleanup requires mineral spirits.
Apply one thin, even coat of primer with a brush or roller. Don’t worry if the coverage looks a little patchy—the primer’s job is to seal, not to provide perfect color. Let the primer dry completely according to the manufacturer’s instructions. If you’re painting over a very dark stain, a second coat of primer is a good idea.
Step 5: Apply Your Acrylic Paint
Now for the fun part! Once your primer is fully cured, it’s time to paint. Stir your acrylic paint well. Using a high-quality brush or a foam roller, apply your first coat of paint in thin, even strokes. It’s always better to apply two thin coats than one thick, gloppy one. A thick coat is more likely to drip and will take much longer to cure properly.
Let the first coat dry completely—check the can for recommended drying times. Once it’s dry, lightly sand the surface with very fine-grit sandpaper (220-grit) to knock down any small bumps or imperfections. Wipe away the dust, and then apply your second coat. Most projects will need at least two coats of paint for full, even coverage.
Step 6: Add a Protective Topcoat (Highly Recommended)
For pieces that will see a lot of use—like a dining table, desk, kitchen cabinets, or bookshelf—a clear topcoat is your secret weapon for long-term durability. It protects your beautiful paint job from scratches, scuffs, and spills.
Choose a water-based polyurethane, such as Minwax Polycrylic. It’s compatible with acrylic paint, dries clear, and won’t yellow over time like oil-based polyurethanes can. Apply 2-3 thin coats with a good quality synthetic brush, letting each coat dry and lightly sanding with 220-grit sandpaper in between coats (but not after the final coat). This will give you a silky-smooth, super-strong finish.
Common Mistakes to Avoid
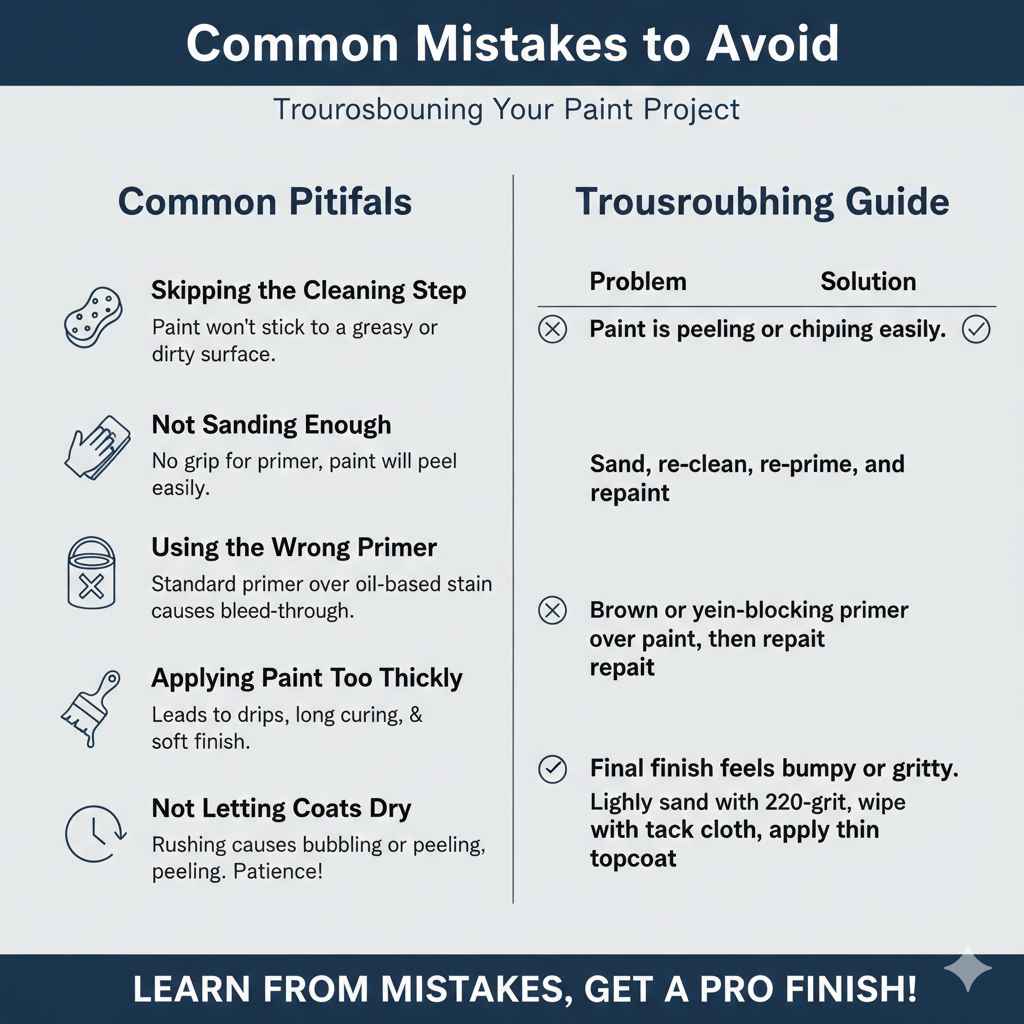
Even seasoned DIYers can make mistakes. Here are a few common pitfalls to watch out for:
- Skipping the Cleaning Step: Paint simply won’t stick to a greasy or dirty surface. Always start with a thorough cleaning.
- Not Sanding Enough (or at all): If you don’t scuff up the glossy finish, your primer and paint will have nothing to grab onto and will easily peel off.
- Using the Wrong Primer: Using a standard water-based primer over an oil-based stain will result in bleed-through. You must use a dedicated stain-blocking primer.
- Applying Paint Too Thickly: This leads to drips, a long curing time, and a soft finish that can be easily damaged. Thin coats are always better.
- Not Letting Coats Dry Completely: Rushing the process and painting over a wet layer can cause the paint to bubble or peel. Patience is key!
Here’s a quick troubleshooting guide if you run into problems:
| Problem | Likely Cause | Solution |
|---|---|---|
| Paint is peeling or chipping easily. | The surface was not cleaned or sanded properly before priming. | You’ll need to sand the peeling area down, re-clean, re-prime, and then repaint. |
| Brown or yellow stains are showing through the paint. | The wrong type of primer was used, or no primer was used at all. | Apply a coat of shellac-based or oil-based stain-blocking primer directly over the paint, then apply a fresh coat of acrylic paint. |
| The final finish feels bumpy or gritty. | Dust was not completely removed after sanding. | Lightly sand the surface with fine-grit (220) sandpaper until smooth, wipe clean with a tack cloth, and apply one more thin topcoat. |
Frequently Asked Questions (FAQ)
1. Do I absolutely have to sand before painting over stain?
Yes, for the best and most durable results, you should always sand. Sanding deglosses the old finish and creates tiny grooves for the primer to bite into, ensuring a strong bond. It’s the difference between a paint job that lasts for years and one that starts peeling in months.
2. What is the best primer to use over stained wood?
The best primers are shellac-based (like Zinsser B-I-N) or oil-based (like Kilz Original). Both are specifically designed to block tough stains and tannins from bleeding through your water-based acrylic paint. A standard latex primer will not be effective.
3. Can I use chalk paint instead of acrylic?
Yes, you can. Chalk paint is known for its excellent adhesion and often requires less sanding. However, it is a very porous paint and absolutely requires a protective topcoat (usually a specialty wax or water-based polyurethane) to be durable. It also has a distinct matte, chalky finish.
4. How long should I wait between coats of paint?
Always check the paint can for the manufacturer’s recommended time. For most acrylic paints, you should wait at least 2 to 4 hours between coats. Waiting longer is always better, as it ensures the layer underneath is hard enough to be painted over without issues.
5. Will the wood grain show through the paint?
It depends on the wood. For woods with a deep, open grain like oak, you may still see the texture of the grain even after painting. If you want a perfectly smooth, grain-free surface, you will need to apply several coats of a grain-filling primer or a wood grain filler before you start painting.
6. How do I know if the old stain is oil-based or water-based?
Here’s a simple test: Dab a small amount of rubbing alcohol on a cotton ball and rub it on an inconspicuous area of the wood. If some of the finish or color comes off, it’s likely a water-based finish. If nothing comes off, it’s almost certainly oil-based. For stained wood, it’s safest to assume it’s oil-based and use a stain-blocking primer.
7. Is one coat of paint enough?
Almost never. One coat of paint will likely look streaky and uneven, especially when painting a light color over a dark stain. Plan on applying at least two thin coats of paint, plus a coat of primer, for full, solid coverage.
Conclusion: Your Beautiful New Finish Awaits!
So, can you paint over stained wood with acrylic paint? You absolutely can, and now you know exactly how to do it the right way. It may seem like a lot of steps, but each one—from cleaning to top-coating—plays a vital role in creating a finish that is not only beautiful but also incredibly durable.
Don’t let an outdated piece of furniture or trim hold back your home’s style any longer. By taking your time and focusing on proper preparation, you can confidently tackle this project and achieve results that you’ll be proud of for years to come. Grab your tools, put on some music, and get ready to completely transform that old wooden piece. Happy painting!