Can You Plant Cherry Seeds From Store Bought Cherries? Essential
Yes, you absolutely can plant cherry seeds from store-bought cherries, but understand this: it’s a fun, rewarding experiment, not a quick way to grow fruit trees. The process takes patience, proper stratification (cold treatment), and several years before you might see a bloom.
Have you ever bitten into a juicy, sweet cherry and immediately thought, “I bet I could grow my own tree”? That’s a wonderful feeling! Many of us dream of harvesting fresh fruit right outside our doors. But when you look at that small seed in your hand, you might wonder if it’s the real deal or just garden clutter. Good news: those pits contain viable seeds! However, growing a fruit tree from scratch is different than assembling a piece of furniture; it requires time and specific steps. Don’t worry if you’ve never done this before. We will walk through every step simply and clearly, making sure you have the confidence to start this rewarding project today. Let’s turn that leftover pit into a potential new tree!
Why Growing Cherries From Seed Is a Different Kind of DIY Project
When we tackle a home improvement project, we usually have clear blueprints and immediate results. Growing a cherry tree from a store-bought seed is less like building a shed and more like mastering a long-term craft. It requires understanding nature’s slow clock.
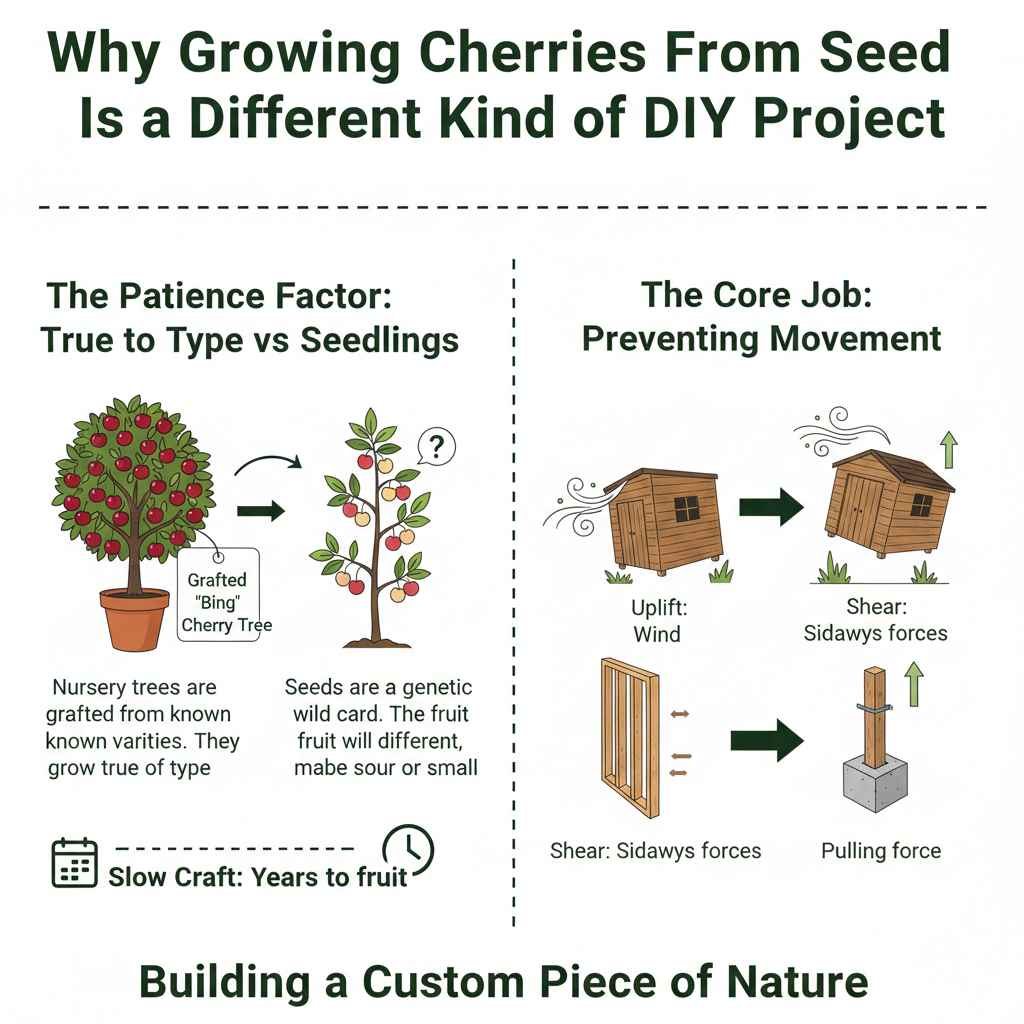
The Patience Factor: True to Type vs. Seedlings
If you buy a ‘Bing’ cherry tree from a nursery, that tree will grow into a ‘Bing’ tree. This is because nurseries use grafting—attaching a known branch onto a hardy rootstock. When you plant a seed, however, you get a wild card.
The seed carries genetic material from both parent trees (since cherries are often cross-pollinated). This means your resulting tree will likely not produce the exact same sweet cherries you just ate. It might produce sour cherries, small fruit, or, in some cases, take many years to fruit at all.
Think of it like building a custom piece of furniture from scrap wood. You know the wood came from a cherry tree, but the final shape and utility are up to nature. This is perfectly fine if your goal is educational, or if you just want a nice, hardy ornamental tree!
Step 1: Harvesting and Preparing Your Cherry Pits
This is where the hands-on work begins. You need to safely extract the seed from the hard outer pit shell.
Cleaning the Pits
The flesh surrounding the pit harbors mold and fungus, which will ruin your efforts to germinate the seed indoors.
- Eat the Fruit: Enjoy your cherries! Try to get pits from several different, healthy-looking fruits.
- Rinse Thoroughly: Wash the pits under running water, scrubbing off all remaining fruit residue.
- Soak (Optional but Recommended): Soak the clean pits in a bowl of water for about 24 hours. Discard any pits that float, as they are usually non-viable.
- Dry Slightly: Pat the pits dry with a clean cloth.
Extracting the Inner Kernel (The True Seed)
The “seed” we want is actually a small kernel inside the hard pit shell. If you plant the whole pit, germination rates drop significantly.
Caution: Cherry pits (and the kernels inside) contain compounds that can release cyanide if chewed. Always handle them with care and wash your hands well after cracking them. Do not crush or chew them!
To crack the pit, you need gentle, focused pressure. This is similar to hulling walnuts or cracking tough nuts.
Tools for Cracking Pits:
- Nutcracker: The safest and most common tool. Use gentle, even pressure.
- Small Pliers: Only use if the nutcracker fails, applying very light pressure on the seam of the pit.
- Small Hammer (Use Extreme Caution): If you must use a hammer, place the pit on a hard, non-breakable surface (like a concrete paver, not your kitchen counter) and tap very lightly on the seam.
Once cracked, you should find one, sometimes two, small, pale kernels inside. This kernel is what you will be planting. If you cannot bring yourself to crack the pit, you can try planting the entire pit, but your success rate will be lower.
Step 2: Stratification – Mimicking Winter (The Most Crucial Step)
Cherry seeds, like many temperate fruit seeds (apples, peaches), need a cold, moist resting period before they will sprout. This process, called stratification, tricks the seed into thinking winter has passed, signaling it’s time to grow.
For most sweet cherries, this cold period needs to last between 60 to 90 days, mimicking a natural winter.
Materials for Cold Stratification:
- Sterile, moist medium (sphagnum moss, peat moss, or perlite work well).
- A sealable plastic bag (ziplock style works great).
- A thermometer to monitor the refrigerator.
The Stratification Procedure:
- Moisten Your Medium: Place your chosen medium (moss or perlite) in a bowl and dampen it thoroughly until it feels like a wrung-out sponge—moist but not dripping wet.
- Bag the Seeds: Mix the cherry kernels (or whole pits) into the damp medium.
- Seal the Bag: Place the entire mixture into the plastic bag and seal it tightly, allowing a little air in, or use a bag designed for freezer storage.
- Refrigerate: Place the bag in the main compartment of your refrigerator (not the freezer!). The ideal temperature range is between 33°F and 40°F (0.5°C to 4.5°C).
- Monitor Weekly: Check the bag every week or so. If the medium looks dry, add a few drops of water. If you see mold or fungus beginning to grow, immediately remove the seeds, gently rinse them in very mild, diluted hydrogen peroxide or plain water, and place them in a fresh, clean bag with fresh damp medium.
This long, cold wait is often where new gardeners get discouraged. Remember, this step is non-negotiable for many stone fruits. You are essentially preparing the seed’s internal clock. For more specific timing guidelines, consulting resources from university agricultural extension offices, such as those provided by Cornell University’s Horticulture Department, can offer region-specific advice.
Step 3: Planting Your Stratified Seeds
Once your seeds have spent their required time in the cold, it’s time to plant them! You should ideally plant them when the outside soil temperature is warming up, usually late spring or early summer in many climates.
Choosing the Right Container and Soil
Since you want this seedling to grow for at least a year before considering moving it outside, container size matters.
For the initial sprouting, smaller containers work best, allowing you to control the immediate environment. Think of standard 4-inch nursery pots or small starter trays.
Soil Mix Components:
- 50% High-quality Potting Mix (Sterile and well-draining)
- 30% Perlite or Coarse Sand (For drainage—crucial!)
- 20% Compost or Peat Moss (For moisture retention)
Tip from Md Meraj: Just like when prepping lumber, drainage is key! Soggy soil is the number one killer of indoor seedlings. Make sure your pots have excellent drainage holes.
The Planting Process
- Prepare the Pot: Fill your chosen container with the mixed soil, leaving about an inch of space at the top. Gently tamp the soil down—don’t pack it hard, just enough so it’s settled.
- Position the Seed: Plant the seed about 1/2 inch to 1 inch deep. If you used whole pits, plant them horizontally (on their side). If you only have the kernels, plant them flat, about 1/2 inch deep.
- Water Gently: Water the pot slowly until water runs out of the bottom. Use a fine-spray nozzle to avoid disturbing the soil surface.
- Cover (Optional): Some gardeners cover the pot with clear plastic wrap to keep humidity high while waiting for germination. If you do this, poke a few small air holes in the plastic.
Step 4: Nurturing the Sprout and Early Growth
Your seed has successfully awakened from its winter slumber. Now it needs sunlight and steady care to become a sapling.
Light and Temperature Requirements
Once you see a little green sprout emerging, immediately remove any plastic covering.
Place the pot in the sunniest location you have. For indoor growing, this usually means a south-facing window or, ideally, under a dedicated grow light. Cherry seedlings need significant light to grow strong stems.
Maintain warm, consistent temperatures—around 65°F to 75°F (18°C to 24°C) during the day. Avoid placing the pot near drafty windows or heating vents.
Watering During Growth
This is the balance you must master: moist, but never wet.
| Growth Stage | Watering Frequency Guideline | How to Check Moisture |
|---|---|---|
| Germination (First 2 weeks) | Keep soil consistently slightly moist. | Top inch of soil should always feel damp. |
| Active Growth (First 6 months) | Water thoroughly when the top 1-2 inches of soil dry out. | Use your index finger to check depth; if it feels dry, water well. |
| Overwintering (After 6 months) | Reduce frequency significantly to prevent root rot. | Soil should dry out more thoroughly between waterings. |
Feeding Your Young Tree
Don’t over-fertilize a tiny seedling. Too much fertilizer can burn delicate roots. Wait until the seedling has developed its first set of true leaves (after the initial round leaves).
Start with a balanced, water-soluble fertilizer diluted to 1/4 strength. Fertilize lightly once a month during the growing season (spring through early fall). Stop feeding entirely in the late fall and winter.
Step 5: Transplanting and Hardening Off
After about a year of growing indoors or in a protected spot, your seedling will be large enough to move into a bigger container or directly into the ground—but you can’t rush this final move!
Potting Up
If your seedling is growing vigorously, you might need to move it to a 1-gallon or 3-gallon container after the first year.
When transplanting, handle the roots gently. Cherry trees do not like having their roots disturbed heavily, so try to keep the original root ball intact as much as possible. Use a slightly larger container with fresh, well-draining soil.
Hardening Off: Preparing for the Outdoors
This is a vital step, especially for plants that started indoors or in a greenhouse. Hardening off slowly introduces the young tree to the harsher realities of wind, direct sun, and temperature fluctuations. Skipping this is like asking someone who has only worked inside to suddenly run a marathon in direct summer sun—they will burn out!
Start this process about two weeks before your last expected frost date if planting outside, or just before moving it to its final outdoor container spot.
Hardening Off Schedule:
- Day 1–3: Place the pot in a spot that gets bright, indirect sunlight for only 1-2 hours per day. Keep it sheltered from wind.
- Day 4–7: Gradually increase the outdoor time to 3–4 hours, allowing morning sun only.
- Day 8–12: Increase sun exposure to about 6 hours (morning and mild afternoon sun).
- Day 13+: The tree can handle full sun and being left outside overnight (provided temperatures are safe).
Step 6: Planting in the Garden (Long-Term Placement)
If you decide to plant your homemade cherry tree outside, location matters immensely for its long-term health.
Site Selection Essentials
Cherry trees need specific conditions to thrive, even the seedlings we grew from pits.
- Sunlight: They require at least 6 to 8 hours of full, direct sunlight daily.
- Soil Drainage: This cannot be overstated. Cherries absolutely hate “wet feet.” If your native soil is heavy clay, plant on a slight mound or amend the soil heavily with compost and sand to improve drainage significantly. According to the USDA Agricultural Research Service, proper soil structure is vital for fruit tree longevity.
- Air Circulation: Good air movement helps prevent fungal diseases. Avoid planting in low-lying, damp spots.
Planting Depth Guide
Dig a hole that is two to three times wider than the root ball, but no deeper than the root ball itself. You want the top of the root ball to sit slightly above the surrounding soil level so water drains away from the trunk base.
After placing the tree, backfill with the native soil mixed with some compost. Water deeply after planting. Add a layer of organic mulch (wood chips or straw) 2–3 inches deep, keeping the mulch pulled a few inches away from the trunk itself to prevent rot.
Understanding the Timeframe: When Will It Fruit?
This is the reality check for anyone starting from seed. Store-bought cherry seeds, especially from sweet varieties, take a significant amount of time to mature enough to produce flowers and then fruit.
The Unpredictable Waiting Game
While a nursery-bought grafted tree might fruit in 3–5 years, a tree grown from seed is much slower:
| Development Milestone | Estimated Time from Seed |
|---|---|
| Reaching Maturity (Vegetative Growth) | 3 to 5 years |
| First Blooms (If pollination is successful) | 5 to 10 years (sometimes longer) |
| First Harvestable Cherries | 7 to 12 years |
If your goal is simply to have a beautiful, strong tree in your yard that provides shade, growing from seed is an amazing, rewarding project. If your primary goal is eating a homegrown Bing cherry next year, purchasing a grafted dwarf tree from a reputable local nursery is the most reliable path.
Troubleshooting Common Seed Starting Issues
Even with perfect steps, nature throws curveballs. Here are quick fixes for things that commonly trip up new seed starters, much like debugging a tricky piece of furniture assembly.
Issue 1: Seeds Won’t Sprout After Stratification
Likely Cause: Insufficient cold period, or seeds died during storage.
Fix: Try the remaining seeds if you have any, but ensure they stay cold (33°F–40°F) for the full 90 days next time. Also, check your seed viability by cracking one open—if the kernel looks rotten or mushy, it failed.
Issue 2: Seedlings Emerge Then Suddenly Die (Damping Off)
Likely Cause: Overwatering leading to fungal growth near the soil line.
Fix: This is very common. Ensure the soil is airy (use more perlite). Reduce watering frequency. If the seedling is affected, gently remove it and try to dry out the soil immediately.
Issue 3: Seedling Stretches Tall and Thin (Leggy Growth)
Likely Cause: Not enough light.
Fix: Immediately move the plant closer to the light source or install a full-spectrum LED grow light directly above it. A leggy stem is weak and will likely snap under wind stress later on.
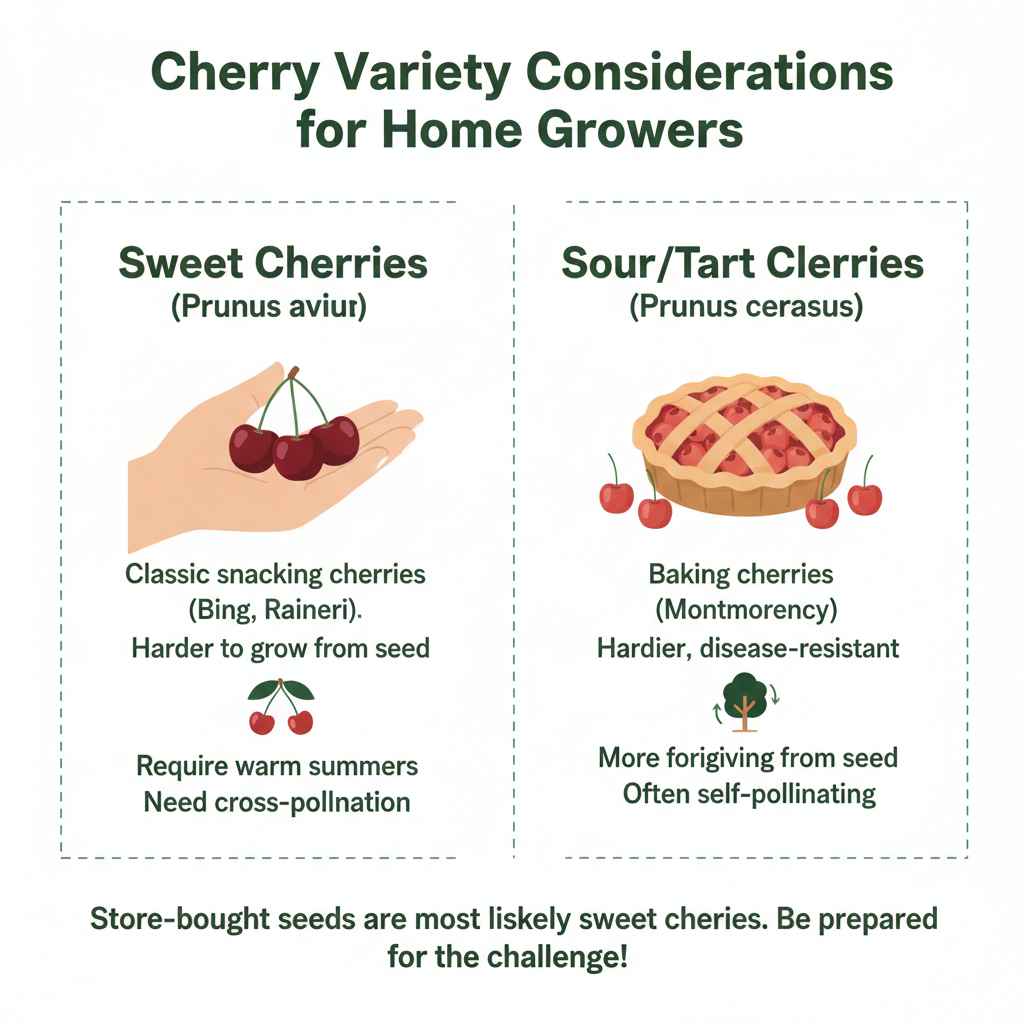
Cherry Variety Considerations for Home Growers
While you cannot dictate the exact variety from a seed, knowing the two main categories of cherries grown helps set expectations for what your seedling might become:
- Sweet Cherries (Prunus avium): These are the classic snacking cherries (like Bing, Rainier). They are much harder to grow from seed, require warm summers, and must have a different variety nearby for cross-pollination to set fruit.
- Sour/Tart Cherries (Prunus cerasus): These are the Montmorency types, excellent for baking. They are generally hardier, more disease-resistant, and sometimes more forgiving when grown from seed. They are often self-pollinating, which increases the chance of eventual fruit production if you only plant one tree.
Your store-bought seed is most likely from a sweet cherry, simply because those are the most commonly sold fresh. Be prepared for the challenge!
FAQ: Beginner Cherry Seed Growing
Can I just put the whole cherry pit in the ground outside?
Answer: You can try, but success is very low. The pit needs proper cleaning and chilling (stratification) to break dormancy. If planted directly outdoors without chilling, winter might not be cold enough, or the seed might rot before spring.
How long do I have to leave the seeds in the fridge?
Answer: Generally, 60 to 90 days of consistent cold (33°F to 40°F) is required for cherry seeds to break dormancy and be ready for planting.
Do I need two different cherry trees for them to grow fruit?
Answer: For most sweet cherry varieties grown from seed, yes, you will need two genetically different, mature trees planted nearby to ensure cross-pollination occurs. Sour cherries are often self-fertile.
Is it safe to eat the kernel inside the pit?
Answer: No. The kernel contains amygdalin, which can release cyanide when digested. Always wash your hands after handling the kernels, and never chew or ingest them. Only the hard shell and the surrounding flesh should be discarded.
What if my seed sprouts while it’s still in the refrigerator?
Answer: This means the stratification period was a success! Immediately remove the sprouted seed from the damp medium, plant it in soil (1/2 inch deep), and keep it under bright light indoors to continue growing. It has missed the natural timeline but can still survive.
Can I use regular garden dirt to sprout the seeds indoors?
Answer: It is strongly recommended that you do not. Garden dirt is often too dense, compacts easily, and may contain pests, weed seeds, or disease pathogens that thrive in the warm, moist environment of indoor sprouting. Use a sterile potting mix.
A Rewarding Project for the Patient DIYer
Starting a cherry tree from a store-bought seed is an excellent demonstration of patience and basic horticulture. It might feel different from using your favorite power tool to build a new bookshelf, but the satisfaction of watching something small grow into a strong, living structure is just as rewarding.
Remember, you are not just planting a seed; you are starting a multi-year journey. Focus on nailing the preparation—cleaning the pits well, being precise with the cold stratification period, and ensuring excellent drainage when you plant. If you manage these crucial steps, you’ve already succeeded in getting the hardest part done.
By following these steps, you’ll have a resilient young sapling that serves as a wonderful testament to what you can achieve through careful observation and consistent effort. Enjoy the process, and you might just have a beautiful, if unpredictable, cherry tree in your yard ten years down the road. Happy growing!