Can You Spray Drywall Mud Through a Paint Sprayer? DIY Guide
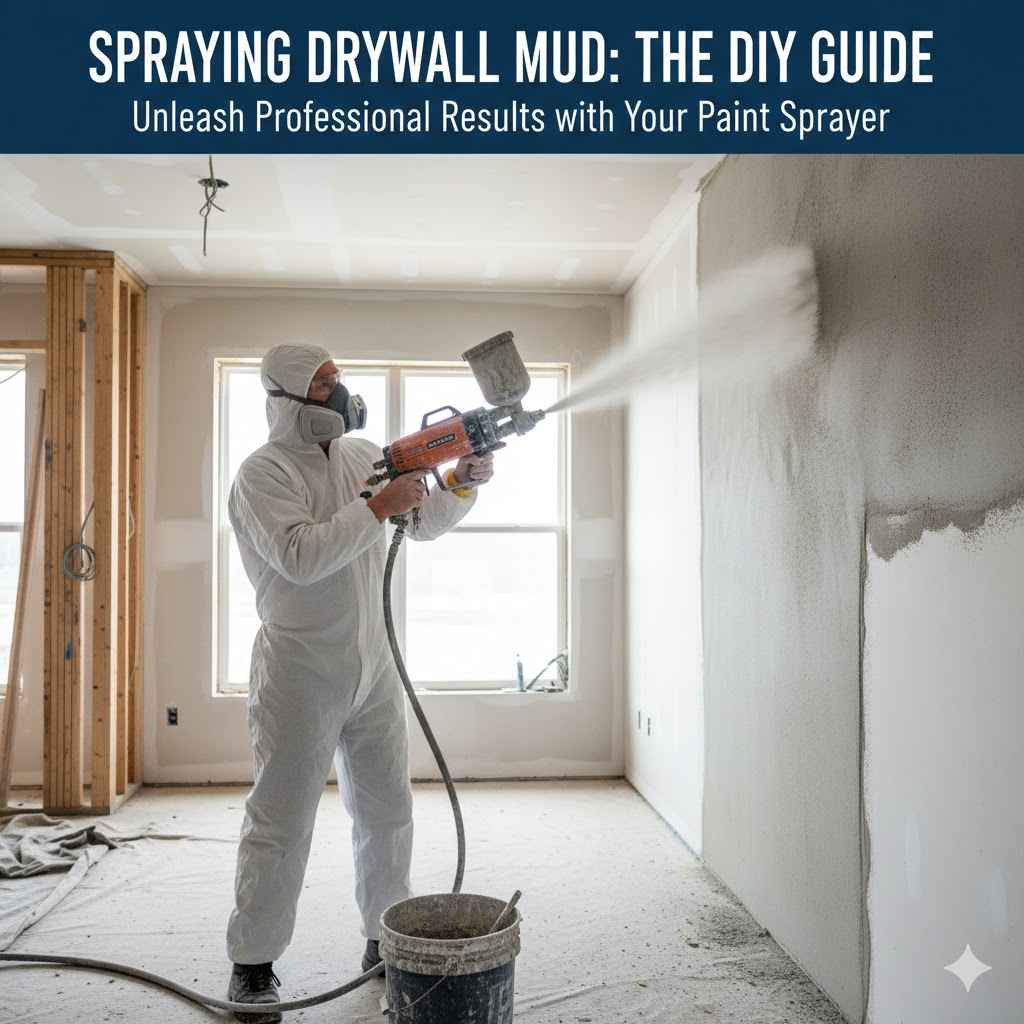
Thinking about tackling a drywall project and wondering, Can You Spray Drywall Mud Through a Paint Sprayer? It’s a common question, especially for those just starting with home repairs. Spraying mud sounds like a quicker way to get things done, but is it really possible? Don’t worry! This guide breaks down everything you need to know, from the right equipment to the best techniques. We’ll skip the fancy stuff and get straight to a simple, step-by-step approach. Let’s explore how to make your drywall project a success, and get you ready for what comes next.
What You Need Before Spraying Drywall Mud
Before you even think about grabbing your paint sprayer, you’ll need the right tools and materials. Choosing the incorrect equipment is a common mistake and can lead to frustration. Getting the correct setup ensures a smoother application. This section covers all the essential items you should gather before beginning. It will save you time and prevent you from having to make last-minute trips to the store.
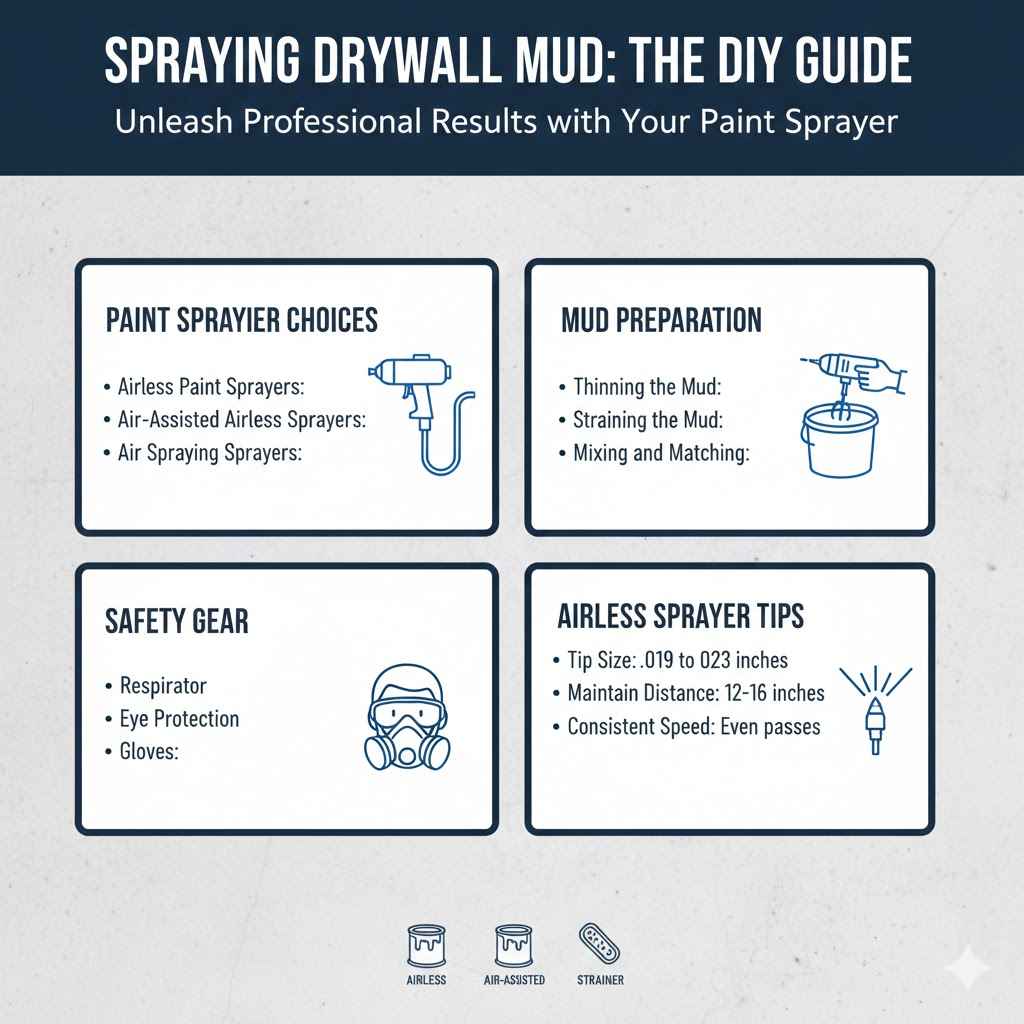
Paint Sprayer Choices
The type of paint sprayer you select is key. You can’t just use any old sprayer for drywall mud. Drywall mud is thick, and not all sprayers are built to handle it. You have to consider the viscosity of the material and the pressure required. Two main types are recommended, each with pros and cons. Airless sprayers are more powerful, while others can be easier for beginners. Choosing the right one significantly impacts your results.
Airless Paint Sprayers: Airless sprayers use high pressure to push the mud through a small tip. This creates a fine mist. They are a good choice for thicker materials. These sprayers work by forcing the drywall mud through a nozzle at high pressure, which atomizes the mud.
Airless sprayers are usually more expensive up front, but the speed and the quality of the finish often make them worth the investment. You’ll need to select a tip size appropriate for mud, often in the range of .019 to .023 inches. You’ll also have less overspray compared to other types. Regular cleaning is a must with airless sprayers to prevent clogs and ensure a long life.
Air-Assisted Airless Sprayers: These sprayers combine features of both airless and air sprayers. They provide better control and atomization compared to pure airless systems. They use air to assist in the spray process, leading to a finer finish.
These are often used in commercial settings. The extra cost of an air compressor and related equipment may make them less attractive for smaller, DIY projects. Air-assisted airless sprayers still require regular cleaning, but the risk of clogs can be slightly reduced.
Air Spraying Sprayers: Using air sprayers, like gravity-feed or siphon-feed sprayers, is usually not recommended for applying drywall mud. These sprayers rely on compressed air to atomize the material. They often struggle with the thickness of drywall mud, leading to clogs.
If you’re using this type, you’ll need a compressor that can supply consistent airflow. These sprayers tend to have more overspray, and the finish can be uneven without significant practice. For the average homeowner, air sprayers are generally not the best choice for this task.
Mud Preparation
Preparing the drywall mud is as important as choosing the right sprayer. If the mud is too thick, it won’t spray. If it’s too thin, it will run and sag. Proper preparation ensures the best outcome. This involves thinning the mud to the right consistency. It also addresses the critical step of removing any lumps or debris. This helps prevent clogs and gives you a smooth finish.
Thinning the Mud: Drywall mud, right out of the bucket, is usually too thick to spray. You need to thin it to get the right consistency. Begin by adding water to the mud gradually. Stir well with a mixing paddle attached to a drill. The ideal consistency is like thick paint or heavy cream.
Over-thinning is a common mistake that causes the mud to run down the wall or sag. You want a consistency that spreads smoothly but still covers well. Always add water in small amounts. Check the consistency after each addition. It is also important to test the mud in the sprayer before you start the project. This will help you find the right mixture.
Straining the Mud: Even if your mud seems smooth, it may contain small lumps or debris. These will clog your sprayer. The best way to remove these is to strain the mud before spraying. A paint strainer is perfect for this. Place the strainer over a clean bucket and pour the thinned mud through it.
Straining ensures that only smooth, clog-free mud goes into your sprayer. You’ll be surprised at what the strainer catches. This simple step can save you a lot of time and frustration later on. Regular inspection of the strainer can also help you quickly catch any issues with the mud itself.
Mixing and Matching: Always use a mixing paddle attached to a drill to thoroughly combine the water and the drywall compound. This tool effectively breaks up any clumps or inconsistencies, promoting a homogenous mixture ready for application.
After thinning the mud, mixing it thoroughly is important to achieving a uniform consistency. A good mixture ensures that the thinned mud sprays evenly and adheres well to the surface. It will also reduce the risk of clogs. Mix at a moderate speed to prevent air bubbles from forming in the mud. Air bubbles can cause issues during spraying. Make sure you match batches carefully to achieve uniform colors.
Safety Gear
Spraying drywall mud can create a lot of mess, and it can also pose some health risks. It’s important to protect yourself properly. This means using the right safety gear. This section covers all the essential items to wear when you spray mud. From preventing inhalation to keeping your skin safe, these items will reduce any hazards.
Respirator: Drywall mud contains dust particles that can be harmful if inhaled. A respirator with a particulate filter is essential. The respirator should have an N95 or higher rating. This rating shows it can filter out tiny particles.
Make sure the respirator fits your face properly. If it doesn’t seal well, it won’t protect you. Change the filter regularly. You will need to replace the filter when it becomes difficult to breathe through. A good respirator can help you avoid breathing problems.
Eye Protection: Spraying mud can easily get into your eyes. Wear safety glasses or goggles. The protection should be snug fitting to keep out any material. A pair with side shields is even better for more coverage.
If you wear glasses, make sure the safety glasses or goggles fit over them. Clean your eye protection regularly. If drywall mud gets in your eyes, flush them immediately with water. Safety glasses are crucial for protecting your eyes.
Gloves: Drywall mud can dry out and irritate your skin. Wear gloves to protect your hands. Use a good pair of disposable gloves or work gloves. Choose gloves that fit well and are easy to work in.
Gloves prevent mud from sticking to your skin. This makes clean-up easier. If your gloves get covered in mud, change them. Make sure that you are using gloves that are durable. Some of the chemicals that might be in the mud can damage gloves that are not resistant to them.
The Spraying Process: Step-by-Step Guide
Now that you have all the equipment and know what to wear, it’s time to actually spray the mud. This part focuses on the practical steps. From setting up the sprayer to the finishing touches, it provides a simple, easy-to-follow guide. It will lead you through each stage. Following these steps helps you get the best possible finish.
Sprayer Setup
Setting up your paint sprayer is crucial for a smooth spraying process. It impacts your results. This involves preparing the sprayer, loading the mud, and adjusting the settings. Making sure everything is correct will prevent clogs and ensure an even application. Proper preparation is the key to preventing problems later.
Preparing the Sprayer: Before you start, clean your sprayer thoroughly. Assemble it according to the manufacturer’s instructions. Check all connections to make sure they are secure. You should test the sprayer with water before you try the mud.
Making sure your sprayer is clean prevents mud from drying and causing clogs. A little preparation now saves you a lot of trouble later. If you are using a new sprayer, familiarize yourself with its parts and operation. This will help you identify issues quickly.
Loading the Mud: Once your sprayer is ready, it’s time to load it with the prepared mud. Pour the strained mud into the sprayer’s reservoir. Avoid overfilling the container. Follow the manufacturer’s recommendations for the maximum fill level.
Overfilling can lead to spills. Make sure your hands and any surrounding areas are clean. If you are using an airless sprayer, prime the sprayer. Prime the sprayer by directing the hose into a bucket and running the pump until mud comes out. If you notice any air bubbles, burp the pump.
Adjusting Settings: The settings on your sprayer control how the mud comes out. Start by adjusting the pressure. Begin with the lowest pressure setting, and increase it gradually until you get a good spray pattern. You might also have a knob to adjust the spray width.
The right settings depend on your sprayer and the mud’s thickness. Experimenting on a piece of scrap drywall can help you find the best setup. Pay attention to the spray pattern, the consistency, and how the mud is adhering to the surface. It can take some practice to get it right. Also make sure to wear your mask at all times.
Spraying Techniques
Knowing how to spray is just as important as having the right equipment. This involves learning how to hold the sprayer. It involves knowing how to move your arm, and the distance from the wall you should be. Proper technique gives you a smooth, even coat of mud. It will also help you avoid common issues like drips and runs.
Holding the Sprayer: Hold the sprayer at a 90-degree angle to the wall. Keep it at a consistent distance. Maintain a comfortable grip to avoid fatigue. Your stance and posture are important for getting good coverage.
The distance from the wall will vary depending on the type of sprayer and the mud’s consistency. Try starting with a distance of 10-12 inches. Keeping the sprayer perpendicular to the wall ensures an even application. This will prevent issues like thin spots and uneven coverage. Good posture also helps prevent fatigue.
Spraying Motion: Move the sprayer in smooth, even strokes, overlapping each pass by about 50%. Start and stop the spray off the surface you’re working on. This prevents blobs of mud from forming at the beginning and end of each stroke.
Consistent speed is key. Avoid pausing or slowing down mid-stroke, as this can cause uneven application. Overlapping each pass ensures complete coverage. Smooth, controlled motions result in a professional-looking finish. When you are done, clean the sprayer immediately to prevent the mud from drying inside it.
Dealing with Overlap: Achieving the perfect overlap is key to a smooth finish. Ensure that each new spray covers a small portion of the previous one. This process ensures thorough coverage.
By overlapping the strokes, you prevent any areas of the wall from receiving too much or too little mud. The right overlap amount will depend on the type of sprayer and the mud’s thickness. Aim for a 50% overlap. This gives you a balanced coat and results in a more uniform look. Remember to control the pressure in the sprayer.
Post-Spraying and Finishing Touches
The work doesn’t stop once you’ve sprayed the mud. Proper cleanup and the final touches are important. This includes the process of cleaning the equipment. This also covers sanding. This will make your drywall look perfect. These final steps make your project professional and give it that polished look.
Cleaning the Sprayer: Clean your sprayer immediately after use. Disassemble it according to the manufacturer’s instructions. Remove all mud from the parts. Use water to clean water-based mud. For oil-based mud, use the appropriate solvent.
Thorough cleaning prevents clogs and extends the life of your sprayer. Rinse all components until clean. Pay special attention to the nozzles and tubes. If mud dries in the sprayer, it can be very difficult to remove. Proper cleaning is important for maintaining your equipment.
Drying Time: Allow the mud to dry completely. Drying time depends on the type of mud and the environmental conditions. It also depends on the number of coats of mud. The drying time might be longer in humid or cold conditions.
Rushing this process can lead to problems later, such as cracking or peeling. Always refer to the manufacturer’s recommendations for drying times. Make sure the room has adequate ventilation to allow the mud to dry properly. Patience is key to achieving a professional finish.
Sanding and Smoothing: Once the mud is dry, you will need to sand the surface to get a smooth finish. Use fine-grit sandpaper for this. Start by sanding lightly. Check your work frequently. This ensures that you don’t remove too much material.
Wear a dust mask during sanding. Always sand in the direction of the wall. This will minimize scratches. Apply light pressure to avoid damaging the underlying drywall. For best results, use a sanding sponge. Sanding creates a smooth surface. It’s an important step for painting.
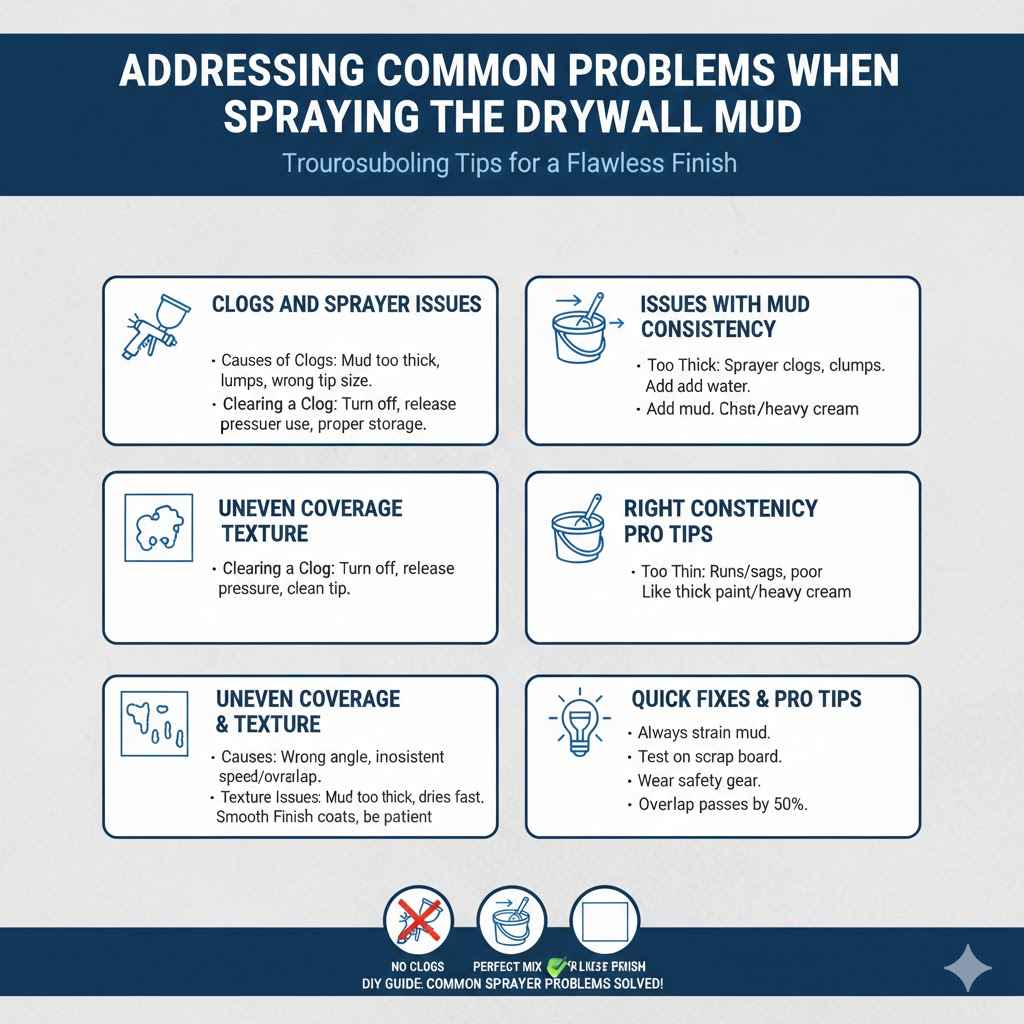
Addressing Common Problems When Spraying Drywall Mud
Even with careful preparation, issues can arise when you spray mud. This section focuses on common problems and how to fix them. From clogs to uneven coverage, it gives you practical advice. These tips allow you to troubleshoot common issues. This prevents you from making costly mistakes. It helps you quickly get back on track if something goes wrong.
Clogs and Sprayer Issues
Clogs are one of the most common issues when spraying drywall mud. They interrupt your work and can affect the outcome. This section covers what causes clogs. It covers how to fix them. This will help you get back to work quickly. It also covers basic maintenance to prevent these issues.
Causes of Clogs: Clogs happen for a few key reasons. The mud might be too thick. The mud could have lumps or debris. You might be using the wrong size sprayer tip. Make sure that you are using the correct tip size for drywall mud.
Always strain your mud before spraying. Using the wrong tip can cause problems. Dirty equipment can also cause clogs. Regular maintenance can significantly reduce the risk of clogs. Check the instructions for your sprayer to determine the correct tip size.
Clearing a Clog: If your sprayer clogs, don’t panic. Turn off the sprayer and release the pressure. Then, try cleaning the tip and nozzle with a brush or a wire. You can use a tip cleaning tool. If that doesn’t work, disassemble the sprayer and clean all parts thoroughly.
Always release the pressure before cleaning the tip. Always check the nozzle for any obstructions. Cleaning the parts will allow you to quickly resume your work. Proper cleaning helps ensure the long life of your sprayer. Check the manual of your sprayer for specific cleaning instructions.
Sprayer Maintenance: Regular maintenance will help prevent clogs and extend the life of your sprayer. Always clean your sprayer thoroughly after each use. Store your sprayer properly when not in use. Check and replace worn parts as needed.
Proper storage prevents mud from drying in the sprayer. Regularly inspect your equipment for wear and tear. Following a maintenance schedule will keep your sprayer working well. Make sure you use the appropriate cleaning solutions for your sprayer. By maintaining your equipment, you’re improving the quality of your work.
Issues with Mud Consistency
The right mud consistency is essential. If the mud is not right, you’ll have problems. This section explains what issues arise from the wrong consistency. It shows you how to adjust the mud’s thickness to get better results. It explains key tips for getting the perfect texture for spraying.
Too Thick: If your mud is too thick, it won’t spray well. The sprayer might clog. The mud might come out in clumps. It won’t spread evenly on the wall.
Thick mud results in an uneven application. To fix this, add water. Stir well until the mud becomes more fluid. Make small adjustments, and test your mixture. It is important to adjust the mud consistency. This will help to prevent the sprayer from clogging.
Too Thin: If the mud is too thin, it will run or sag on the wall. The coverage will be poor. The mud won’t build up properly.
Thin mud makes it difficult to achieve the desired finish. If your mud is too thin, add more mud. Stir the mixture well and test it. The process of adjusting the mud will greatly improve the final outcome. Use the right mud consistency.
Achieving the Right Consistency: The perfect consistency is like thick paint or heavy cream. It needs to be thick enough to cover the wall. But it has to be thin enough to spray easily. Always add water gradually.
Achieving the right consistency will require some practice. Mix the mud thoroughly after each adjustment. Test the mud by spraying it onto a piece of scrap drywall. The right consistency ensures a smooth finish. It also helps to prevent common problems. You can also ask for recommendations.
Uneven Coverage and Texture
Uneven coverage and texture are common issues. They can affect the final look of your work. This section explains what causes unevenness and texture issues. It shows you ways to fix them. These tips will give you a smooth, professional finish. It can boost the quality of your project.
Causes of Uneven Coverage: Uneven coverage is often caused by incorrect spraying techniques. The sprayer might be held at the wrong angle. Your speed might be inconsistent. There might be too much or too little overlap.
Keep the sprayer perpendicular to the wall. Maintain a consistent distance. Keep the overlap consistent, and avoid stopping and starting mid-stroke. Practice is important. It helps you get the hang of spraying. This can fix any issues with uneven coverage.
Addressing Texture Issues: Texture issues can be caused by a number of things. The mud might be applied too thick. The mud might dry too quickly. Your spray pattern might not be correct.
Use the right nozzle tip. Adjust the settings on your sprayer. Adjust your speed to ensure a uniform distribution. If the texture is bad, you might need to sand the wall. Sanding after the mud is dry helps to create a uniform finish. These steps help with texture issues.
Achieving a Smooth Finish: After spraying, use these steps to achieve a professional finish. Make sure to sand the wall with fine-grit sandpaper. Always apply the mud in thin, even coats. Avoid applying the mud too thick, and allow each coat to dry completely.
Proper preparation is key. Use the correct tools, and practice. Always be patient. By using these methods, you’ll get a professional finish. It will give your project a polished look. You can also reach out for assistance.
Frequently Asked Questions
Question: Is it really possible to spray drywall mud through a paint sprayer?
Answer: Yes, you can spray drywall mud through a paint sprayer, but you must use the right equipment and techniques to do it effectively and without clogging the sprayer.
Question: Which type of paint sprayer is best for spraying drywall mud?
Answer: Airless paint sprayers are generally the best choice for spraying drywall mud due to their ability to handle thick materials and provide consistent pressure.
Question: What do I need to prepare before spraying drywall mud?
Answer: Before spraying, you need to thin the drywall mud to the right consistency, strain it to remove any lumps or debris, and gather all of your safety gear, including a respirator and eye protection.
Question: What are some common problems when spraying drywall mud?
Answer: Common problems include clogs in the sprayer, issues with the mud consistency (too thick or too thin), and uneven coverage or texture on the wall.
Question: How do I clean my paint sprayer after using it to spray drywall mud?
Answer: After spraying, disassemble the sprayer according to the manufacturer’s instructions. Remove all mud from the parts and use water to clean water-based mud. Use the appropriate solvent for oil-based mud, and ensure all parts are thoroughly clean to prevent clogs.
Final Thoughts
So, Can You Spray Drywall Mud Through a Paint Sprayer? Absolutely! While it requires a bit more preparation and the right equipment, spraying mud can be a rewarding way to achieve a professional finish. You’ve now seen how to prepare your mud, set up your sprayer, and use the correct techniques. You have also read about how to handle any problems. Remember, practice makes perfect. Don’t be afraid to experiment on scrap material first. You’ll master the art of spraying mud quickly. With the right approach and a little patience, you’ll be well on your way to smooth, seamless walls. Go ahead and start your project today!