DIY Wood Shutters Exterior: Create Stunning Curb Appeal
In the realm of residential architecture, the integration of DIY wood shutters exterior has emerged as a remarkable solution for homeowners seeking both aesthetic appeal and functional benefits. These custom-crafted window coverings are not merely decorative; they offer enhanced privacy, light control, and thermal insulation. The process of designing and constructing wood shutters involves an understanding of various woodworking techniques, materials, and finishes that can elevate curb appeal. As the desire for personalized home improvement grows, DIY enthusiasts are turning to wood shutters as a canvas for creativity and craftsmanship.
Discover how these exterior elements can transform your home into a stunning masterpiece.
Transform Your Home With DIY Wood Shutters Exterior
Discover the charm and practicality of DIY wood shutters for your home’s exterior. This summary highlights the benefits of creating custom shutters, including cost-effectiveness and the opportunity for personal expression through design. Additionally, it covers essential materials and tools needed for the project, along with a step-by-step guide to ensure a successful build. Whether aiming for traditional elegance or modern flair, DIY wood shutters can enhance your home’s curb appeal while offering functional benefits.
Why Choose DIY Wood Shutters?
Benefits of wood shutters. Costeffectiveness vs. professional installation. Personalization and customization options.
Wood shutters bring charm to your home, not to mention they are super functional! They help control light and offer privacy, making your space cozy. Plus, DIYing them saves money compared to hiring a pro.
Why pay someone else to do the fun work? Customization options are endless! You can paint them any color or add unique designs that match your style. Here’s a fun fact: when you finish, you’ll feel like a superhero for saving cash and beautifying your home!
| Benefit | DIY Option | Professional Installation |
|---|---|---|
| Cost | Lower overall expenses | Higher cost |
| Personal Touch | Bespoke designs | Standardized styles |
| Satisfaction | Creative fulfillment | Less personal connection |
Materials Needed for DIY Wood Shutters
Types of wood suitable for exterior shutters. Essential tools for the project. Recommended finishes and hardware options.
To build your own wood shutters, start with the right materials. Consider these types of wood for durability:
- Cedar: Naturally resistant to decay.
- Pine: Affordable and easy to work with.
- Redwood: Strong and weather-resistant.
Gather essential tools such as a saw, drill, and sandpaper. For finishing, choose weather-resistant paint or stain. Don’t forget the hardware, like hinges and brackets, to secure your shutters and make them functional.
Measuring Your Windows for Shutter Installation
Stepbystep guide on measuring. Common mistakes to avoid in the measuring process. How to determine the number of shutters needed.
To install DIY wood shutters, accurate measurements are key. Start by measuring the width and height of each window. Use a tape measure and note down the sizes.
Avoid common mistakes like measuring only one side or forgetting to allow space for trim. Here’s how to determine the number of shutters needed:
- Count each window separately.
- Factor in the style you desire—full-height or café style.
- Double-check your numbers for accuracy.
This careful approach ensures a perfect fit for your shutters.
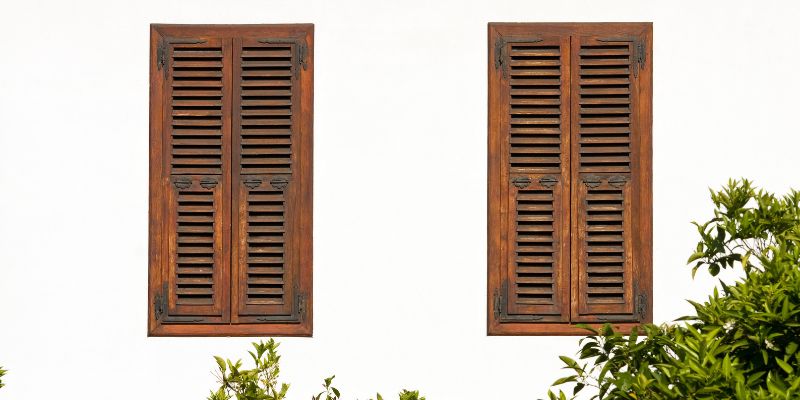
Designing Your Wood Shutters
Popular styles of wood shutters (board & batten, louvered, etc.). Design considerations for different home aesthetics. Inspiration and resources for creative designs.
Choosing the right style is key for wood shutters. Here are a few popular types:
- Board and Batten: Great for rustic homes, they have vertical boards with horizontal battens.
- Louvered: Perfect for modern designs, featuring angled slats that allow airflow.
- Raised Panel: These offer a classic look, ideal for traditional houses.
Consider your home’s style. A farmhouse may suit board and batten, while a contemporary home looks best with louvered shutters. Seek inspiration from magazines or online resources.
DIY projects can help bring your unique vision to life!
Step-by-Step DIY Shutter Construction Process
Cutting the wood to size. Assembling the shutters. Sanding and finishing techniques.
First, grab your wood and a saw. Measure carefully, then cut the pieces to size. Remember, measure twice, cut once—unless you want a mystery puzzle!
Next, it’s time to assemble the shutters. Use wood glue and screws, like a pro chef mixing ingredients for a secret recipe. After that, grab some sandpaper. Smooth out those edges until they shine!
Finish with a coat of paint or stain. Voilà, you have fabulous shutters ready to impress!
| Step | Action |
|---|---|
| 1 | Cut wood to size |
| 2 | Assemble with glue and screws |
| 3 | Sanding for smooth edges |
| 4 | Finish with paint or stain |
Painting and Staining Your Wood Shutters
Best practices for painting or staining. Choosing the right colors and finishes for exterior use. Maintenance tips for longlasting durability.
To make your wood shutters look great, follow these best practices for painting or staining:
- Always sand the surface first for better paint adhesion.
- Use a high-quality exterior paint or stain for durability.
- Choose colors that complement your home’s style.
A good finish protects against weather damage.
Consider using a glossy finish for a nice shine. For long-lasting shutters, regular maintenance is key:
- Clean them every season with mild soap and water.
- Inspect annually for wear and tear.
- Repaint or restain every few years as needed.
Following these tips will keep your shutters looking fresh and colorful!
Installing Your DIY Wood Shutters
Tools and hardware needed for installation. Stepbystep installation process. Troubleshooting common installation issues.
To install your wood shutters, gather these essential tools and hardware:
- Drill and drill bits
- Screws and anchors
- Tape measure
- Level
- Saw (if adjustments are needed)
- Screwdriver
Follow these steps for a smooth installation:
- Measure your window to ensure proper fit.
- Mark where the shutters will attach.
- Drill holes for screws and anchors.
- Attach the shutters using screws and check they are level.
If you face issues, check these common problems:
- Shutters not fitting properly? Measure again.
- Screws stripping?Use larger anchors.
- Shutters wobbling? Adjust screws for better stability.
With these tips, you’ll enjoy your new DIY wood shutters!
Maintenance Tips for DIY Wood Shutters
Regular cleaning and upkeep guidelines. Seasonal care practices. Repairing damages and wear over time.
Keeping your DIY wood shutters in shape is easier than you think! Regular cleaning is like giving them a refreshing shower—use mild soap and water. For seasonal care, check for any signs of wear; think of it as a check-up for your shutters.
If you spot any damage, like a funny creak or a chip, don’t worry! A little wood filler or paint might be all you need. Remember, happy shutters mean a happy home!
| Task | Frequency | Notes |
|---|---|---|
| Cleaning | Monthly | Use mild soap and water |
| Seasonal Inspection | Every Season | Check for wear and tear |
| Repairs | As Needed | Use wood filler or touch-up paint |
Incorporating DIY Wood Shutters into Your Home’s Curb Appeal
Enhancing exterior design with shutters. Landscaping and other elements to complement your shutters. Reallife examples of improved curb appeal.
Adding diy wood shutters can truly transform your home’s look. They come in various styles and colors, allowing you to match them with your favorite exterior design. Consider pairing shutters with fresh landscaping, like colorful flowers and green shrubs, to enrich the overall appeal.
- Choose bold colors for a striking contrast.
- Use soft hues for a cozy, inviting feel.
- Incorporate planters beneath windows for a unified look.
Many homes have seen improvements in curb appeal.
Picture a house with bright blue shutters against white siding. The contrast catches the eye and adds charm. These simple changes can make a big difference!
Resources and Additional Learning Materials
Recommended books, websites, and video tutorials. FAQs about DIY wood shutters. Community forums and groups for DIY enthusiasts.
Building your own wood shutters can be a fun adventure, and you don’t have to go it alone! Numerous resources are available to help you. For reading enthusiasts, check out some recommended books that guide you step-by-step.
Websites like Pinterest spark creativity with endless ideas and tutorials. Video tutorials can show you that constructing shutters isn’t rocket science—more like playing with Lego blocks!
Have questions? FAQs can tackle all your queries about DIY wood shutters.
Plus, joining community forums connects you with fellow DIY enthusiasts. Sharing and learning together makes the journey more enjoyable. Remember, laughter is key: Who knew building shutters could lead to such memorable “wood” puns?
| Resource Type | Recommended Sources |
|---|---|
| Books | “Shutter Up! DIY Designs” |
| Websites | Pinterest, DIY Network |
| Videos | YouTube, Home Repair Tutor |
| Forums | Reddit DIY, Facebook DIY Groups |
Conclusion
In conclusion, DIY wood shutters can significantly enhance the curb appeal and value of your home while providing a practical solution for controlling light and privacy. With a little creativity and effort, you can craft beautiful exterior shutters tailored to your style. Embrace this rewarding project and transform your windows into charming focal points that elevate your home’s overall aesthetic.
FAQs
What Are The Best Types Of Wood To Use For DIY Exterior Shutters To Ensure Durability And Weather Resistance?
The best types of wood for DIY exterior shutters are cedar, redwood, and marine-grade plywood. Cedar and redwood are naturally resistant to moisture, rot, and insects, making them ideal for outdoor use. Marine-grade plywood offers durability and water resistance, perfect for harsh weather conditions. To enhance longevity, it’s recommended to apply a protective finish such as a sealant or paint.
How Do I Measure My Windows Accurately To Create Custom-Fit DIY Wood Shutters?
To measure your windows for custom-fit DIY wood shutters, start by measuring the width at the top, middle, and bottom of the window frame; use the smallest measurement. Next, measure the height from the top of the window frame to the sill in multiple places, again using the shortest measurement. Additionally, note the depth of the window frame to ensure the shutters will fit properly. Be sure to take these measurements in inches for accuracy, and write them down for reference.
What Tools And Materials Do I Need To Build And Install My Own Exterior Wood Shutters?
To build and install your own exterior wood shutters, you’ll need high-quality exterior-grade wood (like cedar or pine), screws or nails, wood glue, and weather-resistant paint or stain for finishing. Essential tools include a saw (table saw or circular saw), drill, measuring tape, level, and a square for accurate cuts and assembly. Additionally, you might want sandpaper for smoothing edges and hinges for installation. Consider using a stud finder to locate the best points for mounting your shutters securely.
What Are Some Creative Design Ideas For DIY Wood Shutters To Enhance The Curb Appeal Of My Home?
Consider using reclaimed wood for a rustic look, which can add character and charm. You can also paint the shutters in a bold color that complements your home’s exterior to make a statement. Incorporating decorative cutouts or patterns, such as chevrons or louvered styles, can create visual interest. Finally, adding hardware like oversized hinges or decorative brackets can elevate the design and enhance your home’s curb appeal.
How Can I Properly Finish And Protect My DIY Wood Shutters From The Elements To Extend Their Lifespan?
To properly finish and protect your DIY wood shutters, start by sanding the surfaces smooth to ensure good adhesion of finishes. Apply a high-quality exterior wood primer followed by outdoor-grade paint or a sealant specifically designed for wood protection against moisture and UV rays. Additionally, consider using a water-repellent wood preservative before the final finish to enhance durability. Regular maintenance, such as repainting or resealing every few years, will also help extend their lifespan.