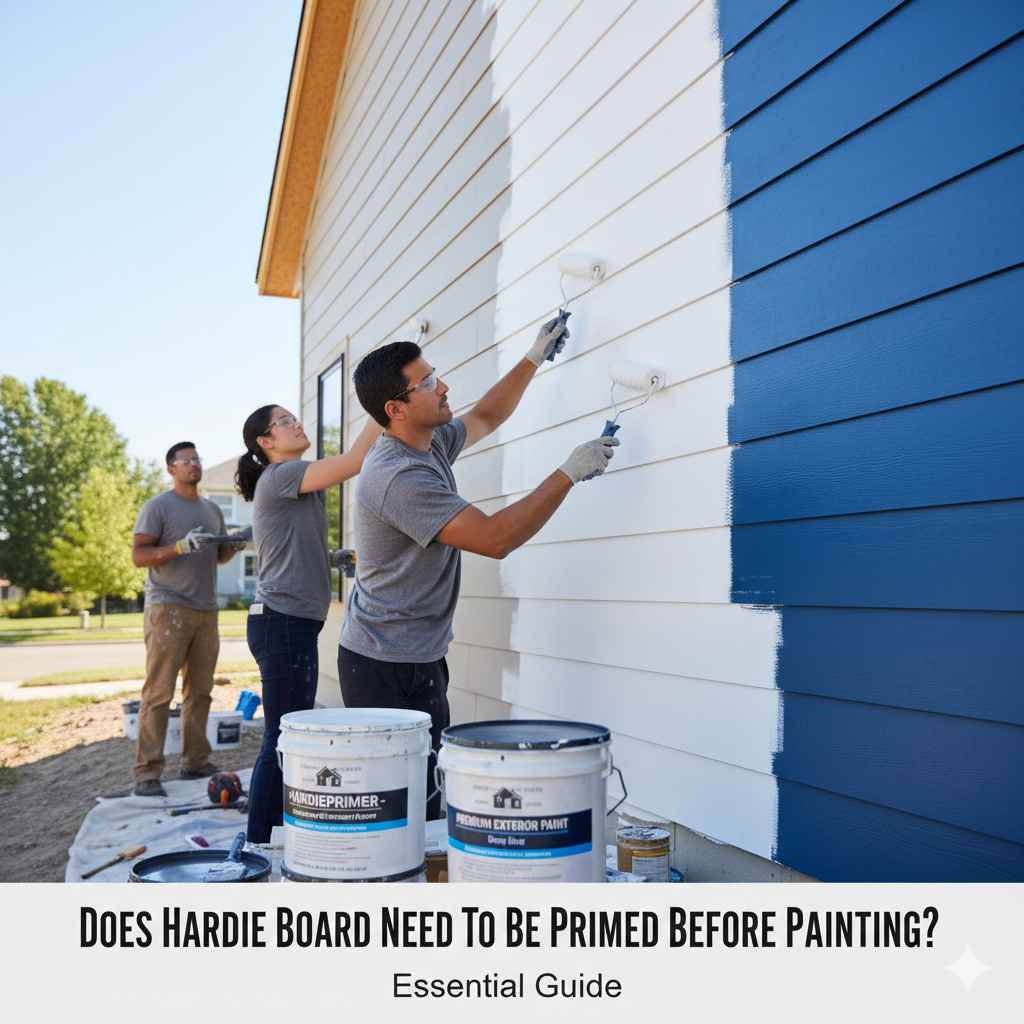
Does Hardie Board Need To Be Primed Before Painting? Essential
Yes, you absolutely must prime new James Hardie siding (Hardie Board) before applying your topcoat paint. Skipping this essential step leads to poor adhesion, premature peeling, blotchy color, and voided warranties. Proper priming ensures a beautiful, long-lasting, professional finish that locks in the siding’s durability.
Welcome, DIY friends! Dealing with siding projects can feel overwhelming, but you’ve come to the right place. Hardie Board, or fiber cement siding, is a fantastic, durable choice for any home upgrade. One question pops up constantly when homeowners look at that beautiful, unpainted board: “Do I need to prime this?” It seems like an extra step, right?
Well, skipping the primer coat is a surefire way to waste time and money down the road. We are going to clear up this mystery completely. I’ll show you exactly why priming is crucial, what primer to grab, and how to do it right. Let’s get your siding looking stunning and sticking perfectly!
Why Priming Hardie Board Isn’t Optional: The Essential First Step
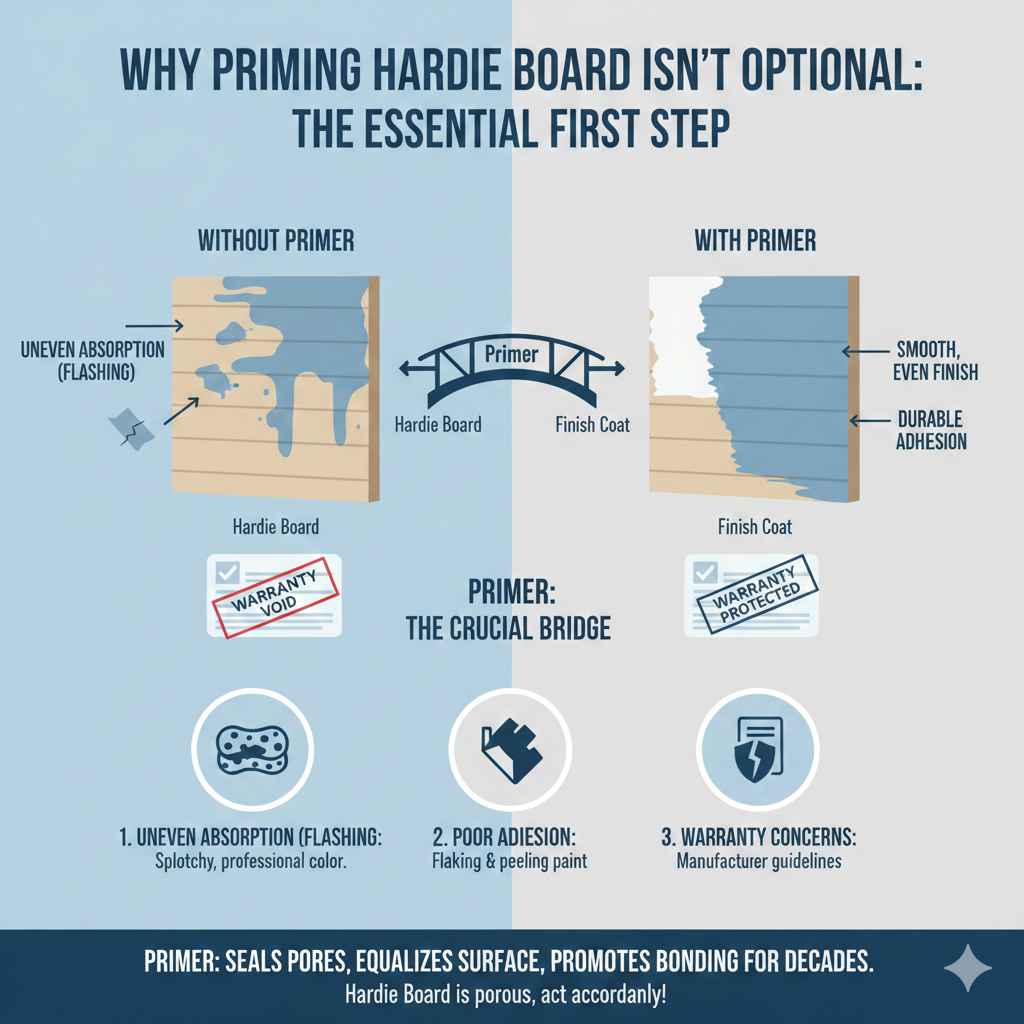
If you’ve ever tried painting plain, bare wood versus something that’s already sealed, you know the difference. Bare wood sucks up the paint unevenly. Hardie Board is different from wood, but it still needs prep work. Fiber cement siding is made from sand, cement, and cellulose fibers. It’s incredibly tough, resisting rot and fire, which is great!
However, that cement mixture is porous, meaning it has tiny little holes that act like a sponge. If you paint directly onto that sponge, several problems pop up:
- Uneven Absorption (Flashing): The dry, raw cement soaks up the paint base unevenly. This causes lighter patches and darker patches, making your final color look blotchy and unprofessional.
- Poor Adhesion: Paint needs a “sticky” surface to grab onto. Primer creates that surface. Without it, your topcoat just sits on top and can easily flake or peel off when exposed to sun, rain, or temperature changes.
- Warranty Concerns: The manufacturer, James Hardie, specifies preparation guidelines. Skipping primer can void parts of your siding warranty, leaving you unprotected if future issues arise.
Think of primer as the crucial bridge between the siding material and your beautiful finish coat. It seals the pores, equalizes the surface, and gives the paint something reliable to bond with for decades.
The Science Simplified: What Primer Actually Does
As someone who values projects that last, I want you to understand why this step matters, not just that you should do it. Primer isn’t just colored water; it’s formulated differently than your exterior paint.
Here’s a quick breakdown of primer’s three main jobs on fiber cement:
- Sealing: The cement particles in the board can react chemically with certain components in the paint, causing chalking or discoloration over time. Primer seals these particles off from the topcoat.
- Binding (Grip): Primer has higher concentrations of binder—the sticky stuff—compared to paint. This allows it to penetrate slightly into the surface pores, creating maximum grip.
- Uniformity: By creating a consistent, uniform surface texture and porosity, the primer ensures your expensive finish coat looks exactly the same everywhere you brush or spray it.
For reliable results, look into the official recommendations from the siding manufacturers themselves. The James Hardie company website often points contractors toward high-quality, alkali-resistant exterior primers.
Choosing the Right Primer: Don’t Just Grab Any Can
This is where many DIYers make a crucial mistake. You can’t just use any old primer you have lying around for wood projects. Fiber cement siding has a high pH (it’s slightly alkaline, like concrete). Using the wrong primer can lead to a chemical reaction that breaks down the paint layer before it even dries!
The Golden Rule: Use an Alkali-Resistant Primer
When you are standing in the paint aisle, you need to look for specific terms on the can. For Hardie Board, you need a primer specifically designed for masonry, concrete, or highly alkaline surfaces.
Here are the keywords you must look for:
- “For Stucco or Masonry”
- “High-Build Primer”
- “Alkali-Resistant” or “Alkali-Blocking”
- “Exterior Primer”
Never use a standard interior drywall primer or a wood-specific oil-based primer unless the manufacturer explicitly states it is safe for fiber cement. Acrylic or high-quality latex exterior primers formulated for masonry are usually your best bet.
Primer Comparison Table
To make things simple, here is a comparison of primer types you might see, and which one is best for your Hardie Board project.
| Primer Type | Best For | Hardie Board Suitability | Why? |
|---|---|---|---|
| Standard Oil-Based Wood Primer | Bare, untreated wood | No (Avoid) | Can react poorly with the cement’s alkalinity. |
| Standard Latex/Water-Based Primer | Previously painted surfaces, light drywall | Maybe (Use with Caution) | May lack the sealing power needed for raw cement. |
| Masonry/Alkali-Resistant Acrylic Primer | New Stucco, Concrete, Fiber Cement | Yes (Highly Recommended) | Blocks high pH, seals pores perfectly for superior adhesion. |
If you are using pre-primed Hardie Board (often called ColorPlus Technology), this article focuses on the raw, unpainted fiber cement panels you buy unfinished from the lumber yard. If your board is already coated, you may skip priming if you are simply recoating with the manufacturer’s recommended topcoat, but check your specific product documentation!
The Step-by-Step Guide: Priming Hardie Board Like a Pro
Getting the priming done correctly ensures that when you apply your expensive finish paint, it adheres flawlessly and looks perfect for years. This process is easy once you break it down. Safety first, always!
Step 1: Safety Gear Check
Before touching any tools or chemicals, get protected. Even though we are using primer and paint, safety is paramount. Always work outdoors in well-ventilated areas.
- Safety Glasses: Protect your eyes from dust or splatter.
- Gloves: Keep solvents and chemicals off your skin.
- Respirator/Mask: Essential when sanding or spraying solvents or fine primer dust.
- Long Sleeves/Pants: Protect skin from paint contact.
Step 2: Cleaning and Prepping the Surface (Crucial for Adhesion)
Your Hardie Board panels need to be clean, dry, and free of construction debris. Even brand-new siding can have dust, chalky residue, or protective films left over from shipping.
- Inspect for Damage: Check every piece for deep scratches or gouges left during transport. If you find them, repair them with an appropriate fiber cement filler putty before priming.
- Wash Thoroughly: Use a mild detergent (like TSP substitute or a gentle deck cleaner) mixed with water. Scrub the surface lightly with a soft-bristled brush. Do not use high pressure from a washer, as this can damage the surface fibers.
- Rinse Completely: Rinse all soap residue off the siding until the water runs clear. Any soap residue will prevent the primer from sticking.
- Ensure It’s Bone Dry: This is non-negotiable. Wait at least 24–48 hours if you washed it, or until the material is completely dry to the touch, even in the recessed areas. Painting over damp siding traps moisture, causing blistering later on.
Step 3: Cutting In and Edge Treatment
Just like painting an interior wall, you tackle the tricky edges first. This ensures full coverage where your tools might not reach easily later.
Using a high-quality 2-inch or 2.5-inch angled sash brush, “cut in” around the edges, seams, corners, and any trim pieces. Make sure you work the primer slightly into any tiny gaps or rough edges of the siding profile.
Step 4: Applying the Primer (The Main Event)
You have two main ways to apply primer: brushing/rolling or spraying. For the best, most consistent coverage on a large surface like siding, spraying is usually faster, but rolling can achieve excellent results if you don’t own or want to rent a sprayer.
Application Method 1: Rolling
If rolling, use a high-quality exterior roller cover with a medium nap (usually 3/8-inch or 1/2-inch). This nap size helps push the primer into the slight texture of the fiber cement.
- Apply the primer evenly. Work in manageable sections (about 3 feet by 3 feet).
- Maintain a “wet edge” by slightly overlapping the previously coated area as you roll the next section.
- Do not overwork the primer. Too much manipulation can cause it to dry too quickly or create bubbles.
Application Method 2: Spraying (Professional Finish)
Spraying with an airless paint sprayer provides the fastest and most uniform finish, which is excellent for siding. If spraying, you often need to “back-roll” or “back-brush” immediately after spraying.
Back-rolling means following immediately behind the sprayer with a lightly loaded roller. This forces the sprayed primer deep into the siding texture, guaranteeing excellent bond, which is a key technique recommended by many professional coating experts (check resources like the National Park Service preservation briefs often cite best practices for historic/durable materials).
Step 5: Drying Time and Recoating
Read the label on your specific primer can! This is critical. Different brands have different dry times based on temperature and humidity.
Generally, you must allow the primer to dry completely. If it’s a latex masonry primer, this might take 2 to 4 hours. You are waiting until the primer is fully cured and firm to the touch—not just dry to the touch.
Do not proceed to the topcoat until the primer is fully cured according to the manufacturer’s instructions. Rushing this step traps solvents and severely compromises adhesion.
Step 6: Inspection
Once dry, inspect every square foot. If you see any light spots, streaks, or areas where the texture of the fiber cement is still poking through too prominently, apply a second coat of primer only to those specific areas. A uniform base is your goal.
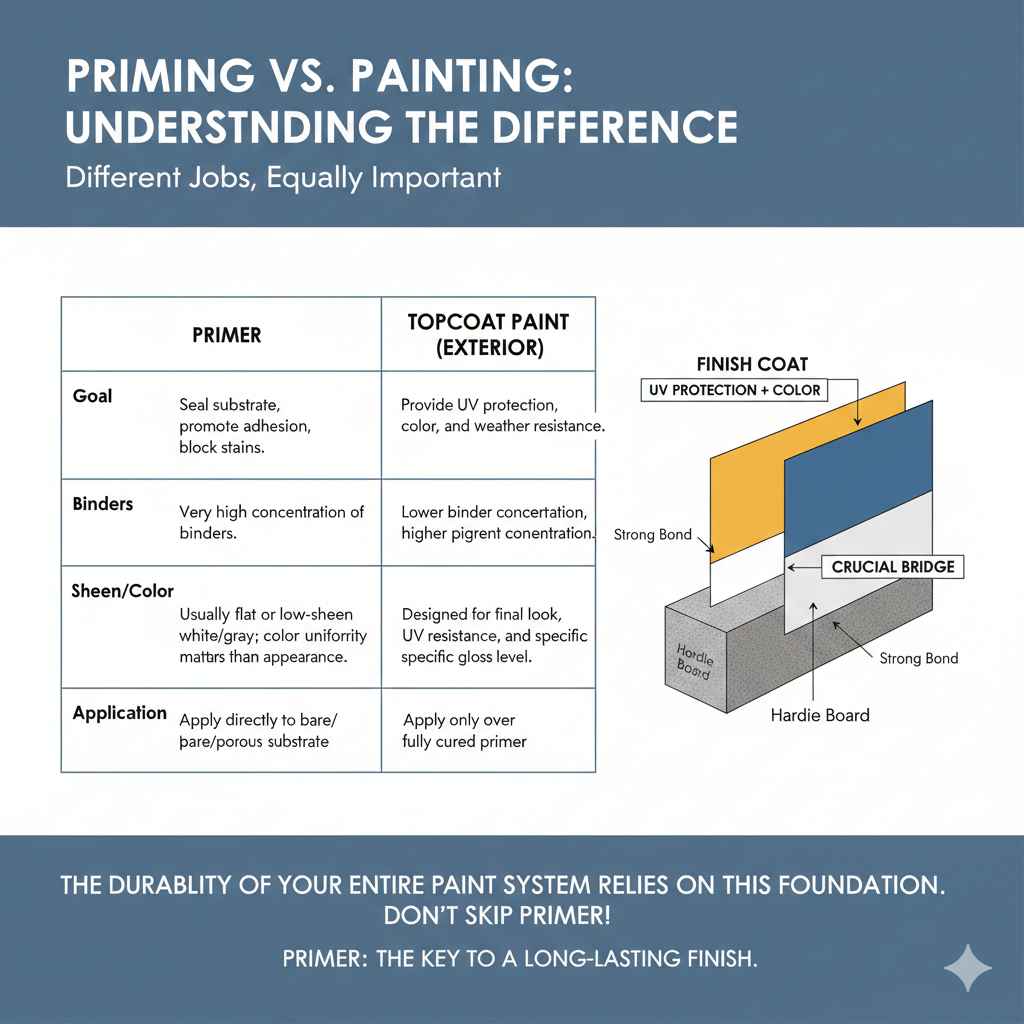
Priming vs. Painting: Understanding the Difference
It’s easy to confuse the role of primer with the role of your topcoat. They perform different, equally important jobs. Confusing them leads to poor performance.
| Feature | Primer | Topcoat Paint (Exterior) |
|---|---|---|
| Goal | Seal substrate, promote adhesion, block stains. | Provide UV protection, color, and weather resistance. |
| Binders | Very high concentration of binders. | Lower binder concentration, higher pigment concentration. |
| Sheen/Color | Usually flat or low-sheen white/gray; color uniformity matters more than appearance. | Designed for final look, UV resistance, and specific gloss level. |
| Application | Apply directly to bare/porous substrate. | Apply only over fully cured primer. |
The durability of your entire paint system relies on that primer layer doing its job of sticking to the cement. The topcoat relies on the primer for a solid foundation to stick to.
Addressing Common Hardie Board Priming Questions
As your trusted DIY guide, I know you might still have a few lingering worries. Let’s tackle the most frequent questions I hear from folks preparing to tackle their fiber cement siding.
FAQ Section
Q1: My Hardie Board came pre-primed. Do I still need to prime it before painting?
A: If your board has the manufacturer’s factory primer (like ColorPlus siding), you usually do NOT need a separate primer coat if you are applying the exact paint recommended by James Hardie. However, if you are changing the color significantly or using a different paint brand, it’s always safest to scuff the surface lightly and apply one coat of a compatible, high-quality acrylic primer.
Q2: Can I just use exterior paint instead of primer?
A: No, this is a mistake you want to avoid. Exterior paint relies on a sealed surface. Painting directly onto raw fiber cement results in the paint being absorbed unevenly, leading to a weak bond, peeling, and premature chalking. Primer is mandatory for bare boards.
Q3: How long do I have to wait between priming and painting?
A: This depends heavily on the specific product and weather. Usually, you must wait until the primer is completely cured—often 24 hours is a safe minimum, but always check the label! If the primer is still soft or curing underneath, the topcoat paint will cause it to fail.
Q4: What happens if I use the wrong kind of primer on Hardie Board?
A: If you use a standard primer not rated for alkali resistance, the high pH of the cement can leach through the primer and chemically break down the paint binder in your topcoat. This causes the paint to fail prematurely, leading to peeling and bubbling.
Q5: Do I need to prime the cut edges of the siding if the face is already primed?
A: Yes, absolutely! Any area where the factory primer was cut away (like the ends of factory-cut trim pieces or field-cut siding panels) exposes the raw cement core. These cut edges must be primed thoroughly on all sides before installation, and then again after installation if the cut edge is exposed.
Q6: Is spraying primer better than rolling it on Hardie Board?
A: Spraying gives the most uniform look and is faster for large areas. However, professionals often recommend back-rolling (lightly rolling over the fresh spray) to ensure the primer physically penetrates the textured surface of the fiber cement for the best possible grip.
Tips for Achieving a Long-Lasting Finish
Since we are investing time and money into our homes, let’s make sure this Hardie Board job lasts as long as possible. Priming is just the first layer of defense. Here are a few extra pro tips to lock in your success.
Tool Recommendation: Airless Sprayers for Speed
If you have a large amount of siding, renting or borrowing a decent airless paint sprayer will save you days of work compared to brushing and rolling the entire surface. Make sure to use a quality tip rated for exterior acrylic primers and topcoats. Remember that crucial back-roll technique mentioned earlier!
Managing Extreme Temperatures
Cold weather dramatically slows down drying and curing times. If the temperature is below 50°F (10°C), most primers and paints will struggle to cure properly. High humidity also slows down drying.
Always paint when the forecast calls for stable, moderate temperatures (ideally 50°F to 90°F) with low humidity. If the siding gets wet from rain after painting, you must stop and wait for it to dry again before proceeding.
Final Coat Selection
Once your primer is perfectly dry, move to your topcoat. Use a high-quality 100% acrylic exterior topcoat. This topcoat provides the final barrier against the elements. Remember, the primer grips the board, and the topcoat grips the primer.
If you choose a darker color for your topcoat, you might consider tinting your primer toward that final color (a technique called “tone-on-tone” priming). This often means you can achieve full color saturation with just two coats of topcoat, saving you a little money on that expensive finish paint.
Conclusion: Confident Completion of Your Siding Project
You’ve seen the details, and now you know the answer clearly: Yes, raw Hardie Board absolutely requires a coat of alkali-resistant primer before painting. It’s not an optional shortcut; it’s foundational maintenance that respects the durability of the material you’ve chosen.
By taking the time to clean the surface, select the right masonry-rated primer, and apply it correctly—with a good wet edge or a proper back-roll—you are setting up your siding for decades of reliable, beautiful service. Don’t let that initial prep step scare you. Follow these steps, trust the process, and you’ll have a professional-quality finish that you applied with your own two hands. Go grab that primer, and let’s get this project looking sharp!