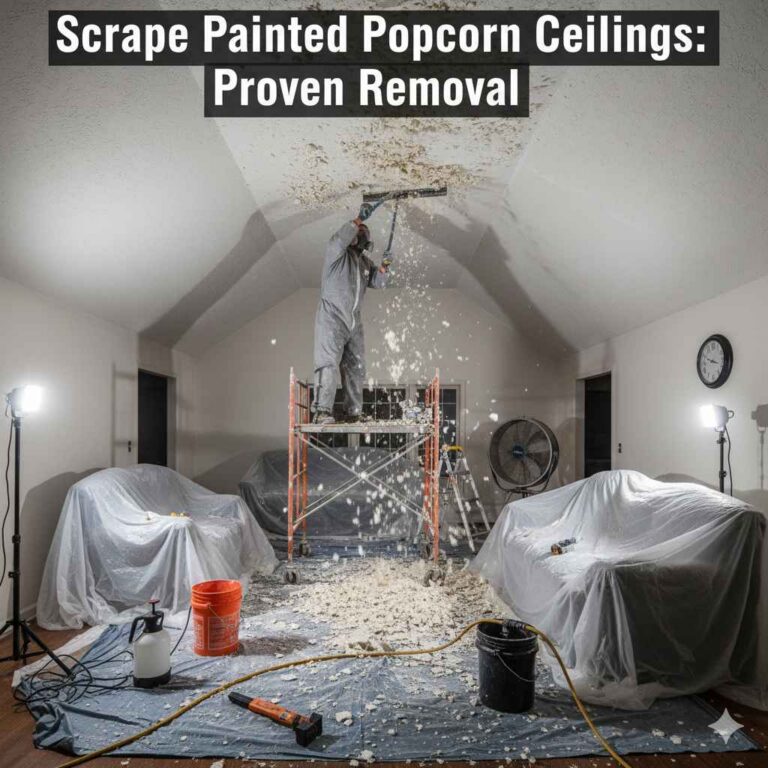
Proven Method: Effortless Scrape Painted Ceilings
Effortlessly scrape painted popcorn ceilings using simple tools and preparation. This proven method focuses on gentle steaming and careful scraping to remove the textured coating without damaging the drywall underneath, making a frustrating job manageable for any beginner.
That bumpy, dated texture on your ceiling? It’s often called “popcorn” or acoustic ceiling texture. It was popular long ago, but today, most homeowners want it gone. If yours has been covered with a coat of paint, the job seems twice as hard. Scraping painted texture feels impossible because the paint seals everything tightly.
Don’t worry! I’m Md Meraj, and I’ve guided many folks through this exact headache. We are going to tackle this tough job together using simple techniques that make scraping feel almost effortless. You absolutely do not need heavy machinery or harsh chemicals.
We will break down the preparation, the steaming secret, and the perfect scraping angle. Let’s turn that textured nightmare into a smooth, beautiful surface you can be proud of!
Why Painted Popcorn Ceilings Are So Tricky (And How We Beat Them)
Popcorn texture alone is easy to remove if it’s never been painted. It’s usually just glued on lightly. But when paint covers it, that paint acts like a hard, waterproof shell. It bonds the texture tightly to the drywall paper, making it incredibly resistant to water or simple scraping.
The old wisdom says you must use harsh chemicals or scrape when bone dry, which creates huge clouds of dust. We are skipping those methods. Our focus is on making the paint soft enough to release its grip.
The Big Warning: Asbestos Check
Before we grab any tool, safety is step number one. If your house was built before 1980, there is a small chance that the texture material contains asbestos, which is very dangerous if disturbed.
Do not scrape until you know for sure.
- If the ceiling was installed before 1980, stop and get a test kit. You can purchase inexpensive test kits online or from home improvement stores.
- Send a small sample to a certified lab for testing. You can often find local accredited labs through state environmental protection agency websites, like those run by your state’s EPA department.
- If the test comes back positive, stop immediately. Do not scrape. Call a certified asbestos abatement professional. This is not a DIY job if asbestos is present.
If your home was built after 1980, or if you have had the texture tested and confirmed it is asbestos-free, you are safe to proceed with our method!

Gathering Your Effortless Scraping Toolkit
Having the right tools ready makes the process smoother and faster. You don’t need fancy power tools here; just reliable, sturdy hand tools.
Essential Tools Checklist
Keep this list handy. Getting the right scraper makes a huge difference in your comfort and the final result.
| Tool Category | Specific Item | Why You Need It |
|---|---|---|
| Scraping | Wide Putty Knife (10-inch recommended) | Covers more area, easier to keep flat against the ceiling. |
| Moisturizing | Garden Pump Sprayer (or good quality spray bottle) | For applying warm water or steam solution evenly. |
| Safety Gear | Safety Glasses, Dust Mask (N95 recommended), Hat | Protecting your eyes and lungs from falling debris. |
| Preparation | Plastic Sheeting & Painter’s Tape | To protect floors and walls completely. |
| Lifting Aid | Sturdy Step Ladder or Scaffolding | Safety first! Never work from unstable footing. |
| Heat Source | Clothes Steamer or Wallpaper Steamer | This is the secret weapon to soften the paint! |
The Secret Weapon: The Steamer
For painted ceilings, water alone often isn’t enough. The paint resists soaking. We need heat to gently re-activate the adhesive under the paint layer and loosen the bond.
A standard wallpaper steamer works perfectly. If you don’t own one, a heavy-duty handheld clothes steamer (the kind used for smoothing wrinkles out of clothing) can often work wonders, though it might take longer. The goal is consistent, localized, moist heat.
Phase 1: Meticulous Preparation (Don’t Skip This!)
Preparation is 50% of an easy renovation project. If you skip laying down protection, you’ll spend hours cleaning up later. Since we are introducing moisture, we need maximum coverage.
Step 1: Clear the Room
Remove every piece of furniture you can. Anything left must be covered completely.
- Turn off the electricity to the room at the breaker box, especially if you are near light fixtures.
- Remove light fixtures, smoke detectors, and ceiling fans. Cap the wiring securely inside the junction box until you are done.
Step 2: Seal and Drape
Use heavy-duty plastic sheeting (6-mil thickness is best) to cover the entire floor. Do not just lay it down; secure it!
- Tape the plastic sheeting securely to the baseboards around the entire perimeter of the room using strong painter’s tape or duct tape. Ensure there are no gaps where wet debris could fall through.
- Cover any built-in shelves or permanent fixtures.
- If you are keeping wall paint, apply painter’s tape along the top edge where the ceiling meets the wall.
Step 3: Get Your Water Ready
We need warm water, not scalding hot water, for safety. If using a pump sprayer, fill it with warm tap water. If you are using a steamer, set it up according to the manufacturer’s directions, ensuring the hose reaches easily where you will be working.
Phase 2: The Steaming and Scraping Technique
This is where the magic happens. We are not flooding the ceiling; we are introducing controlled moisture and heat in small, manageable sections.
Step 4: Test Your Spot
Before committing to a whole section, find a discreet area (like a corner near a closet) to test how your ceiling material reacts.
- Hold the steamer nozzle firmly against the painted texture for 20 to 45 seconds. You want the surface to feel warm and damp, not soaking wet.
- Wait 30 seconds to let the heat penetrate.
- Take your wide scraper and try to slide it gently under the texture.
What you are looking for: If the texture comes off easily in sheets or large flakes without much effort, you’ve found the sweet spot for heat application!
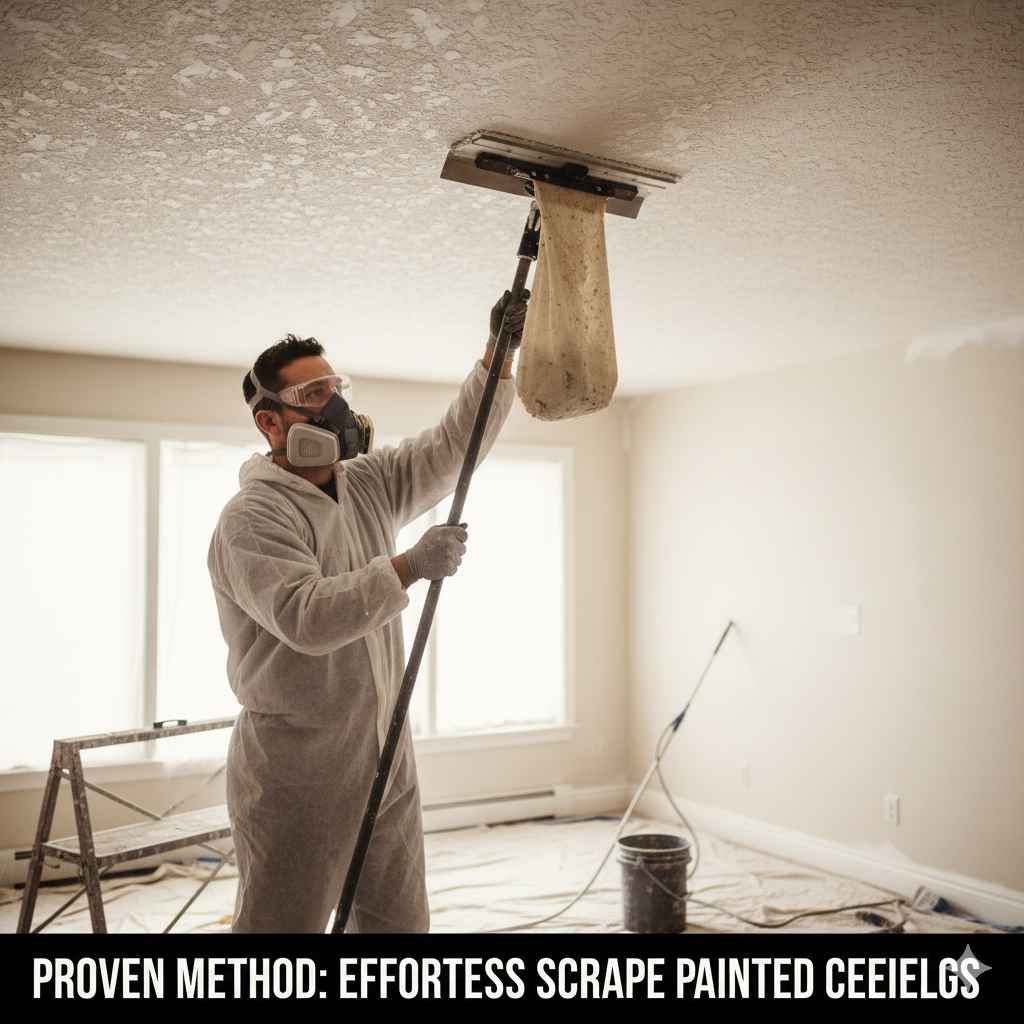
Step 5: The Art of Gentle Scraping
The biggest mistake beginners make is pushing too hard. If you press hard, you gouge the drywall paper underneath, which creates more repair work later. We rely on the heat, not brute force.
Position your ladder securely. Always work on an area you can comfortably reach without overstretching.
- Steam a manageable area, about 3 feet by 3 feet, for the required time (usually 30-45 seconds). Work slowly across the area, moving the steamer continuously to avoid drying out the area you just steamed.
- Wait about 1 minute after steaming before scraping. This dwell time is crucial for the moisture to work its way through the paint and loosen the glue.
- Use your wide putty knife. Hold it at a very shallow angle—almost flat against the ceiling (about a 15 to 20-degree angle).
- Apply light, steady pressure. The goal is to let the blade glide under the texture. It should peel away smoothly.
- If it resists, STOP pushing. Re-steam that spot for another 15 seconds. Pushing hard will tear the ceiling paper.
Step 6: Handling Stubborn Spots and Residue
Even with the best steaming, you might have small, stubborn flecks left behind.
- For these small bits, switch to a smaller, stiffer scraper or just use the corner of your wide scraper. Scrape these spots with more direct pressure, but watch closely for any paper tearing.
- If you tear the drywall paper, don’t panic. We address this in the repair phase. A small tear can usually be patched easily.
Step 7: Re-Moisturizing Technique (If Needed)
If you are working on a large room, the section you steamed 10 minutes ago might be dry again. You can use a light misting from your pump sprayer filled with warm water on these areas before re-attempting to scrape. This helps maintain the moisture level needed to keep the paint pliable.
According to the Department of Energy, managing moisture content is key in many construction processes to ensure materials behave predictably. When working with old paint and texture, controlling moisture application prevents unnecessary structural damage.
Phase 3: Cleanup and Drying
Once the texture is off, you need to clean up the wet debris quickly before it dries into a hard mess.
Step 8: Debris Removal
Because you worked in sections, the debris on the plastic drop cloths should be relatively wet and clumped.
- Gently gather the plastic sheeting, bringing the corners together toward the center to contain the wet mess.
- Carefully roll the plastic up into a manageable bundle. Double-bag this in heavy-duty trash bags. Check local regulations regarding the disposal of construction debris, especially if you used any chemical additive (though we avoided those!).
Step 9: Final Rinse and Inspection
After removing the bulk of the debris, the ceiling will look patchy and damp.
- Wipe the entire ceiling surface down with a damp (not soaking wet) sponge or rag to remove any remaining residue or adhesive.
- Allow the ceiling to dry completely. This can take 24 to 48 hours depending on humidity. Keep fans running for good air circulation.
Phase 4: Repairing and Finishing Your Smooth Ceiling
Once dry, your ceiling will likely show some minor imperfections: small nicks, paper tears, or slight variations in the paper level.
Common Post-Scraping Repairs
This is where a little patching makes the difference between an okay job and a fantastic, professional-looking finish.
Repairing Small Gouges and Tears
If the paper backing of the drywall was torn, you need joint compound (spackle).
- Use a lightweight joint compound. It’s easier to sand and requires less skill than heavier mixes.
- Apply a thin layer over the tear or gouge using your putty knife. Hold the knife at a slight angle and feather the edges out widely so the patch blends seamlessly.
- Let the first coat dry completely (check product instructions).
- Lightly sand the dried compound with 150-grit sandpaper until it is smooth and level with the surrounding ceiling.
- Apply a second, very thin coat if needed, feathering the edges even wider than before. Dry and sand again until it feels perfectly smooth to your touch.
Dealing with Mud Lines (Shadows)
Sometimes, even after careful scraping, you might see faint outlines where the texture used to be—these are sometimes called “mud lines” if the original texture was heavily sprayed on.
- These lines disappear almost completely when primed and painted, but to be safe, ensure all previous sanding dust is completely vacuumed or wiped away before priming.
Priming for a Perfect Paint Job
This step is non-negotiable for a smooth ceiling finish!
The exposed paper and the patched areas will absorb paint differently than the original, intact ceiling areas. If you paint directly over this, you will see “flashing” or dull spots.
Use a high-quality, stain-blocking primer, such as a PVA (Polyvinyl Acetate) drywall primer, or a quality bonding primer. This seals the surface evenly.
Use a roller with a medium nap (like 3/8-inch) to apply the primer evenly across the entire surface. Allow the primer to dry fully before applying your final ceiling paint color.
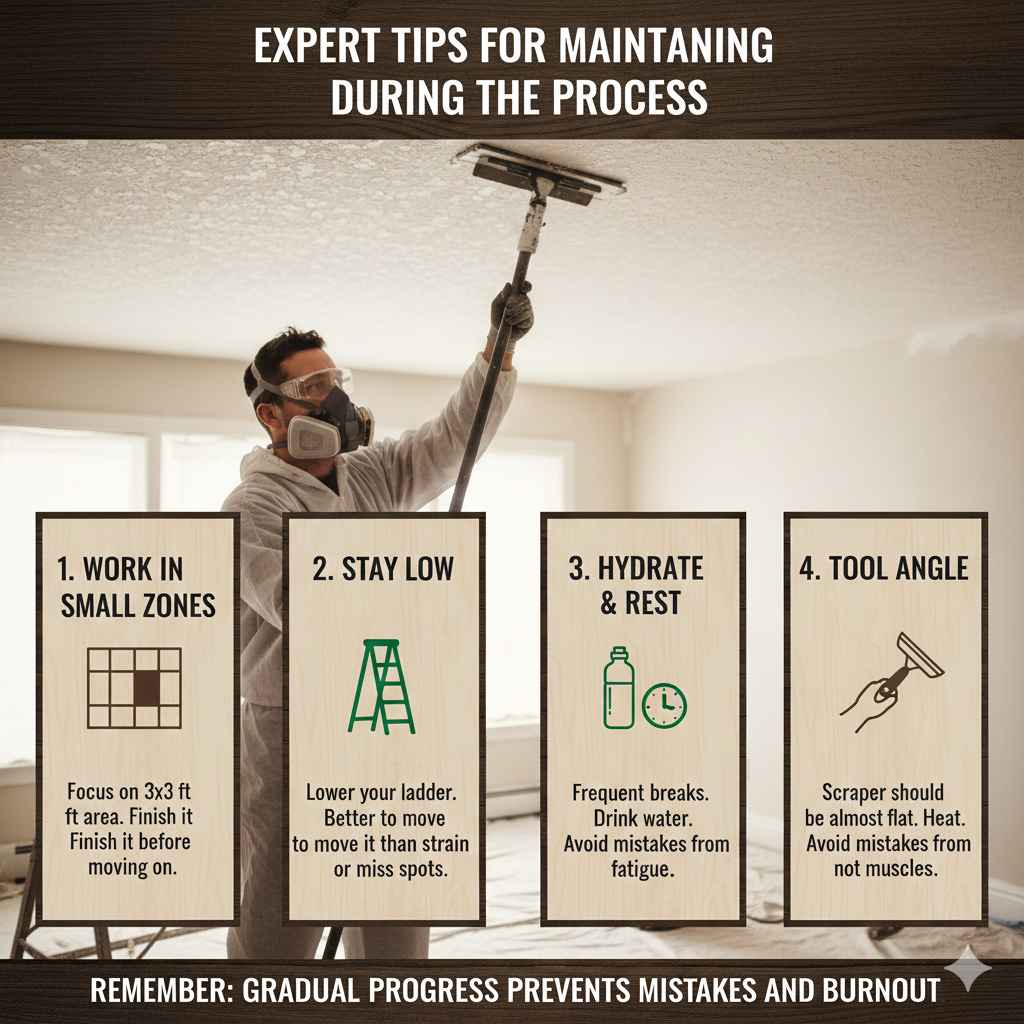
Expert Tips for Maintaining Confidence During the Process
When you are up on a ladder, looking at a big, messy job, it is easy to feel overwhelmed. Remember these confidence boosters:
- Work in Small Zones: Never try to steam the whole room at once. Focus only on the 3×3 foot area you are currently working on. Finish that section perfectly before moving on.
- Stay Low: If you are finding it hard to scrape higher up, lower your ladder slightly. It is better to move the ladder five times than to strain your neck or miss spots because you can’t reach properly.
- Hydrate and Rest: This is repetitive work. Take frequent breaks. Drink water. Cramping hands and tired eyes lead to mistakes (like gouging the drywall).
- Tool Angle is Everything: If you are fighting the ceiling, check your scraper angle. It should be almost flat. The heat should be doing the work, not your muscles.
FAQ: Beginner Questions About Scraping Painted Ceilings
Here are answers to the most common worries homeowners have before starting this project.
| Question | Simple Answer |
|---|---|
| How long does it take to scrape a room? | For an average 12×12 room using the steaming method, expect 1 to 2 full days for scraping and cleanup, plus drying time before repair. Take it slow! |
| Can I just use a regular water sprayer instead of a steamer? | You can try, but painted texture is highly resistant. A standard sprayer might require soaking for hours and heavy scraping. The steamer is necessary to penetrate the paint layer effectively for easy removal. |
| What if I accidentally rip the drywall paper? | This happens! If the tear is small (less than a coin size), simply dry the area and patch it carefully with two thin coats of lightweight joint compound and sand smooth. |
| Is it dusty if I scrape it dry? | Yes, scraping painted popcorn dry creates extremely fine, hard-to-clean dust that can travel everywhere. The steaming method minimizes dust significantly, as the texture comes off in wet clumps. |
| What is the best paint finish for the finished ceiling? | Use a flat or matte finish ceiling paint. These finishes hide minor surface imperfections much better than satin or eggshell paints. |
| Should I use vinegar or soap in the water? | For painted ceilings, it’s best to rely on heat. Adding vinegar or soap can sometimes react unexpectedly with old paint binders. Plain warm water or just steam is the safest bet. |
Conclusion: Enjoy Your Smooth New Surface
You have successfully navigated one of the most daunting DIY ceiling projects! Scraping popcorn ceilings that have been painted feels like a monumental task because of the added barrier the paint creates. However, by using targeted heat from a steamer, you effectively broke that barrier down without resorting to heavy scraping or harmful chemicals.